
Journey blocks
Triggers
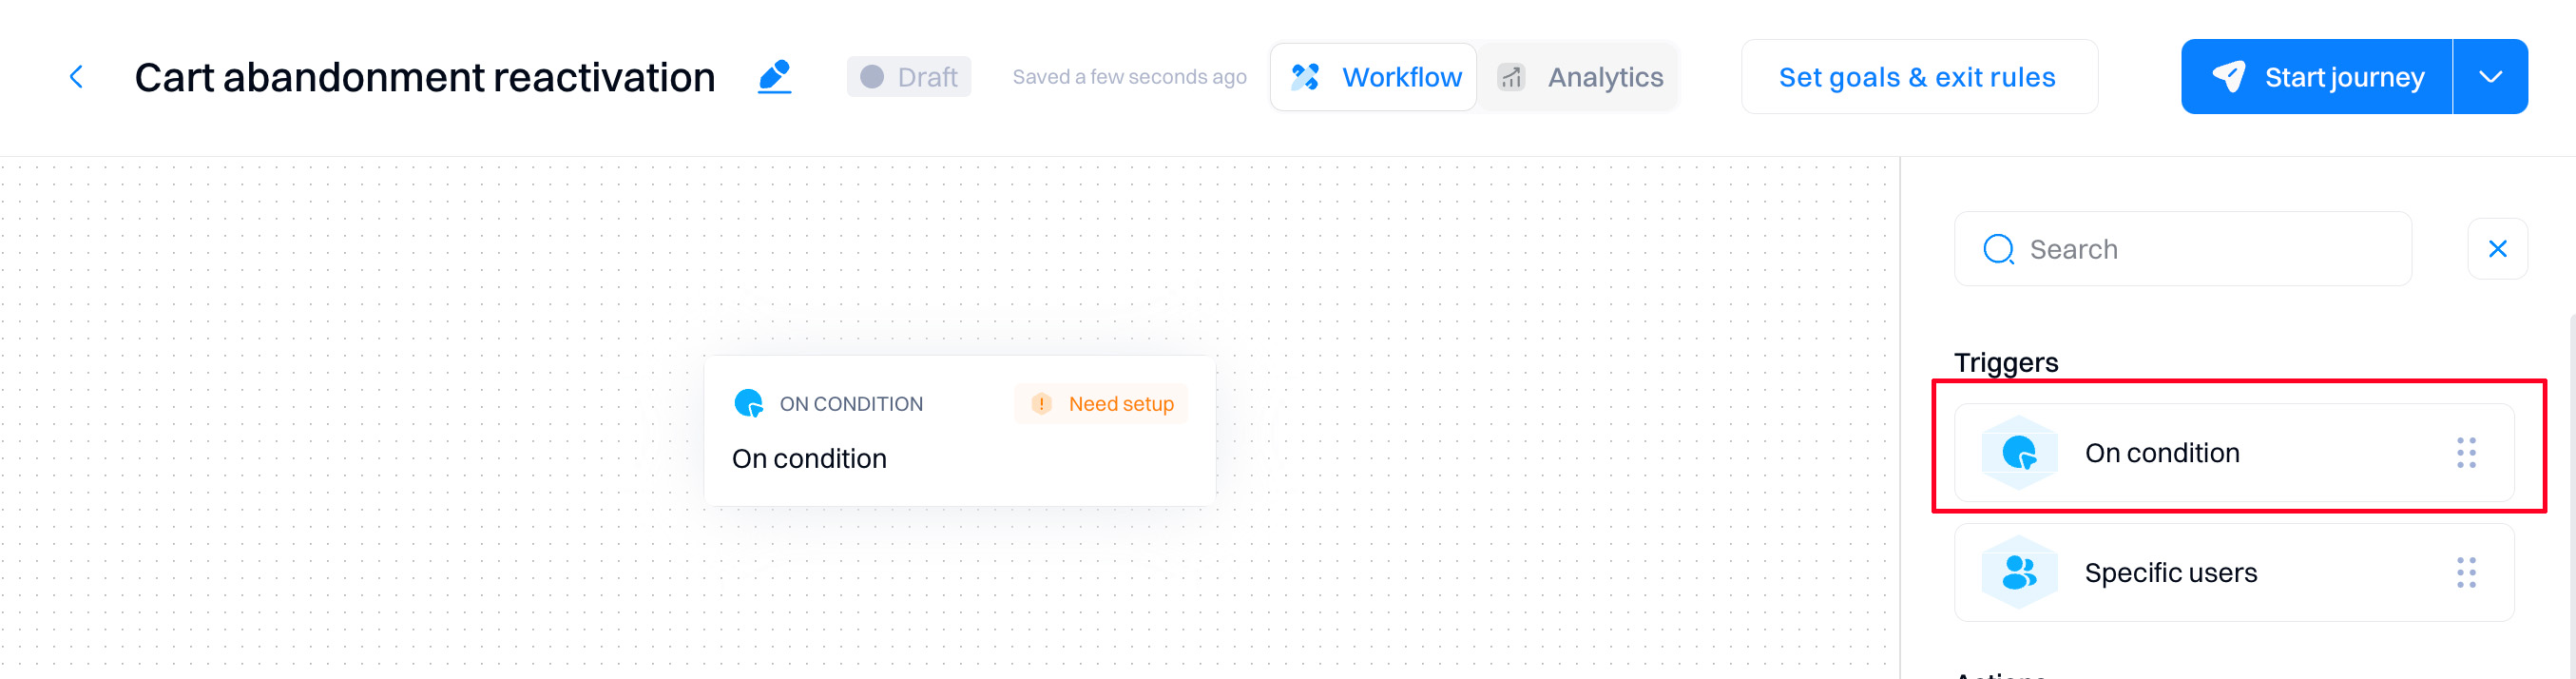
Triggers define the conditions that users need to meet to enter the journey.
On condition
Allows you to define a specific event, attribute, or segment-based criteria for the user to enter the journey.
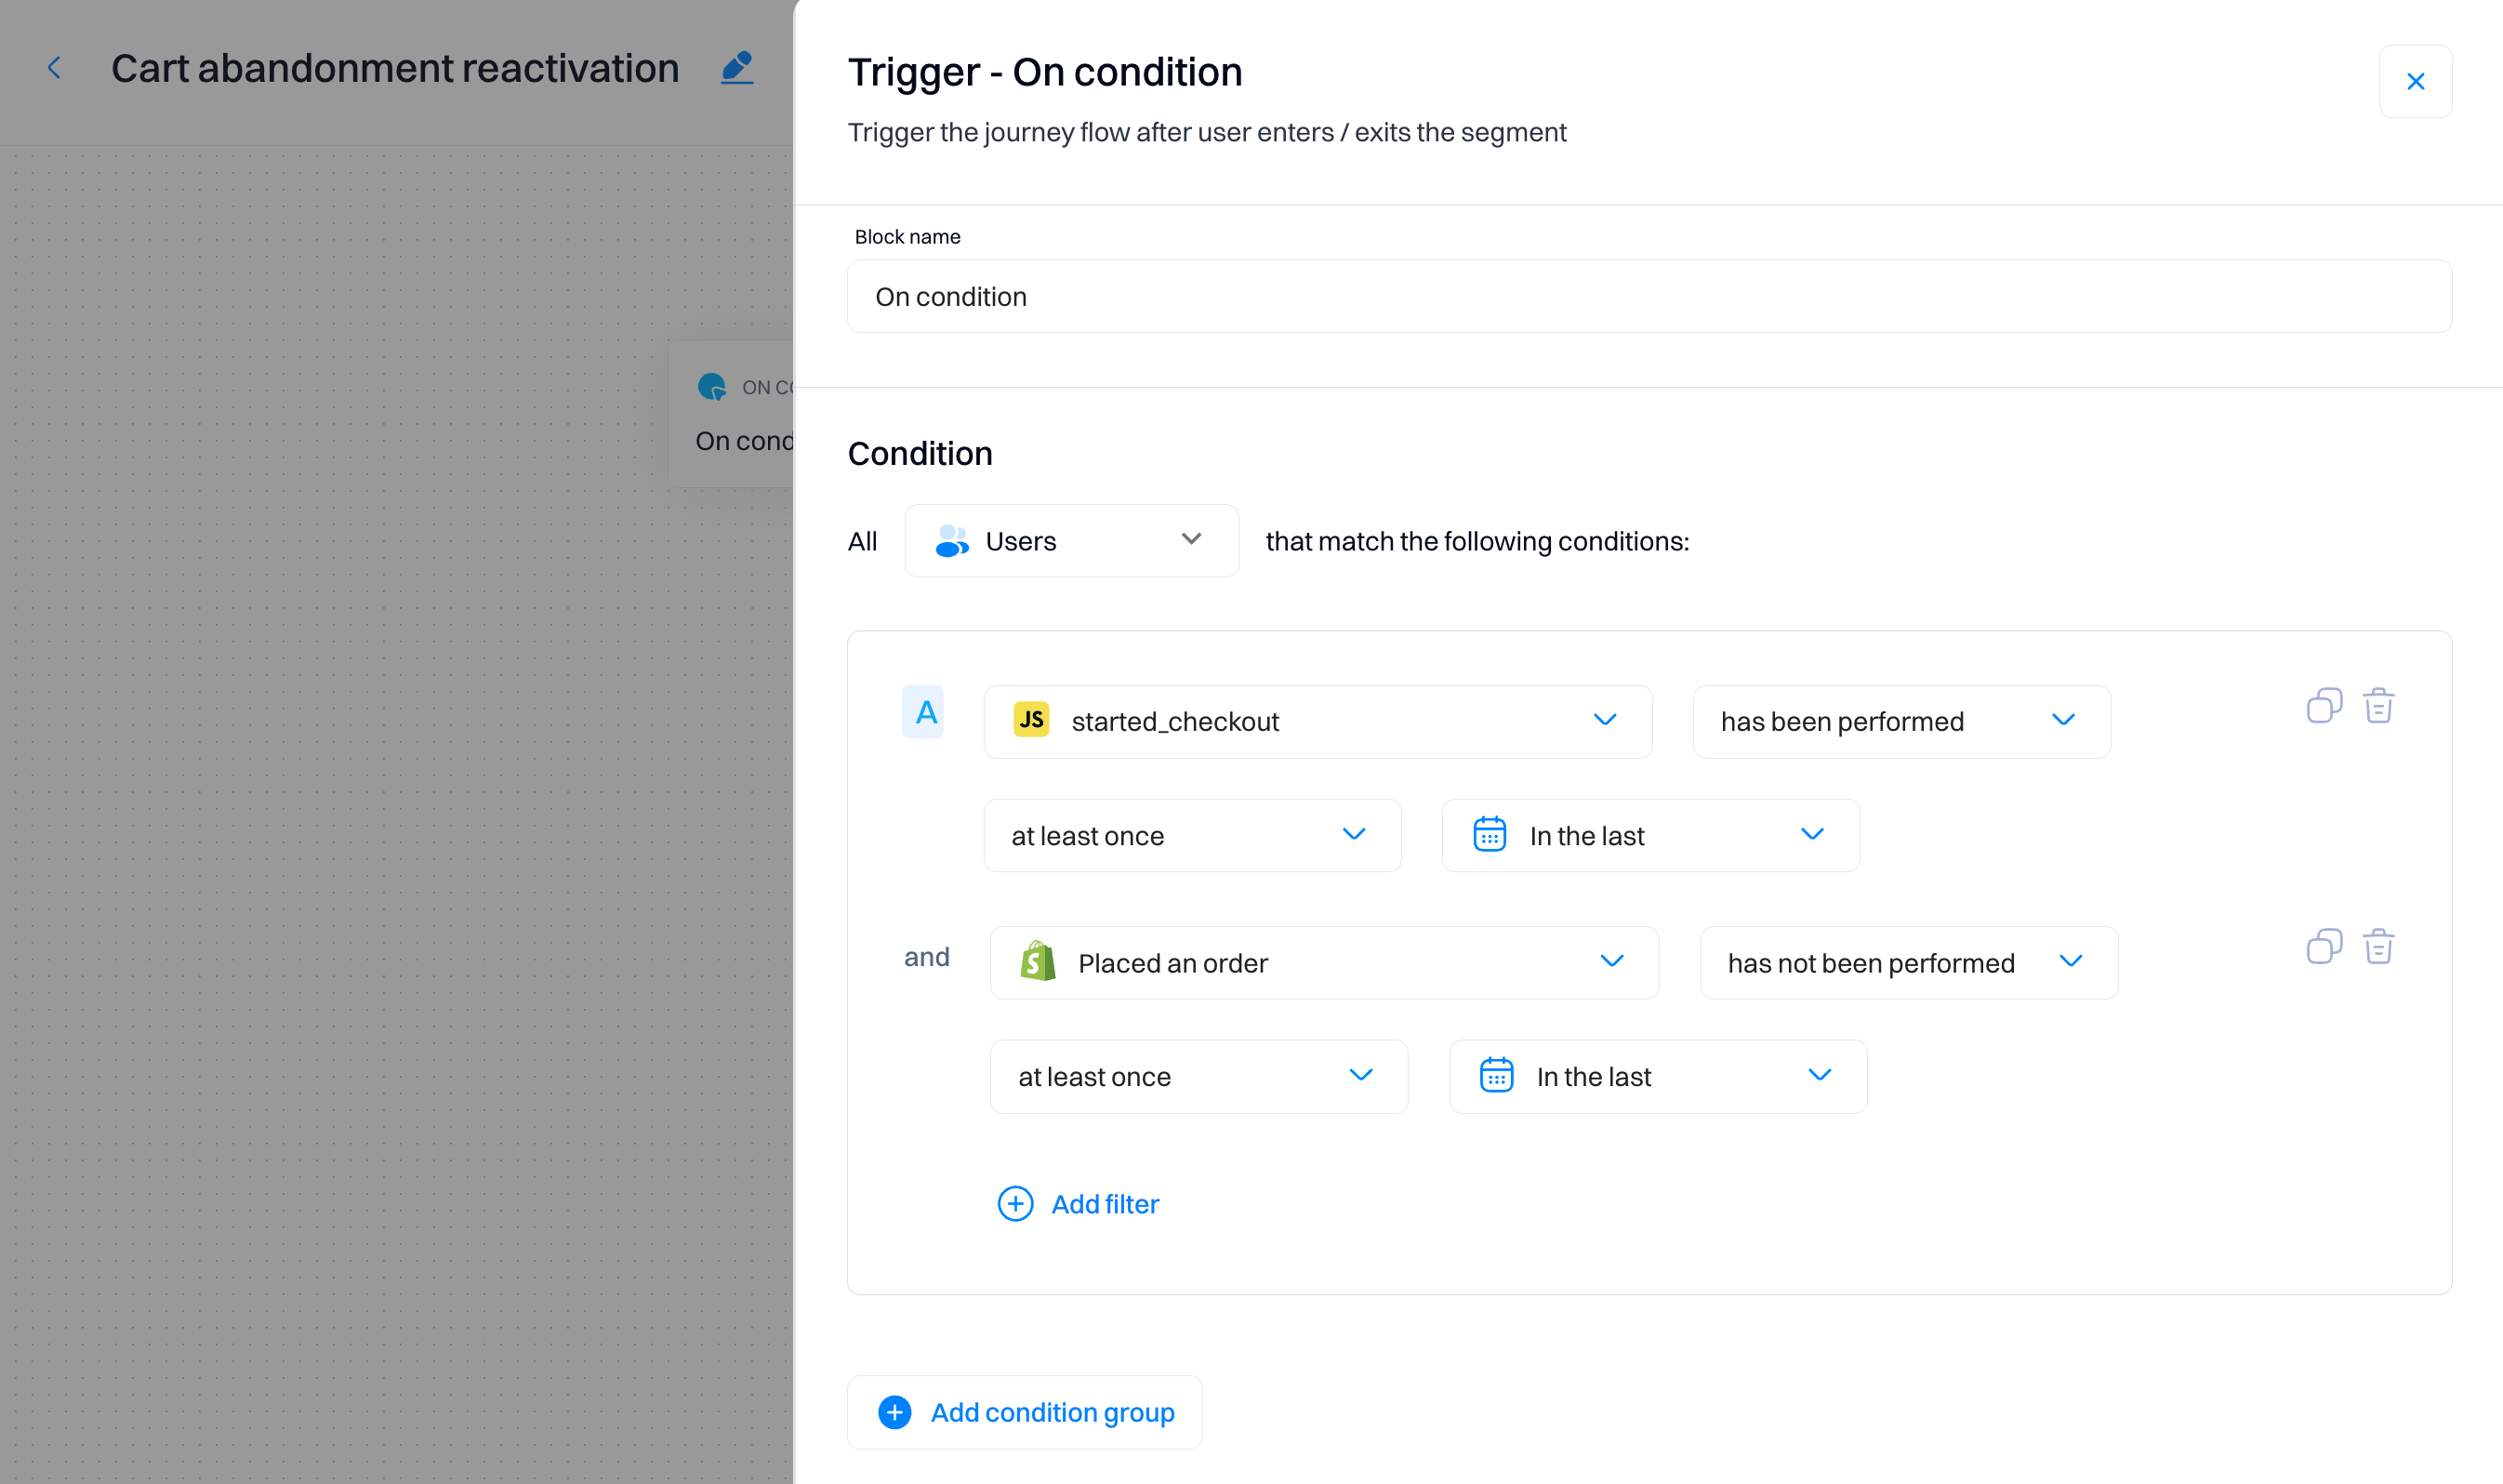
Configuration
Select the targeting condition for the user to enter the journey. Only users who match these targeting conditions will enter the journey.
Good to know
Refer to Creating a segment for configuring the trigger.
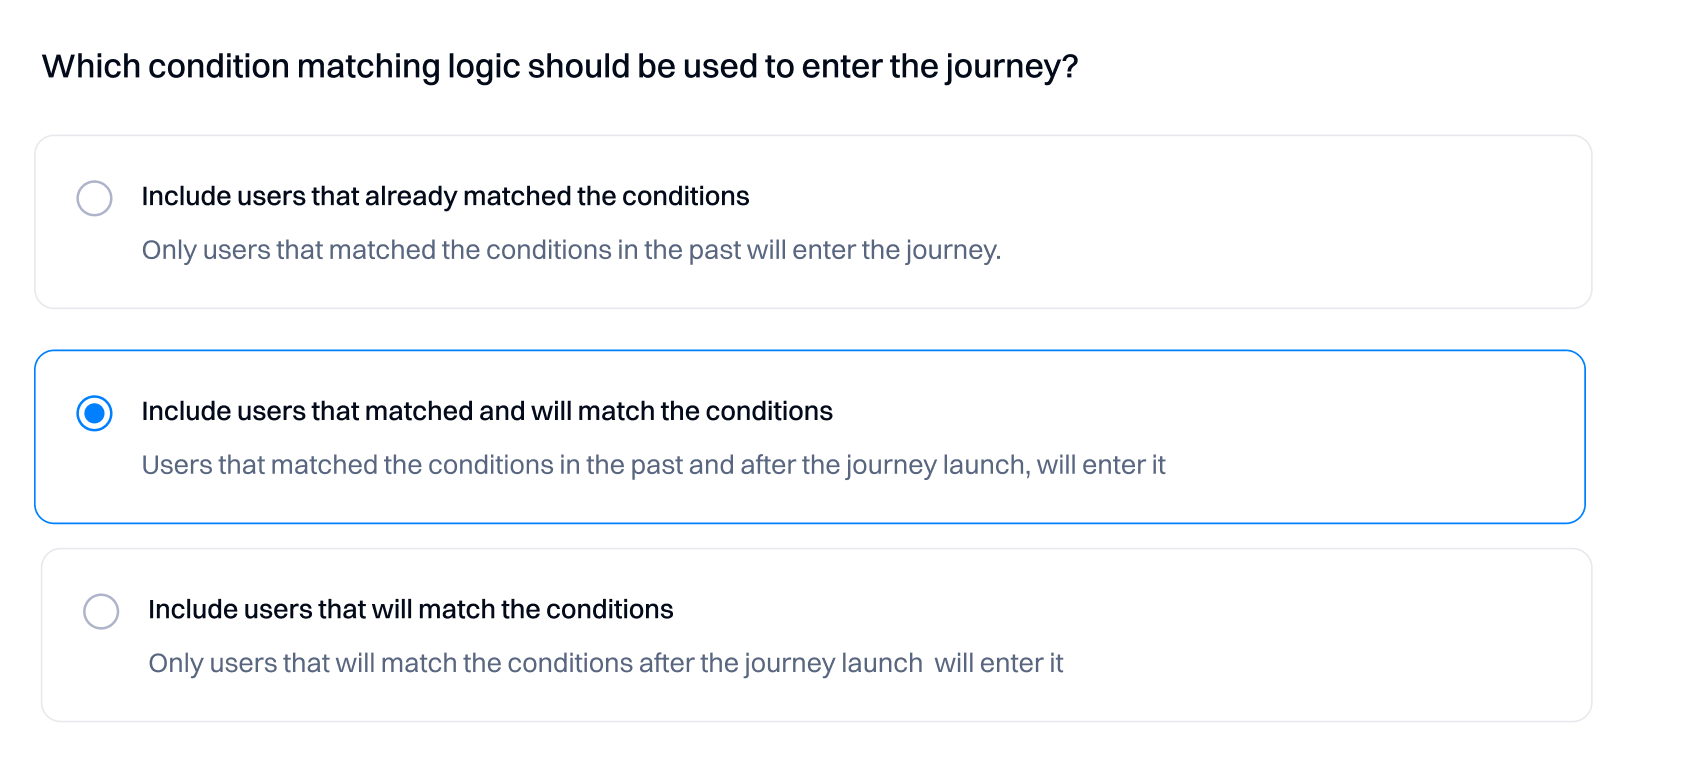
Matching logic
The "Matching Logic" in the "On Condition" block determines which users can enter a journey based on their historical or future interactions with specified conditions.
-
Include users that already matched the conditions. Only users who previously met the conditions will enter the journey.
- Use case. Best used for journeys intended to reward or follow up with users based on past behaviors. For example, a loyalty offer can be sent to previously purchased users.
-
Include users that matched and will match the conditions. Users who met the conditions before and after the journey launch will enter.
- Use case. Ideal for continuous engagement where both past behaviors and ongoing activities are relevant. For example, a re-engagement campaign targeting users who have been active in the past and continue to engage.
-
Include users that will match the conditions. Only users who meet the conditions after the journey has been launched will be included.
- Use case.Suitable for new initiatives or promotions where only new interactions are relevant. For example, launching a new product and targeting users who show interest after the launch.
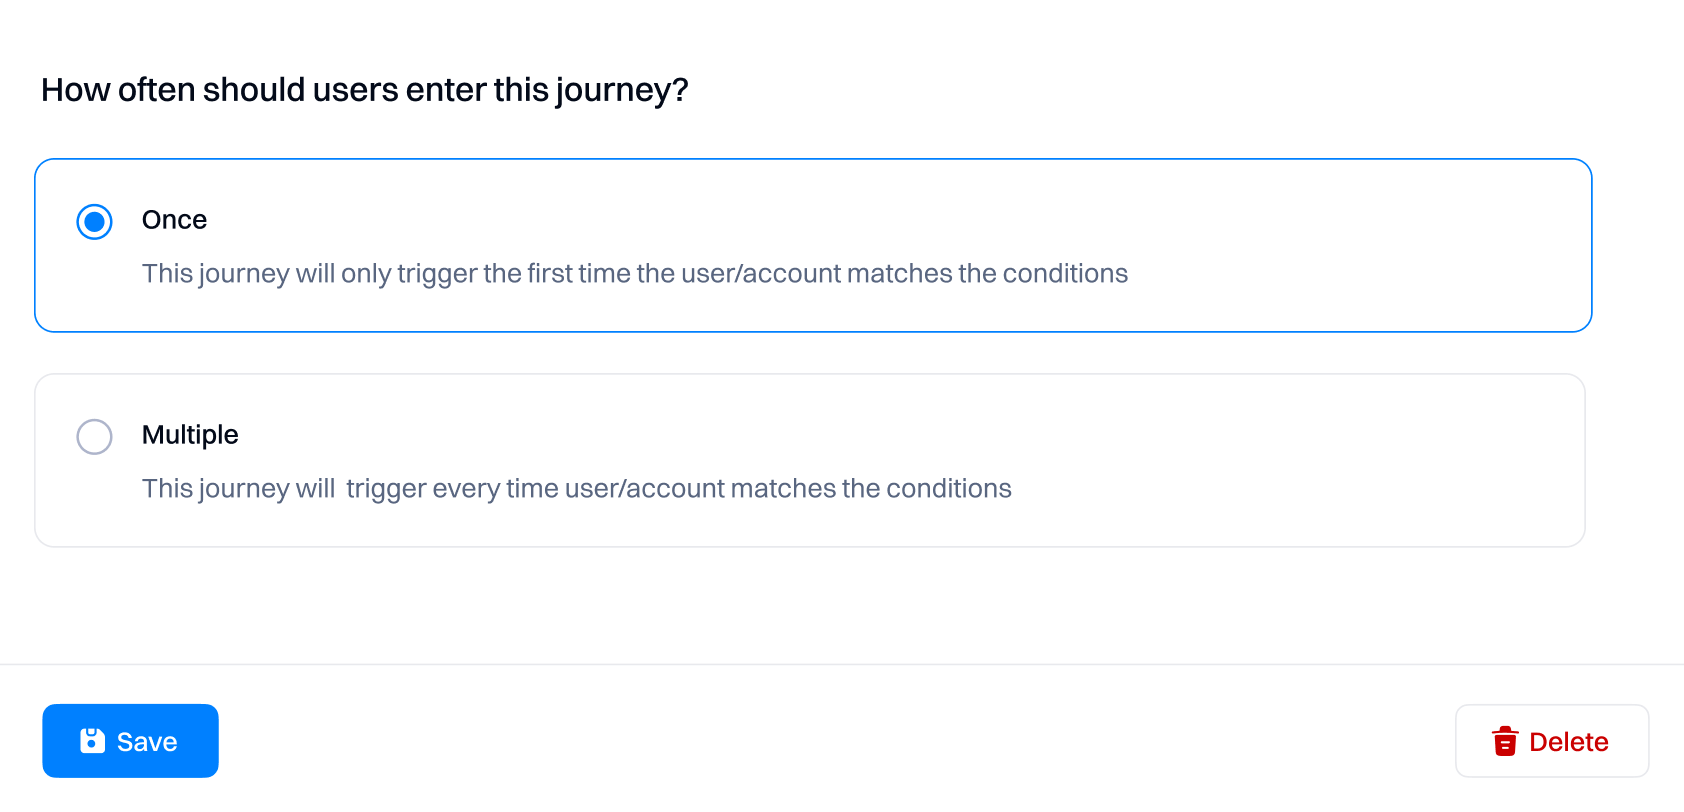
Entry frequency
The "Entry Frequency" setting dictates how often users can enter the journey once they meet the conditions.
-
Once. The journey will only trigger the first time the user/account matches the conditions.
- Use Case. Used when the journey's goal is tied to a one-time event or offer, such as a special discount for first-time users or a unique welcome message for new subscribers. Prevents over-messaging and ensures that users do not receive repetitive content, maintaining a positive user experience and preserving the exclusivity of the offer.
-
Multiple: The journey will trigger whenever the user/account matches the conditions.
- Use Case. Effective for ongoing campaigns where repeated engagement is desired, such as regular reminders to complete a process or recurring promotional offers. It enables marketers to keep engaging with users at multiple touchpoints, enhancing the likelihood of conversion through repeated exposure to the message.
Specific users
This trigger allows you to select specific users who will auto-enter the journey once it is started.
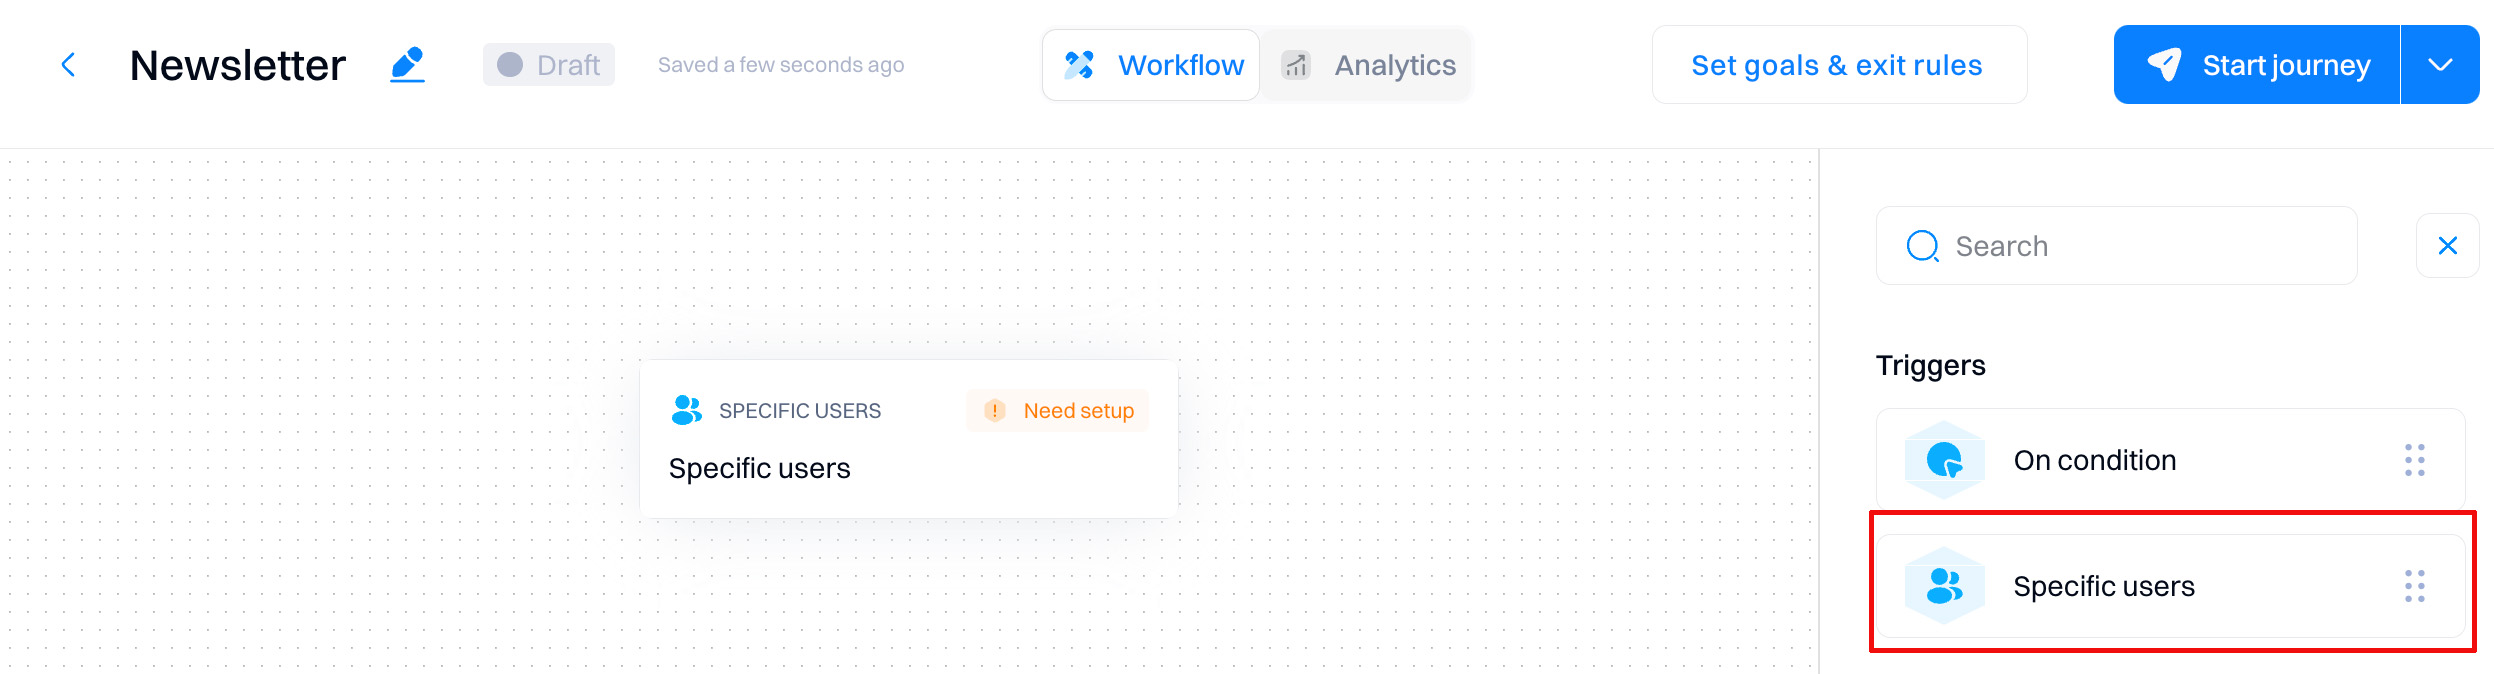
This is particularly useful for campaigns targeting a predefined, static list of users. Since no new users can be added post-launch, this trigger provides high control and precision. Here are several use cases where the "Specific Users" trigger would be useful:
-
Beta testing new features
- Purpose. Limit access to a new product feature to a select group of beta testers.
- Benefits. Facilitates targeted communication and feedback collection from users testing the new feature.
-
Customer retention efforts
- Purpose. Re-engage specific high-value customers who have shown decreased activity.
- Benefits. Tailors the journey to reactivate interest and increase customer retention.
-
Rewarding top customers
- Purpose. Provide exclusive offers or content to specific top customers as a reward for their loyalty.
- Benefits.Enhances customer experience by delivering high-value, personalized campaigns.
-
Event Invitations
- Purpose. Send invitations for VIP events or special webinars to a specific list of invitees.
- Benefits. Ensures that only selected individuals receive the invitation, maintaining the event's exclusivity.
-
Internal Communications or Testing
- Purpose. Use for internal staff training, updates, or testing of the journey system.
- Benefits. Keeps the process contained and controlled within the organization.
Good to know
"Specific users" is a static list, and no new users will enter the journey after the journey is launched.
Selecting users
You can set the trigger criteria by selecting rows representing your target users.
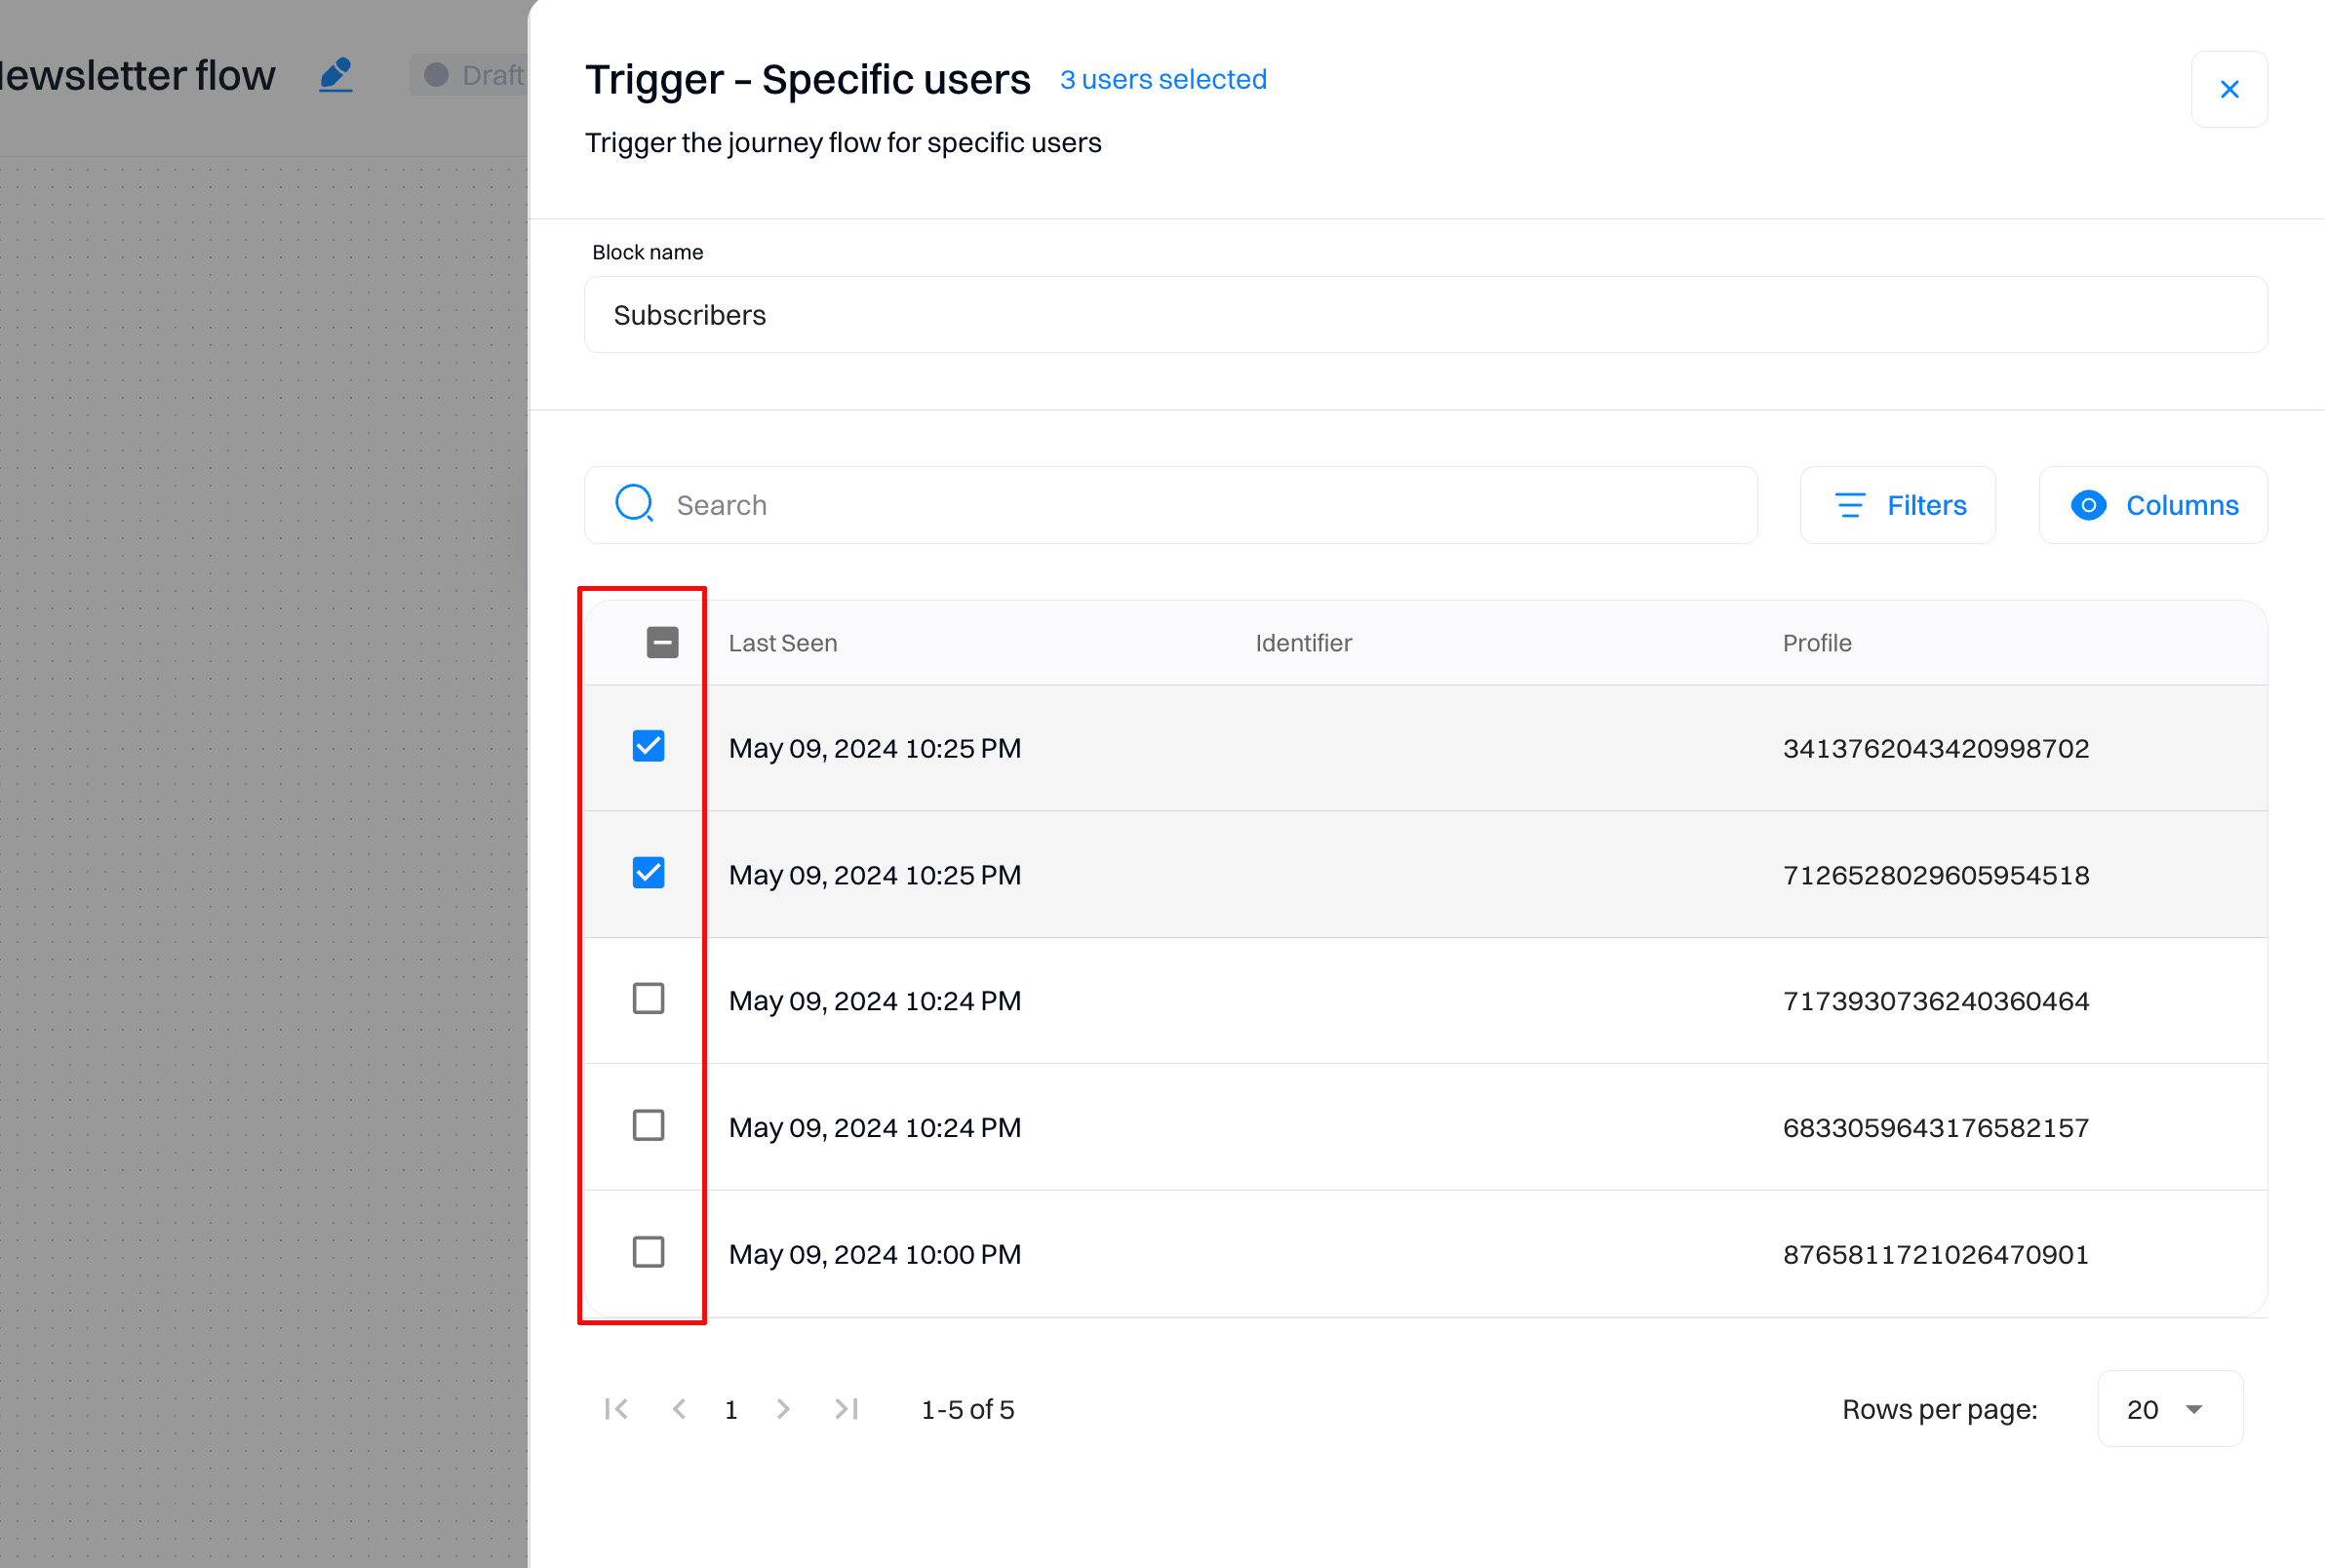
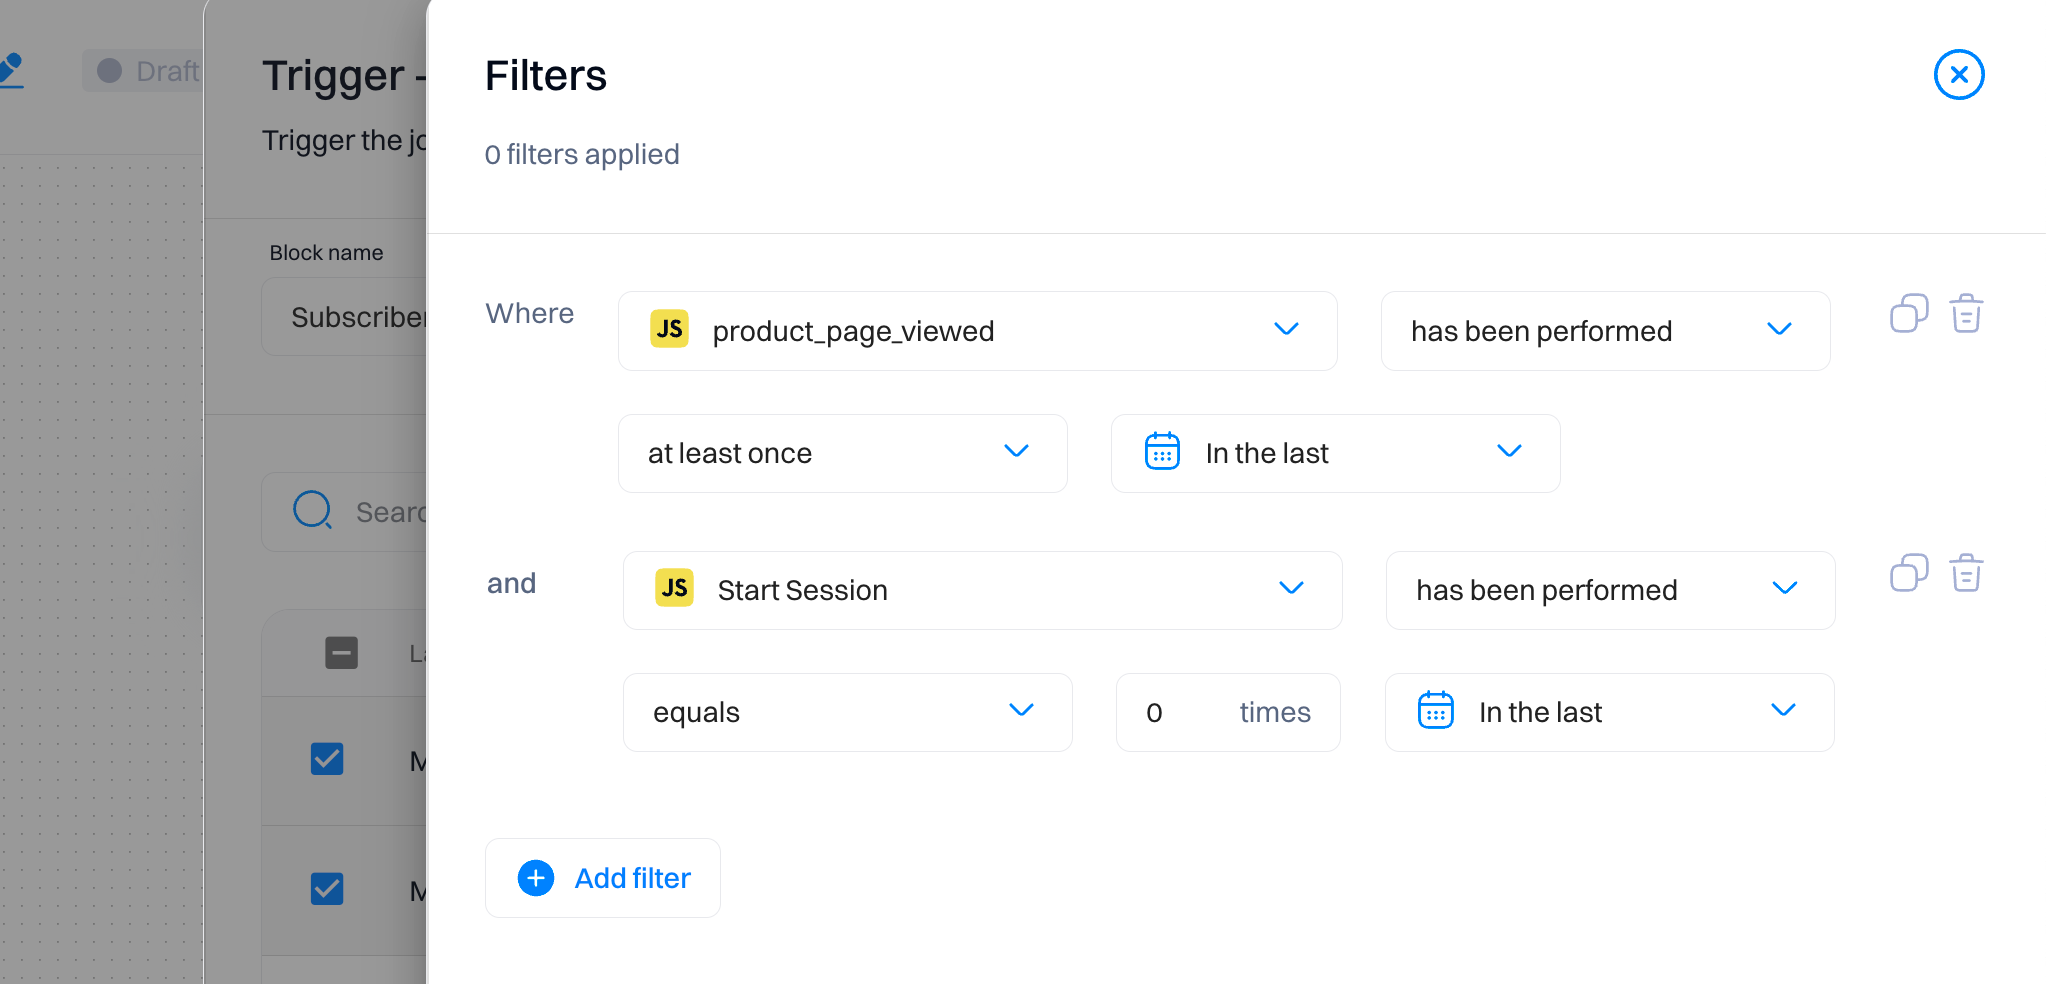
Applying filters will narrow down the selection.
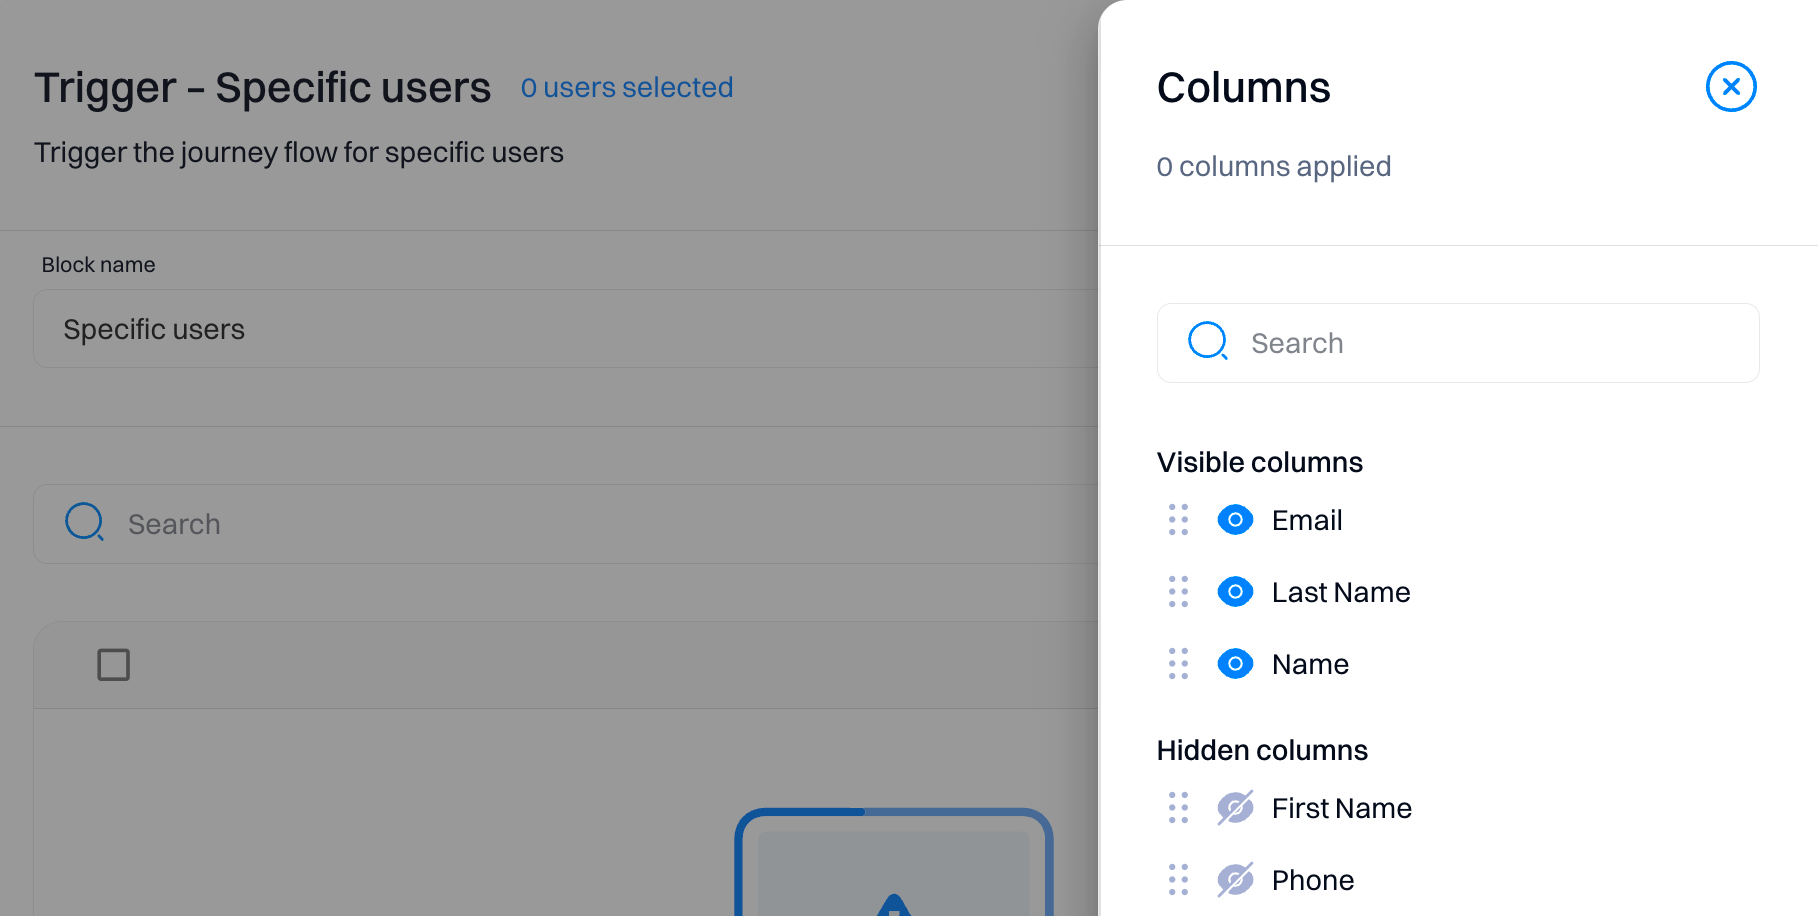
"Columns" allow you to customize the table view by showing columns that show the user's relevant information.
Actions
Actions refer to engagement flows, such as sending emails or SMS, or changing user data, such as " Updating attributes."
Send email
This action allows you to send emails via a selected destination: SendGrid or Gmail.
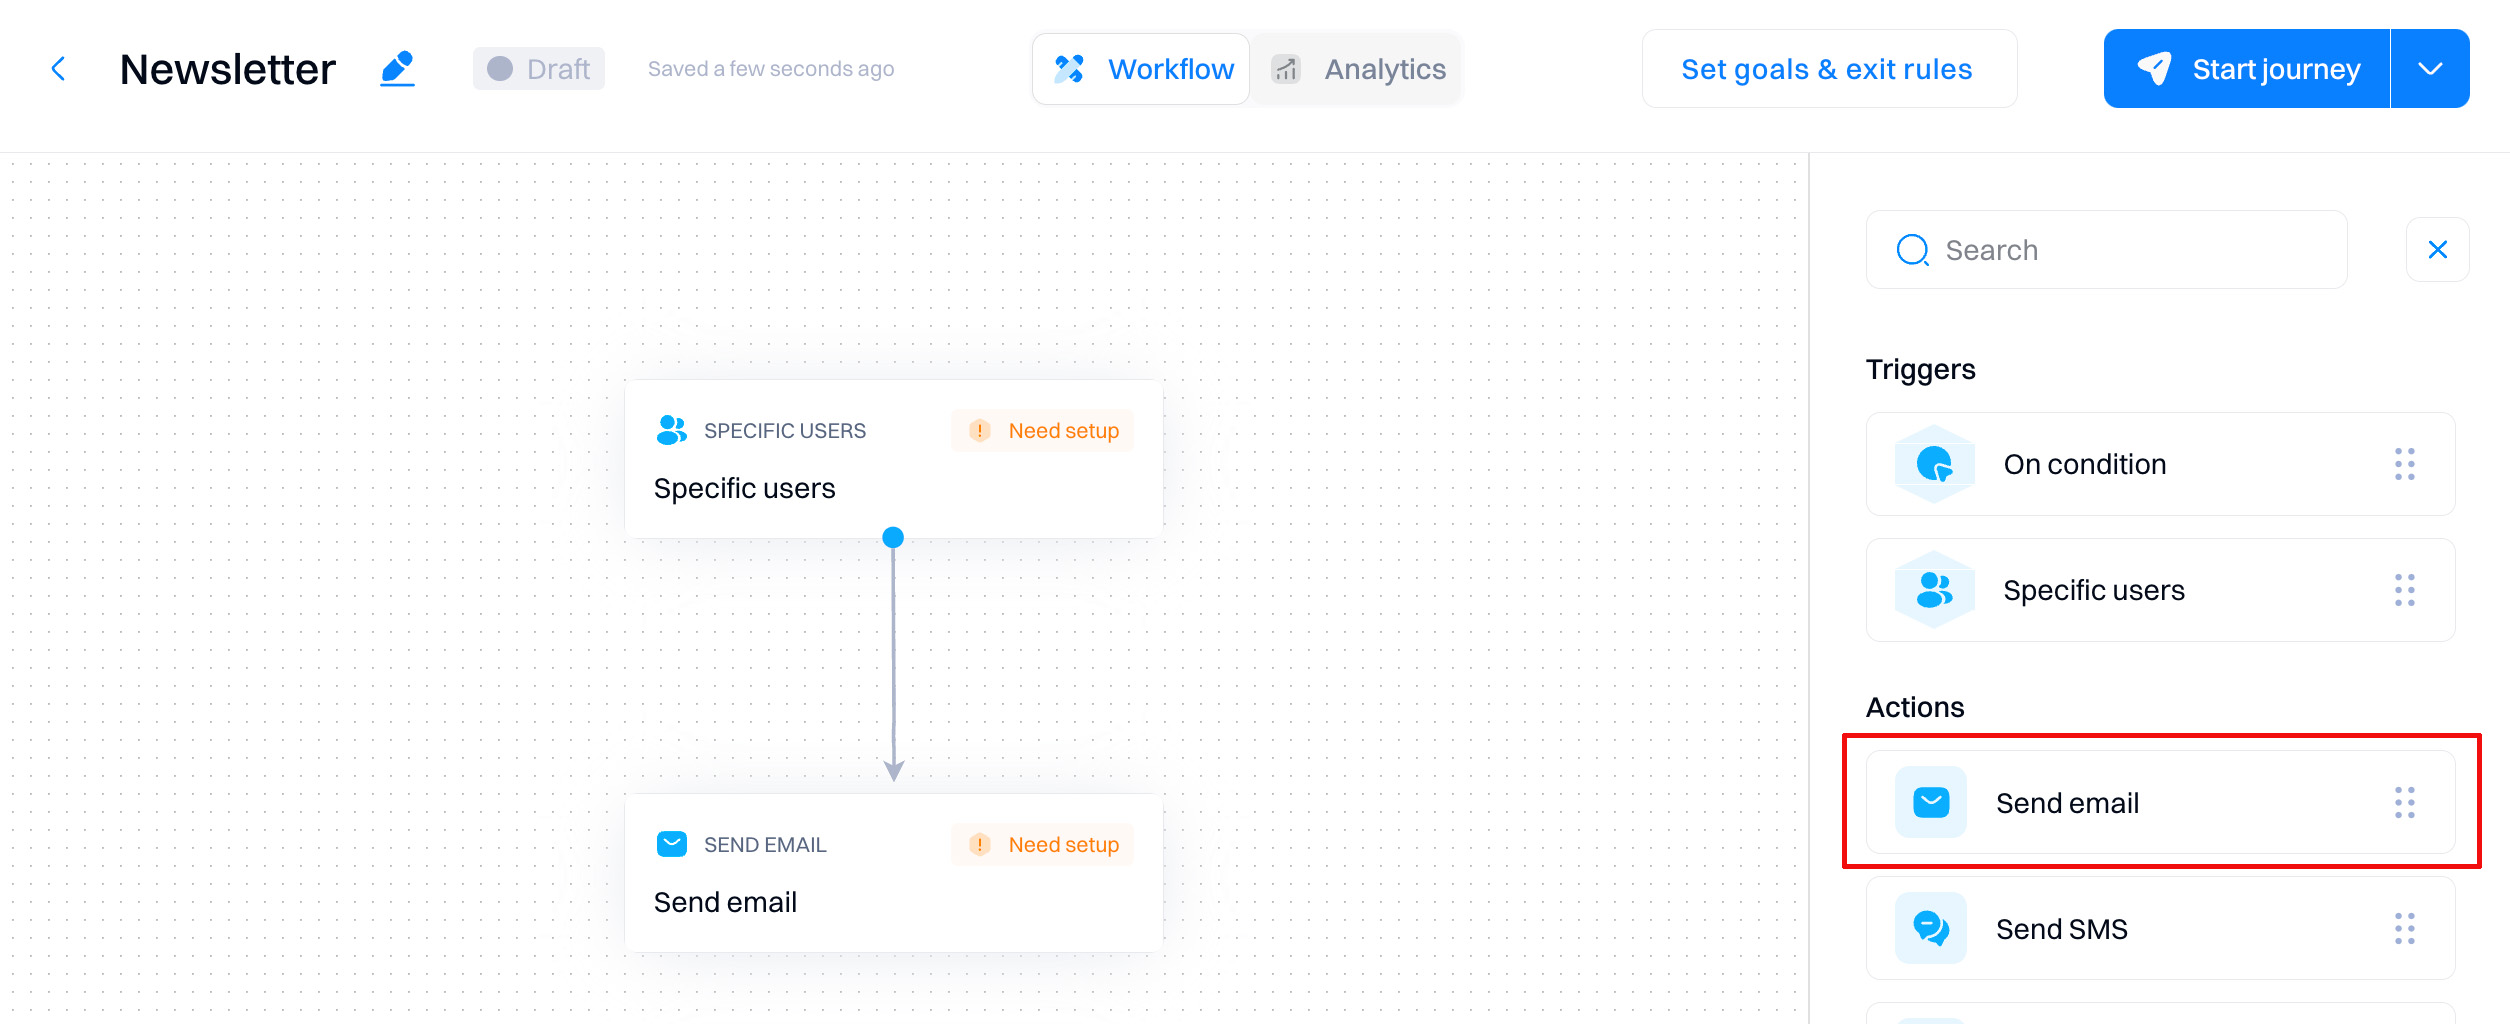
Choose the email destination depending on your requirements and use cases.
SendGrid vs. Gmail
| Criteria | SendGrid | Gmail |
|---|---|---|
| Volume | Suitable for high-volume email campaigns. | Best for low to moderate email volumes. |
| Deliverability | High deliverability rates optimized for bulk mailing. | Good deliverability but more suited for personal communication. |
| Scalability | Highly scalable and can handle rapid increases in email volume. | Limited scalability in comparison to SendGrid. |
| Customization | Extensive customization options with email block builder | Basic customization options, suitable for straightforward communications (rich text editor) |
| Cost | Cost-effective at scale; pricing based on volume. | Generally free up to certain limits; beyond that, fees apply based on Google Workspace plans. |
| Ease of Use | It may require a technical setup for domain authentication. | User-friendly, especially for those familiar with Google products. |
| Regulatory Compliance | Strong compliance features for mass mailing. | Compliance features are available and adequate for individual and small business use. |
| Use Case | Ideal for marketing campaigns, newsletters, and customer engagement emails. | Best for 1:1 sales communications, nurture flows, and internal business communications. |
To summarize, choose SendGrid for professional, high-volume email campaigns where deliverability, scalability, and customization are priorities.
Opt for Gmail for internal communications and low-volume or 1:1 lead interactions like sales emails.
SendGrid
SendGrid action allows you to deliver emails via SendGrid API using the selected template within the configuration.
Good to know
Refer to SendGrid on how to connect your Sendgrid account.
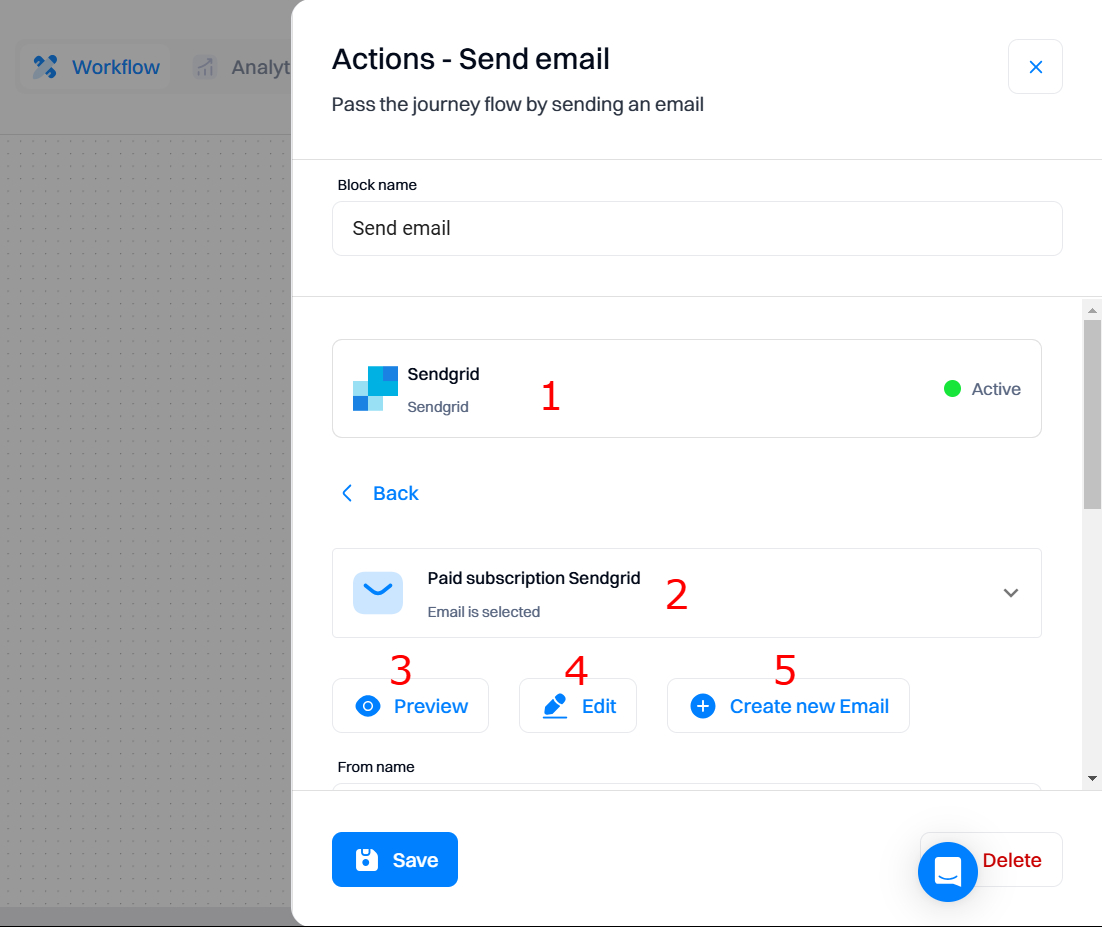
Configuration overview
Good to know
SendGrid action uses Email block templates. Refer to Creating email block templates for a complete creation guide.
- Destination status. Indicates the messaging service being used (SendGrid in this case) and its current status (Active).
- Selected email template. This shows the email template currently selected for sending (e.g., Winback campaign).
- Preview. Review the email's content and layout before sending. It helps catch any errors or needed changes.
- Edit. Make changes to the email content or design directly from the journey builder.
- Create a new email. Open email builder to create a new email template from scratch.
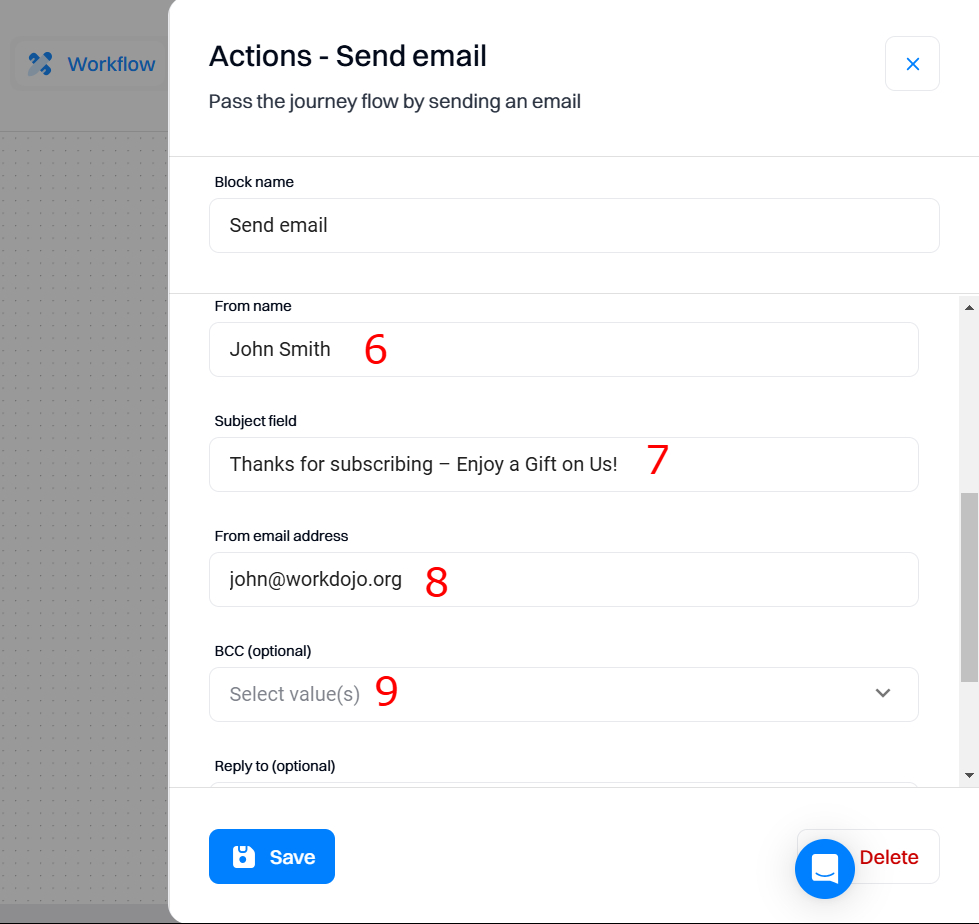
- From name. Allows setting the name that appears as the sender in the recipient's inbox.
- Subject field. The field where users can input or edit the email's subject line. Essential for setting the subject line, which is crucial for open rates. Allows customization for relevance and engagement.
- From email address. The email address that shows as the sender's address to recipients. Vital for ensuring the email appears legitimate and not spam-like, enhancing recipient trust.
- Email field. Specifies the attribute used to populate the recipient's email address from the user database.
Good to know
Overriding is useful when you want an email campaign that requires a unique setup like using a different email address.
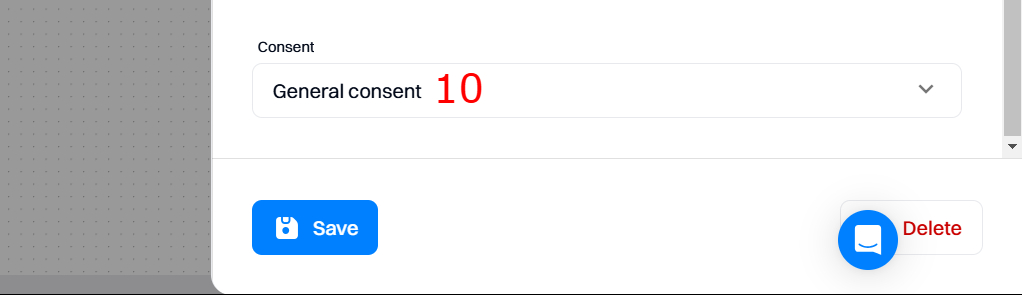
- Consent category. Select the consent category associated with this email action (e.g., Weekly newsletter). This ensures compliance with user consent preferences by only sending emails to users who have granted permission for that category. It is crucial for maintaining trust and adhering to regulations like GDPR.
Good to know
Users will not receive an email if they have not consented to the selected consent category.
Refer to Managing consents for creating and managing consents.
Use cases
-
Welcome series for new subscribers. Send welcome emails to new subscribers, introducing them to your brand, highlighting key products or services, and setting the stage for ongoing engagement.
-
Abandoned cart reminders. Trigger targeted emails to users who have added items to their cart but have not completed the purchase, encouraging them to return and finalize their transactions.
-
Seasonal campaigns. Deploy emails for seasonal promotions or holiday specials, utilizing SendGrid's capabilities to manage large volumes and deliver personalized content.
-
Customer segmentation campaigns. Use SendGrid to segment your customer base and tailor marketing messages based on past purchase behavior, demographic data, or engagement levels.
-
Re-engagement campaigns. Send emails to inactive subscribers using special offers or updates to rekindle their interest in your brand.
-
Product launch announcements. Notify your email list about new product launches with detailed descriptions, special introductory offers, and links to purchase.
-
Newsletter distributions. Regularly send out newsletters that provide valuable content, company updates, and industry news to keep your audience informed and engaged.
-
Feedback and surveys. Request feedback or conduct surveys through email to gain insights into customer satisfaction and areas for improvement.
-
Event promotion and follow-up. Promote upcoming events like webinars or in-person meetups and send follow-up content such as event recordings or key takeaways to attendees.
Gmail
Gmail action allows you to automate sending emails directly from your Gmail account.
Good to know
Refer to Gmail on how to connect your Gmail account.
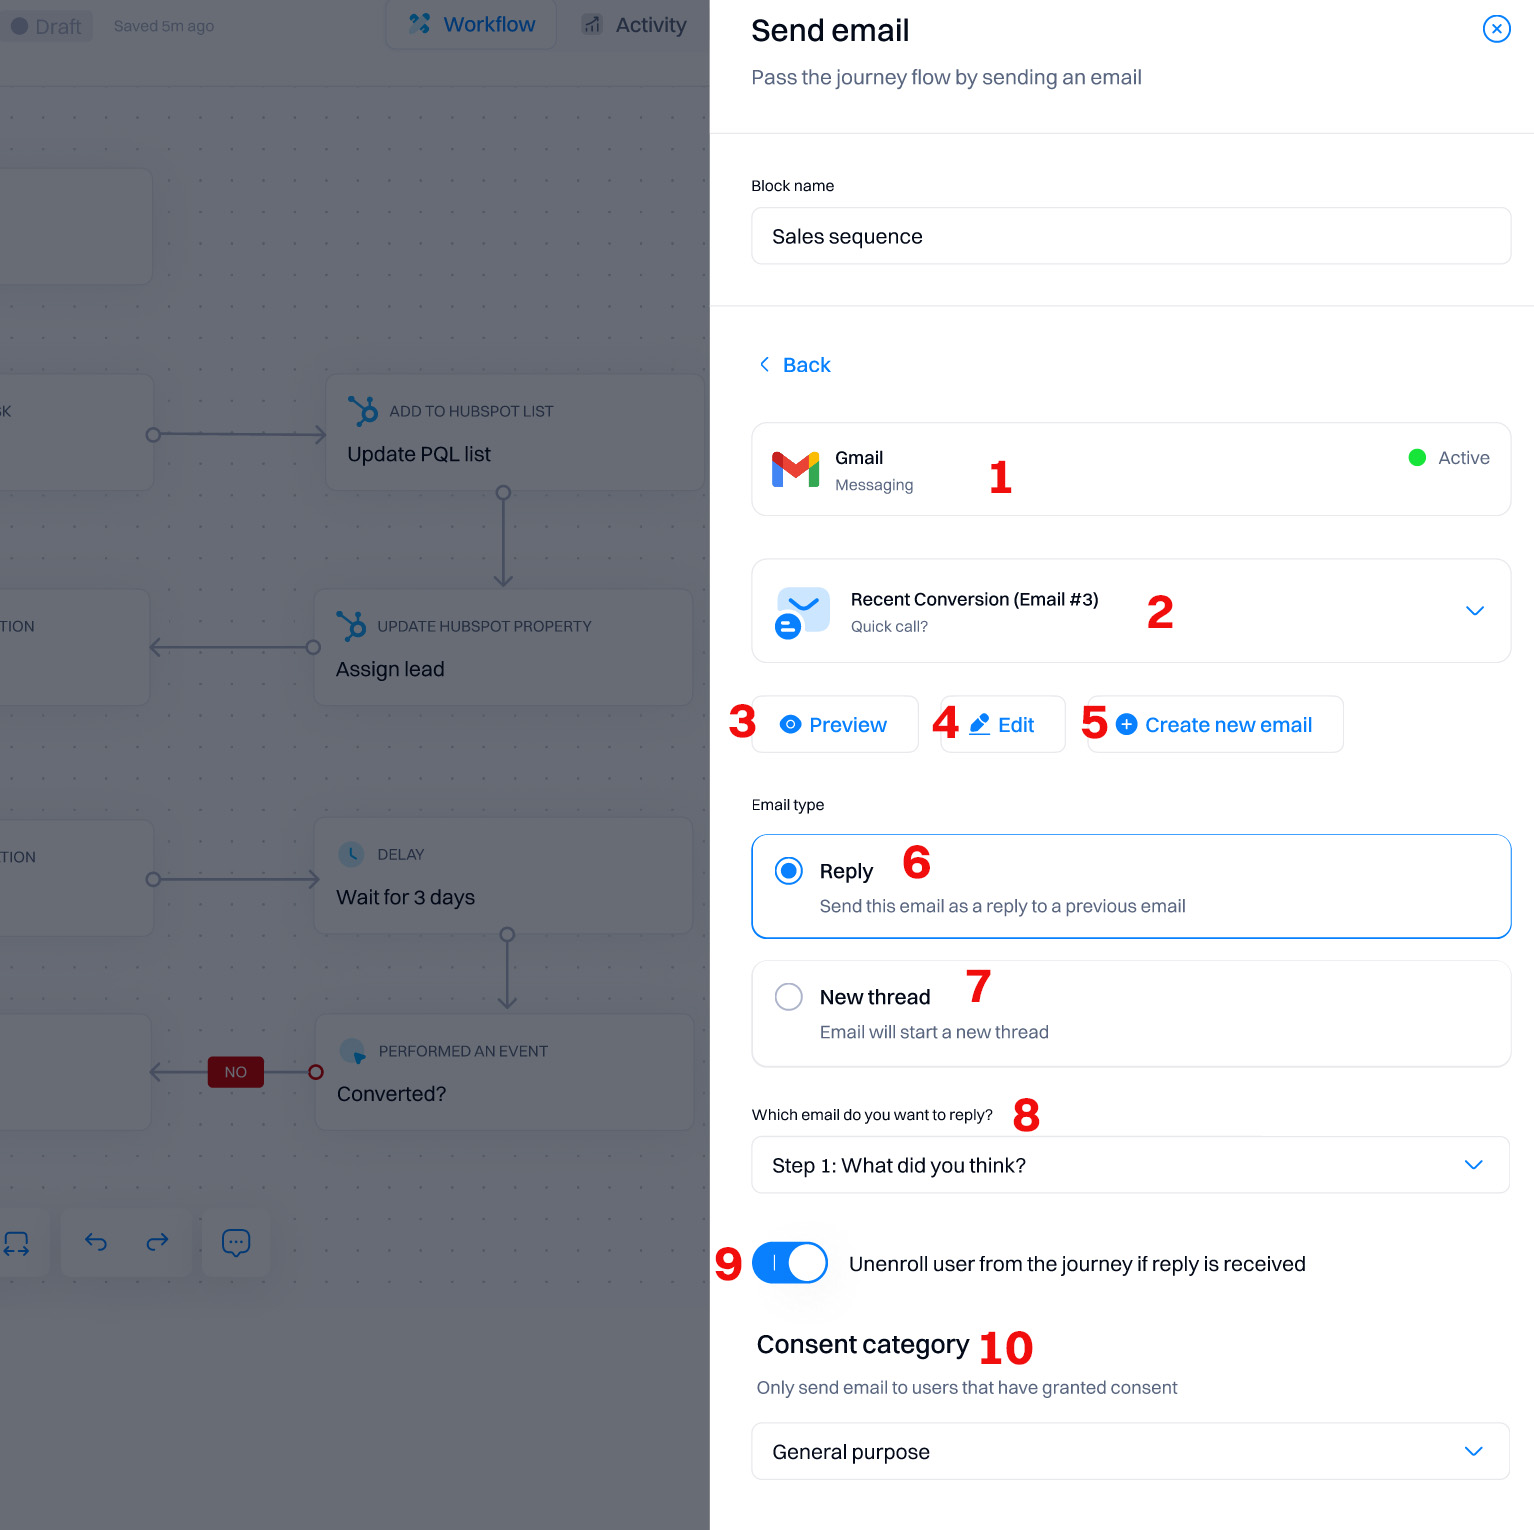
Configuration overview
Good to know
Gmail action uses Rich text email templates. Refer to Creating email rich text templates for a complete creation guide.
-
Destination status. Indicates the messaging service being used (Gmail in this case) and its current status (Active).
-
Selected email template. This shows the email template selected for sending (e.g., Recent Conversion (Email #3)).
-
Preview. Review the email's content and layout before sending it. It helps catch any errors or needed changes.
-
Edit. Make changes to the email content or design directly from the journey builder.
-
Create a new email. Open the rich text email editor to create a new email template.
-
Email type. Reply. This option allows you to send the email as a reply to a previous email action. Selecting this requires you to select the email action that continues the thread (see "Which email action do you want to reply?").
-
Email type. New thread. Starts a new email thread, which will be displayed as a separate email in the user's inbox (in case you send more than one email within the journey).
-
Which email do you want to reply to? Select an email action in this journey that will be used as a thread to continue the email conversation. This option is only visible if you select the email type "Reply."
-
Unenroll user. This toggle unenrolls users from the journey if a reply is received. It automates removing users from the journey based on their engagement—sending a reply.
-
Consent category. Use the Dropdown to select the consent category, ensuring emails are sent only to users who have granted permission for this type of communication. This ensures compliance with user consent preferences, which is crucial for adhering to legal standards like GDPR and maintaining user trust.
Good to know
Users will not receive an email if they have not consented to the selected consent category.
Refer to Managing consents for creating and managing consents.
Use cases
-
Lead nurturing emails. Send personalized follow-up emails to leads who have expressed interest in products or services but have not yet converted, encouraging them to take the next step.
-
Proposal follow-ups. After sending a proposal, automate follow-up emails to maintain communication, address any concerns, and keep the deal moving forward.
-
Product updates and announcements. Inform existing customers about new product features or enhancements that may interest them, keeping the brand top-of-mind and fostering customer loyalty.
-
Customer success check-ins. Periodically send emails to new customers to ensure they are satisfied with their purchase and to offer assistance or resources to maximize their product usage.
-
Appointment confirmation and reminders. Automatically send confirmation emails once meetings are booked and reminders closer to the appointment date to reduce no-shows.
-
Contract renewal reminders. Send reminders to customers whose contracts are nearing expiration, outlining the renewal process and any loyalty incentives.
-
Post-sale follow-up. After a sale is closed, send an email to thank the customer for their business, provide contact information for support, and cross-sell related products or services.
-
Event invitation and follow-up. Invite prospects to webinars, workshops, or other events that could move them further down the sales funnel. Follow up with content or recordings from the event.
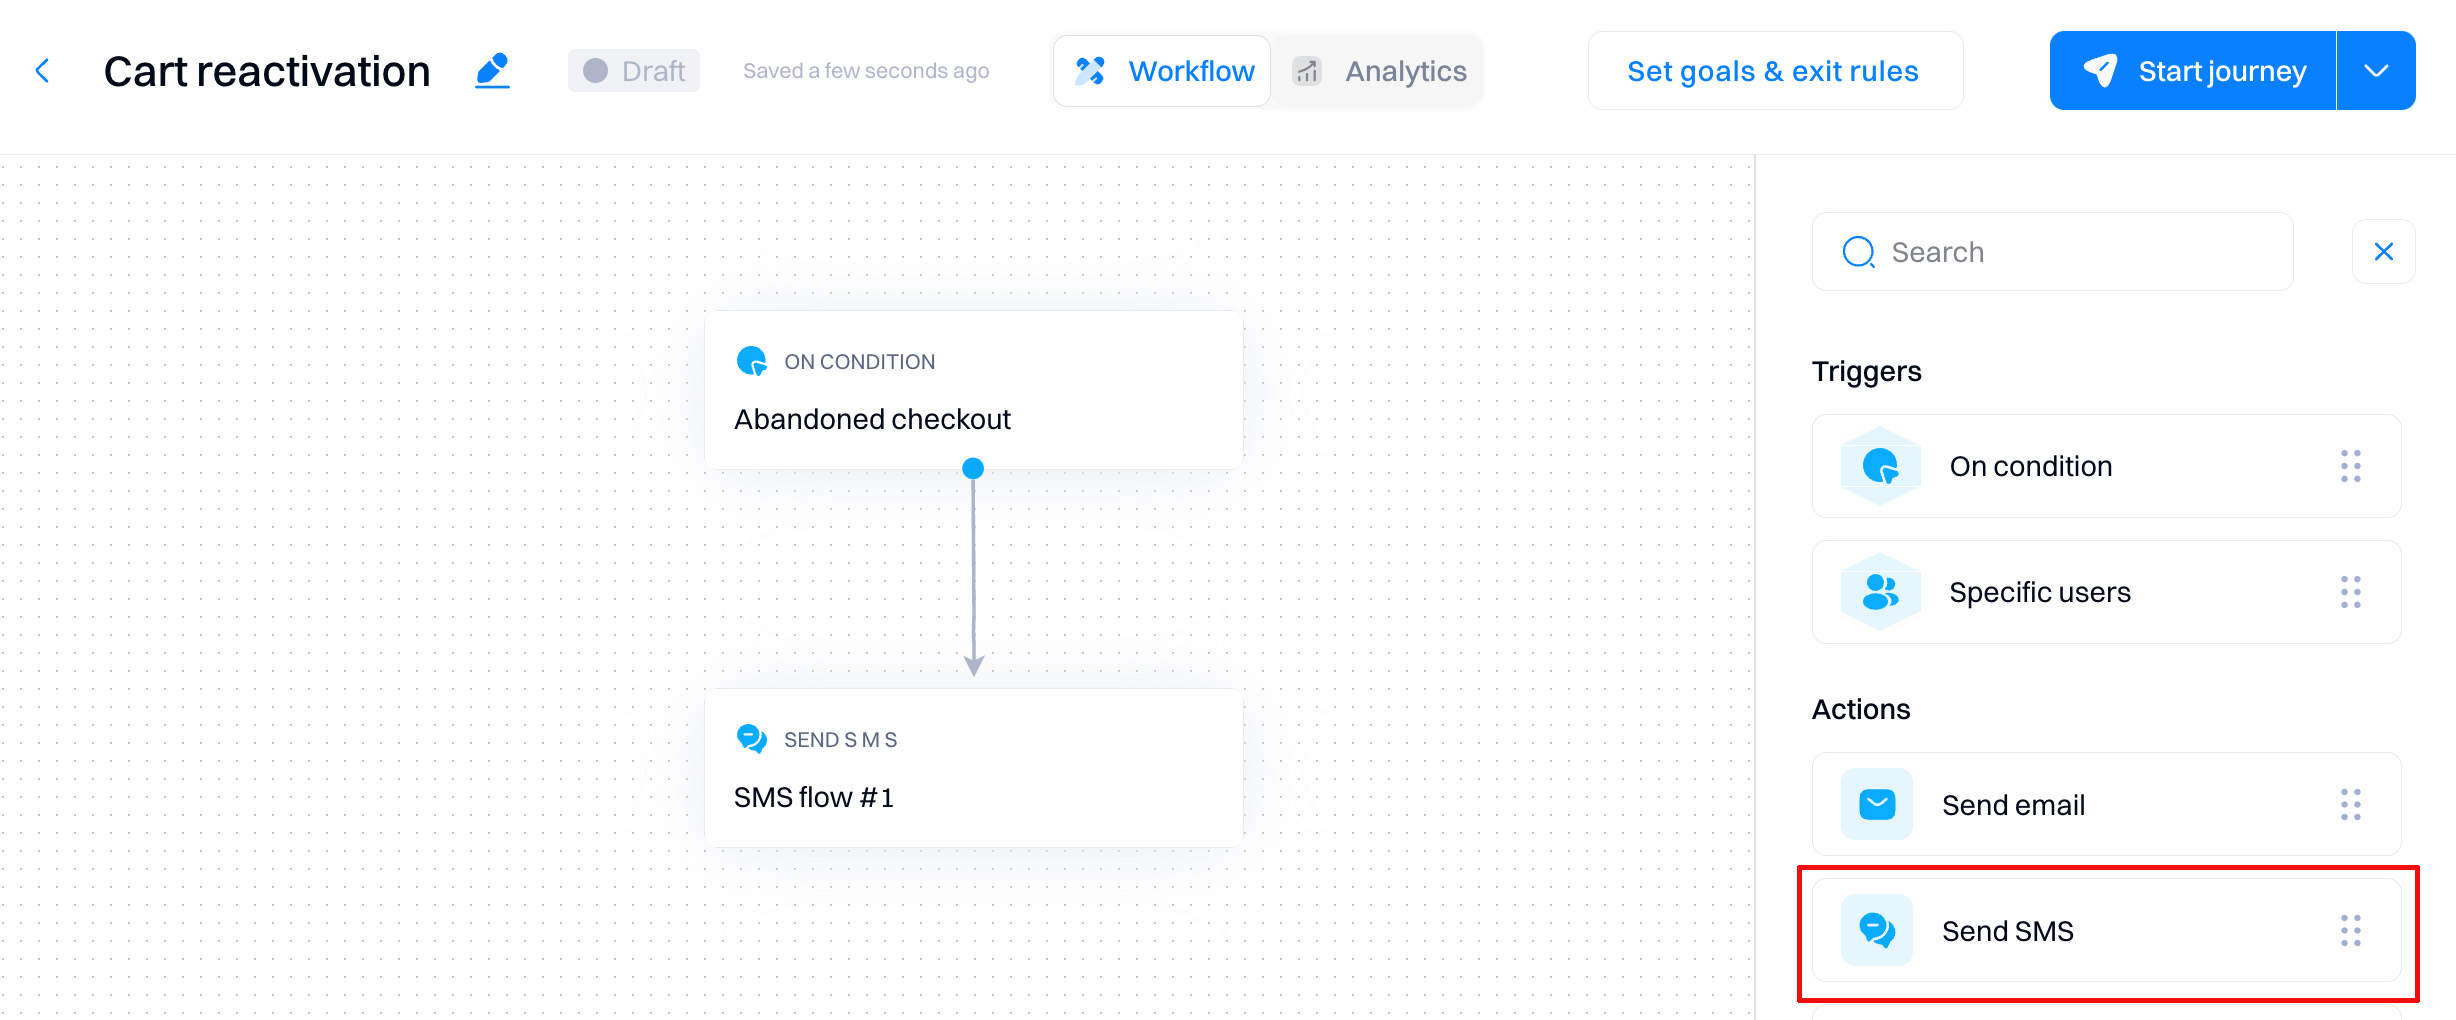
Send SMS
Send SMS allows you to send SMS messages via a connected Twilio account.
Good to know
To send SMS messages, you need to have a Twilio account. Refer to Twilio for how to connect your Twilio account as a destination.
Configuration overview
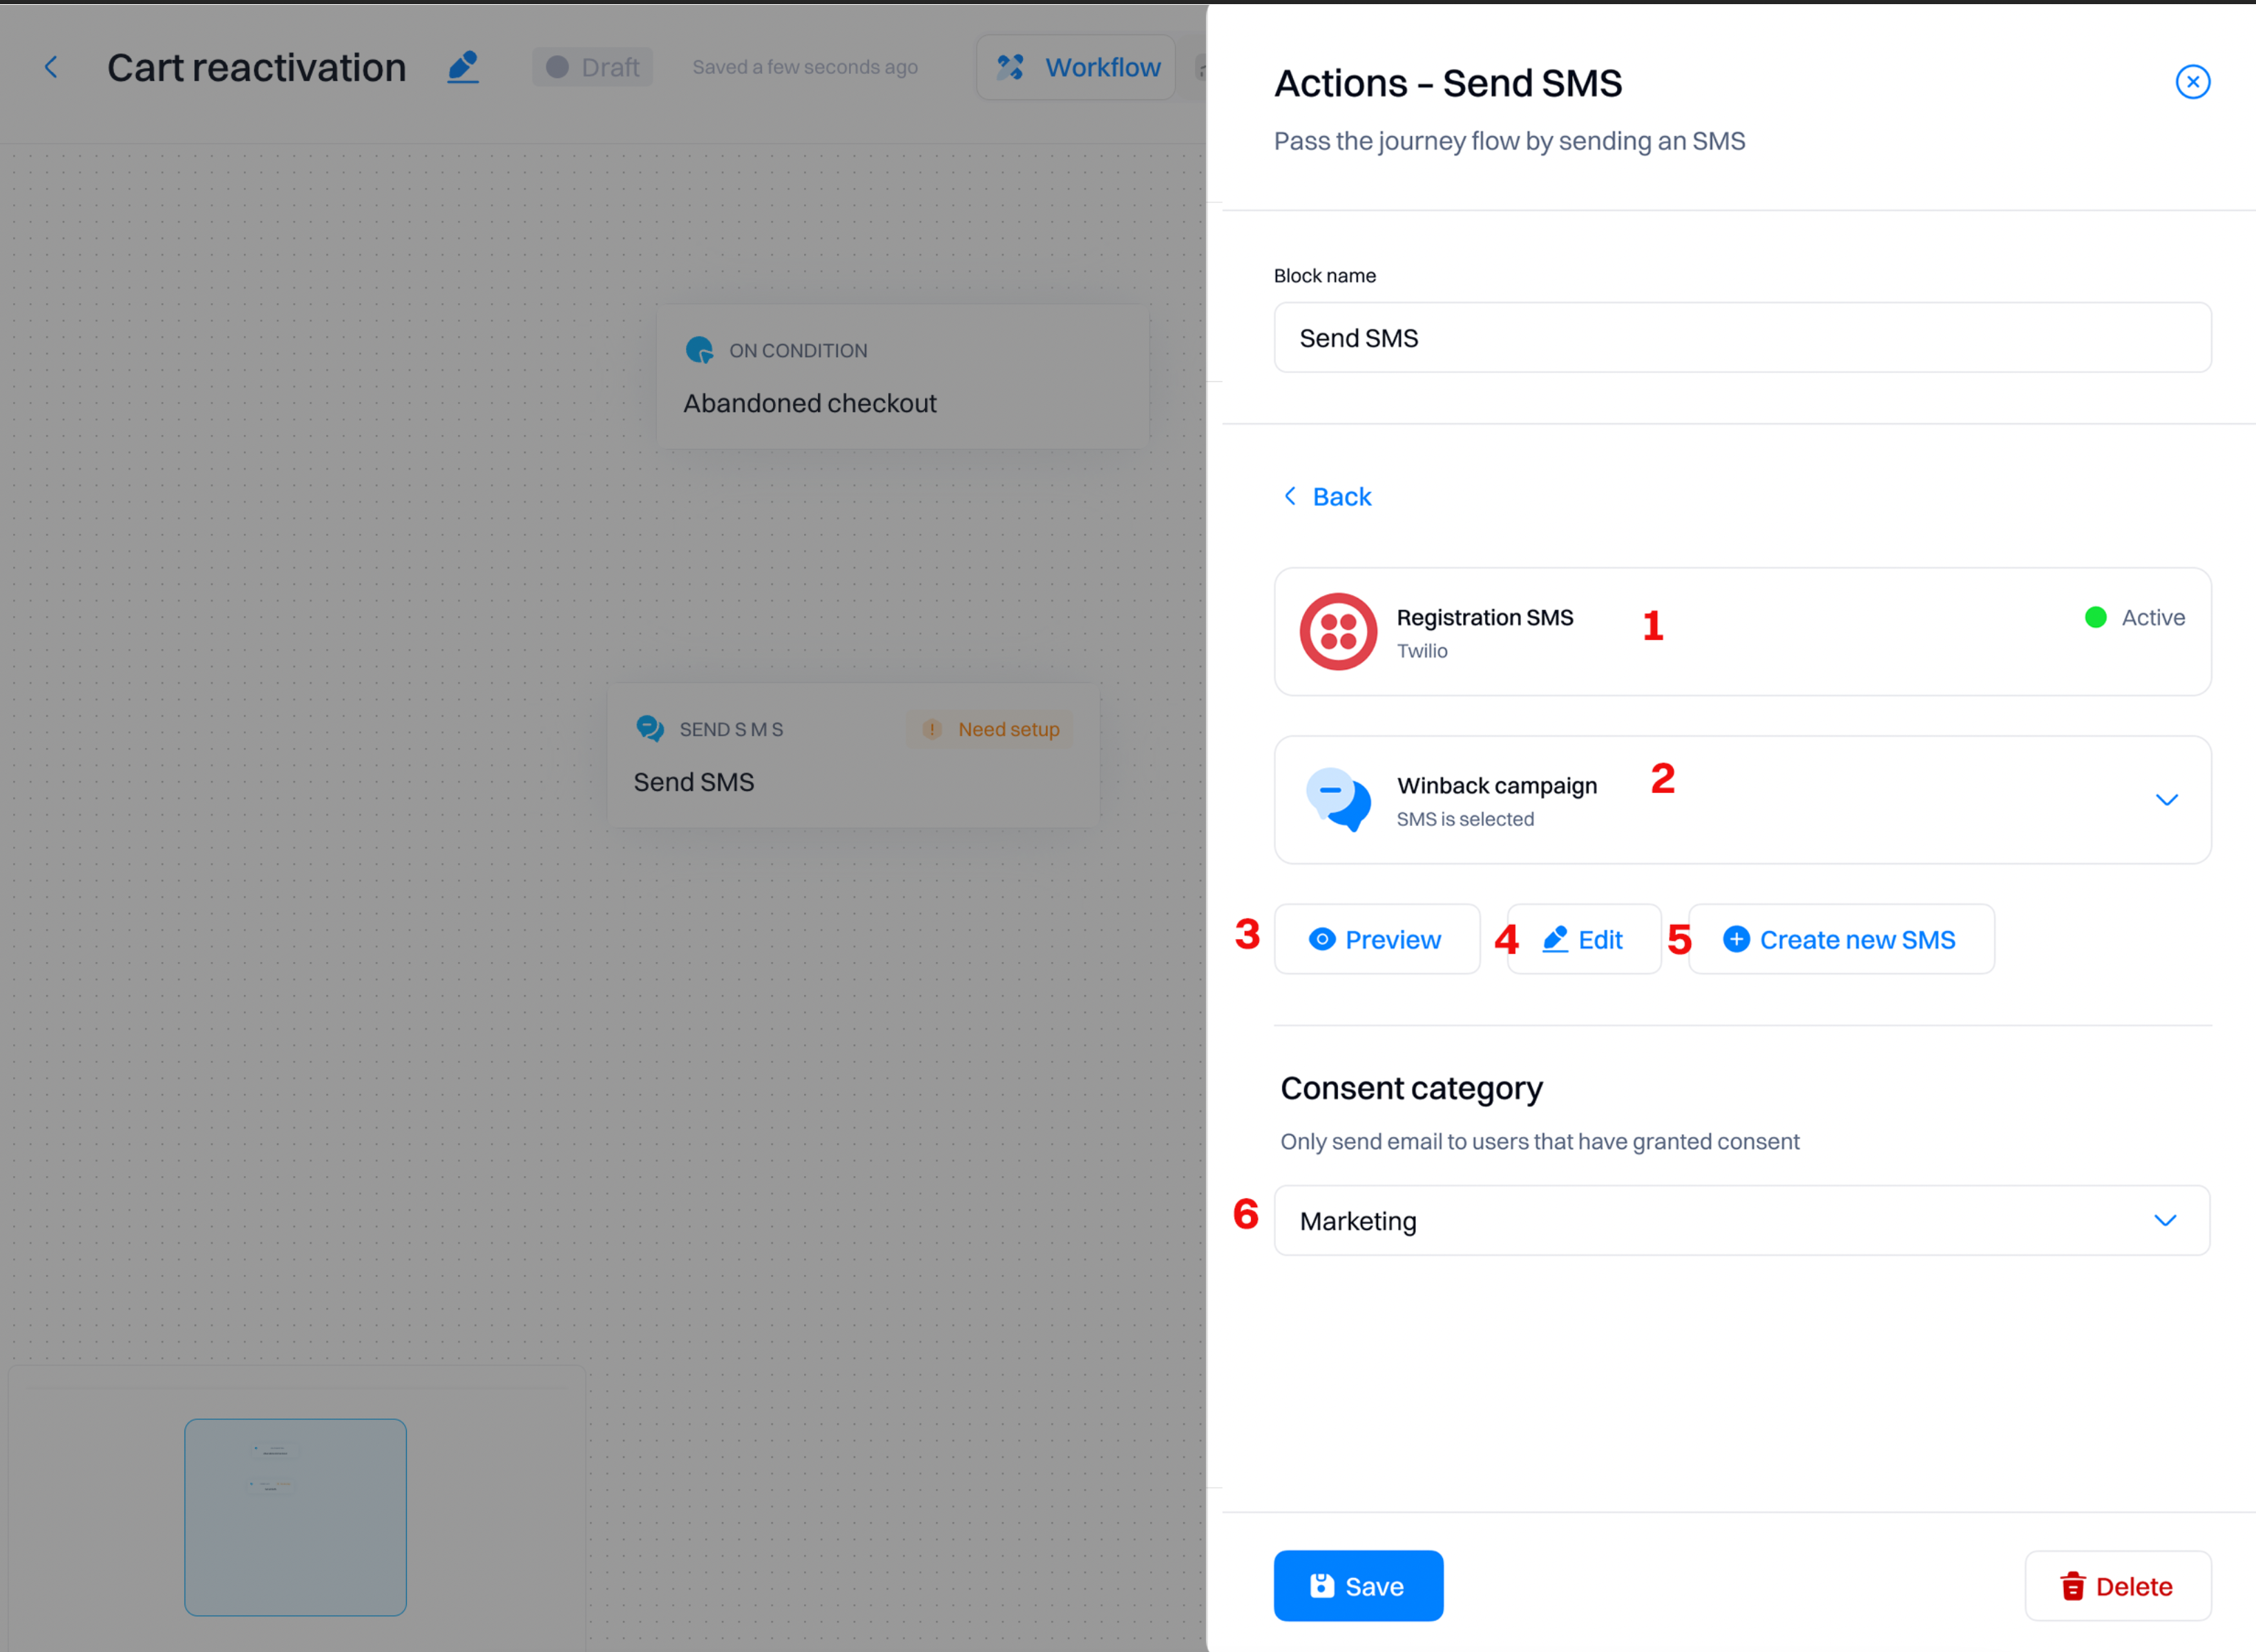
-
Destination status. Indicates the messaging destination being used (Twilio in this case) and its current status (Active/Disabled).
-
Selected SMS template. This shows the SMS template selected for sending (e.g., Winback campaign).
-
Preview. Review the SMS content and layout before sending. It helps catch any errors or needed changes.
-
Edit. Make changes to the SMS content or design directly from the journey builder.
-
Create a new SMS. Open the SMS builder to create a new SMS template from scratch.
-
Consent category. Dropdown to select the consent category, ensuring SMS messages are sent only to users with permission for this communication type. This ensures compliance with user consent preferences, which is crucial for adhering to legal standards like GDPR and maintaining user trust.
Good to know
Users will not receive an email if they have not consented to the selected consent category.
Refer to Managing consents for creating and managing consents.
Use cases
-
Event reminder notifications. Send SMS reminders to attendees before an event or webinar to ensure high attendance and timely arrivals.
-
Promotional campaigns. Notify subscribers about special promotions, discounts, or exclusive offers, driving immediate engagement and increasing sales opportunities.
-
New product launches. Alert customers via SMS about new product releases, providing a direct link to the product page or a special introductory offer.
-
Loyalty program updates. Send updates to loyalty program members about their points balance, upcoming rewards, or changes in program terms, keeping them engaged and informed.
-
Customer feedback requests. Shortly after a purchase or interaction, send SMS messages to customers asking for feedback or directing them to a survey, enhancing customer service and product development.
-
Flash sales alerts. Notify customers of limited-time flash sales, creating urgency and encouraging quick responses from a targeted audience.
-
Seasonal greetings and offers. Send personalized greetings during holidays or special seasons, accompanied by special offers tailored to the recipient's previous purchases or interests.
-
Re-engagement campaigns. Reach out to inactive customers with incentives to re-engage them with the brand, such as special discounts or updates on new product lines.
-
Subscription renewal reminders. Remind subscribers about upcoming renewals, providing easy instructions or incentives to renew their subscription.
-
Event follow-up communications. After an event, send thank you messages to attendees, highlights or key takeaways, and possibly an early bird offer for the next event.
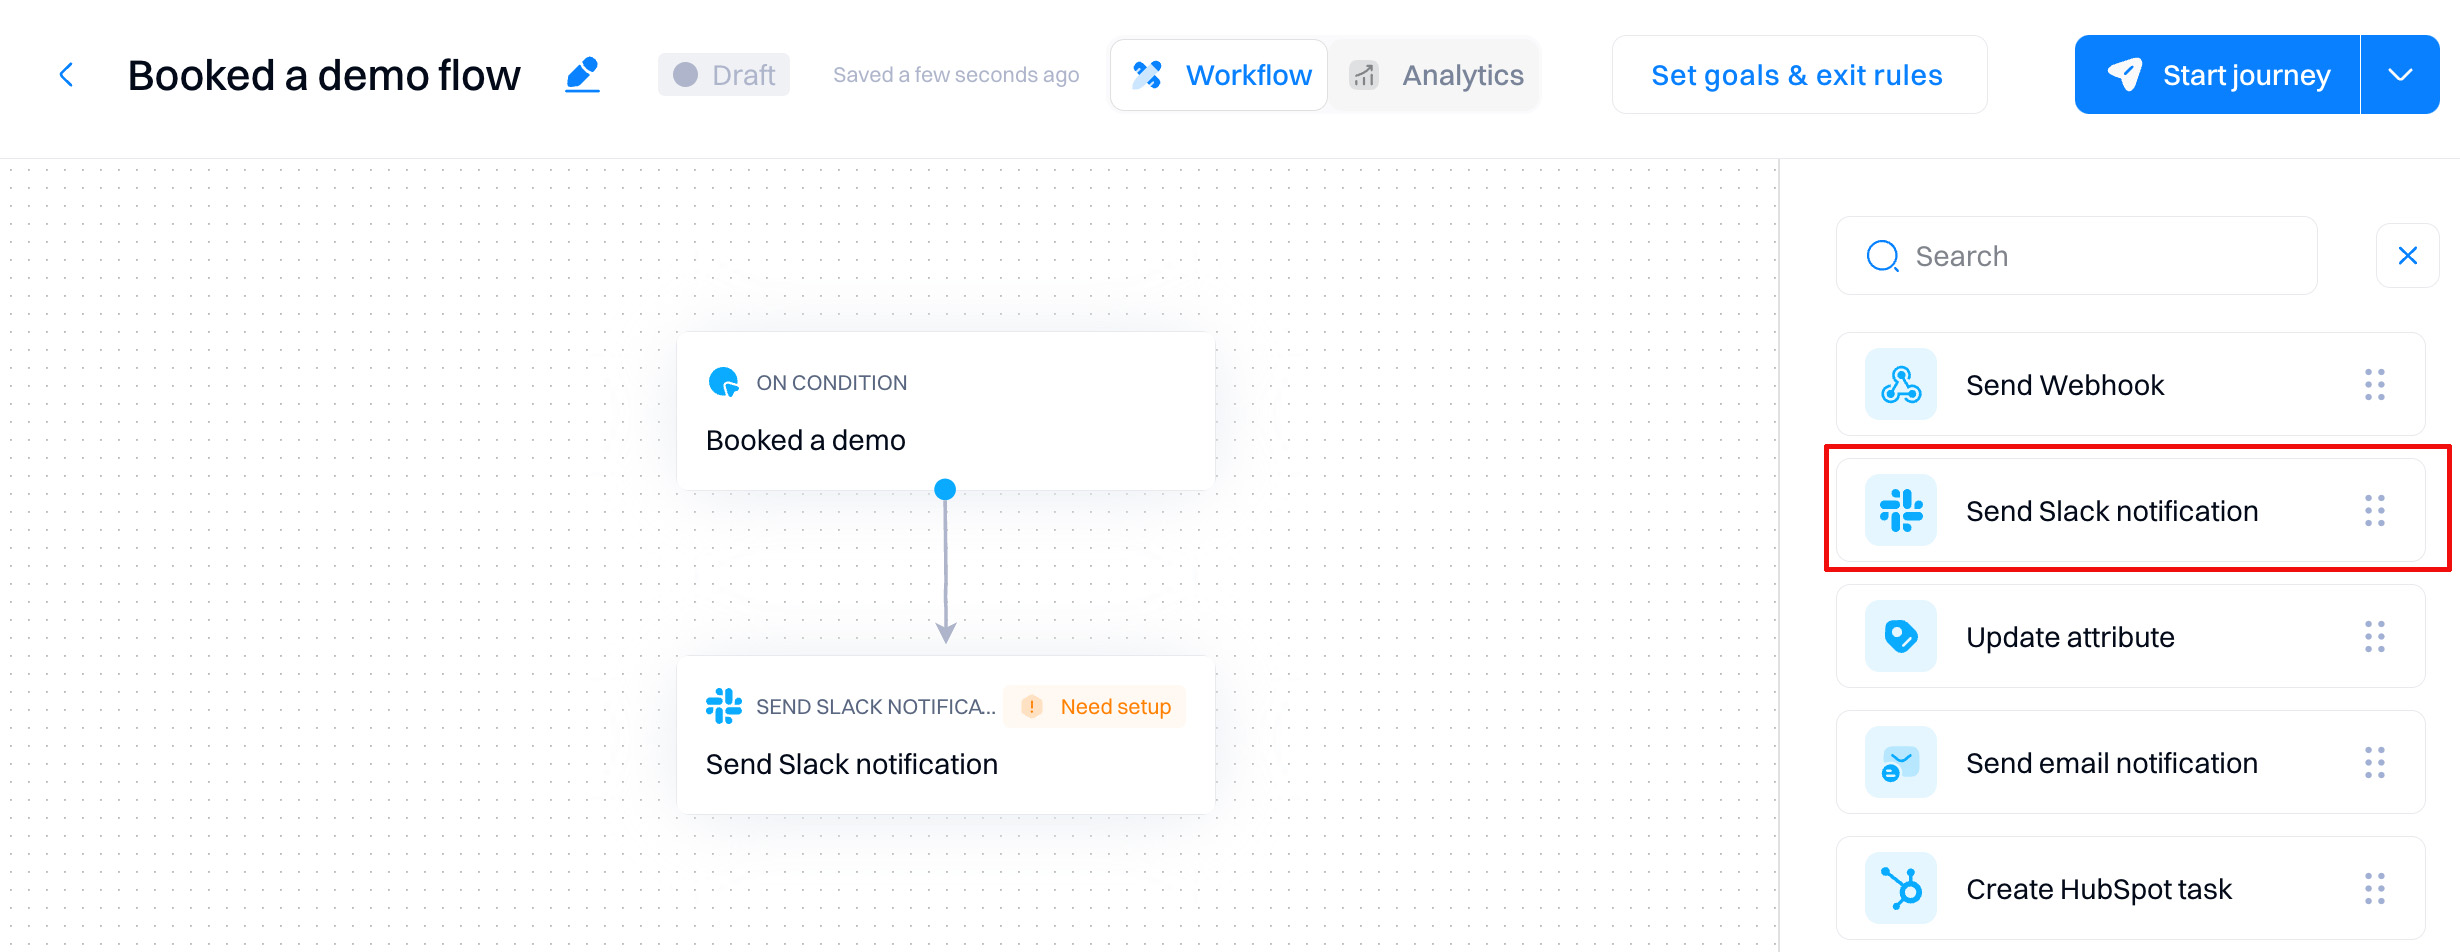
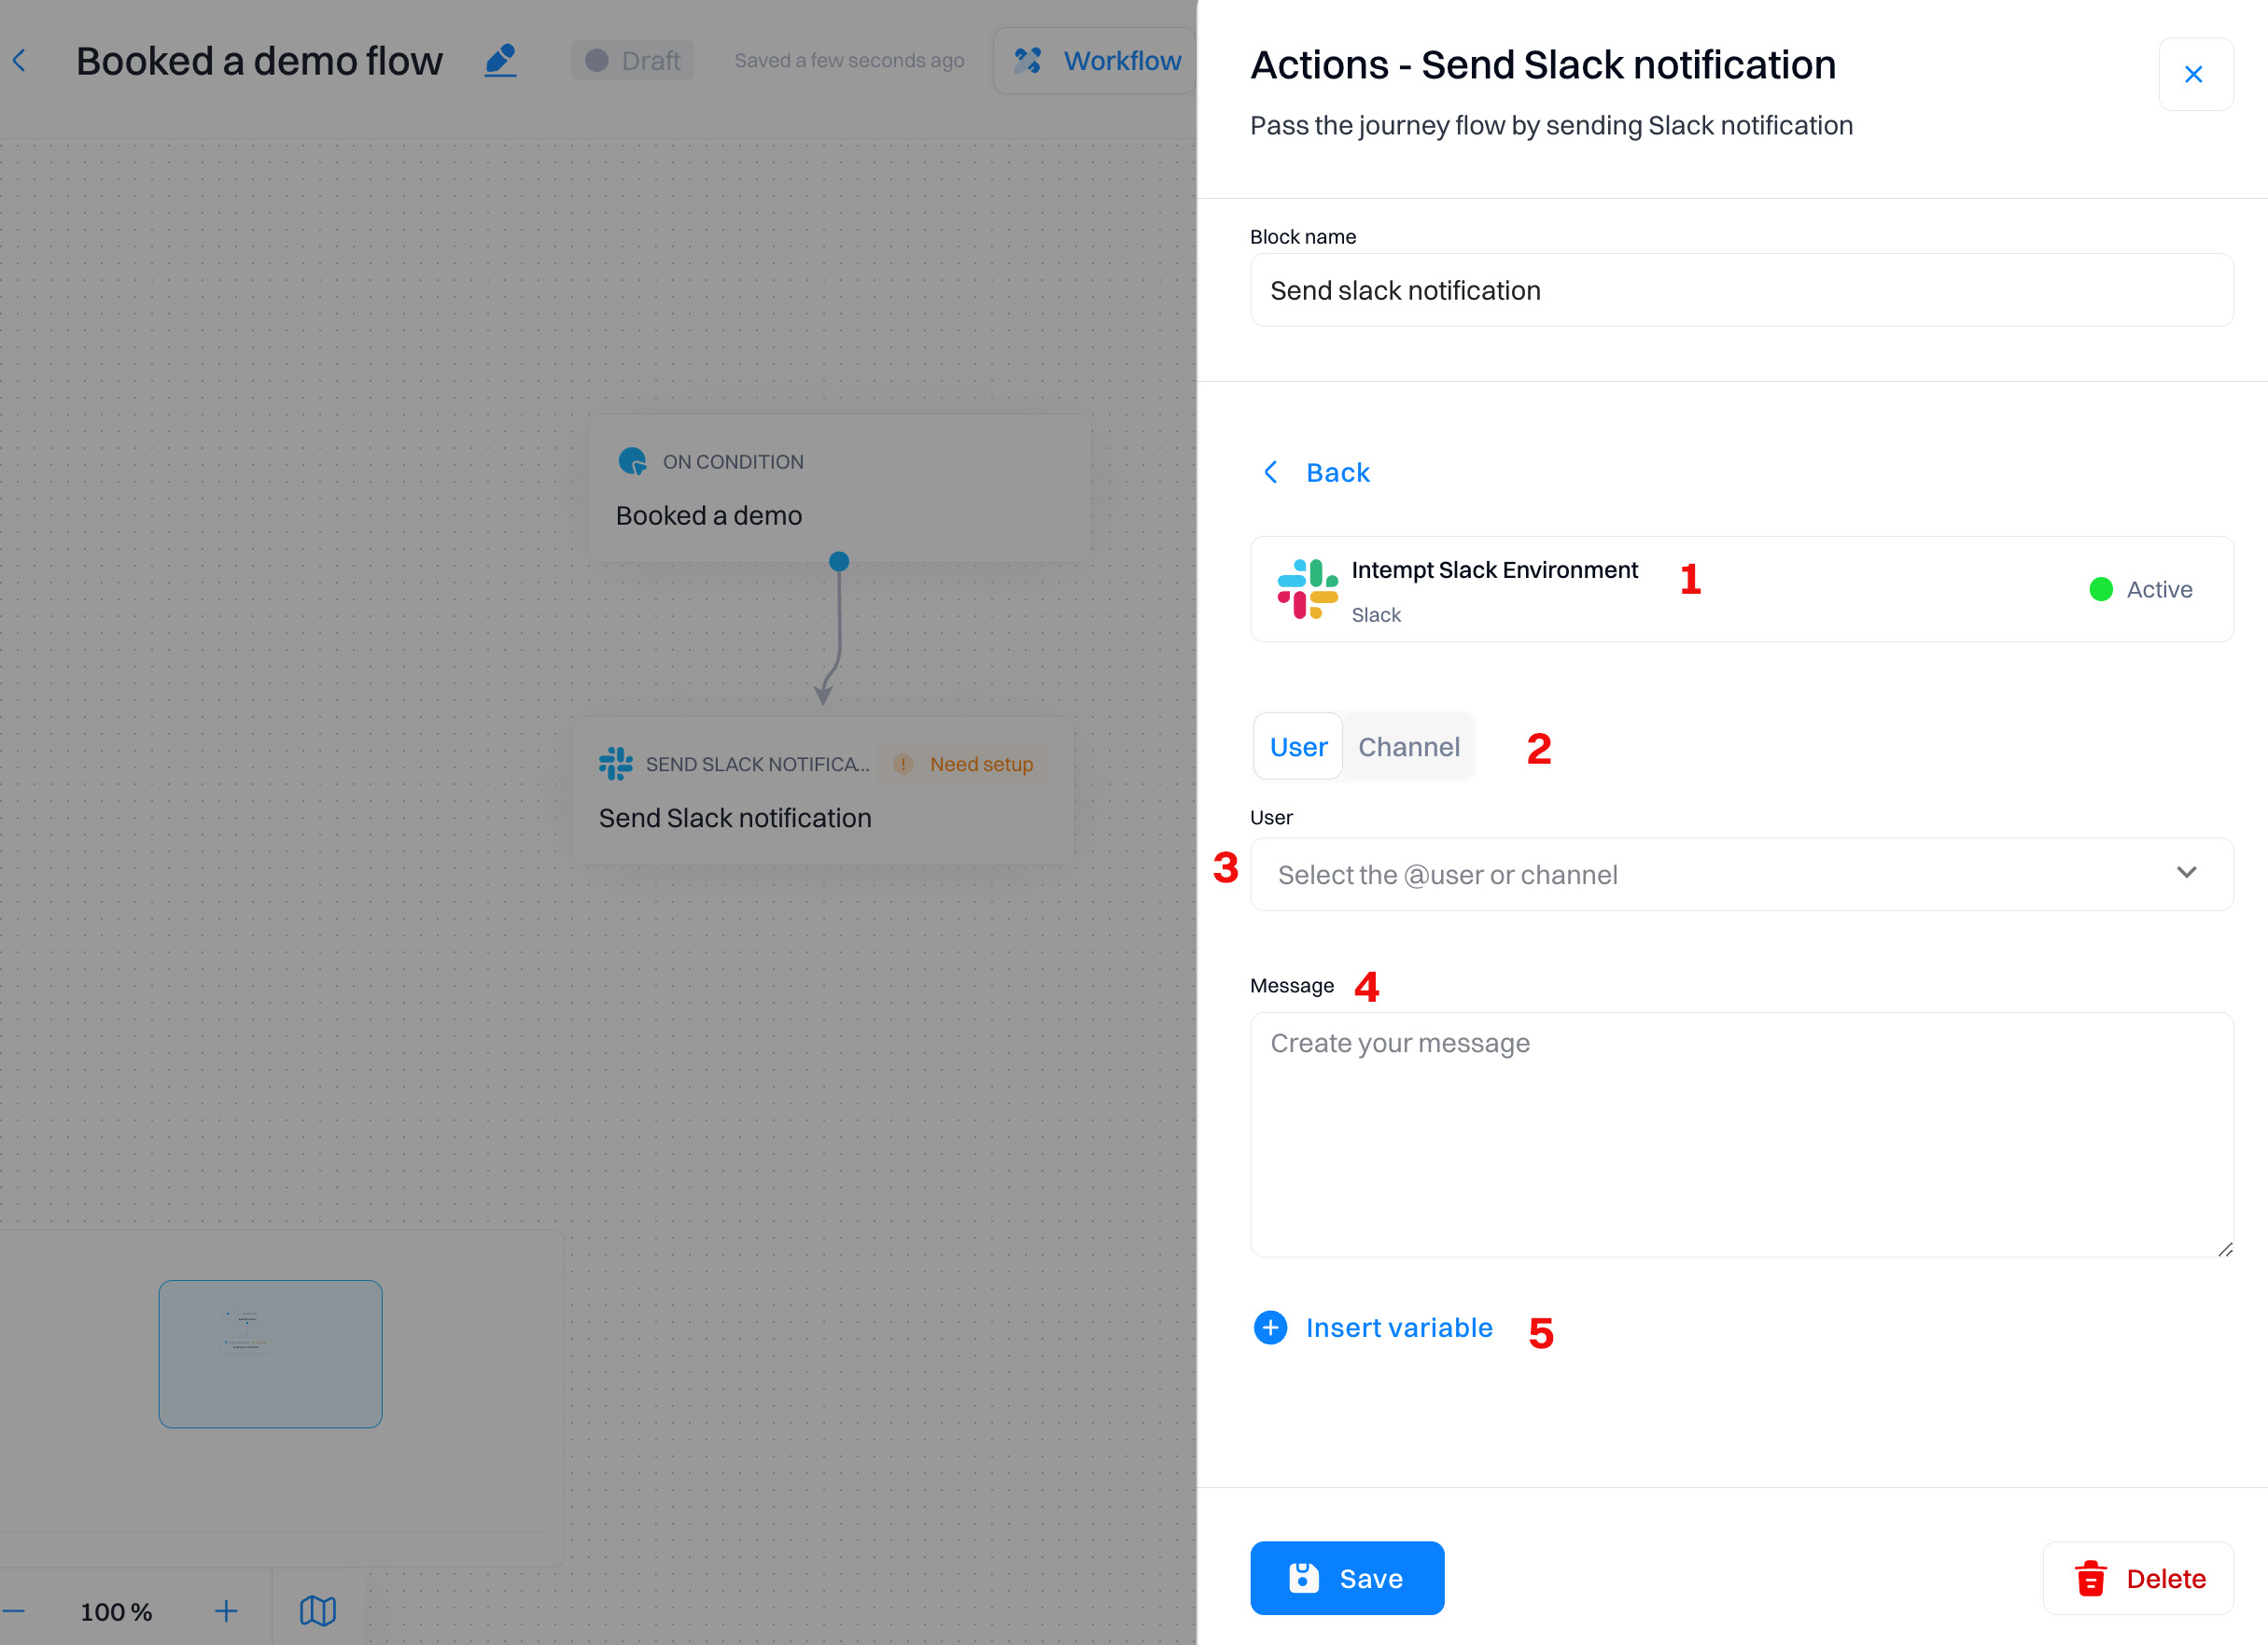
Send Slack notification
This block lets you send Slack messages to a specific user or a channel in your connected Slack workspace.
Good to know
To send Slack notifications, you need to have a Slack account. Refer to Slack for how to connect your Slack account as a destination.
Configuration overview
-
Destination status. Indicates the Slack destination (Slack in this case) and its current status (Active). Note that you can have multiple Slack accounts in your project.
-
User/Channel Selector. This option allows you to choose whether the notification should be sent to a specific user or a channel.
-
Select the @user or channel. Dropdown menu to select the specific user or channel where the notification will be sent.
-
Message Field. Text area to create or edit the message via Slack.
-
Insert variable. Option to insert variables into the Slack message, such as user name, company name, or any other relevant data from the workflow. This enhances the personalization and relevance of the message by allowing dynamic content that adapts based on specific data or actions within the workflow, making the message more engaging and informative.
Use cases
-
Lead notifications. Automatically notify sales teams in Slack when a new lead is captured through the website or other channels for immediate follow-up.
-
Deal closure alerts. Send celebratory messages to a sales channel when deals are closed, boosting team morale and updating everyone on sales progress.
-
Lead status change. Send notification when a lead's status changes, for example from a Prospect to a Product Qualified Lead.
-
Webinar registrations. Notify the sales or marketing team when customers sign up for upcoming webinars, aiding in preparation and follow-up strategy planning.
-
Feedback and survey results. Alert marketing teams when new customer feedback or survey results are available, providing insights into customer satisfaction and areas for improvement.
-
Event reminder notifications. Remind sales teams of upcoming events, tradeshows, or important meetings, ensuring proper preparation and participation.
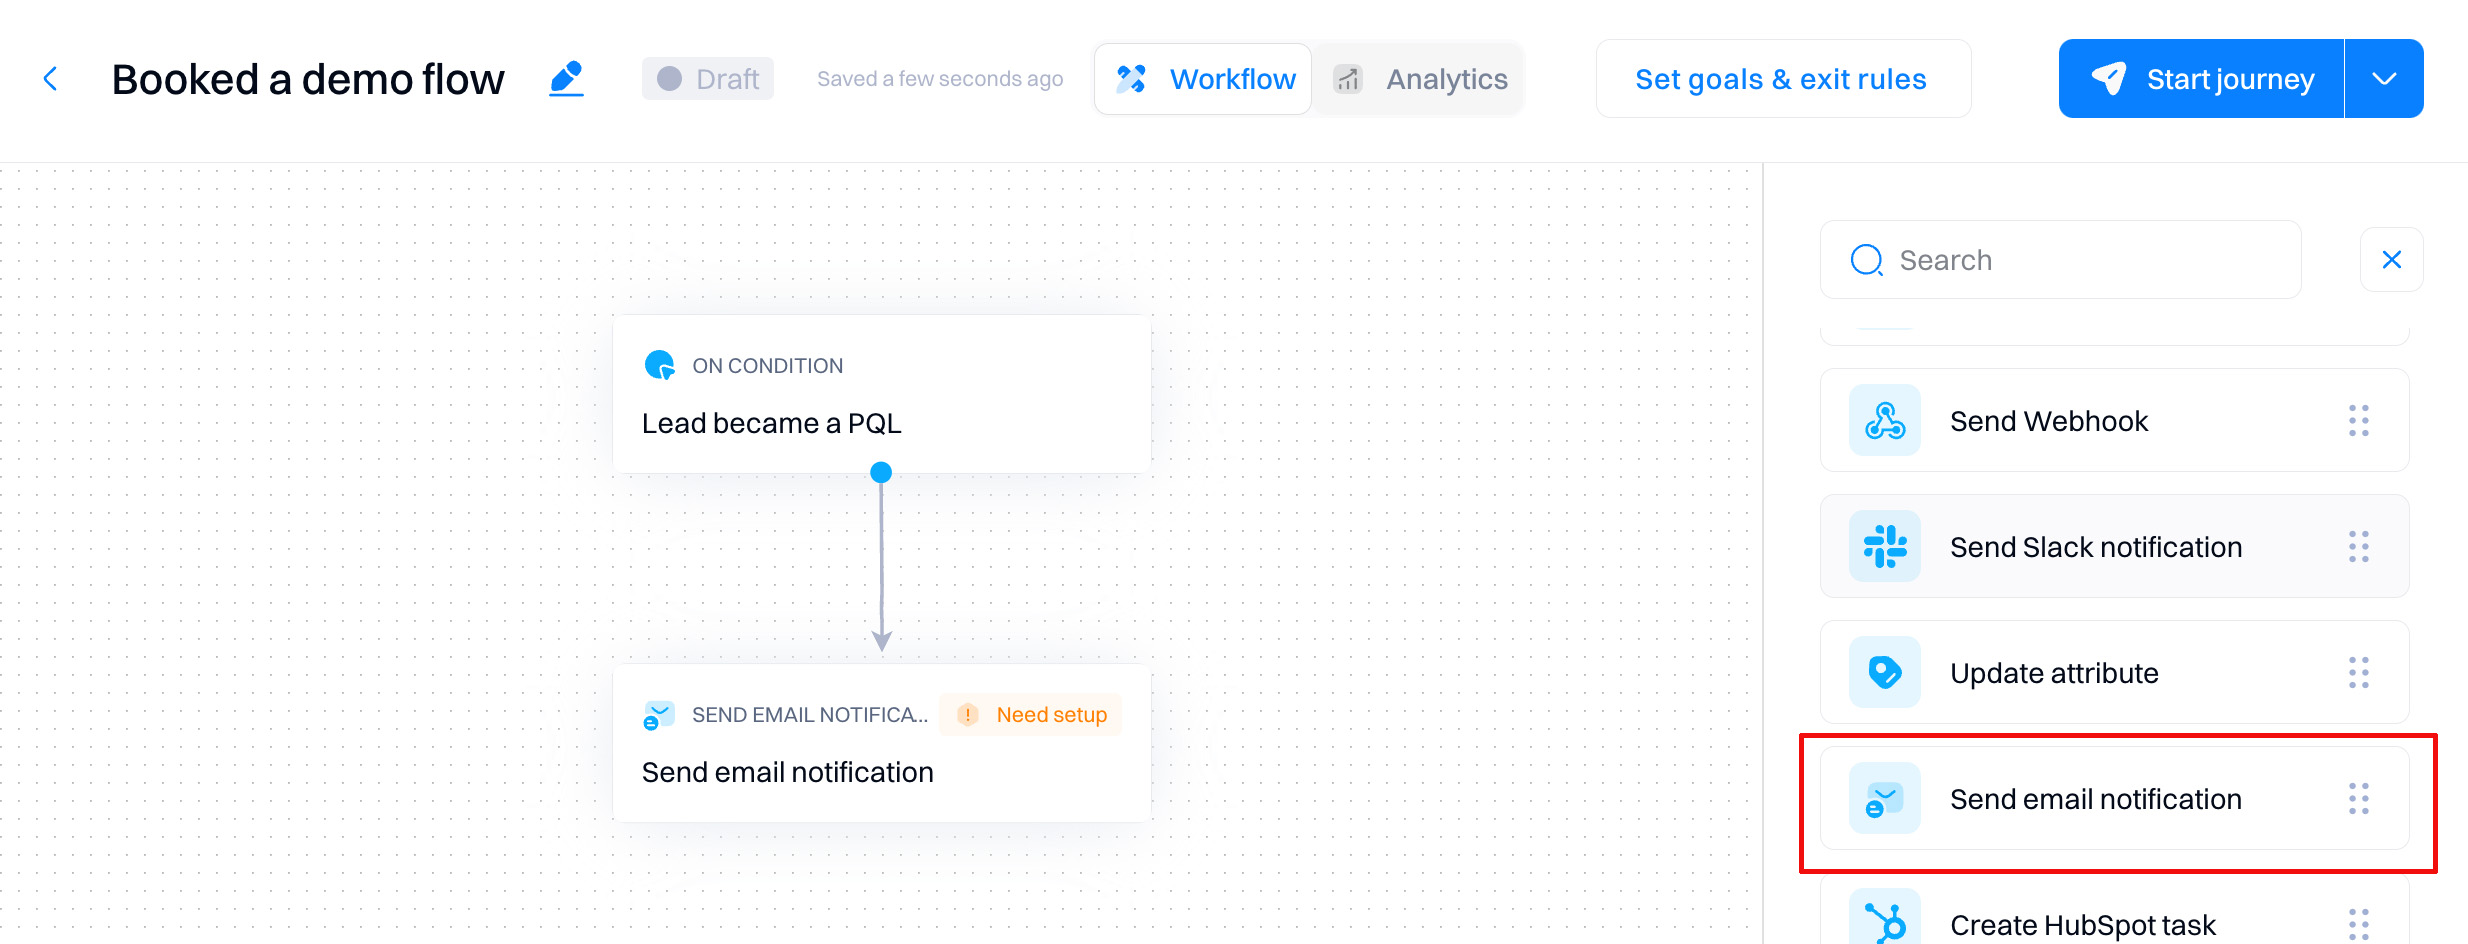
Send email notification
This block allows you to send email notifications to users in your project.
Good to know
This action does not require to create a destination, you can use immediately after creating a project.
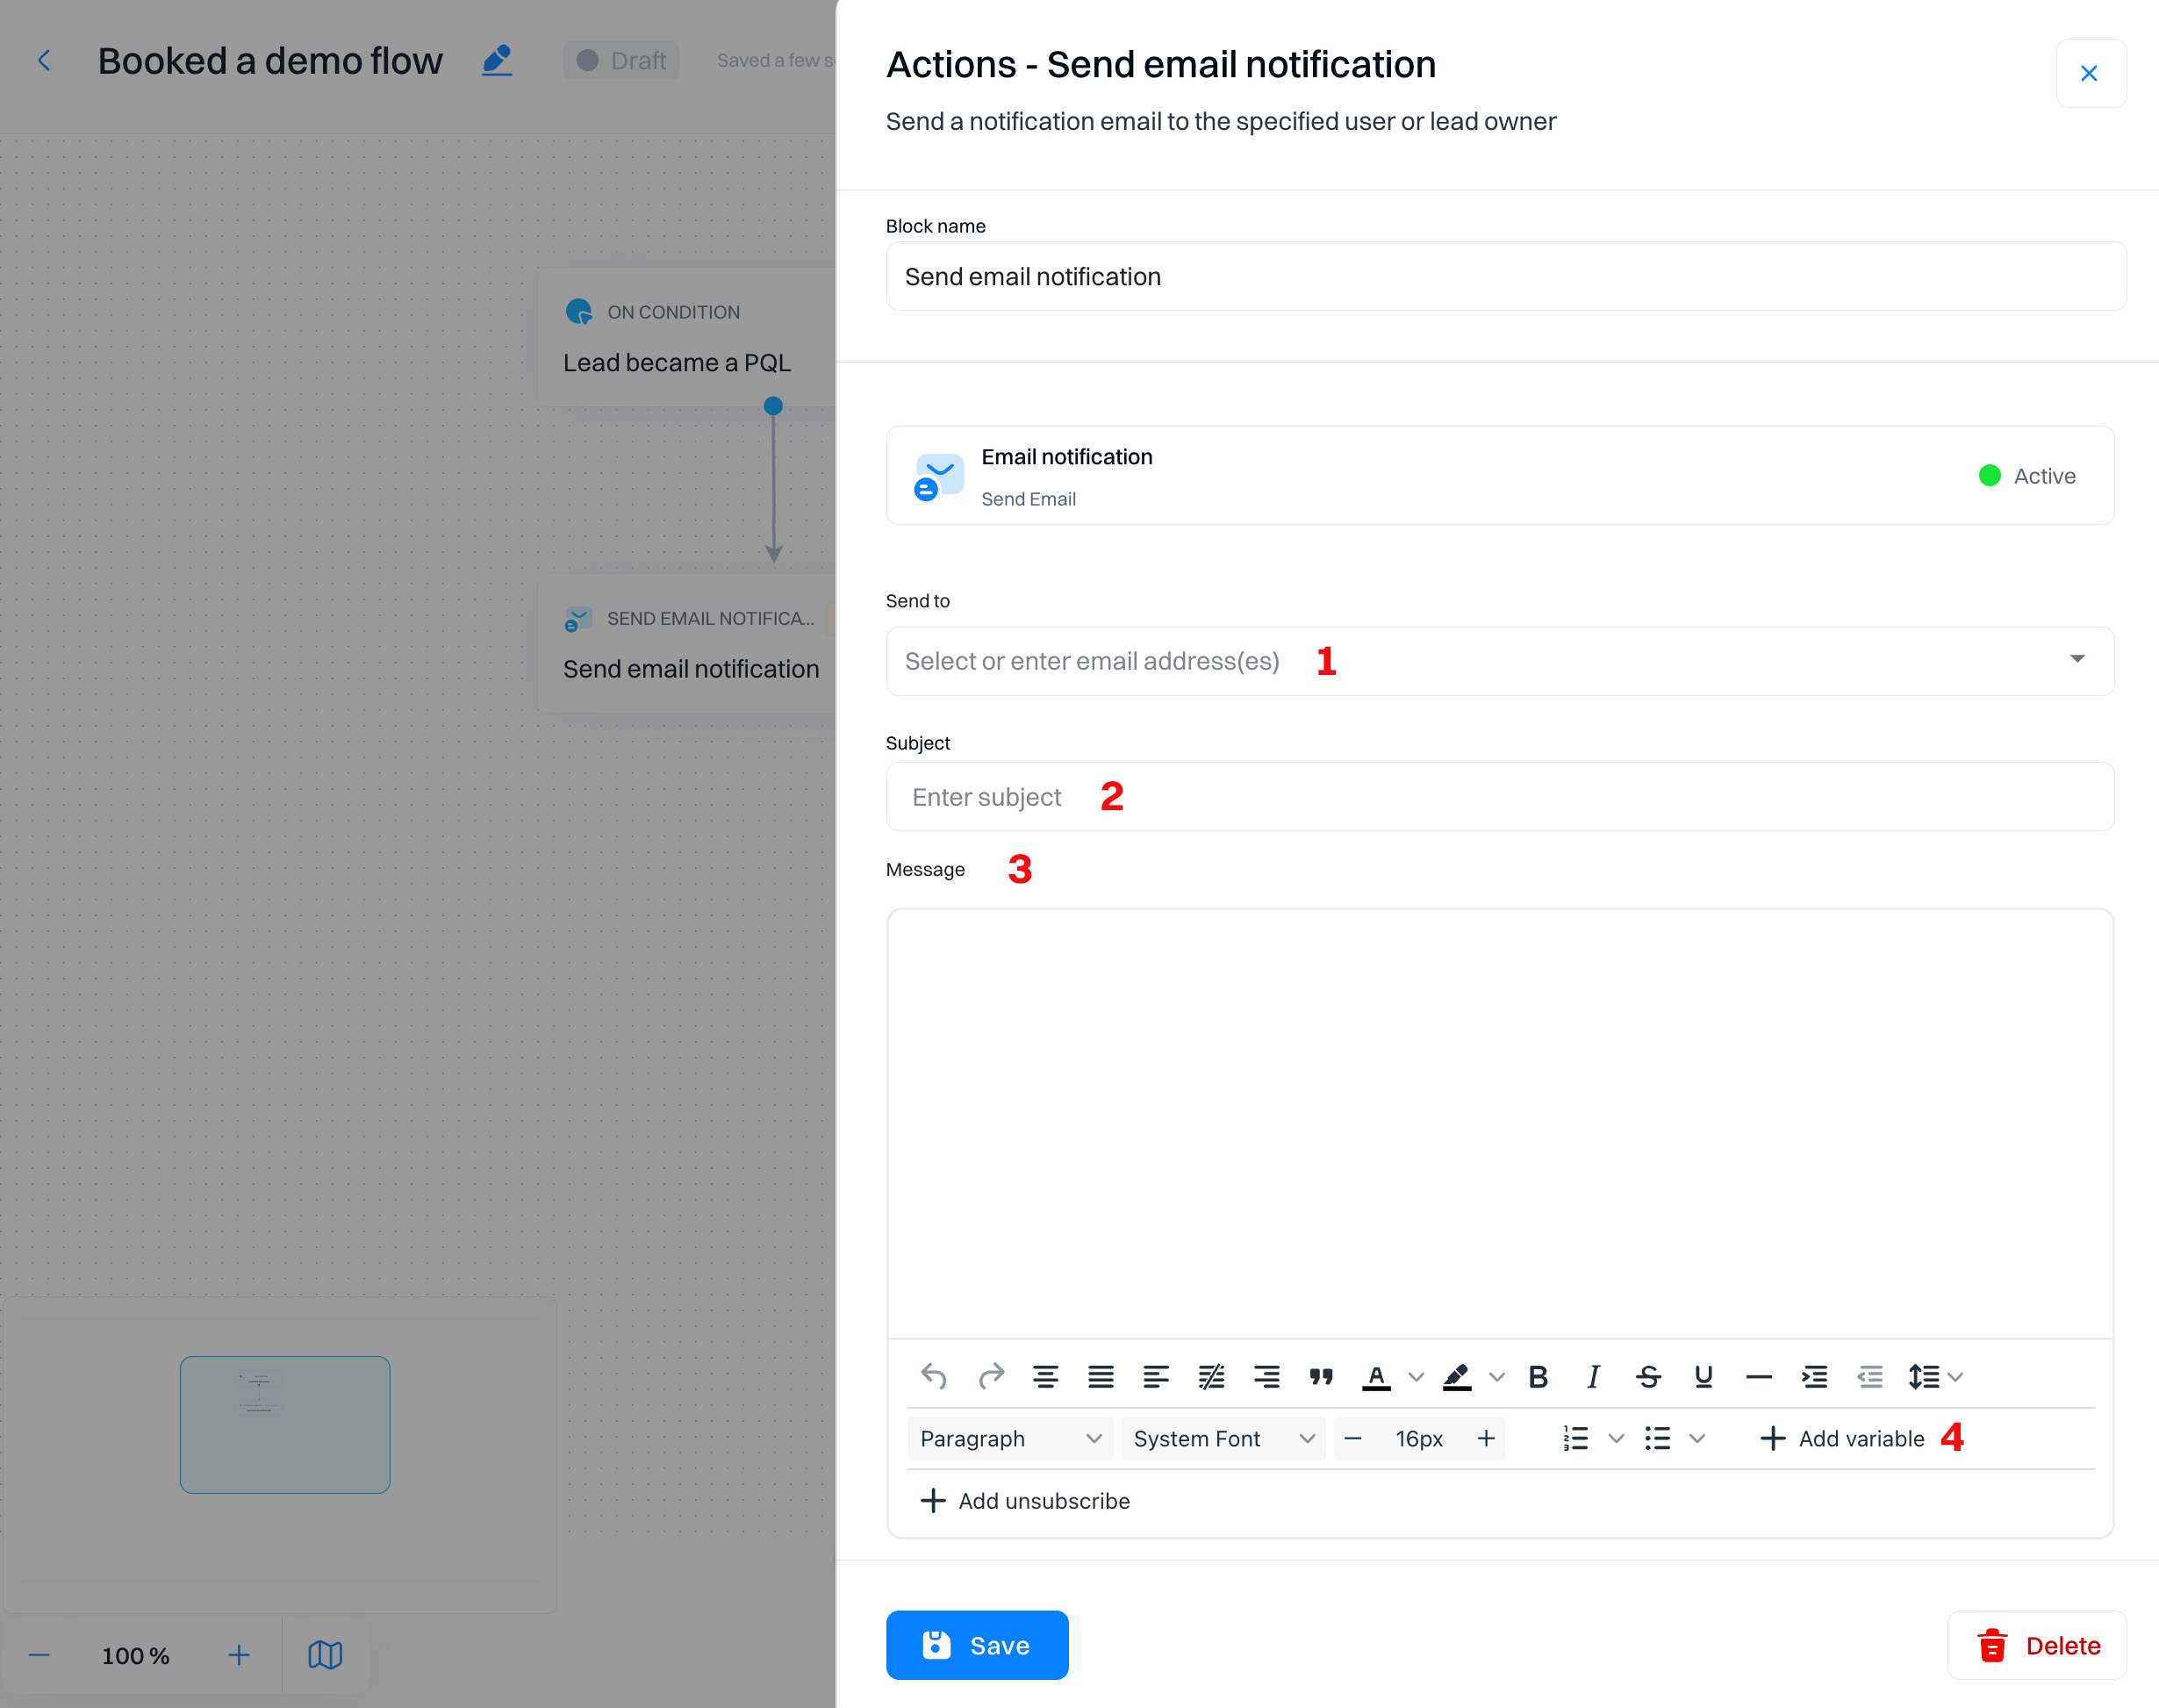
Configuration overview
-
Send to. You can select the email address(es) of the recipients. Note that you can only select project members as the recipients.
-
Subject. The subject line of the notification email.
-
Message. Compose the body of the email using a rich text editor that supports text formatting, links, and images.
-
Add variable. Insert dynamic content into the email, such as the recipient's name, company name, or other relevant data.
Use cases
-
Lead qualification updates. Notify the sales team when a lead moves from one qualification stage to another, such as transitioning from a "new lead" to a "qualified prospect," to enable timely and appropriate follow-up actions.
-
Customer account changes. Send automated emails to account managers when there are significant changes in customer account status, such as contract upgrades, renewals, or at-risk accounts, ensuring proactive account management.
-
Lost deal notifications. Alert the team when a deal is lost, including reasons for the loss where possible, to facilitate quick analysis and learning from the sales experience.
-
High-value deal alerts. Notify team members when high-value deals progress through the sales pipeline, ensuring that key stakeholders are aware and can provide necessary support or oversight.
-
Lead engagement levels. Send notifications to the marketing team when there's a notable increase or decrease in engagement levels from leads or segments, prompting targeted marketing actions or interventions.
-
Campaign interest changes. Alert the team when there are significant shifts in user interest regarding specific marketing campaigns, helping to adjust strategies in real-time based on user responses.
-
VIP customer activity. Notify relevant team members when VIP customers interact with marketing content or campaigns, ensuring personalized follow-up or enhanced customer service.
-
Subscriber status updates. Keep the team informed when subscribers opt-in or opt-out of newsletters or other communications, helping to maintain accurate and current marketing lists.
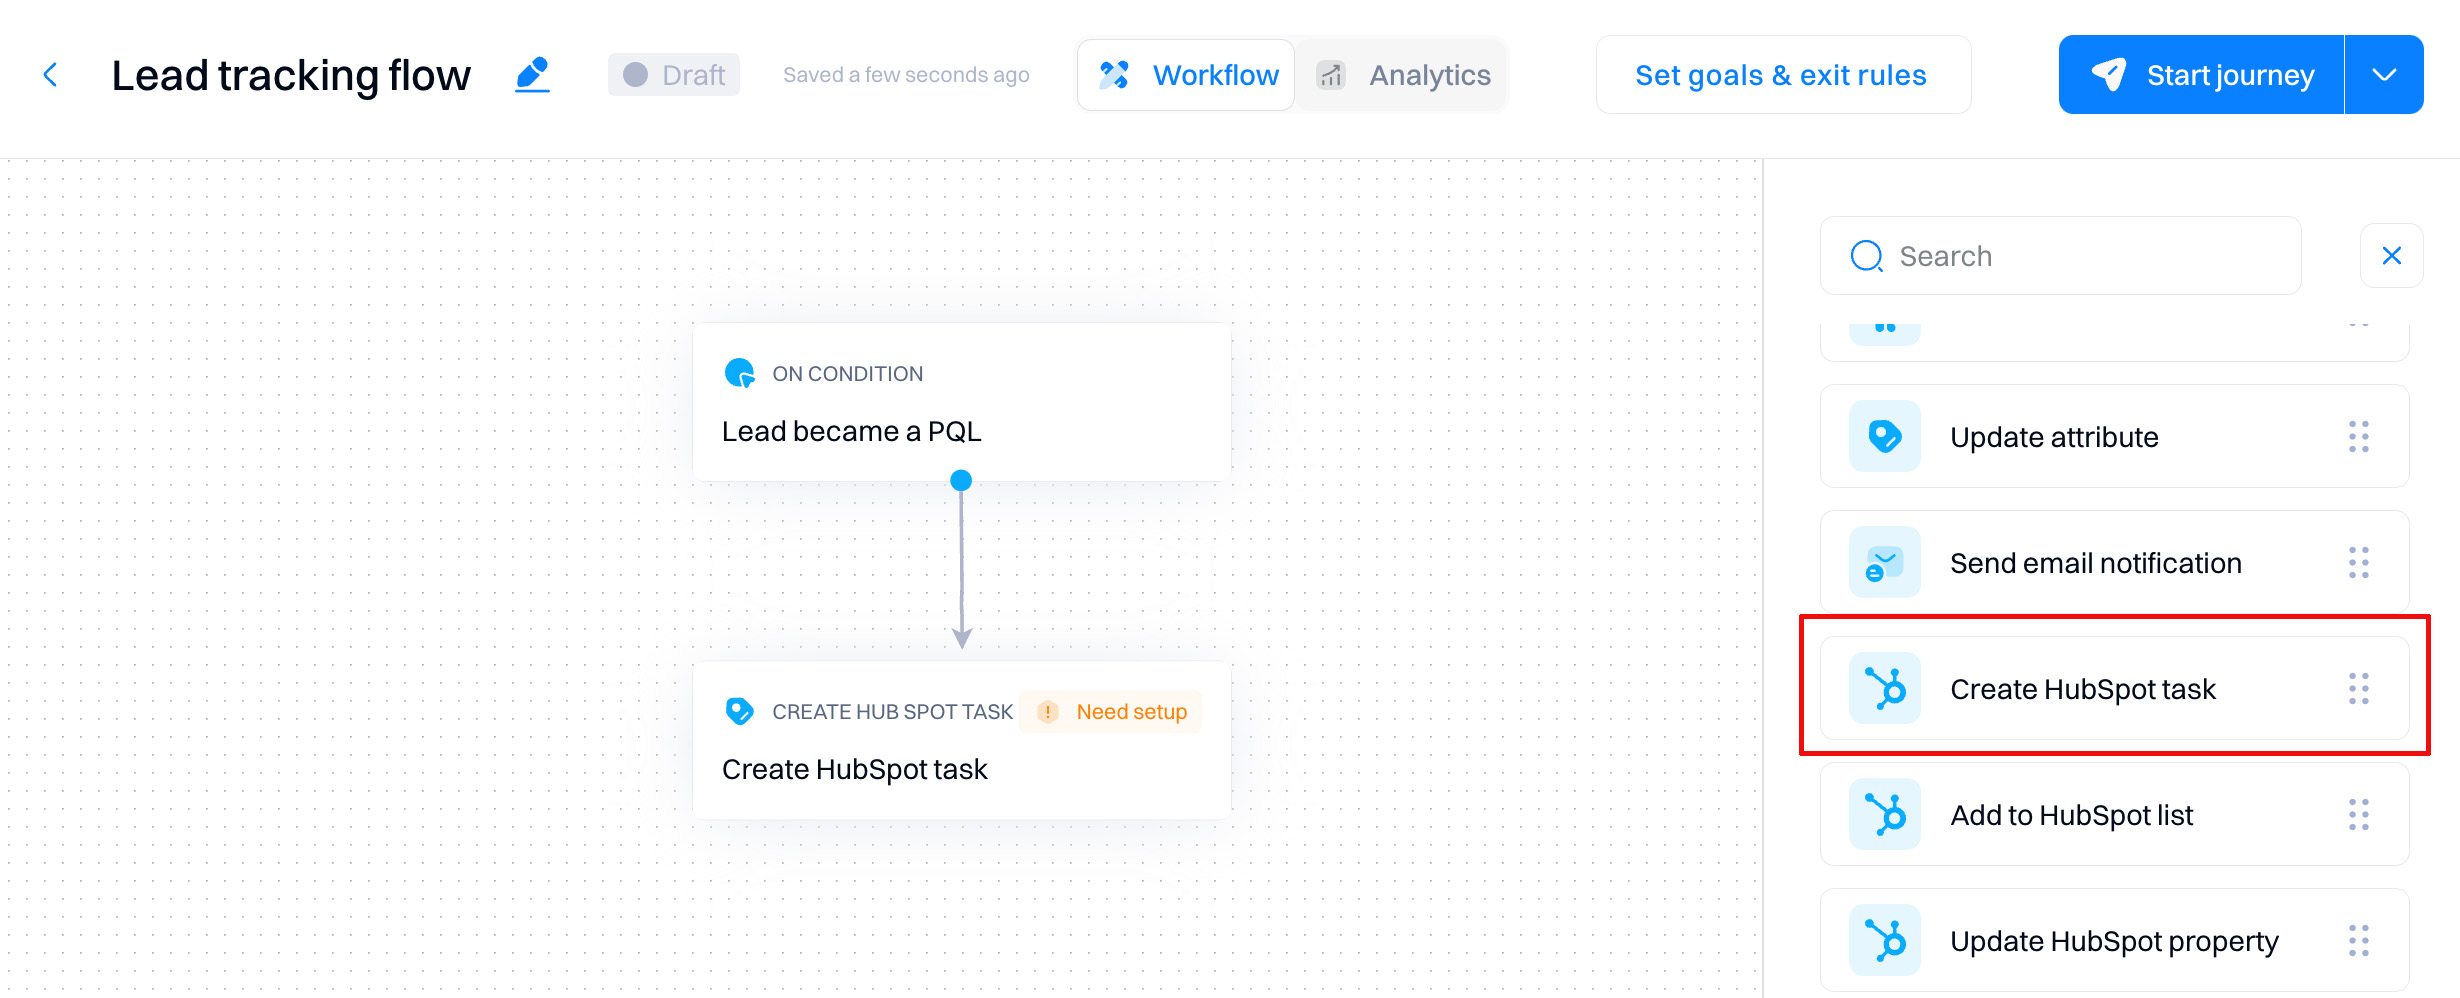
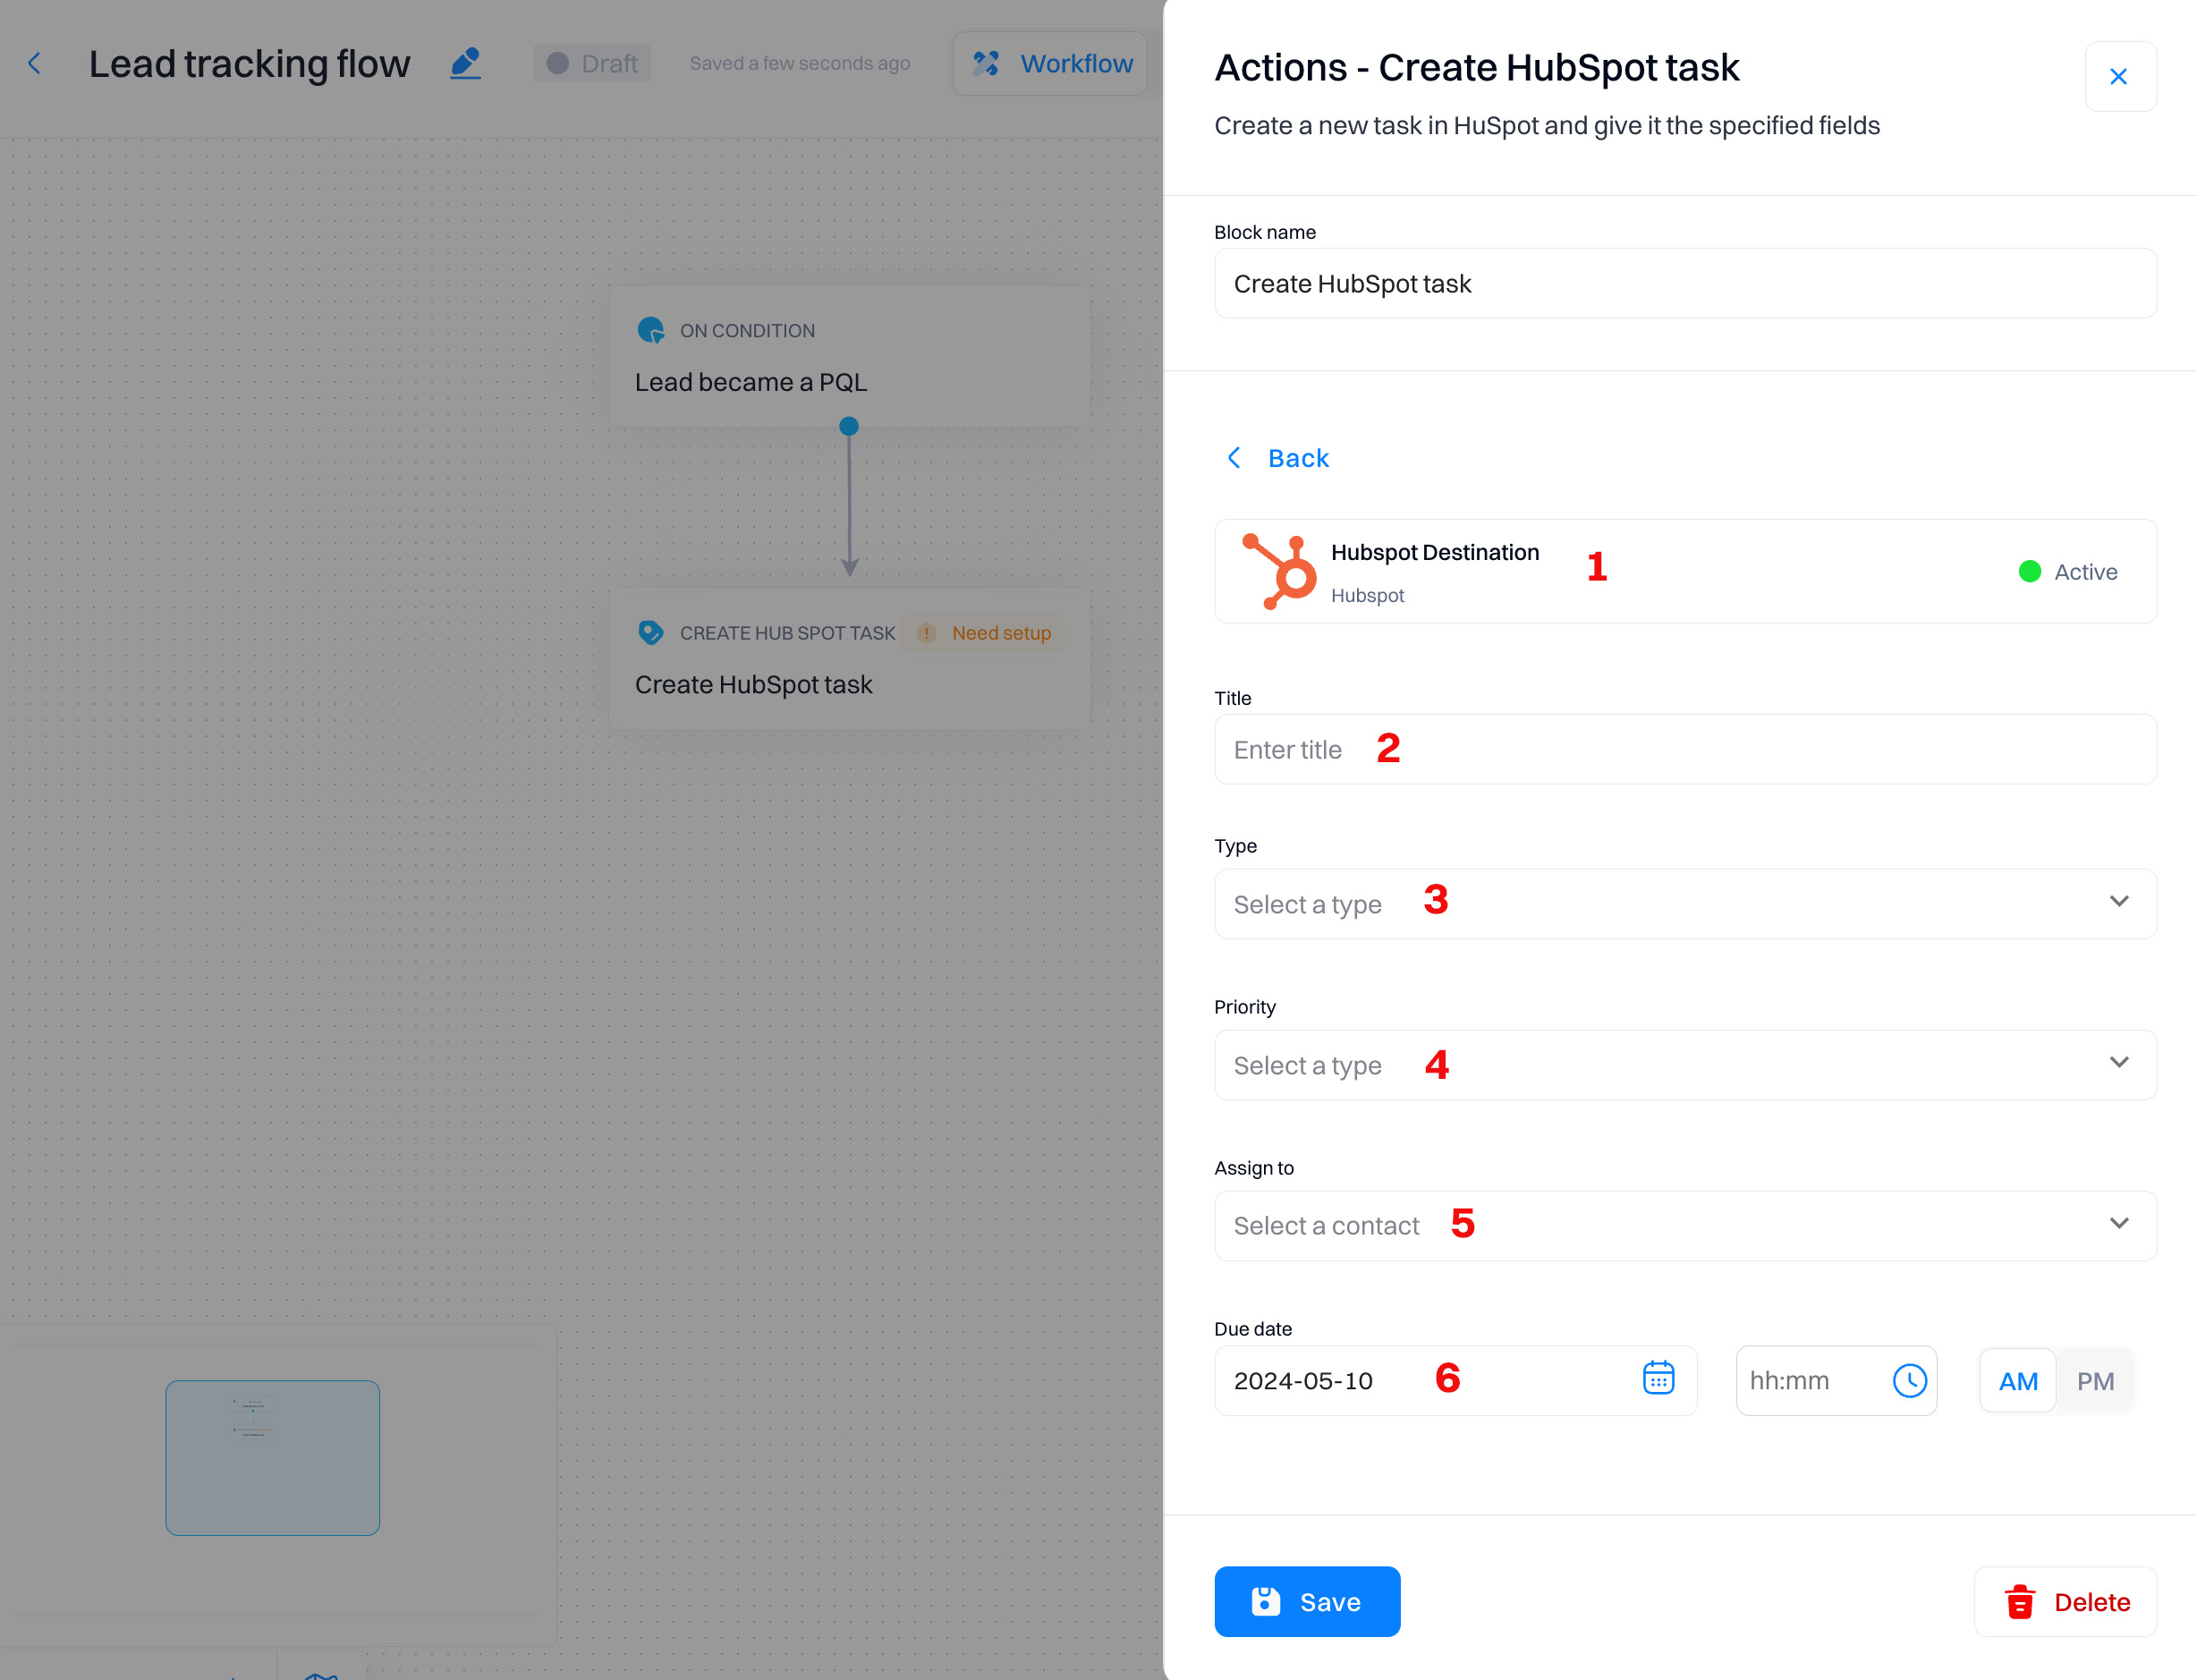
Create HubSpot task
This action creates a task in your HubSpot account.
Good to know
To use this action, you need to have a HubSpot account connected. Refer to HubSpot for a complete guide.
Configuration overview
-
Destination. Indicates the HubSpot destination and shows the current status (active/disabled).
-
Title. Field where you enter the task title to be created.
-
Type. Dropdown menu to select the type of the task (email/to do/call).
-
Priority. Dropdown menu to select the task's priority level (low/medium/high). Setting the priority helps manage the workflow, ensuring that high-priority tasks are attended to promptly.
-
Assign to. Dropdown menu to select a team member from your HubSpot account to whom the task will be assigned.
-
Due date. Field to set the due date and time for the task in HubSpot.
Use cases
-
Lead follow-up task creation. Automatically create tasks in HubSpot for sales representatives to follow up with leads who have recently downloaded content or attended a webinar, ensuring timely and systematic follow-up.
-
Renewal reminder tasks. Set up tasks to remind account managers about upcoming contract renewals. These tasks help initiate client discussions well before renewal, aiming to improve customer retention.
-
Post-demo follow-up. Automatically generate a task after a product demo has been conducted, prompting the sales rep to reach out to gather feedback or answer any remaining questions the prospect might have.
-
Engagement-based tasks. Create tasks for sales reps when a lead reaches a certain engagement threshold, such as multiple website visits or interactions with key content, indicating a potential readiness to engage in deeper sales conversations.
-
Task for inactive leads. Configure tasks for re-engagement of leads that have not interacted with the company's communications for a set period, prompting sales reps to reconnect and assess the lead's current needs and interest levels.
-
High-priority lead alert. Set up tasks in HubSpot when leads are scored above a certain threshold or show significant buying signals, ensuring that high-priority leads are engaged promptly by the sales team.
-
Cross-selling opportunities. Create tasks for sales representatives to explore cross-selling opportunities with existing customers who have shown interest in complementary products or services.
-
Account status review. Schedule regular tasks for account managers to review key accounts, ensure ongoing satisfaction, and identify new sales opportunities or potential issues early.
Add to HubSpot list
This action adds users that reach this block to a static contact list in your HubSpot account.
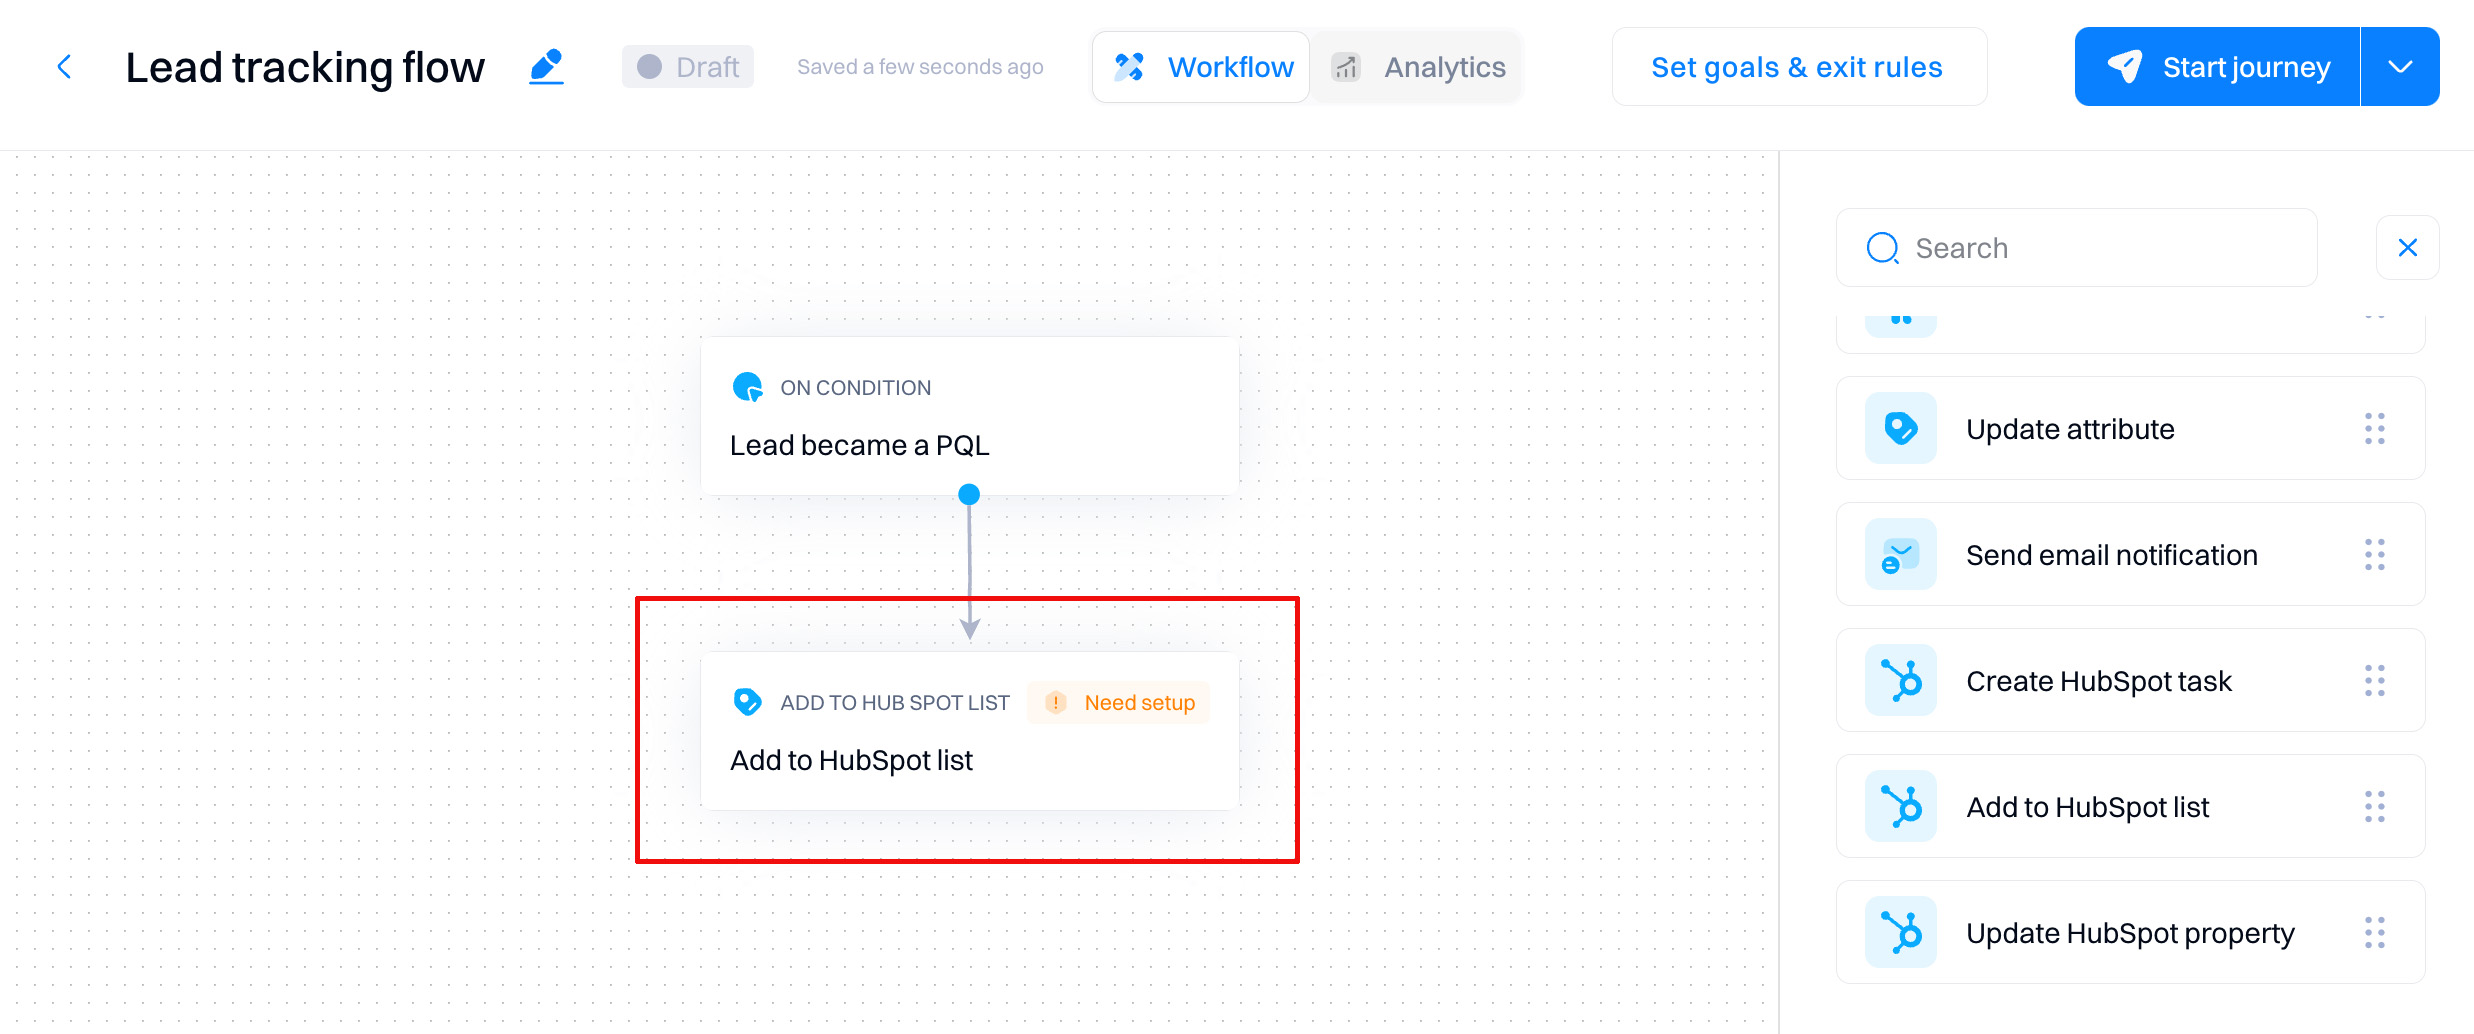
Configuration overview
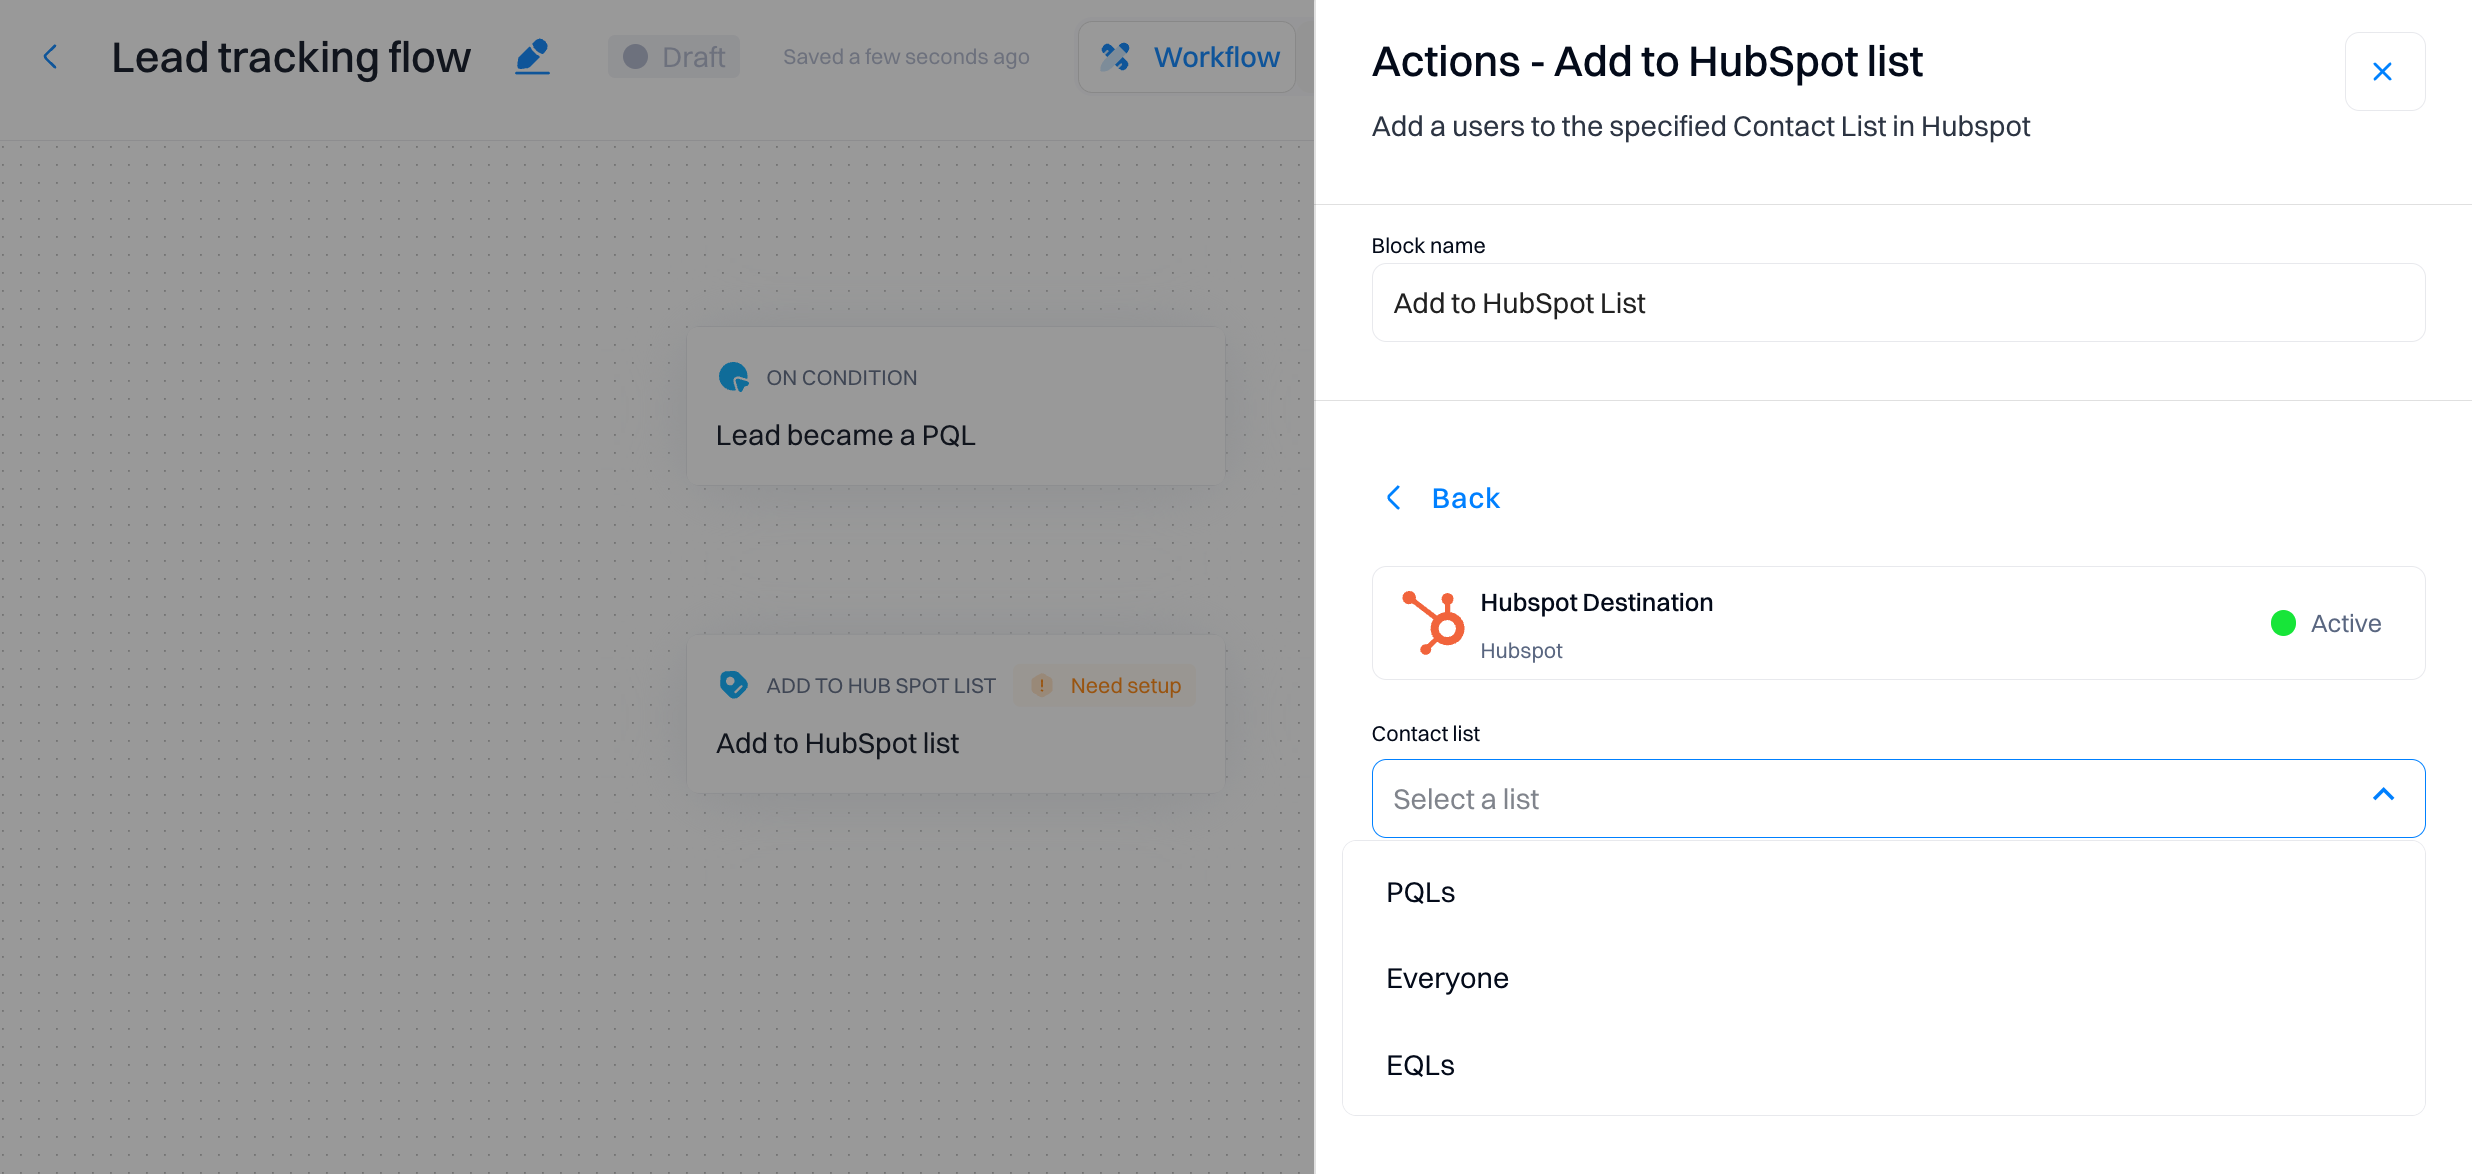
Under "Contact list," select a list in your HubSpot account to which you want to sync users who reach this block.
Good to know
The HubSpot list to which you are adding users is static, so it will only add new users once they reach the flow. Users will not be dynamically removed from this list if they stop matching the condition—it only considers the point in time when they reach the journey block step.
Use cases
-
Segment high-potential leads. Automatically add leads who meet specific criteria (e.g., industry, company size, engagement level) to a dedicated HubSpot list for targeted outreach, enhancing the focus on more promising prospects.
-
Prepare for product launches. Add contacts who have expressed interest in a particular product category to a list that can be used for direct marketing when new products launch, ensuring timely and relevant communication.
-
Manage event follow-ups. After an event or webinar, add attendees to a HubSpot list to streamline the follow-up process, ensuring all participants receive tailored communication based on their attendance.
-
Track campaign interactions. Add users who interact with a specific marketing campaign to a HubSpot list, allowing sales teams to identify and engage with the most engaged prospects quickly.
-
Prioritize lead nurturing. Segment leads based on their actions, such as downloading a white paper or spending significant time on high-value web pages. Add them to specific nurture lists in HubSpot for customized follow-up strategies.
-
Re-engage cold leads. Add leads that have gone cold to a re-engagement list if they suddenly show renewed activity, enabling targeted efforts to warm them up again.
-
Organize regional sales efforts. Sort leads by geographic regions and add them to respective lists in HubSpot for regional sales teams to engage with more localized and relevant approaches.
-
Seasonal promotion preparation. For leads who have shown interest in seasonal offers in the past, add them to a list that will be used for similar upcoming promotions, maximizing the impact of seasonal sales strategies.
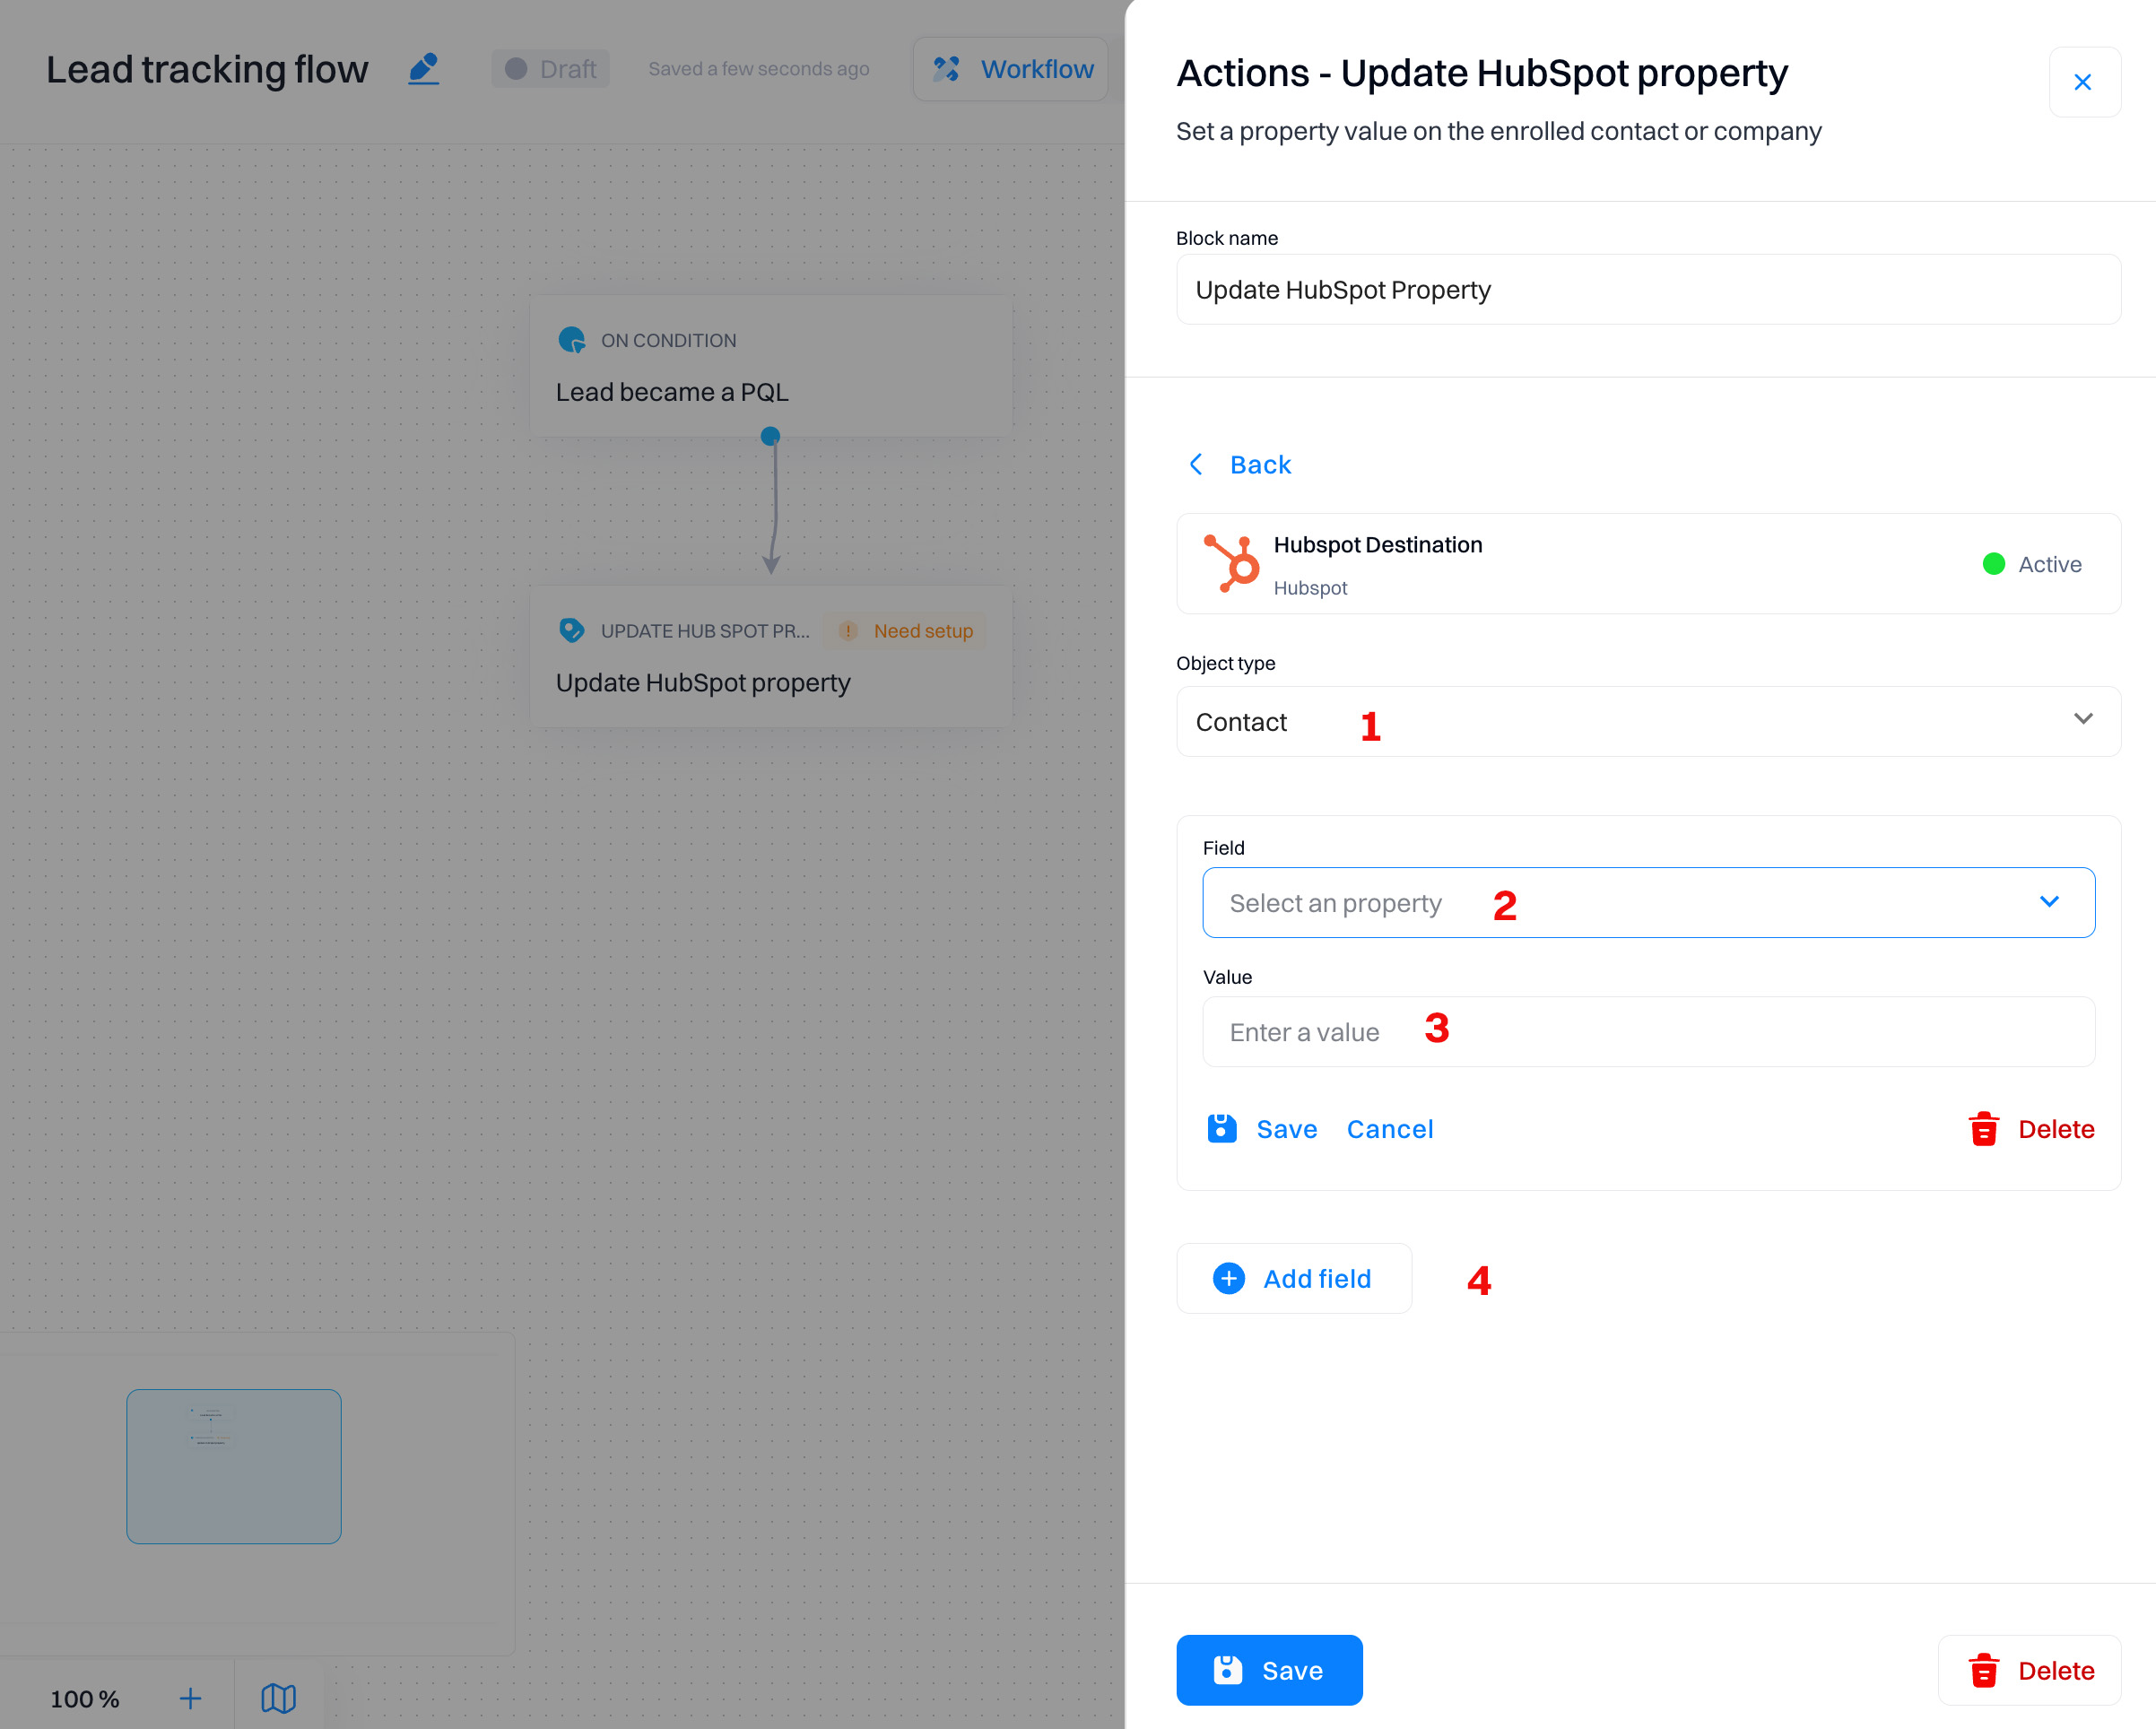
Update HubSpot property
Once a user or account reaches this step, this block updates a selected contact or company property in HubSpot.
Configuration overview
-
Object type. Select whether the property update applies to a Contact or a Company. This selection is crucial as it determines the type of entity in HubSpot (contact or company) that the property update will affect.
-
Field. Dropdown menu to select the specific property to update. Allows for precise targeting of which property needs to be updated, ensuring that the correct data field is modified according to the workflow requirements.
-
Value. Input field to enter the new value for the selected property.
-
Add field. Option to add additional property updates within the same action. This enables multiple property updates to be configured at once, reducing the need for multiple actions.
Use cases
-
Update lead status. Automatically update the lead status property in HubSpot when a lead progresses through different sales funnel stages, such as from 'New' to 'Qualified' or 'Qualified' to 'Opportunity'. This keeps the CRM updated in real-time, enhancing lead management effectiveness.
-
Record event attendance. Update a property in HubSpot for contacts who attend key events like webinars or demos, marking them as attended in their contact records. This helps in segmenting the audience for post-event follow-up actions.
-
Adjust lead scores. Dynamically update the lead score property based on specific interactions or engagement levels with marketing content or sales follow-ups. Higher engagement actions can trigger increases in lead scores, prioritizing leads for sales efforts.
-
Tag high-priority leads. Tag leads as 'High Priority' in HubSpot when they meet certain criteria, such as budget approval or decision-making power indicated during interactions. This allows sales teams to focus efforts on leads most likely to close.
-
Log product interest. Update the product interest property when a lead expresses interest in specific products during interactions or through form submissions. This information can guide personalized sales pitches and product recommendations.
-
Update contact preferences. Modify contact preferences in HubSpot based on feedback or requests made by the contact during sales interactions, ensuring that communication strategies align with customer preferences.
-
Mark account status changes. Update the account status property when there are significant changes in the account, such as upgrades, downsizing, or other modifications, to keep all relevant team members informed and responsive.
Update attribute
Once reached, this block updates the selected user or account attribute values.
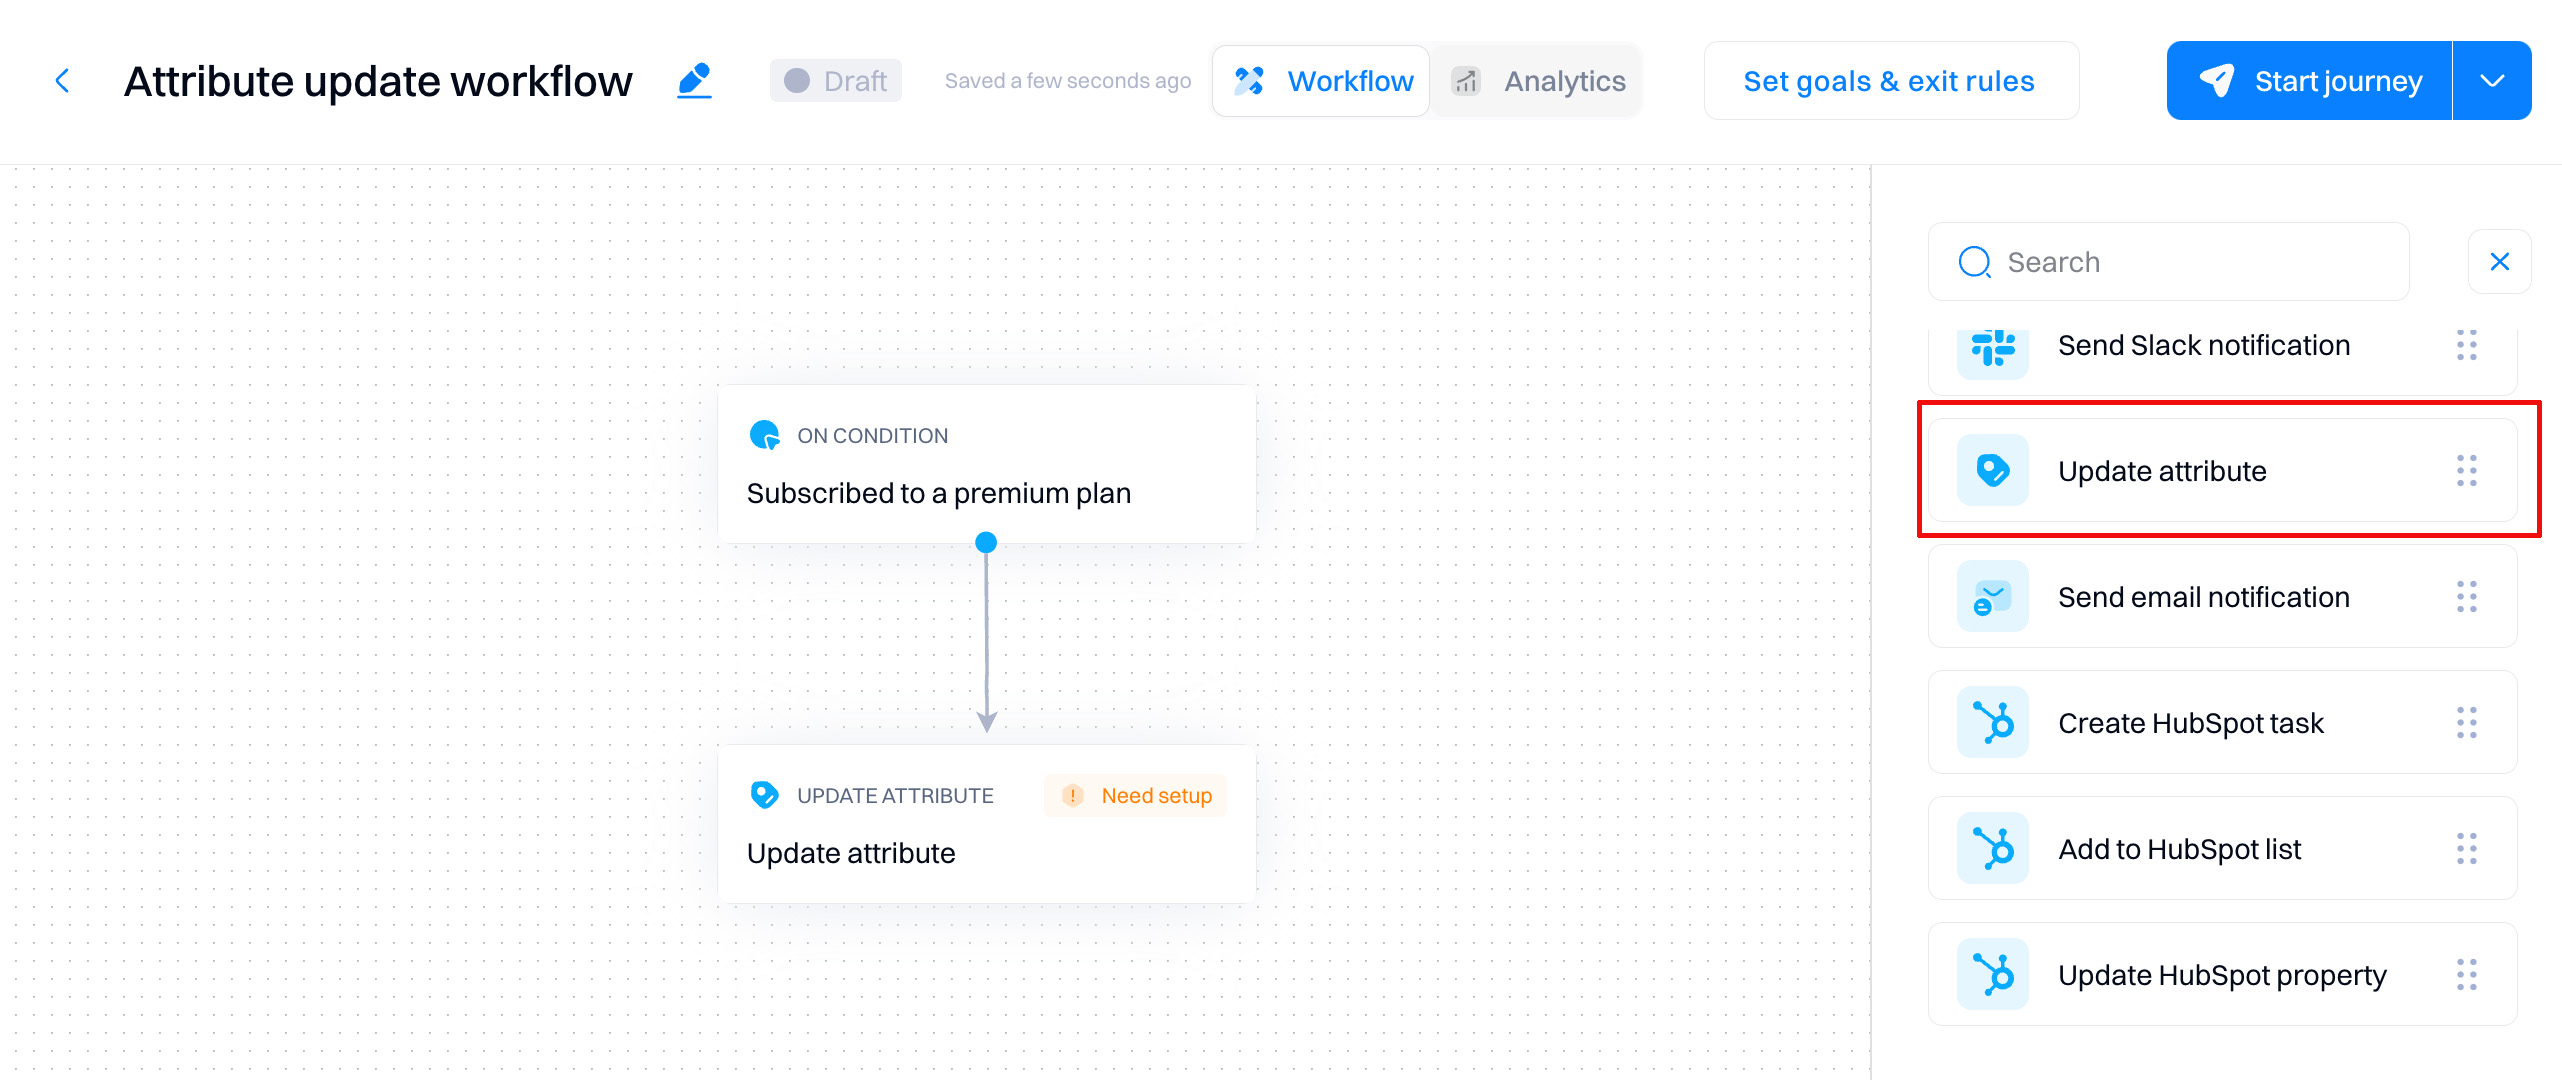
Configuration overview

- Select attribute. Select an attribute you want to update. You can select from user, account, or calculated attributes from the list.
- Enter a value. You can either enter a static value (e.g., "Product qualified lead") or, for advanced use cases, add a dynamic value based on variables.
For a dynamic value, click the plus icon under a User attribute or "Account attribute" in the "Sample data" section to insert the liquid variable into the input field.
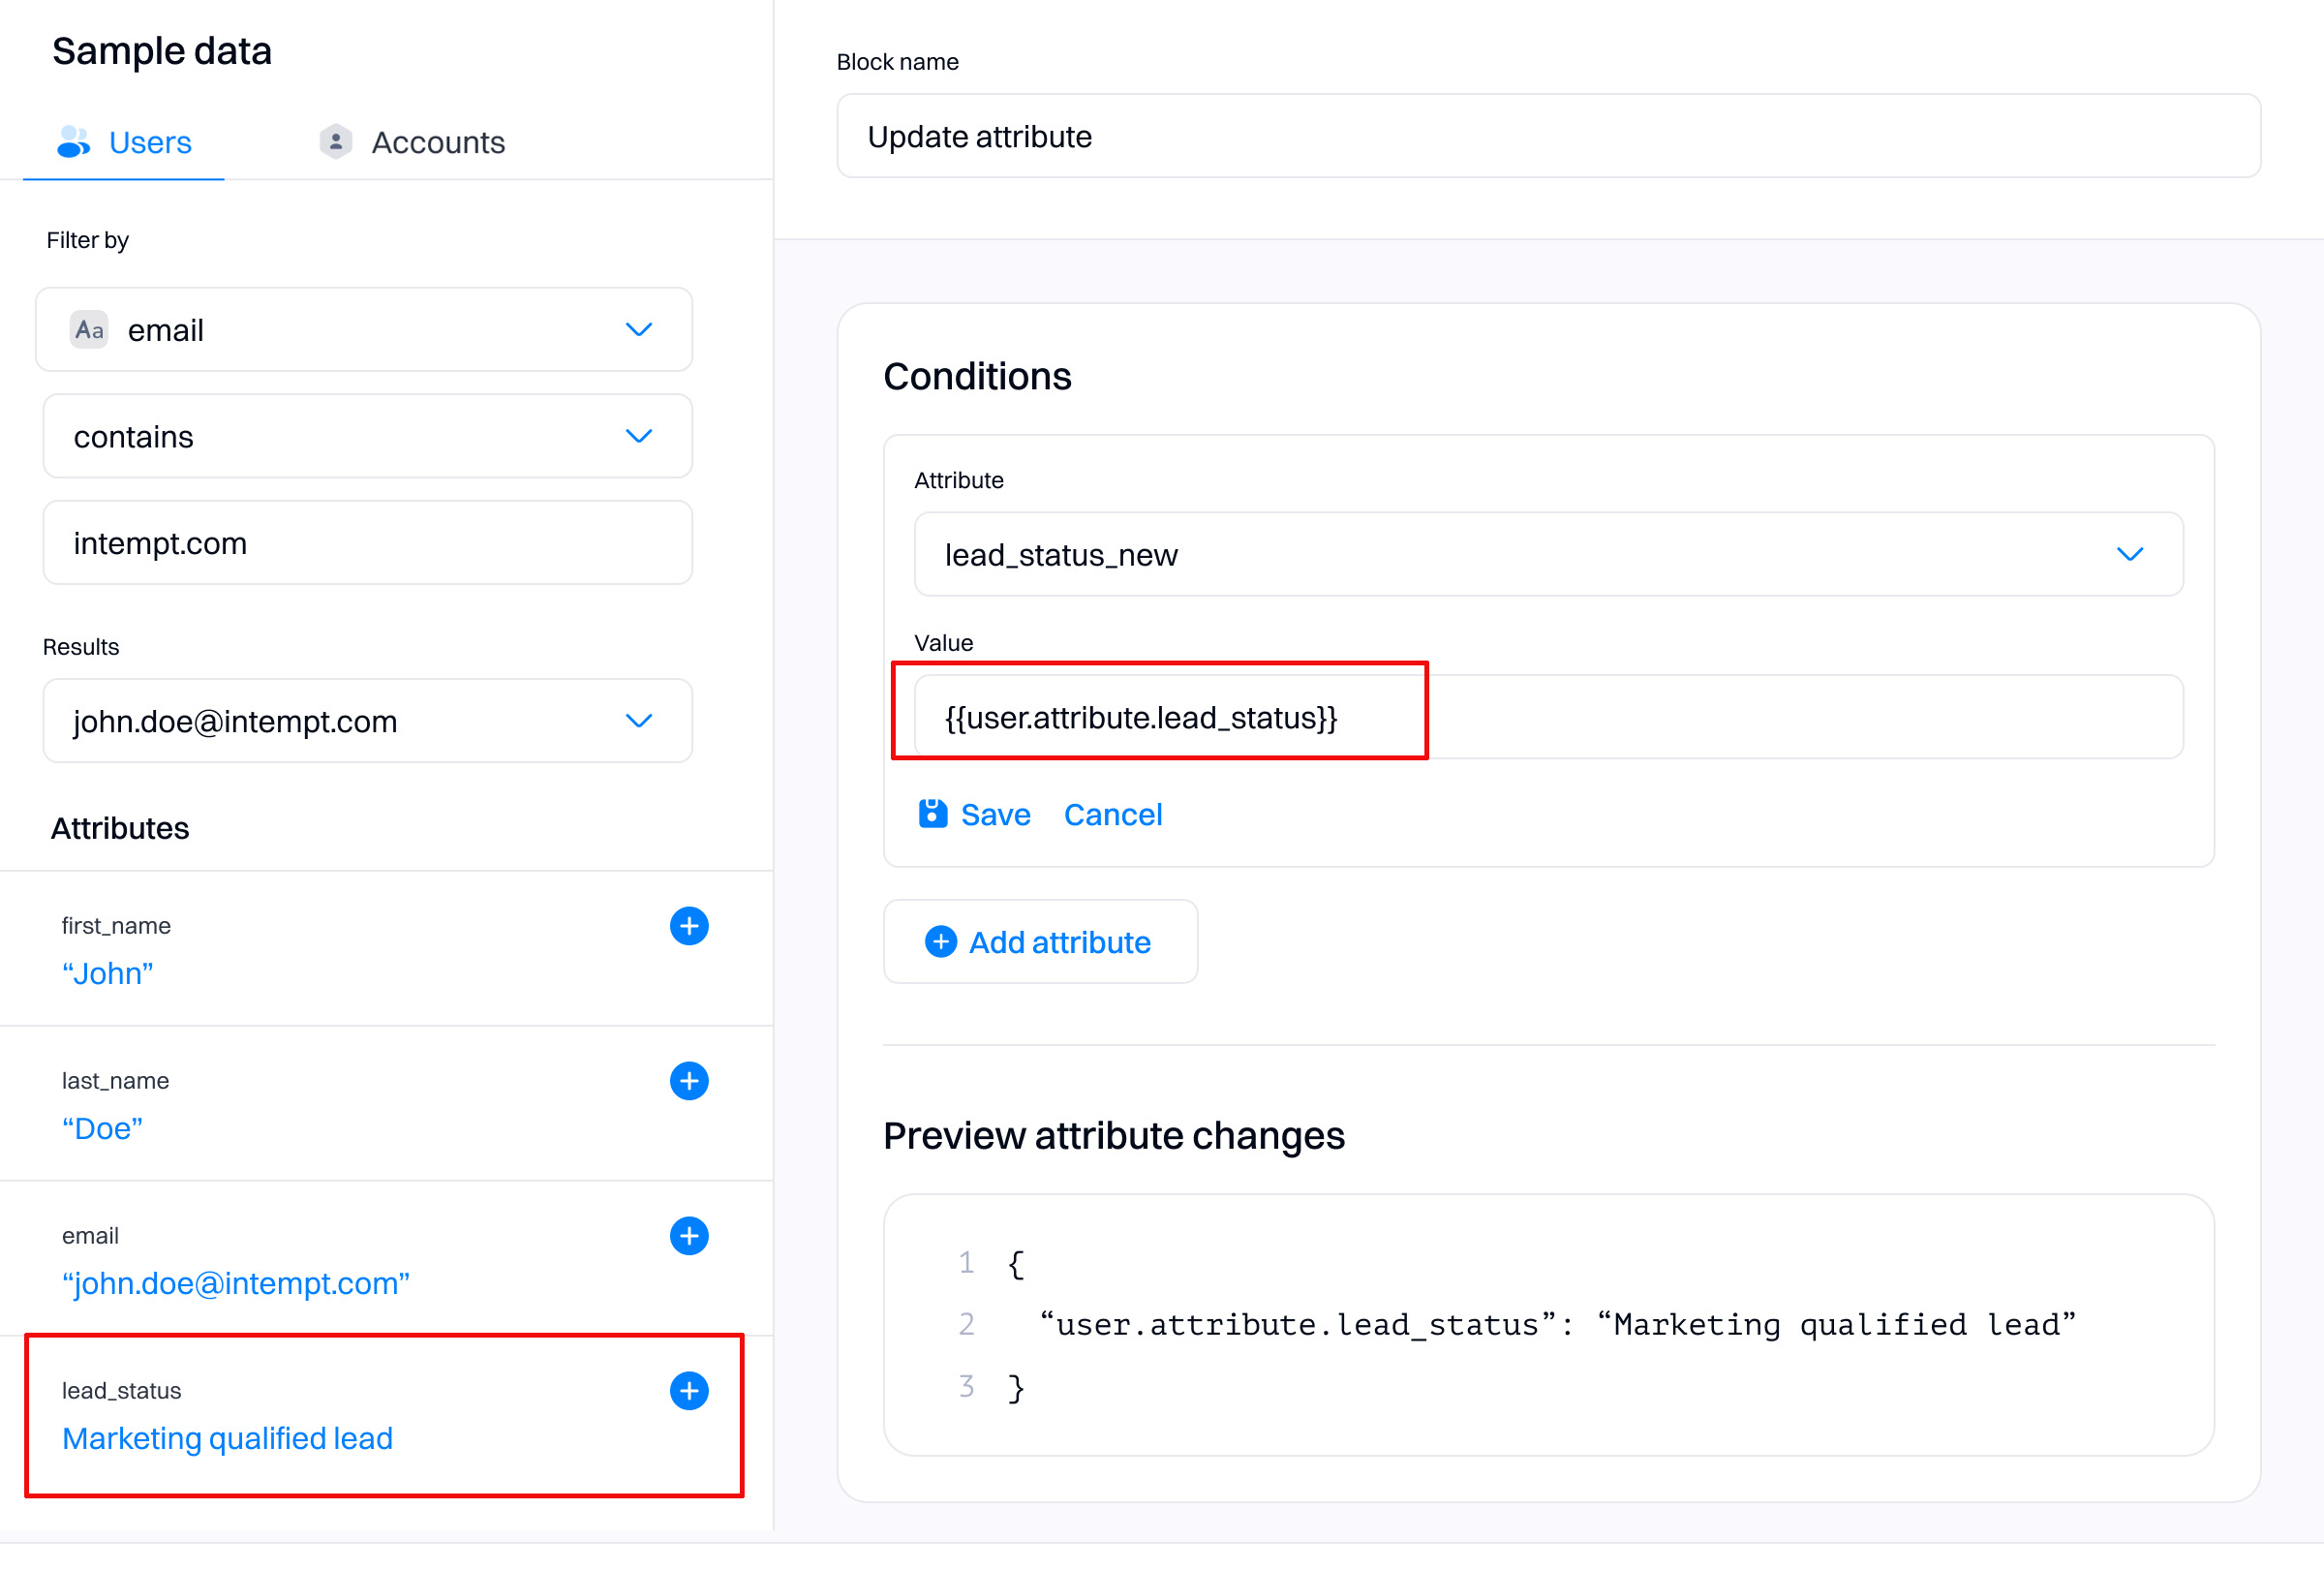
Good to know
Dynamic values are useful if you want to update an attribute dynamically with another attribute's value, for example updating an empty lead score attribute with a Fit & Activity score if user enters a journey.
- Add attribute. You can add multiple attributes to the action to update their values simultaneously without requiring you to create multiple actions.
- Preview changes. You can preview the attribute value, which will be changed for a selected user or account (under "Sample data") if they enter this action.
- Sample data. Under this section, you can select a specific user or an account to preview their attributes. This section is useful in understanding which attributes have values and lets you preview how the attribute will be changed for a selected user or account.
- Users/accounts. Switch between user or account level. Depending on your selection, you can select user or account attributes.
- Filter by. Filter users or accounts based on a selected attribute's value.
- Results. Users or accounts that match the specified filter criteria will displayed under the "Results" dropdown.
- Attributes. A list of all attributes for a selected user or account in the "Results" dropdown.
Use cases
-
Update lead qualification status. Automatically update the qualification status of leads based on their engagement level or interaction with specific content, ensuring the sales team prioritizes the most engaged leads.
-
Adjust lead scores. Dynamically update lead scores based on new interactions or behaviors, such as visiting high-value pages or downloading key resources, helping sales prioritize leads effectively.
-
Track campaign interactions. Update user attributes to reflect interactions with specific marketing campaigns, allowing for refined segmentation and targeted follow-up campaigns.
-
Record event participation. After a user attends a webinar or event, update their attribute to reflect participation, which can be used for targeted post-event marketing efforts.
-
Modify customer preferences. Update customer preference attributes based on their latest interactions or feedback, allowing marketing to tailor communications more precisely.
-
Log product interest changes. When a user shows interest in different products or services, update their product interest attribute, helping sales to customize their sales pitches and recommendations.
-
Renewal readiness tracking. For accounts nearing their renewal date, update attributes to reflect their renewal readiness based on recent engagement and satisfaction indicators, aiding account management strategies.
-
Customer lifecycle stage progression. Update the lifecycle stage attribute when users progress from one stage to another, such as moving from 'prospect' to 'customer,' to keep marketing and sales aligned on customer status.
-
Segmentation for targeted promotions. Update attributes related to user behavior or demographics to refine segmentation for targeted promotions, ensuring that marketing messages are relevant and effective.
-
Account health updates. For B2B sales, update the account health attribute based on recent interactions, support tickets, or satisfaction scores to help account managers prioritize outreach and retention strategies.
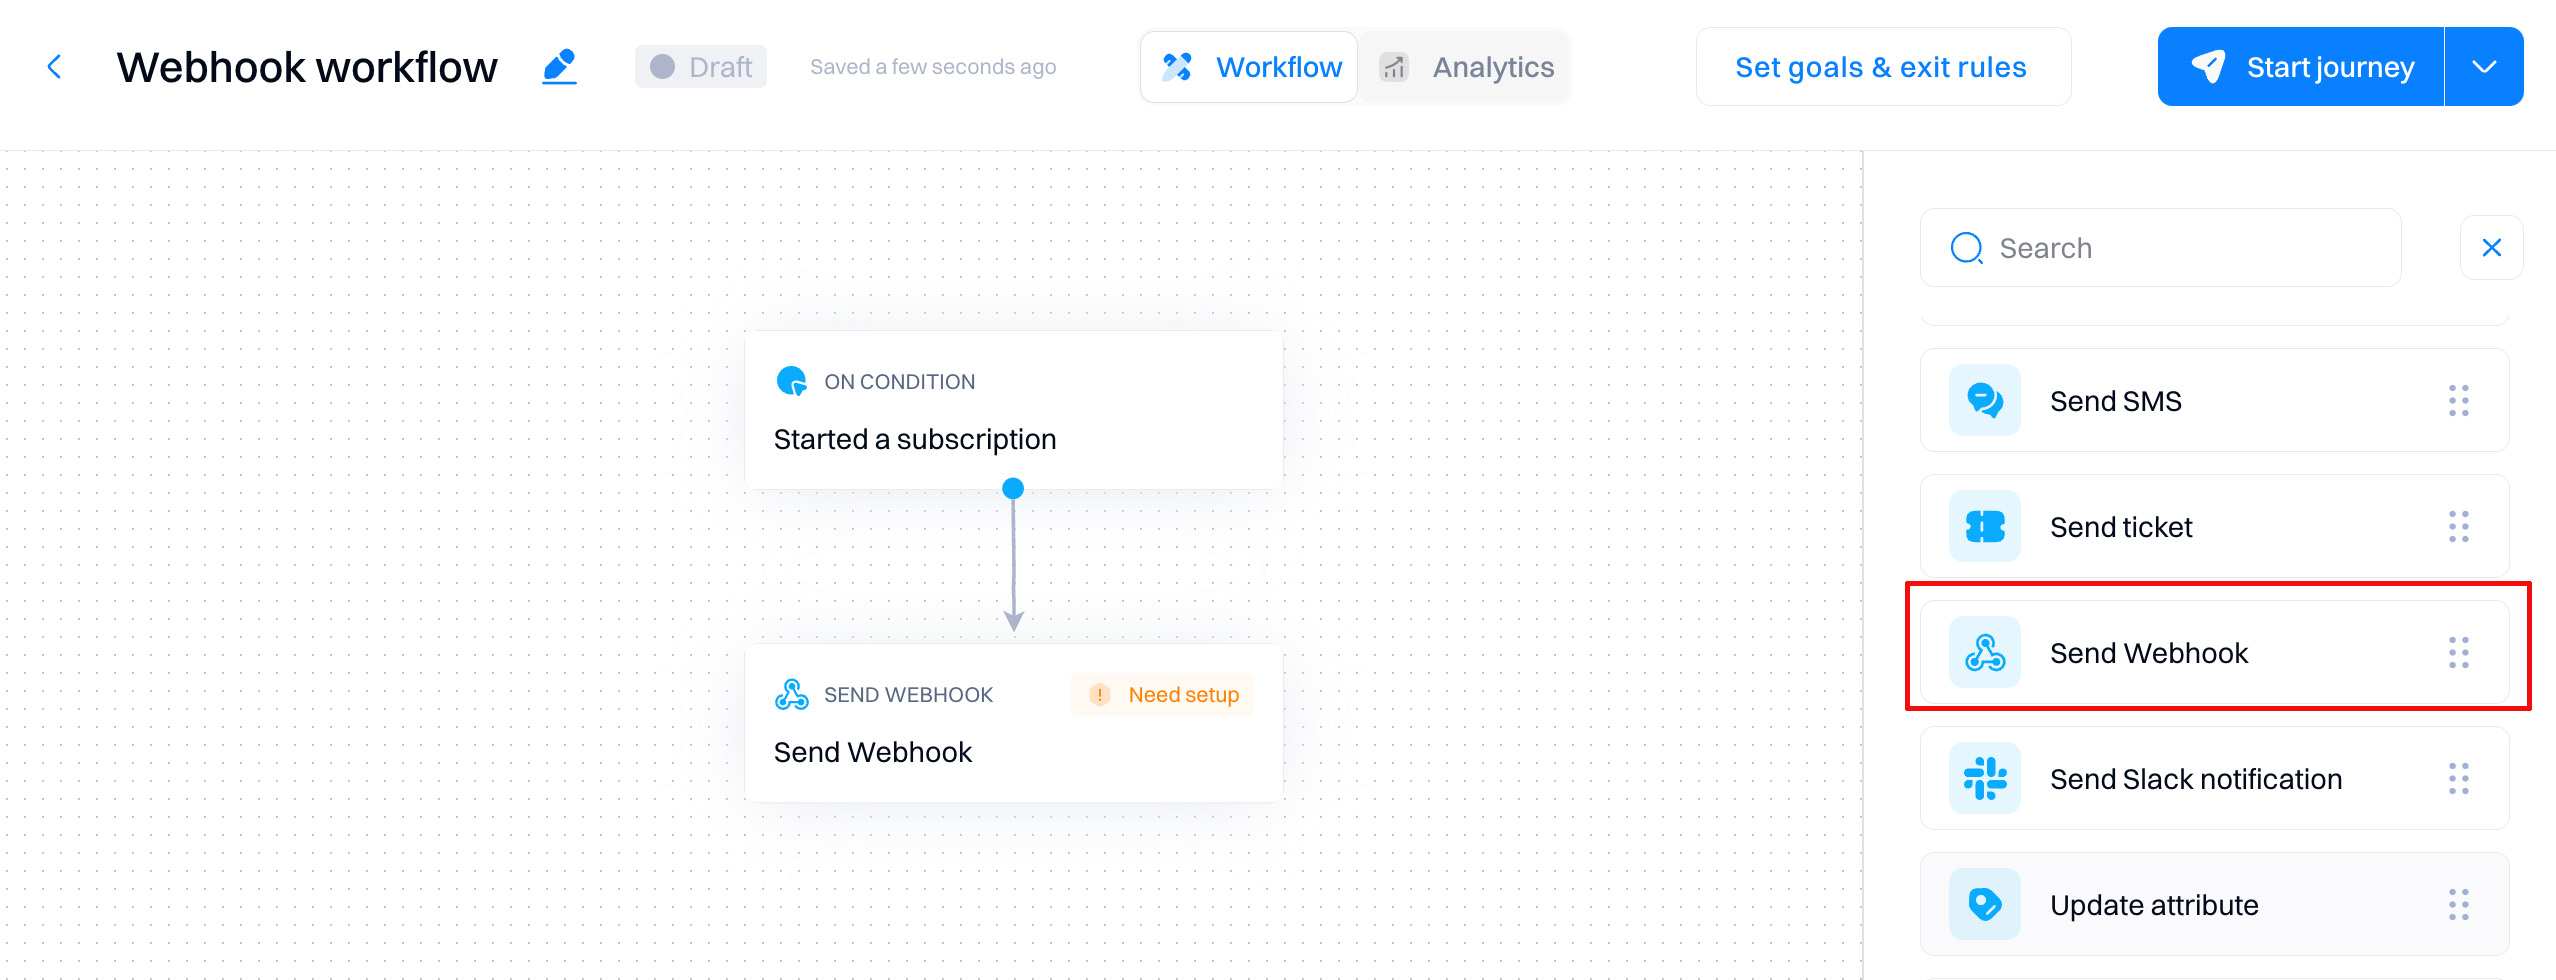
Send Webhook
A webhook allows one application (like Intempt) to send real-time data to another application or system whenever a specific event or trigger occurs.
Good to know
Let’s assume you have created a journey with a trigger like a new user signing up, a payment being made, or a form being filled in your campaign. By adding the webhook block in the journey, as soon as a user signs up or matches the trigger, the webhook is triggered.
This initiates the process of sending a welcome email as soon as a user registers. It ensures that the welcome email is sent in real-time, creating a positive and seamless user experience. Additionally, the webhook can be customized to include specific data or instructions for the welcome email, making it highly personalized for each user.
Configuration overview
Before creating a webhook block, you must ensure that you have created a webhook destination with the required configuration.
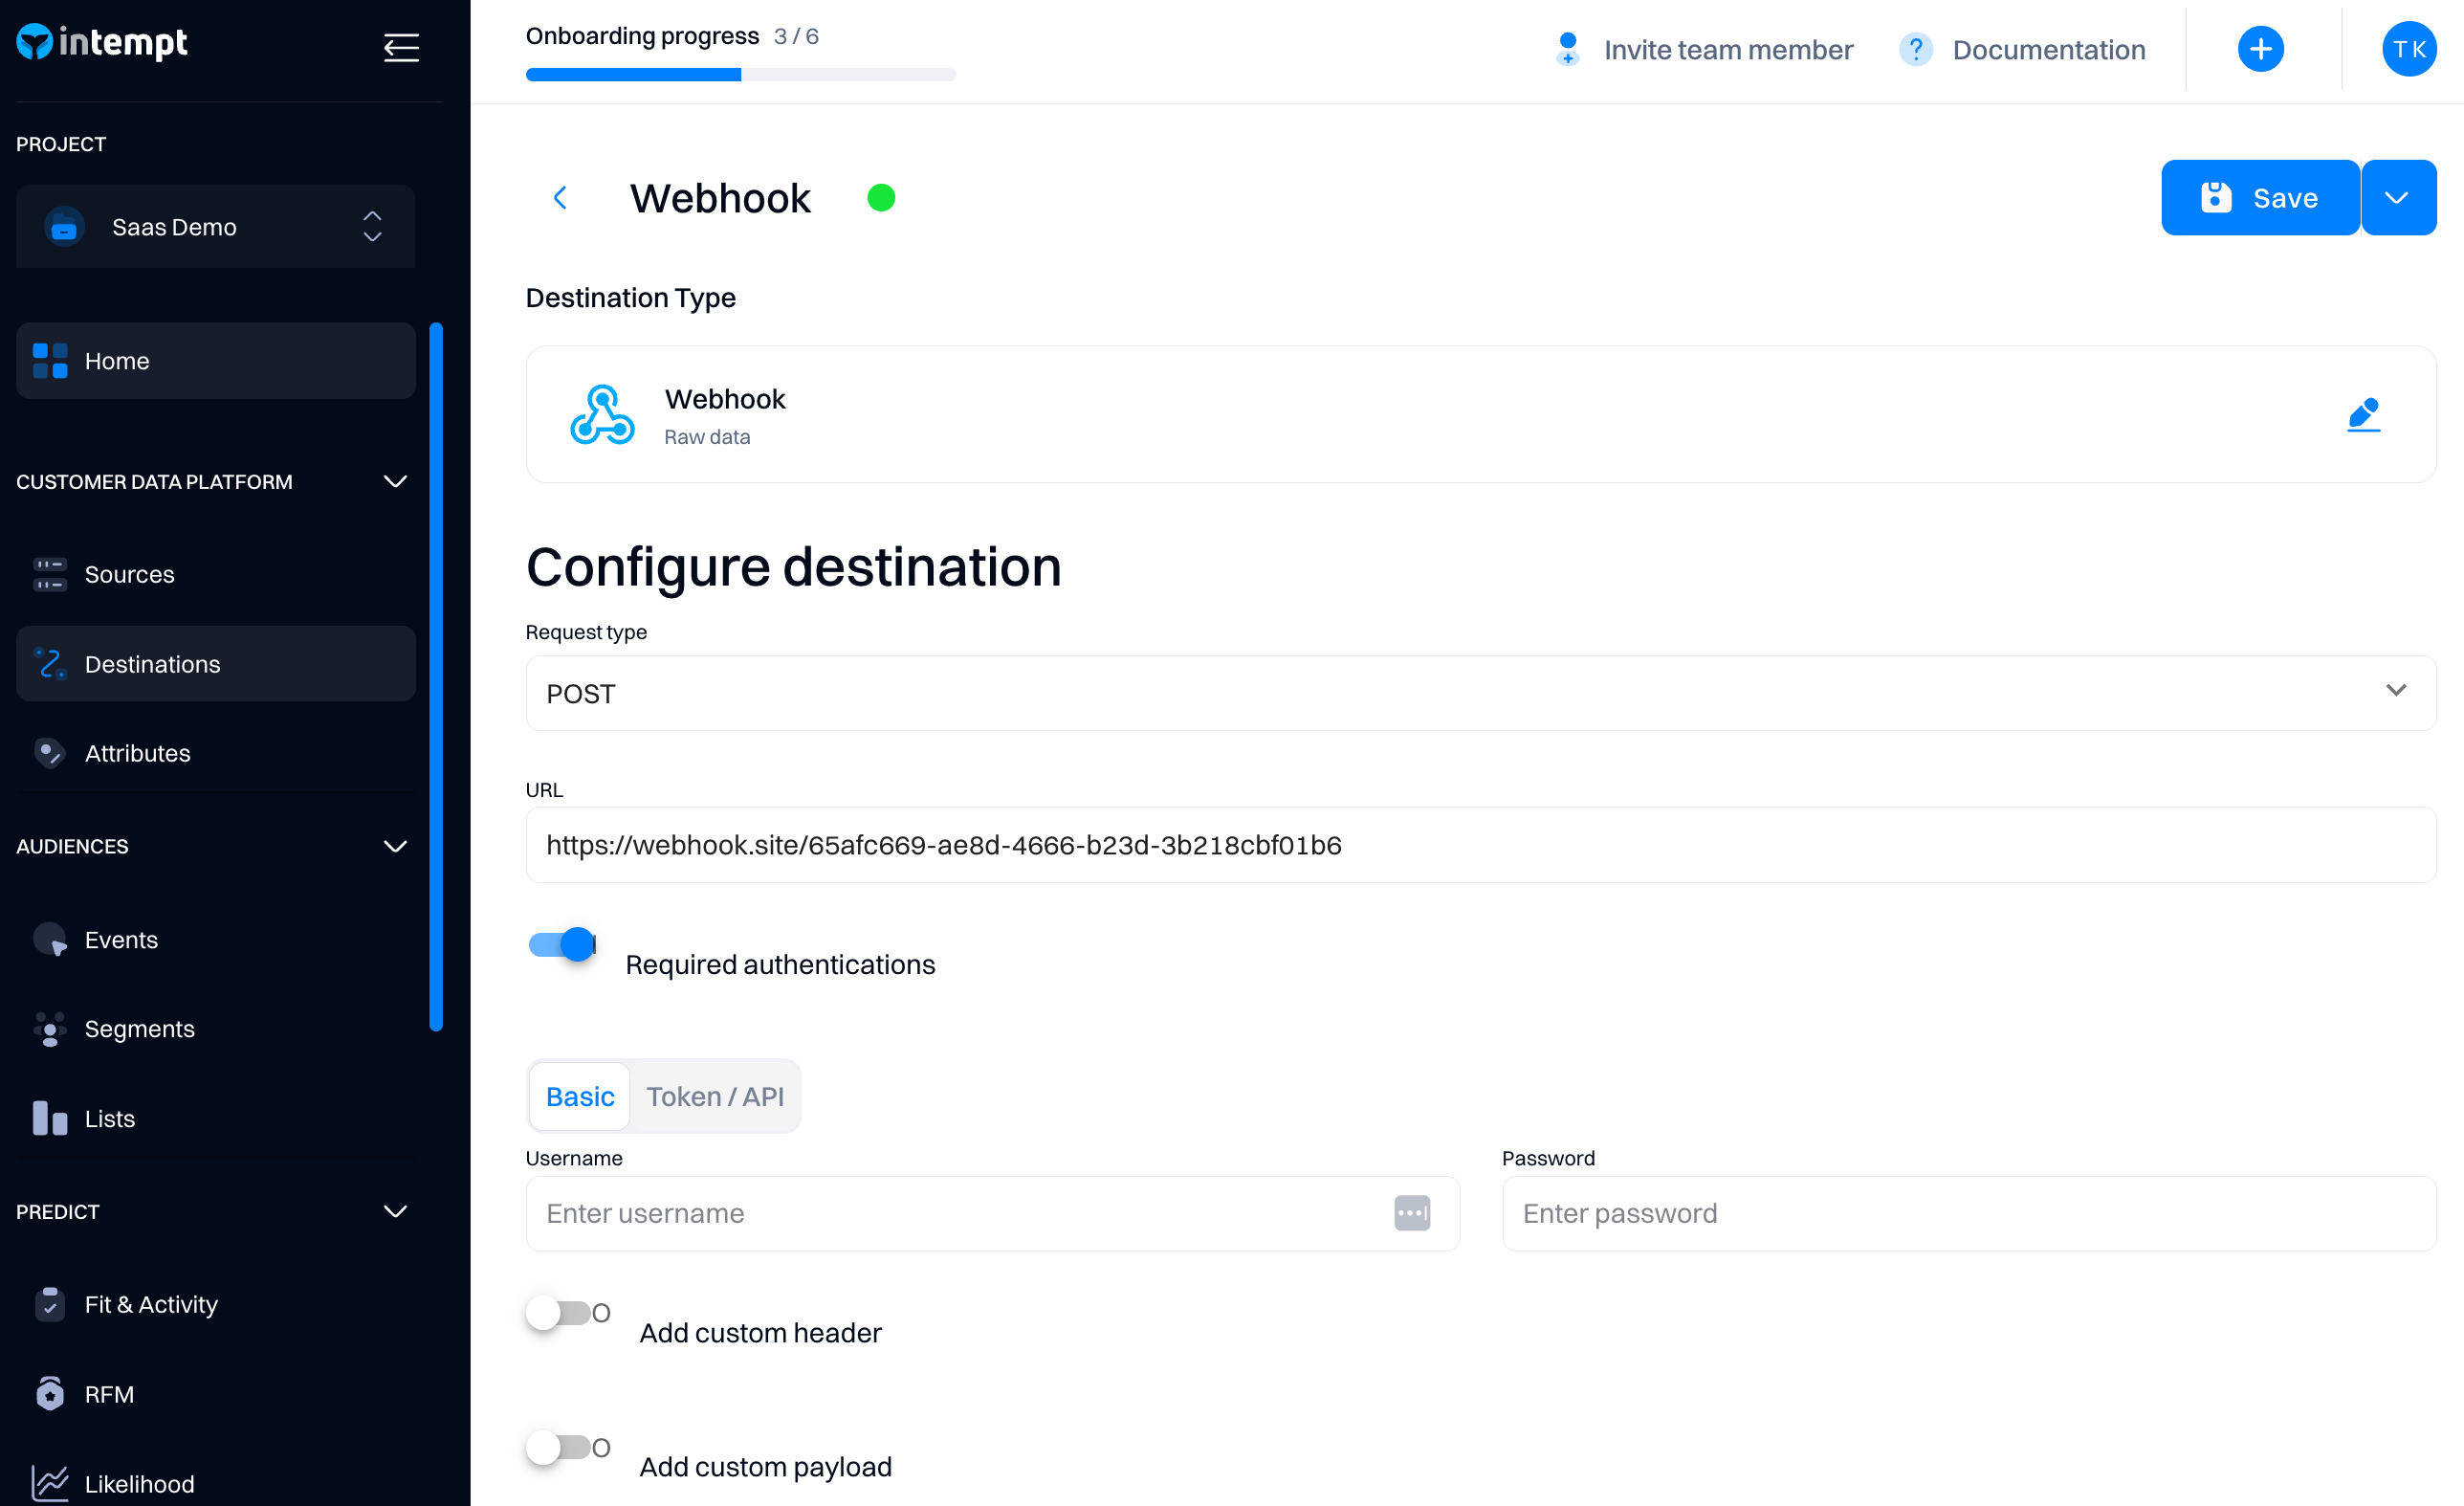
Good to know
Refer to Webhookon how to create a webhook destination.
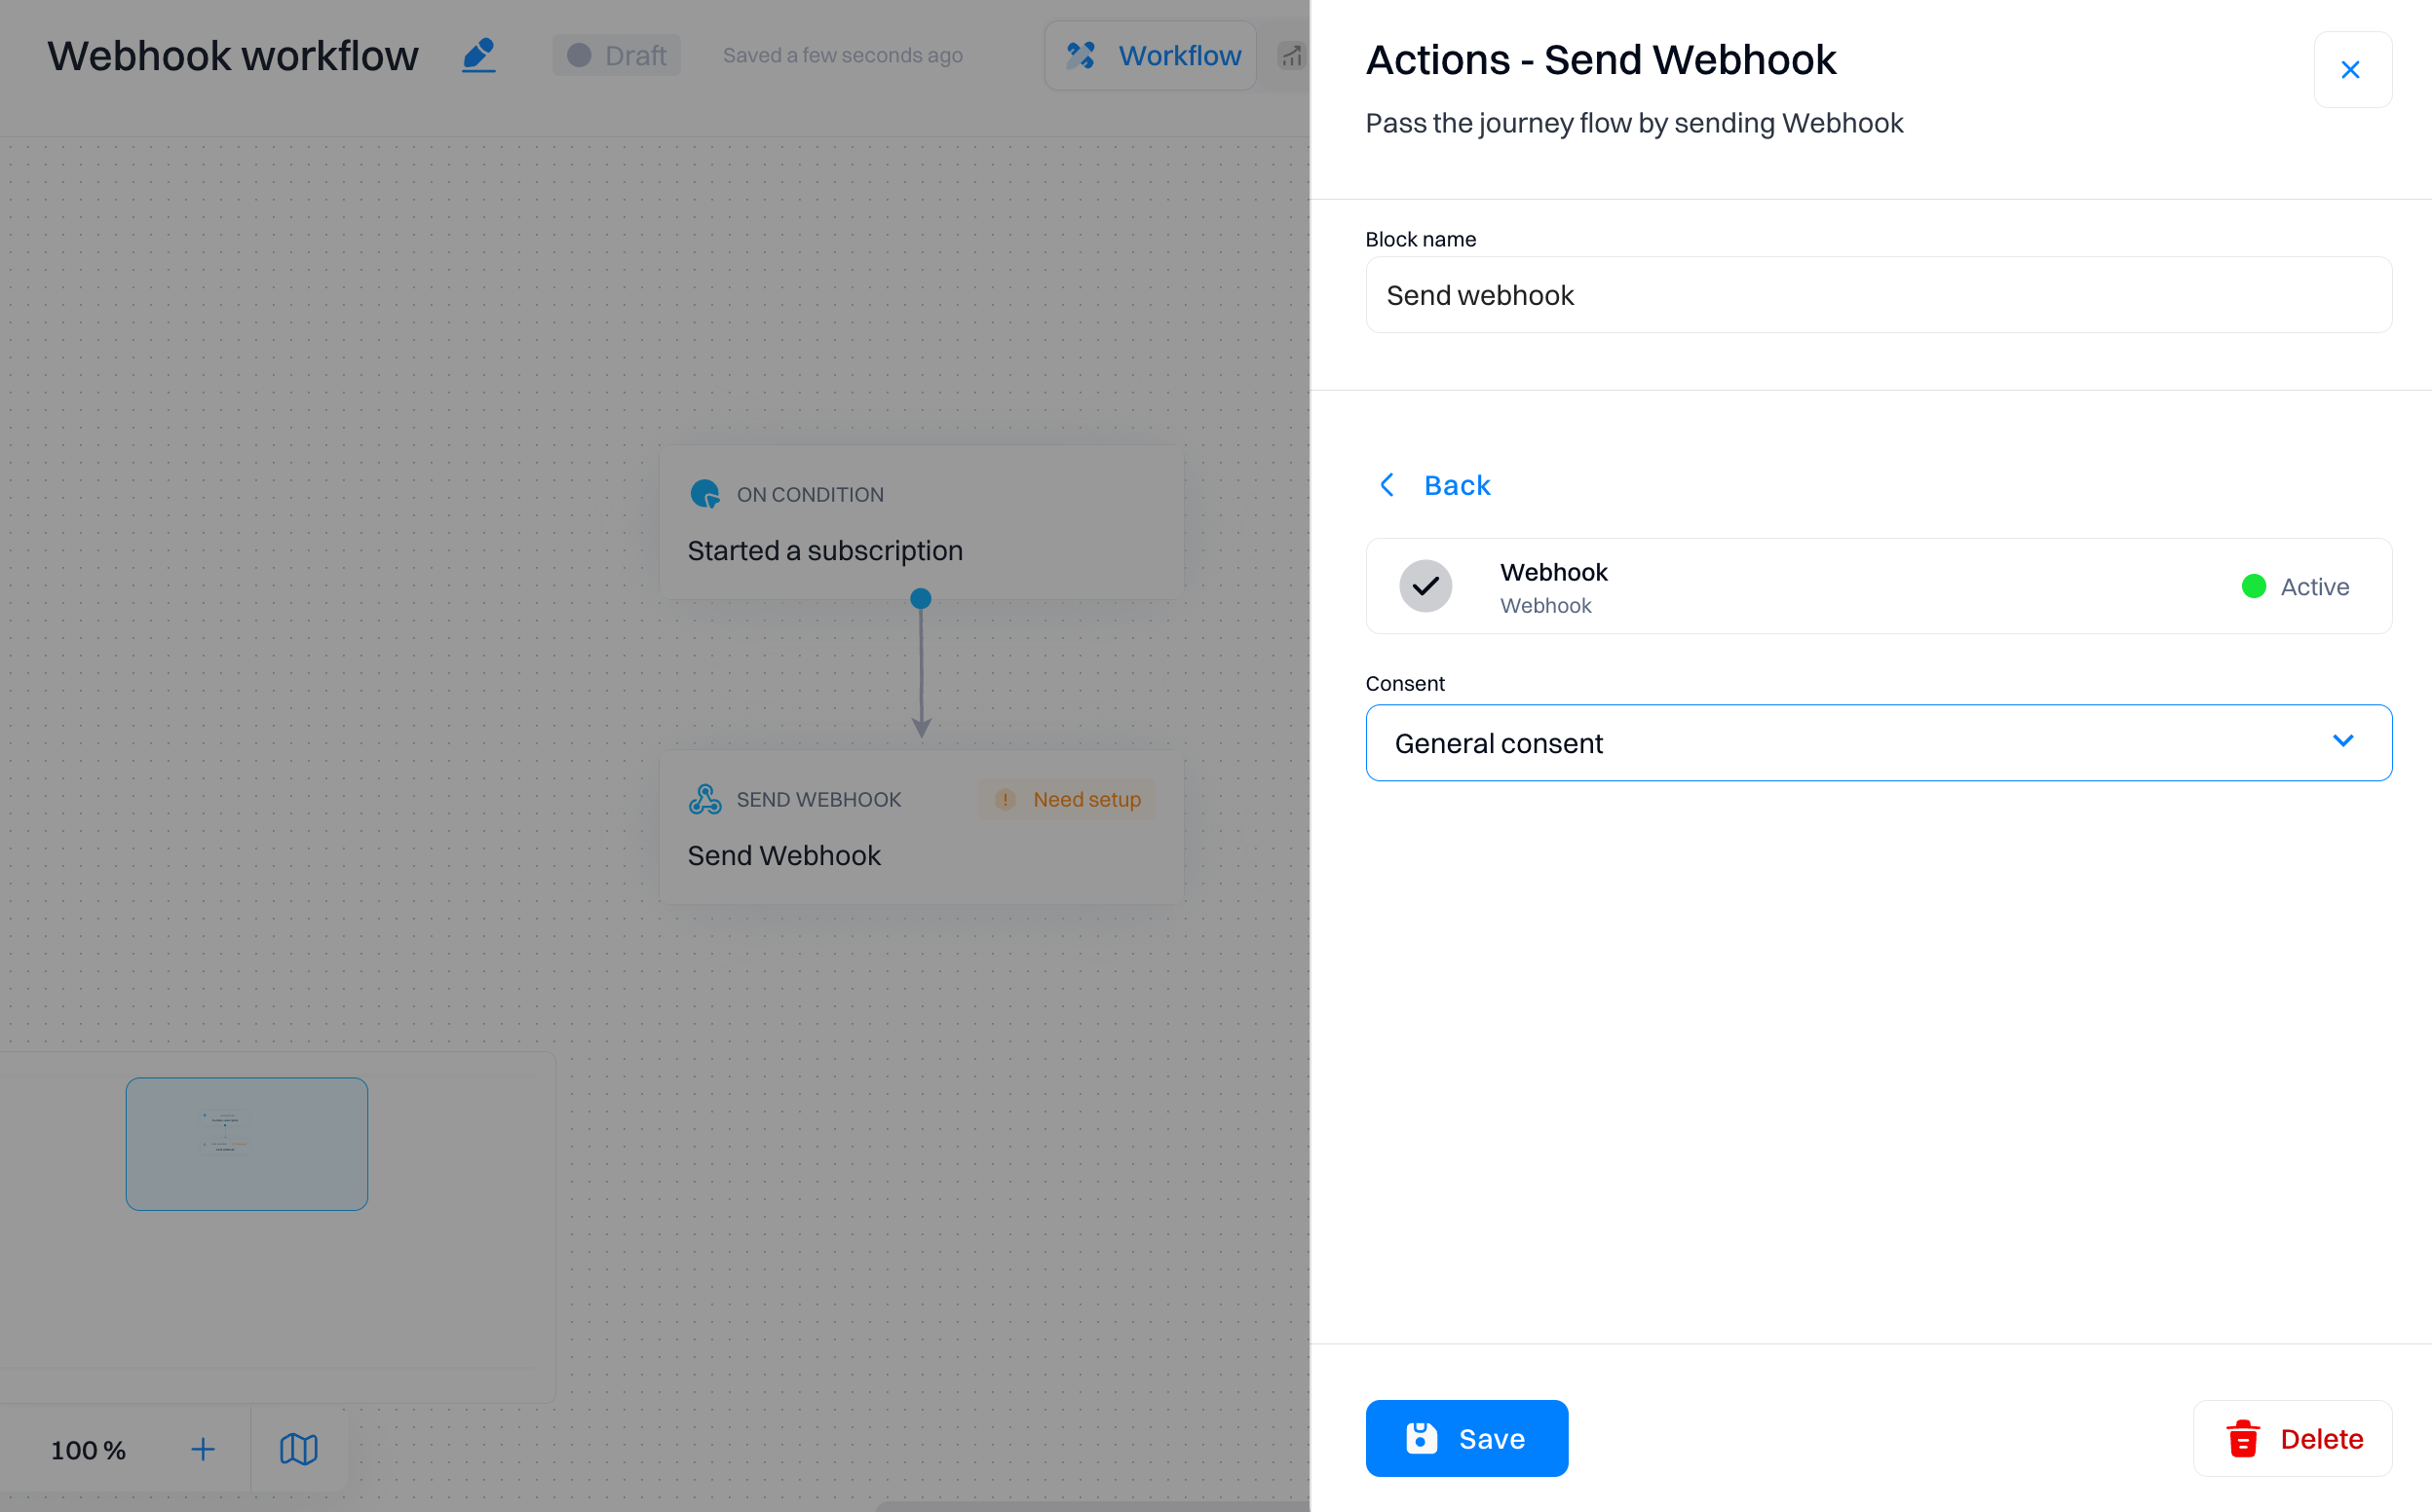
After creating a destination, you can select the required webhook destination within the "Send webhook block.
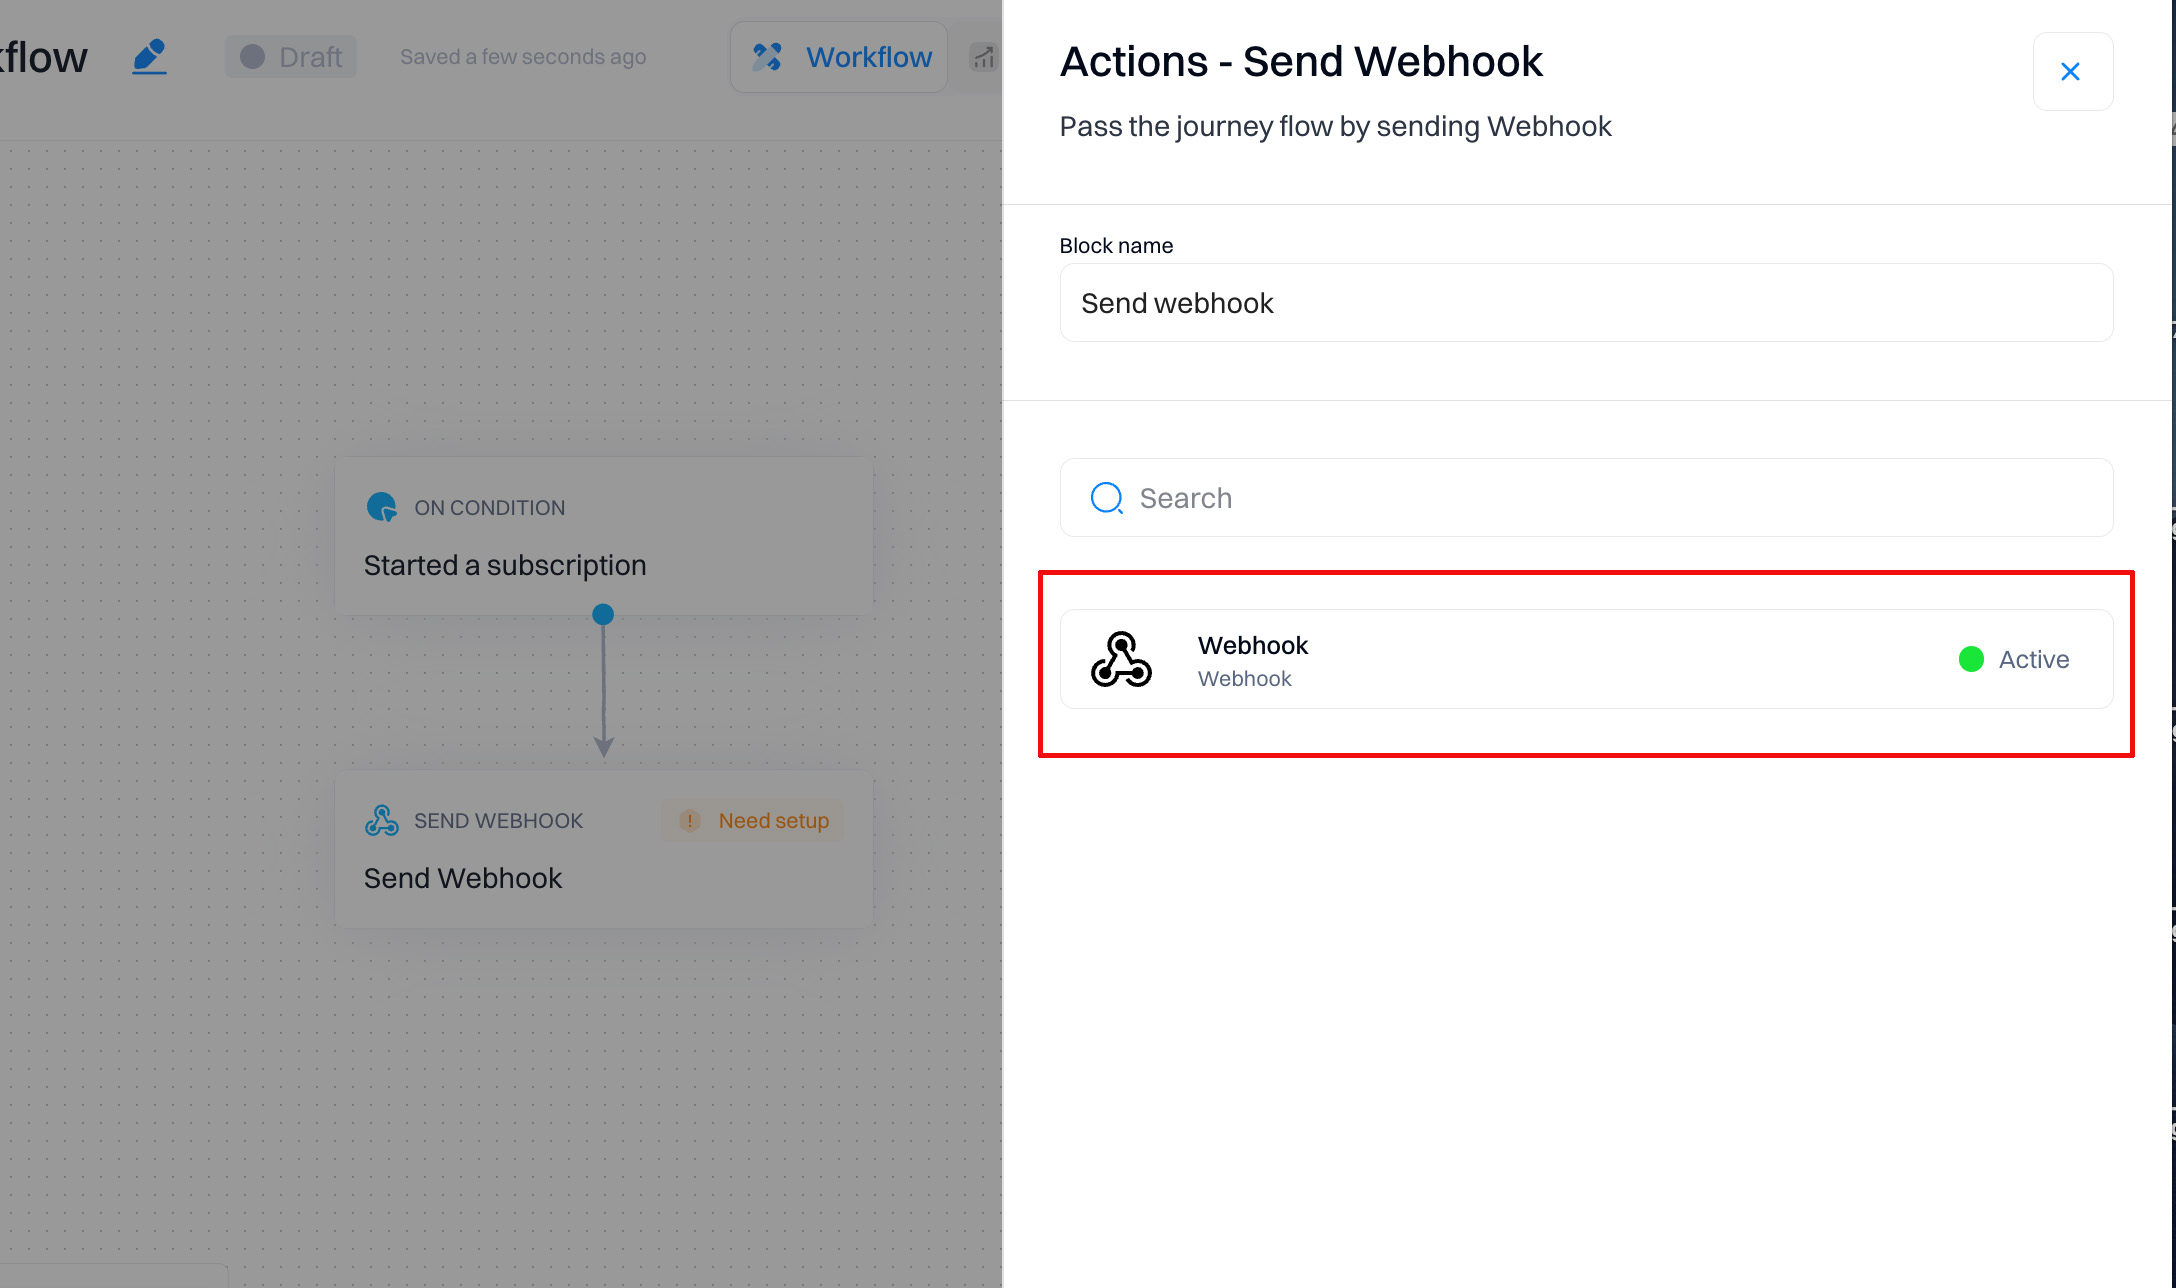
After that, you can set the webhook's consent if required.
How do you test a webhook?
- Visit Webhook.site: Go to the Webhook.site website. The URL is usually something like https://webhook.site/your-unique-identifier. You'll see a screen with a unique URL generated for your testing session.
- Copy the Webhook URL: Copy the unique URL provided on the Webhook.site page. This URL is where you'll send your webhook data for testing.
- Add the Webhook block to the journey: Go back to your journey builder and add the Webhook block to the journey.
- Paste the URL in this webhook block and JSON payload, if any.
- Test the Journey: Trigger the journey with sample data.
- View Webhook Data: Go back to the Webhook.site page in your browser. You should see the details of the sent webhook request, including the headers, payload, and any other relevant information.
Use cases
-
Real-time lead notification. Automatically send webhooks to notify sales teams immediately when a new lead signs up or requests information, allowing for swift, timely follow-ups.
-
Customer activity tracking. Use webhooks to send real-time updates to a CRM or other sales tools when customers engage with key marketing materials, helping sales teams personalize their outreach efforts.
-
Event registration follow-up. Send a webhook to trigger an immediate follow-up sequence when someone registers for an event, ensuring attendees receive all necessary information without delay.
-
Automated data synchronization. Configure webhooks to automatically update customer information across different platforms whenever user or account attribute changes.
-
Survey distribution. Trigger webhooks to send targeted surveys immediately after a purchase or interaction, collecting timely feedback while the experience is still fresh in customers’ minds.
-
Referral program tracking. Send a webhook when a user refers another customer, updating referral program trackers and triggering any applicable rewards or acknowledgments.
-
Marketing campaign analytics. Configure webhooks to send detailed interaction data to analytics platforms in real-time as users engage with campaigns, providing immediate insights into campaign performance.
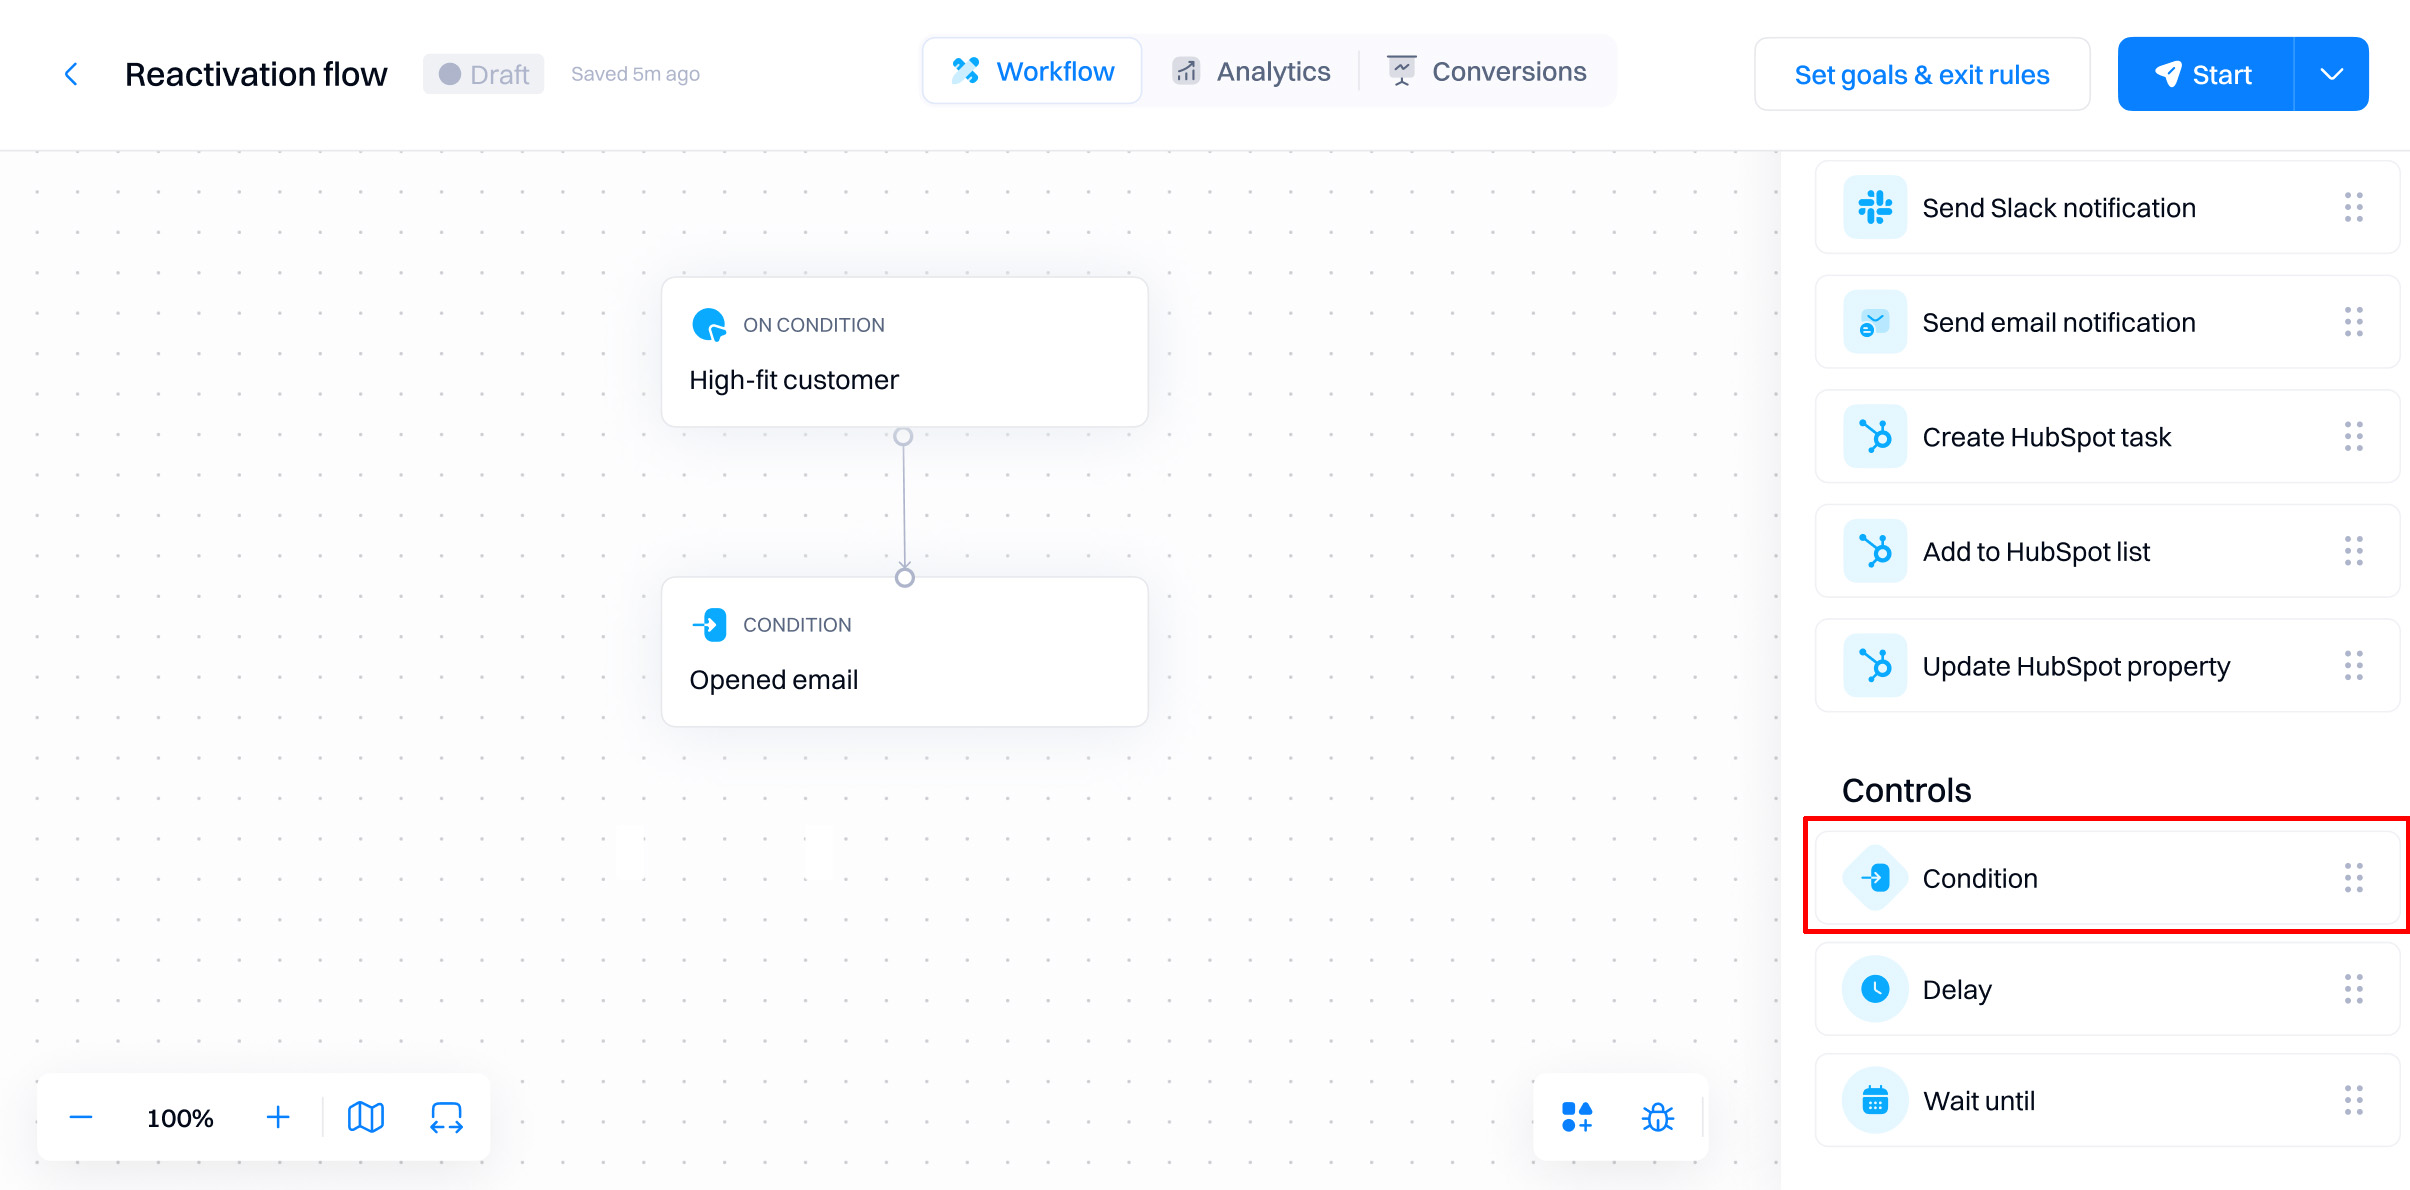
Controls
Controls adjust the conditional branching and time windows within the journey.
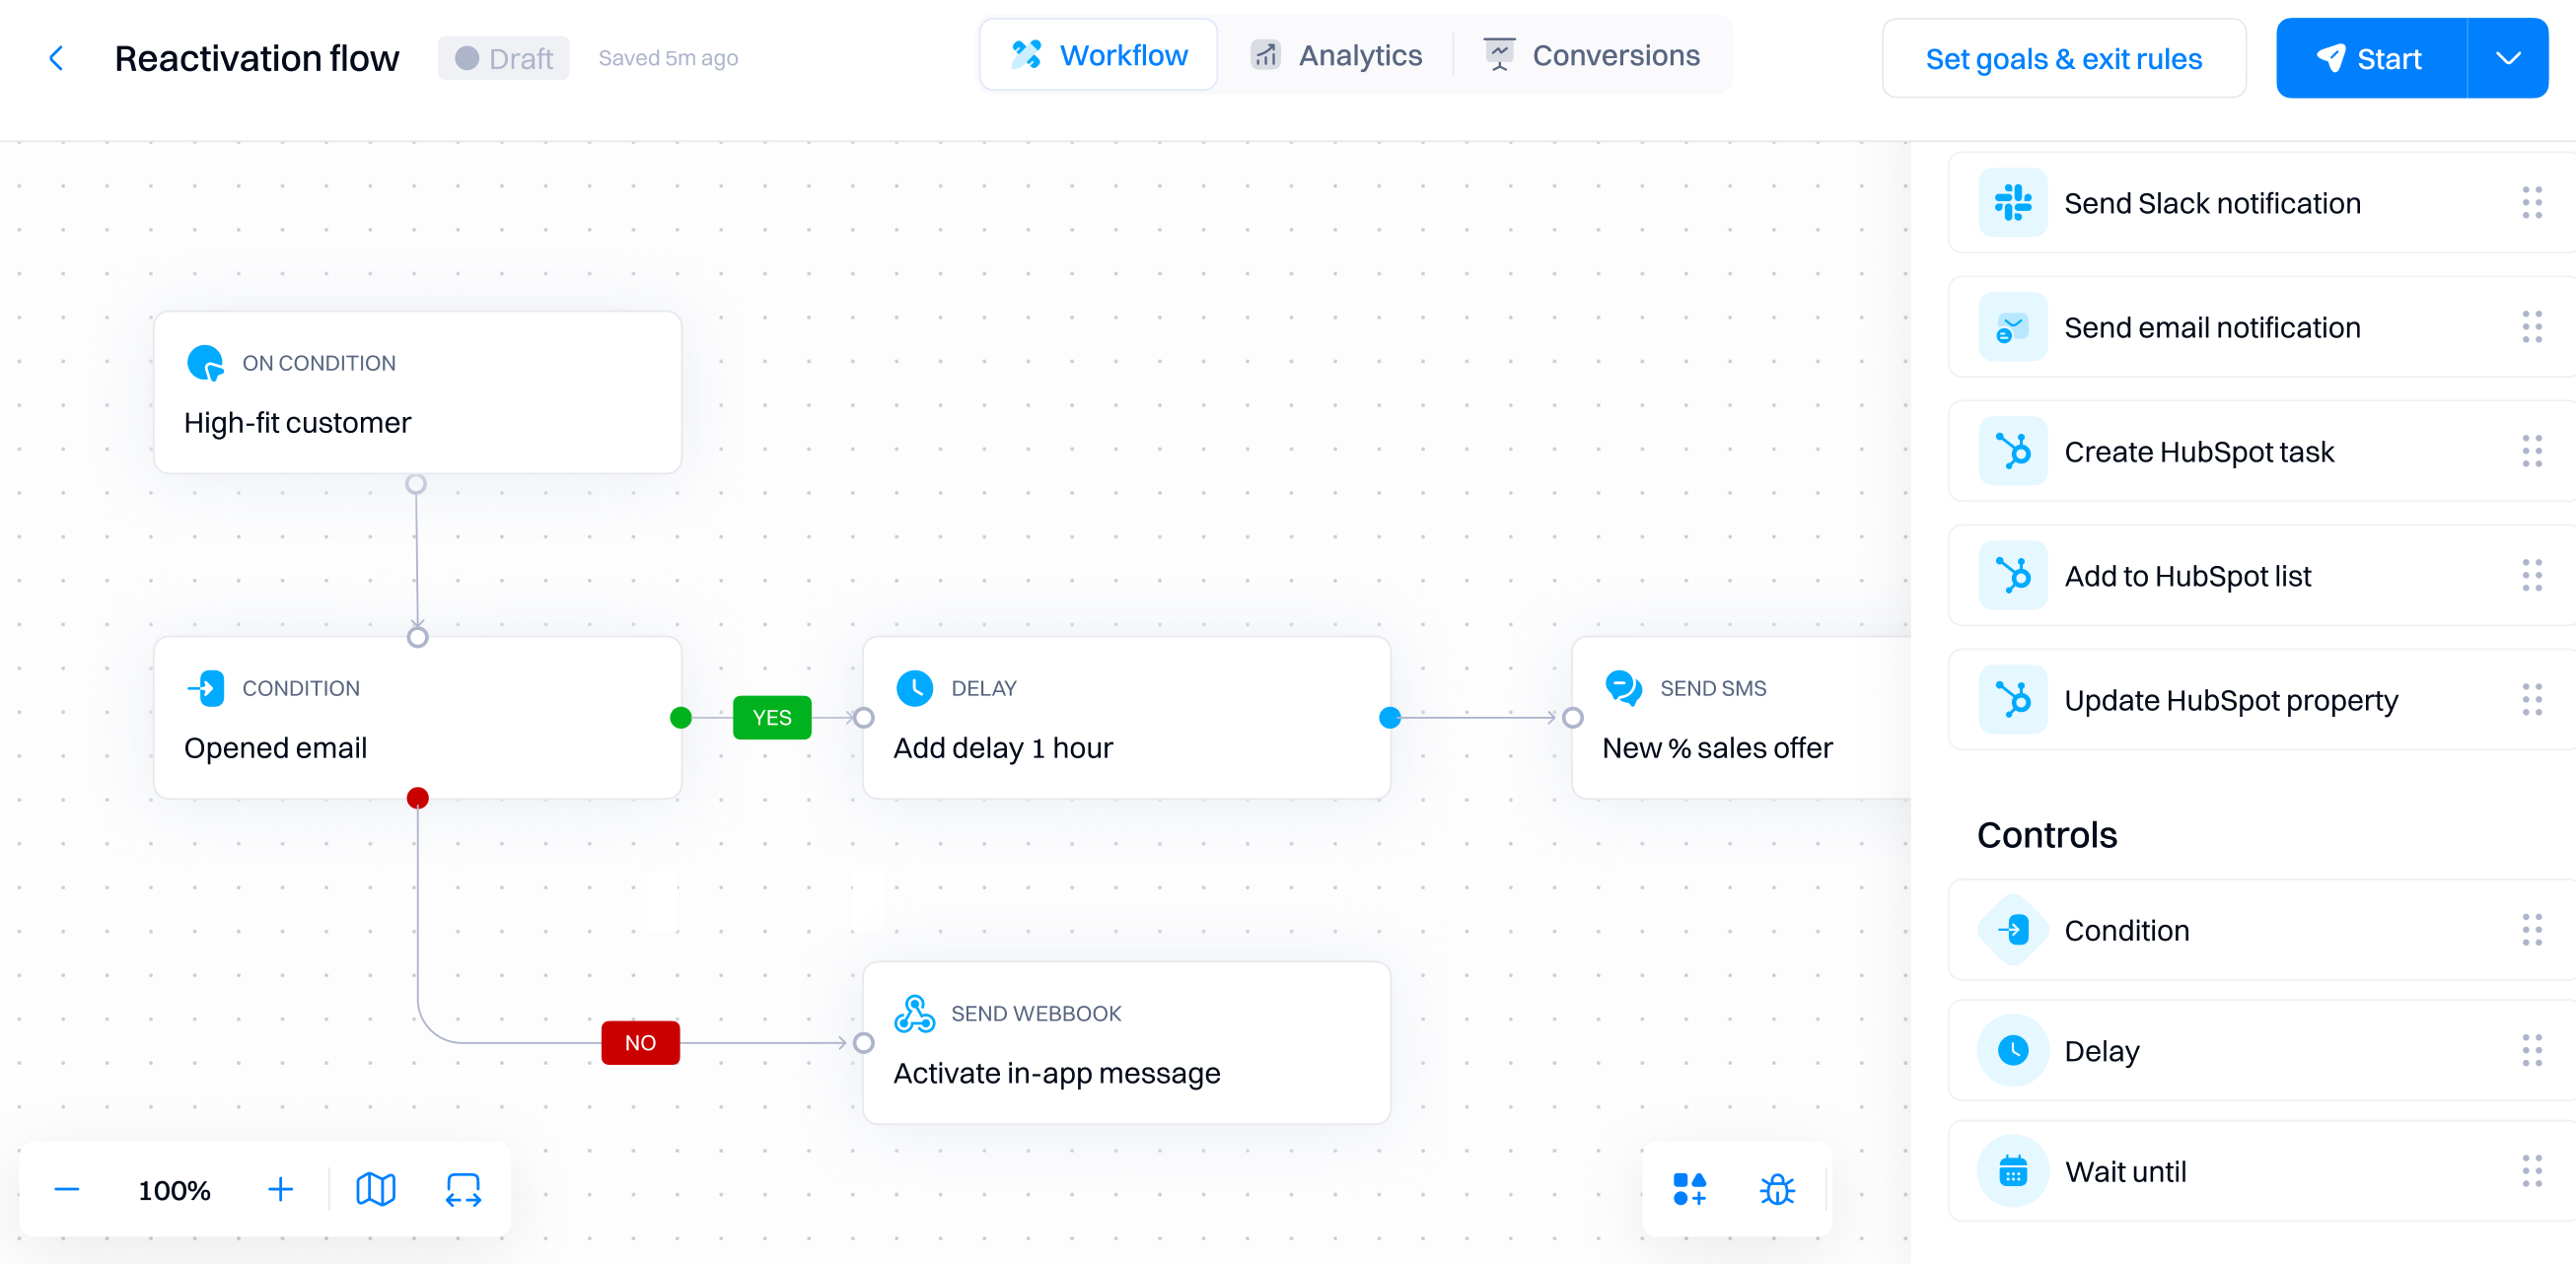
Condition
With the "Condition" block, you define the criteria for users or accounts to pass the flow to the "Yes" or "No" branch.
If a user matches the condition specified in the block, they will go to the green "Yes" branch. They will be sent to the red "No" branch if they don't.
Good to know
The branching logic is execuded immediately after user reaches this block. If you want to add additional time for user complete the indicated condition, we recommend adding a time delay or using "Wait until" block.
Configuration overview
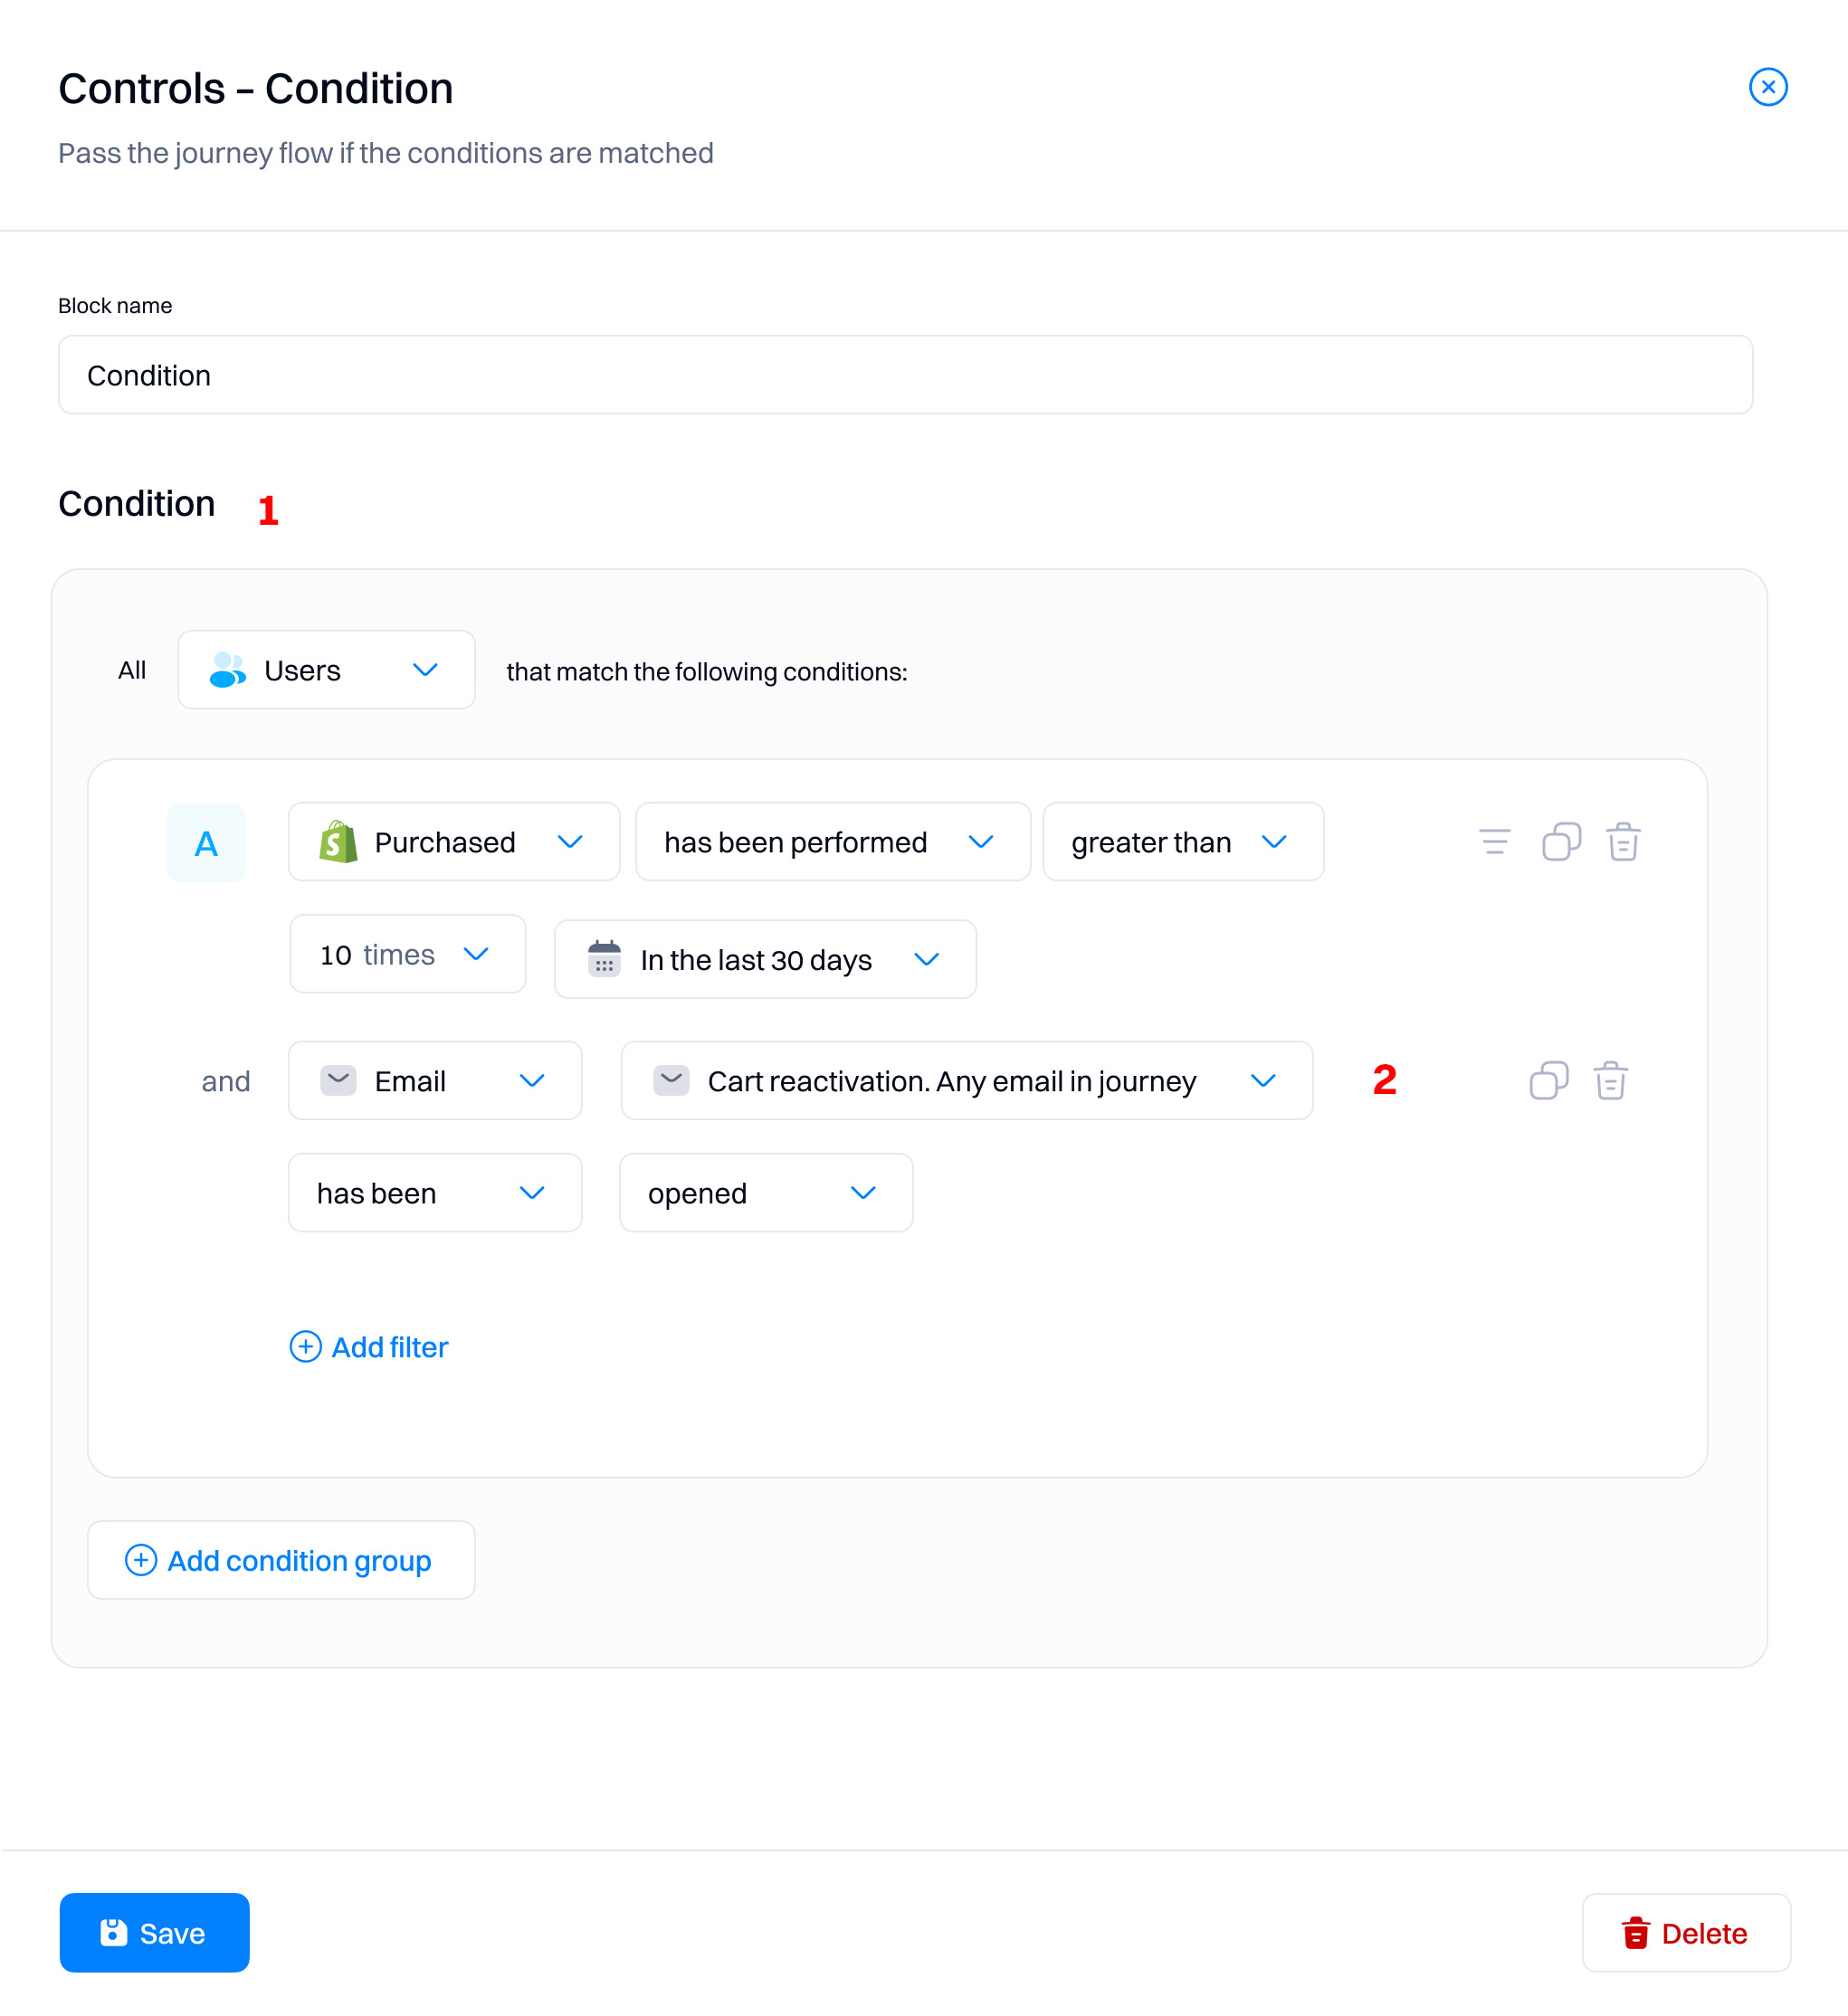
- Condition logic. To define the logic, you can choose any combination of events, attributes, segments, or journeys. Refer to Creating a segment on how to use the editor.
- Messaging conditions. The "Condition" block allows you to create conditions based on messaging events users performed within this or any other journey by adding messaging actions.
Use cases
-
Email interaction routing. Immediately check if a user has opened or clicked on a link in a marketing email. Route users who interacted to a sales follow-up journey, while those who did not receive additional nurturing emails.
-
SMS response evaluation. After sending an SMS about a limited offer, use conditions to check if the user responded or took action, directing responders to a sales conversion track and non-responders to receive a follow-up reminder.
-
Slack engagement follow-up. For internal team notifications sent via Slack, check if team members have acknowledged or responded to critical alerts and route follow-up tasks accordingly to ensure issues are addressed promptly.
-
Webhook trigger based on user activity. Evaluate user activity levels and, based on interaction with previous campaigns, trigger a webhook to trigger real-time actions on other tools.
-
Lead scoring adjustments. Instantly adjust lead scores based on real-time interactions with web content or email campaigns and route high-scoring leads to immediate sales attention or low-scoring leads for further qualification.
-
Purchase pattern segmentation. Check if users have made a purchase following a promotional campaign and instantly segment them into a list for upsell opportunities, while others are targeted with different offers.
-
Renewal readiness via messaging actions. Use conditions to assess engagement with renewal reminder emails or SMS, routing customers who show readiness through more direct renewal processes and others to additional educational content.
-
Event attendance follow-up via email. Post-event, determine if users attended key sessions based on email registrations and interactions, directing attendees to targeted follow-up sequences and non-attendees to access recorded sessions.
-
Customer feedback collection timing. After sending a feedback request via email, check if the customer has submitted feedback and route those who haven’t to a reminder sequence, ensuring comprehensive customer input.
-
Dynamic content delivery based on messaging events. If link tracking in email or SMS shows interest in specific topics or products, dynamically update the journey to provide more focused content or product recommendations, enhancing user engagement and potential conversion.
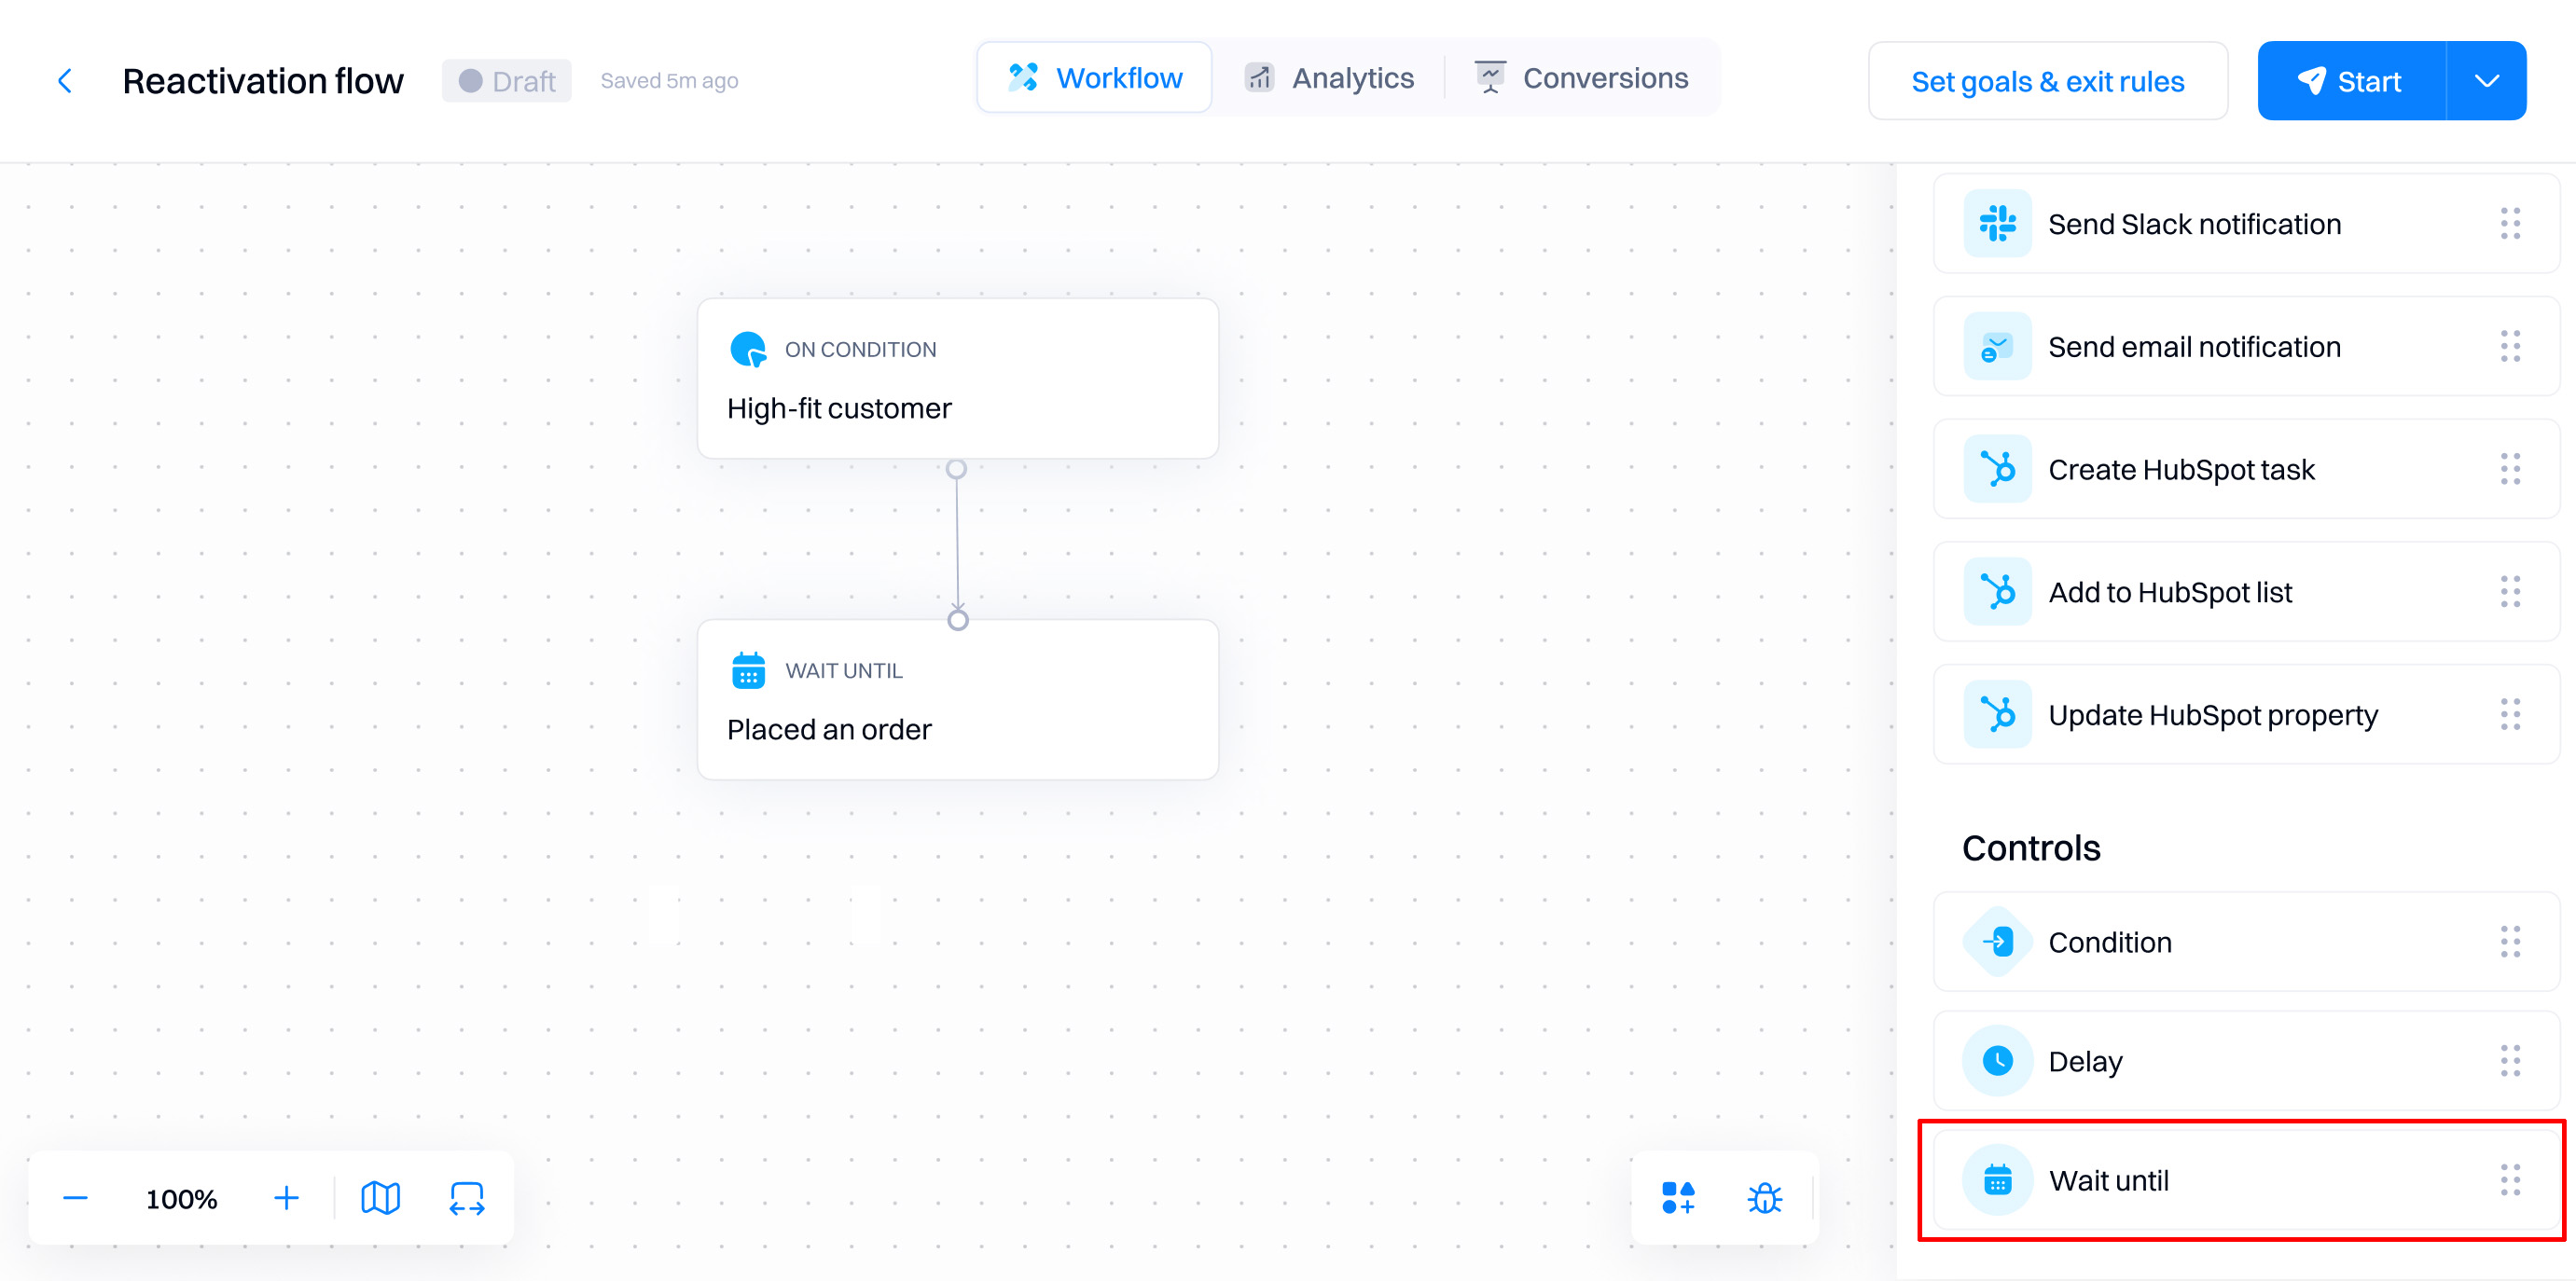
Wait until
Wait until is a condition check that waits until users match the specified conditions; for example, it makes a conversion event. The fundamental difference between the "Condition" and "Wait until" blocks is that "Condition" checks if the users match the conditions only when a user enters the block. At the same time "Wait until" waits for the user to match the condition for prolonged periods.

Configuration overview
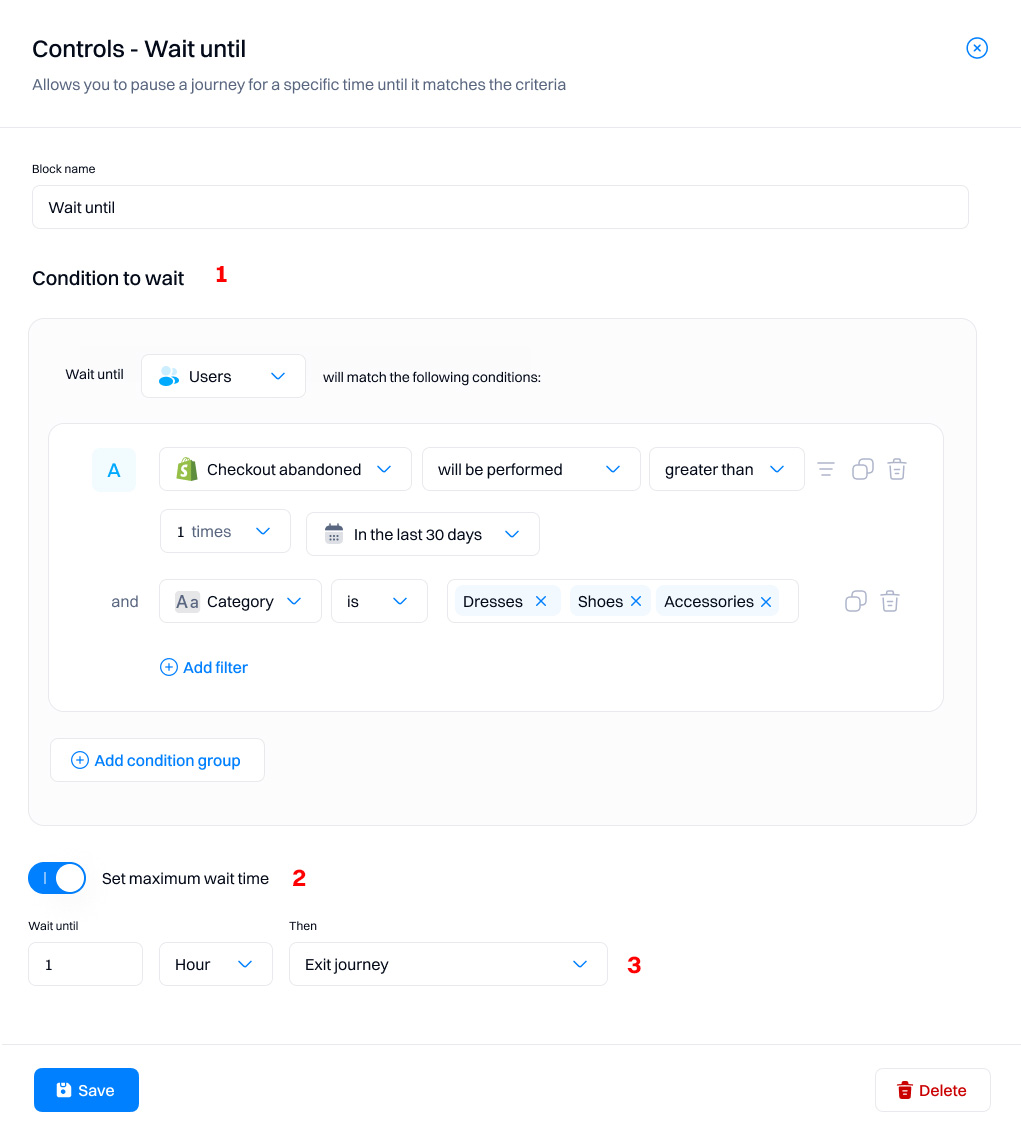
- Conditions. Define the conditions the users need to match to proceed to the next step of the journey.
- Set maximum wait time. You can specify how long to wait until the user matches the conditions. This is useful if you have a time-based action (e.g., a special discount) after this step. If users reach it too late, the action will be rendered useless.
- Action after time passes. You can specify how the user should be handled after reaching the indicated maximum wait time.
- Exit journey. Users exit the journey - they will not enter any new steps.
- Move to another journey action. Users skip this step and are moved to the next action.
Use cases
-
Conversion event completion. Wait until a user completes a conversion event, such as making a purchase or signing up for a service, before moving them to a post-conversion engagement sequence, enhancing the relevancy of follow-up interactions.
-
Engagement verification. Pause the journey until a user engages with a key piece of content, like a promotional email or a critical product video, ensuring that the subsequent messages or actions are timely and appropriate.
-
Lead qualification . Delays further sales actions until a lead meets specific qualification criteria, such as repeated website visits or interactions with pricing information, allowing sales teams to engage with more informed and interested prospects.
-
Customer feedback collection. Hold the journey until the customer provides feedback on a recent purchase or service experience, using this input to tailor future communications or improve service offerings.
-
Anniversary or milestone recognition. Wait until a specific date, such as an account creation anniversary or a seasonal milestone, to send personalized offers or messages, increasing personalization and customer loyalty.
-
Behavior-based upselling. Delay upselling actions until a user demonstrates clear usage patterns or product familiarity, ensuring that upsell offers are timely and relevant to the user’s experience level.
-
Contract renewal preparation. Pause the journey until it's closer to the contract renewal date before initiating renewal discussions or offers, optimizing the timing of renewal outreach.
-
Trial period completion. Wait until the end of a trial period to assess whether the user converts to a paying customer or requires further nurturing, allowing for targeted follow-up based on user actions at the trial’s conclusion.
-
Event follow-up timing. Delay post-event communications until a user has had sufficient time to digest the event content, maximizing the impact of follow-up materials or offers.
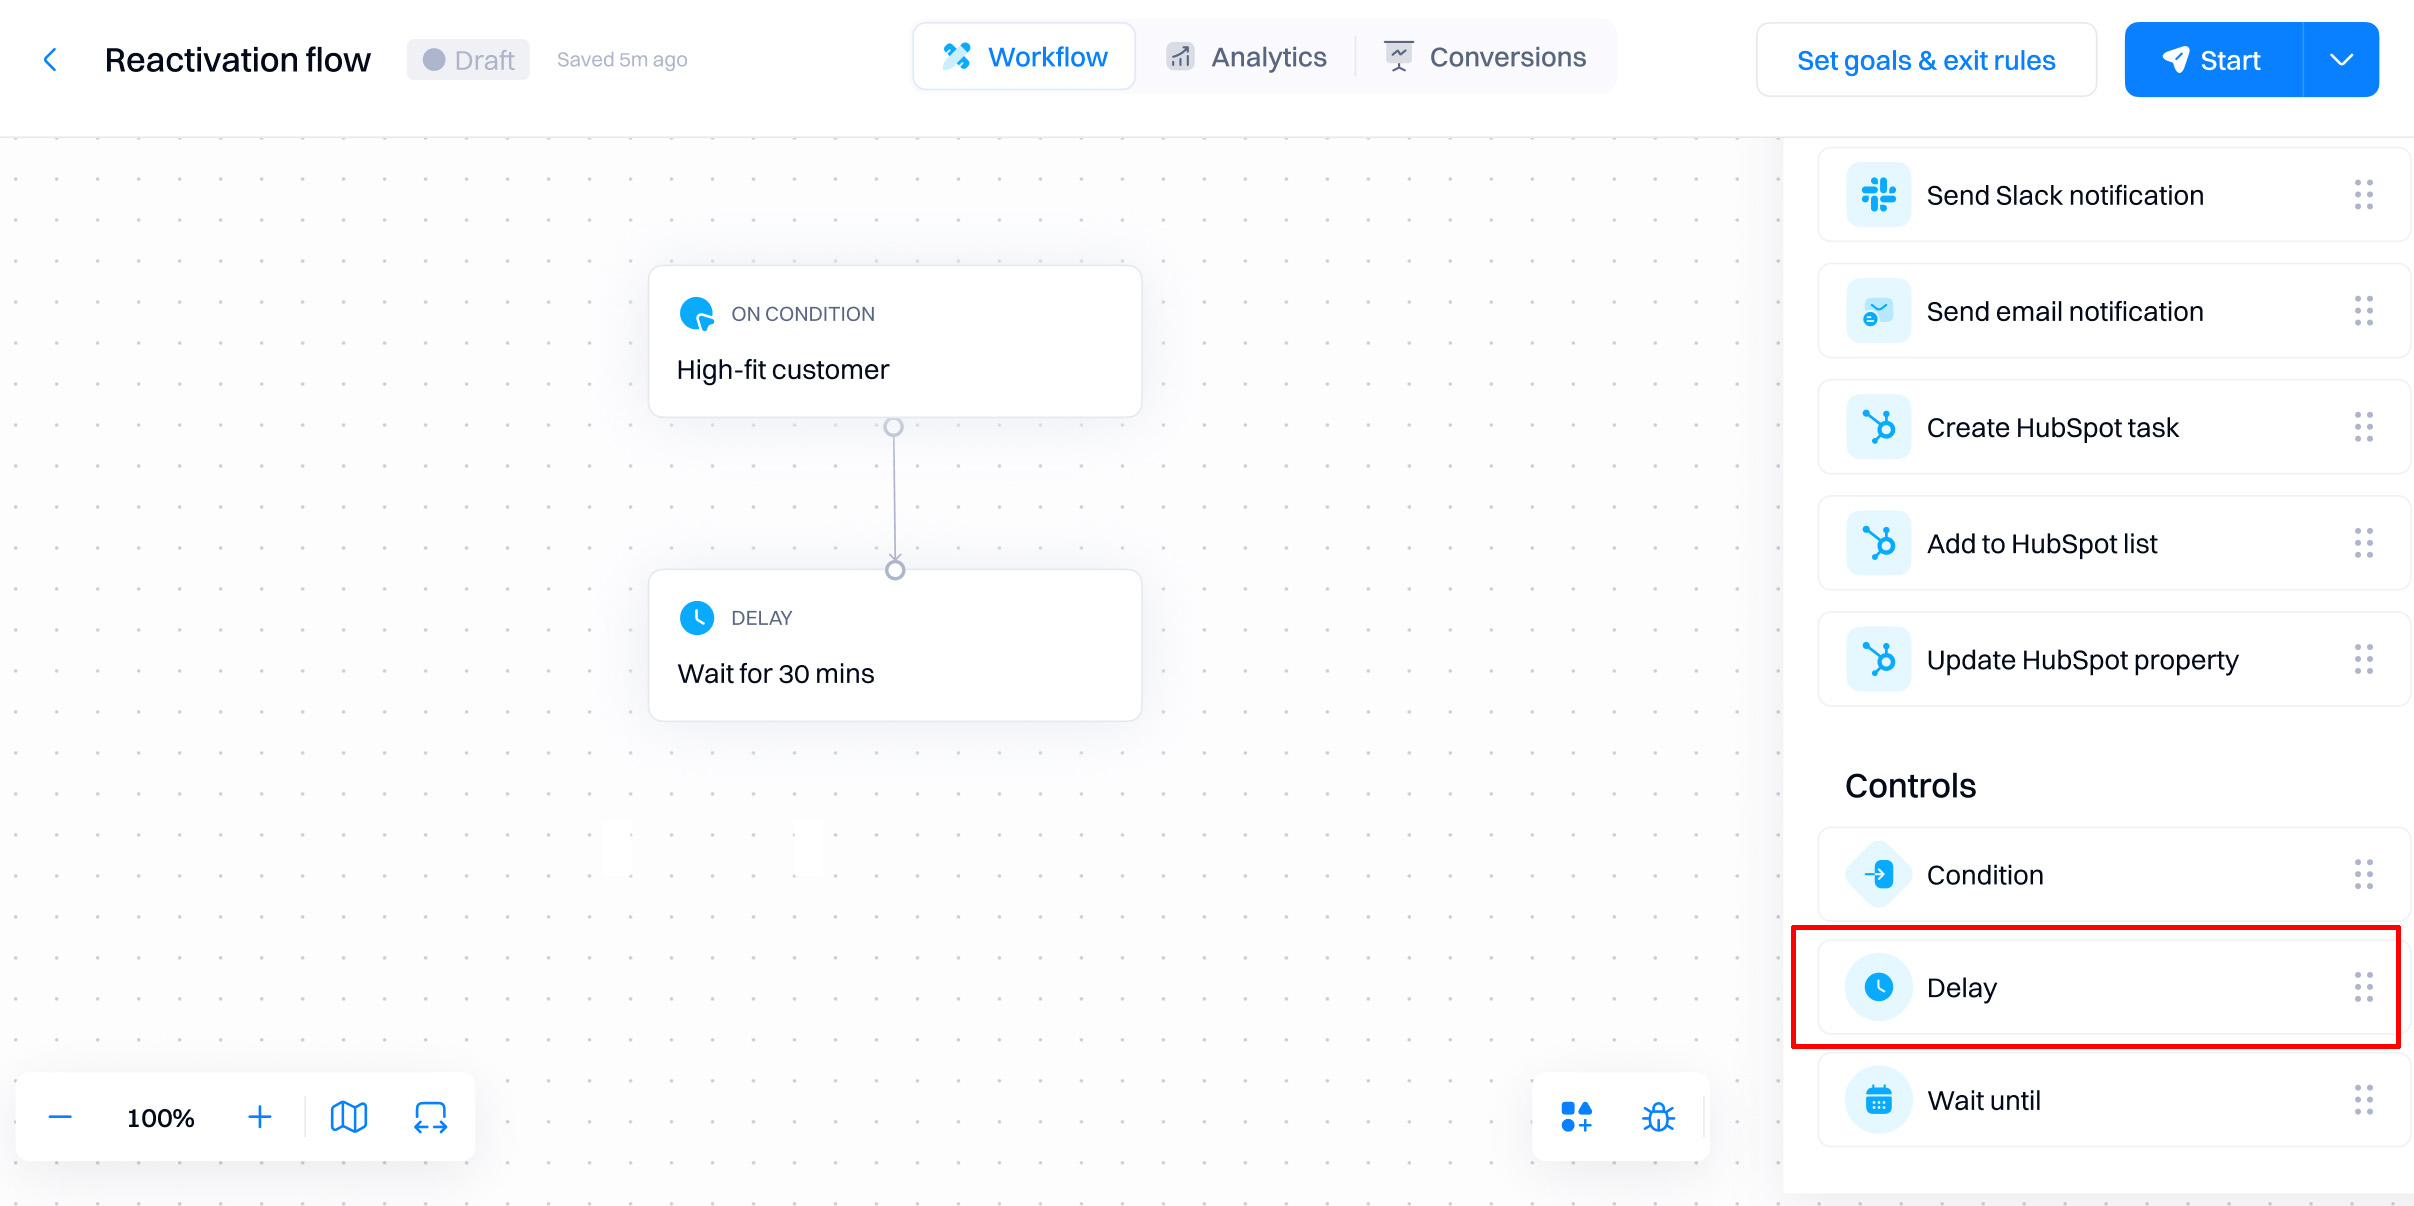
Delay
The delay block adds a specific time gap between two journey steps.
Configuration overview
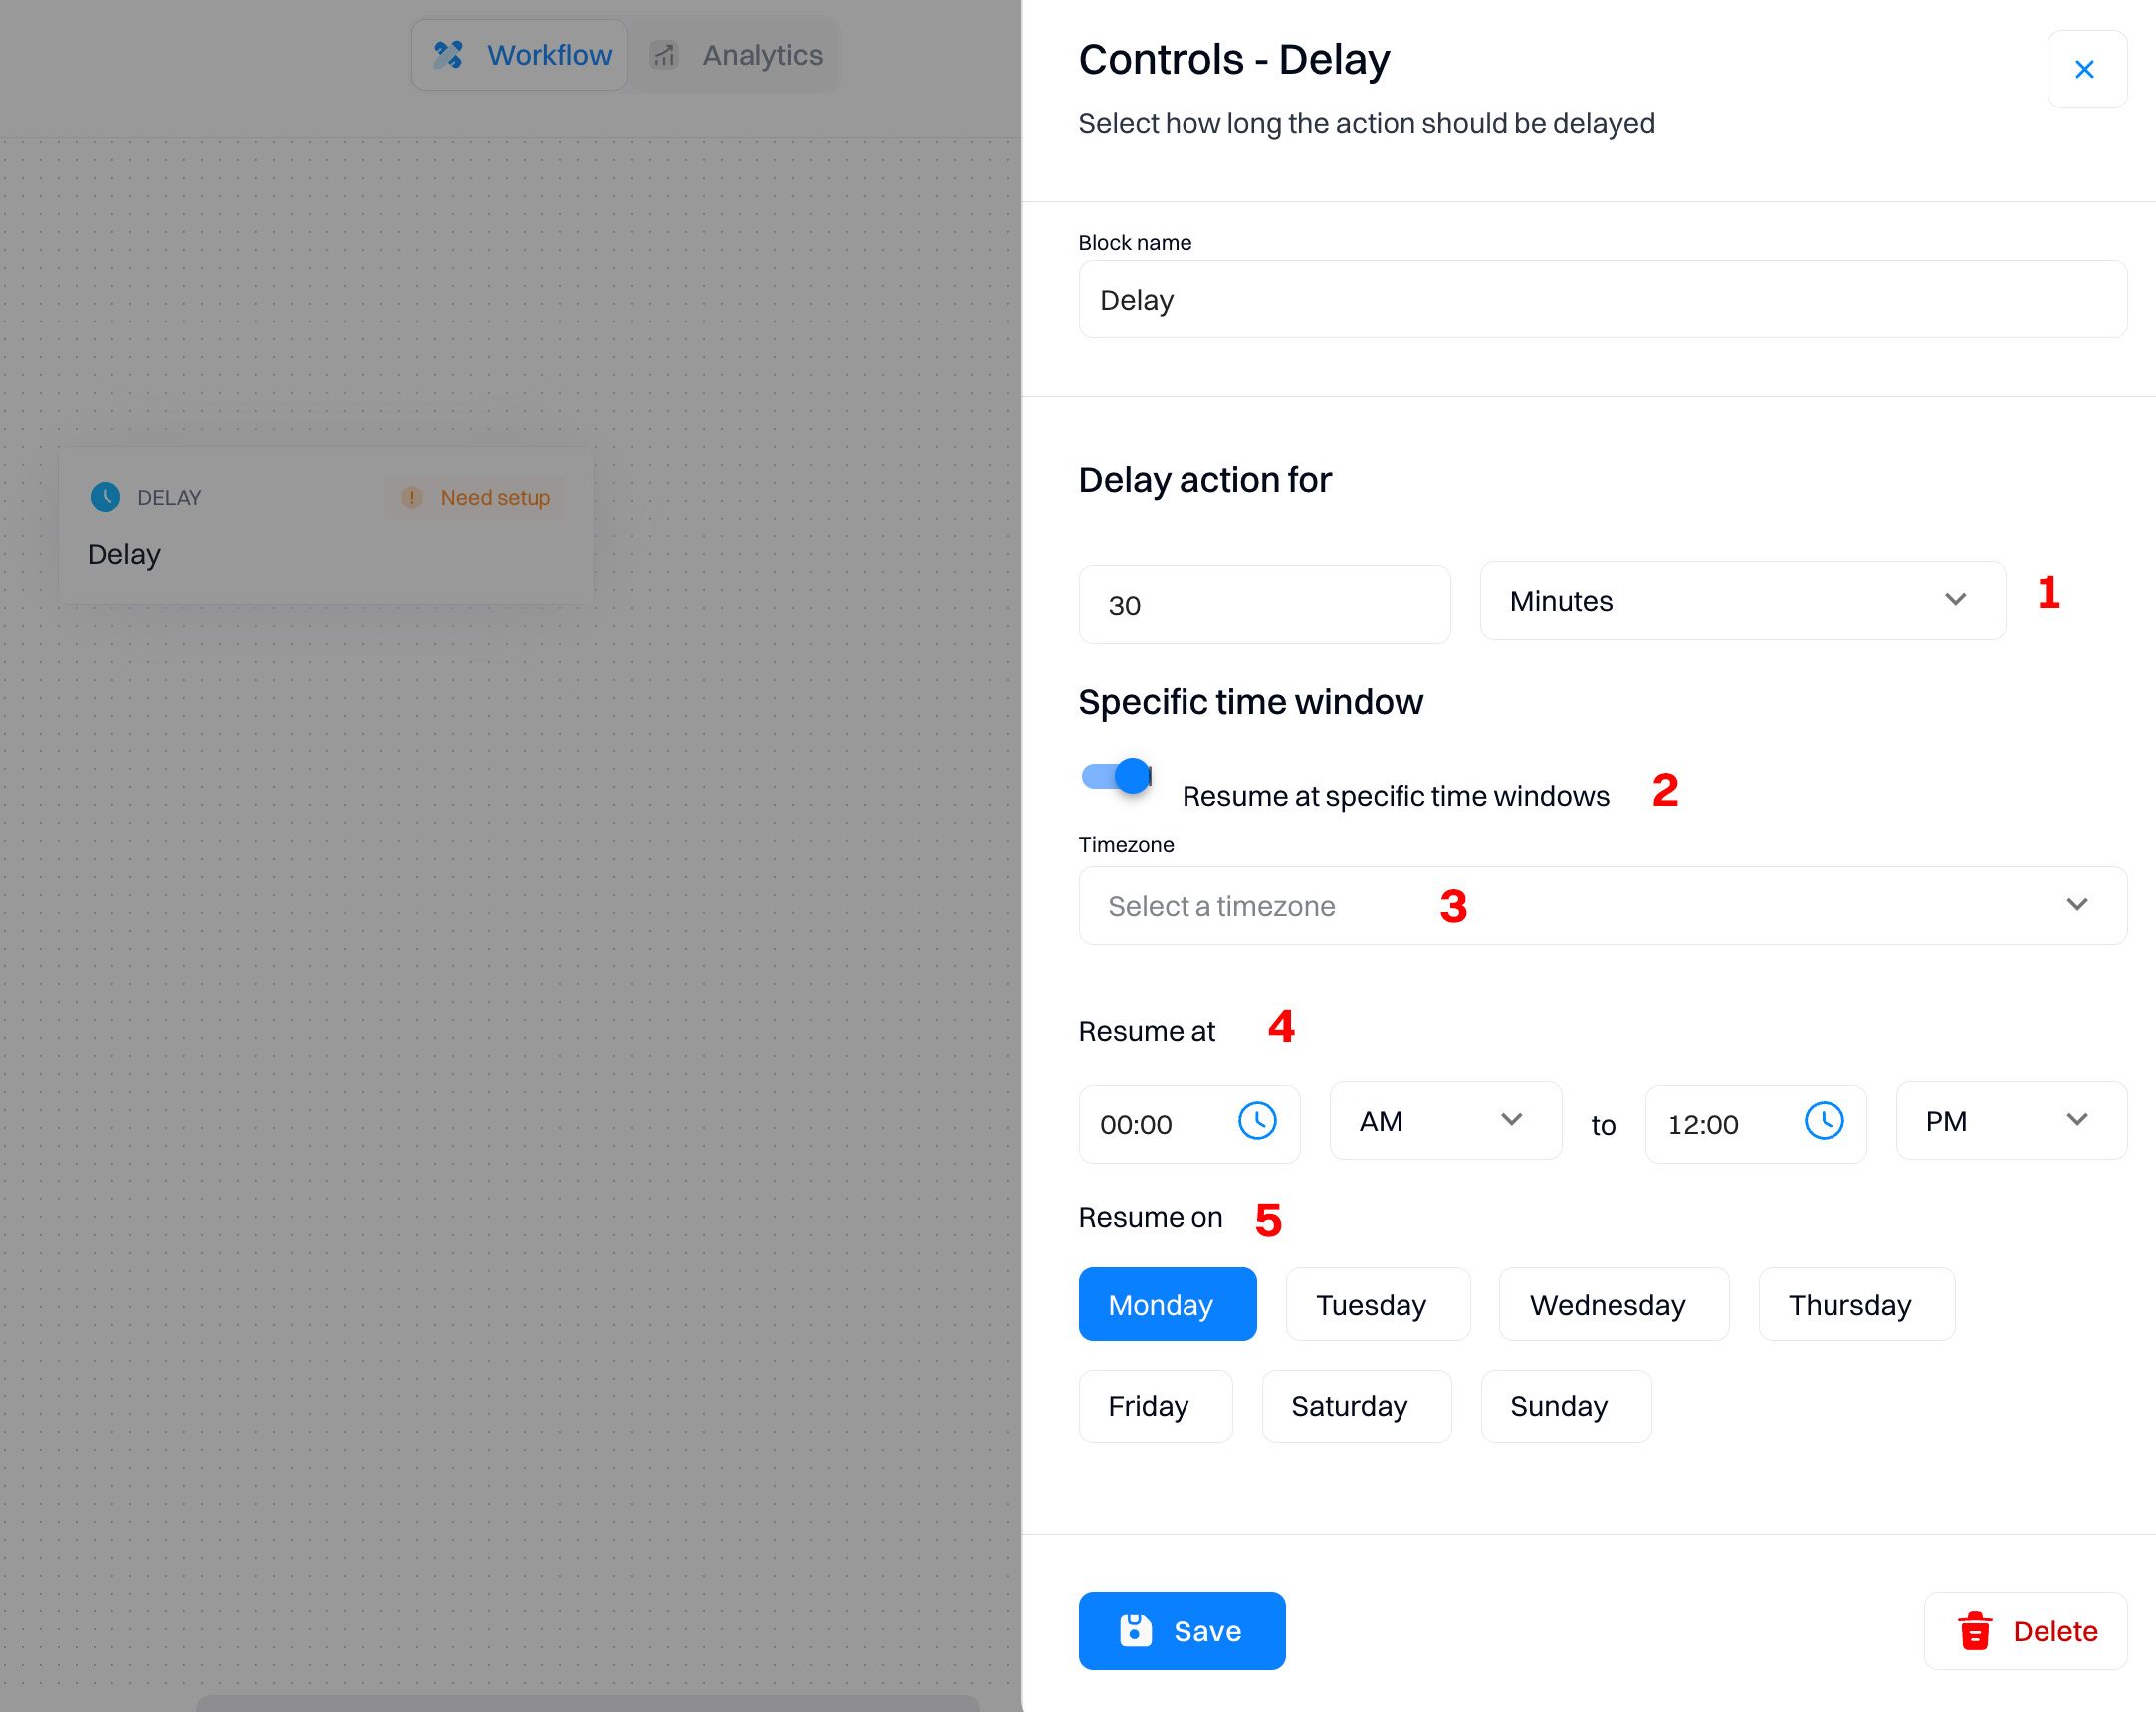
- Delay period. Specify when the delay block should be added between journey steps. You can select minutes, hours, days, or weeks.
- Resume at specific time windows. You can enable this option if you want to delay to be executed during a specific time of day or week.
- Timezone. The delay time windows will executed within your selected timezone.
- Resume at. Specify the time of day when the delay is eligible to be executed.
- Resume on. Specify one or multiple weekdays that delay can be executed.
Good. to know
Time windows are useful if you want to execute specific actions (e.g., send email campaigns) only during work hours or work days, acting as a Do Not Disturb precaution.
Use cases
-
Scheduled follow-up emails. Insert a delay after an initial contact or lead capture to time follow-up emails strategically, such as waiting 24 hours before sending a follow-up to maximize engagement without appearing too aggressive.
-
Nurturing lead engagement. Use delays to space out interactions in a lead nurturing campaign, such as sending educational content over several days or weeks to keep leads engaged without overwhelming them.
-
Post-purchase follow-up. Set a delay after a purchase to send a thank you email or a customer satisfaction survey, giving customers enough time to experience the product before asking for feedback.
-
Anniversary or renewal reminders. Employ delays to time communication close to an anniversary or contract renewal date, ensuring timely and relevant messages.
-
Holiday campaign preparation. Schedule marketing campaigns to begin delays leading up to holidays or special events, ensuring promotions launch opportunistically.
-
Event countdown communications. Implement delays in an event marketing journey to send reminders and teasers at specific intervals before the event date, building anticipation.
-
Behavior-based targeting timing. Delay actions until a certain behavior is observed, such as visiting a key page on a website and then waiting a specific period before sending targeted content.
-
Time zone sensitivity for global campaigns. Use delays to ensure that emails or messages are sent during appropriate local times to avoid reaching customers during inconvenient hours, enhancing the customer experience.
-
Weekend avoidance for business communications. Set delays to pause actions during weekends and resume on weekdays to ensure business-related communications are sent during work hours.
-
Sequential product launches. Introduce a delay between announcements in a multi-product launch strategy to give each product adequate attention and space, maximizing impact and engagement for each launch.
Updated 30 days ago