
Javascript SDK
Overview
Intempt's Javascript SDK enables data to be sent and tracked on the client's browser by using autotrack functionality or calling custom methods to track events.
Features
- Autotrack events
- Track custom events
- Display client-side experiments (if an experiment is created)
- Display client-side personalization campaigns (if a personalization is created)
Methods
Browser support
Javascript SDK supports these browsers that it was tested on:
- Chrome 121+
- Edge 121+
- Safari 17.3+
- Firefox 122+
Installation
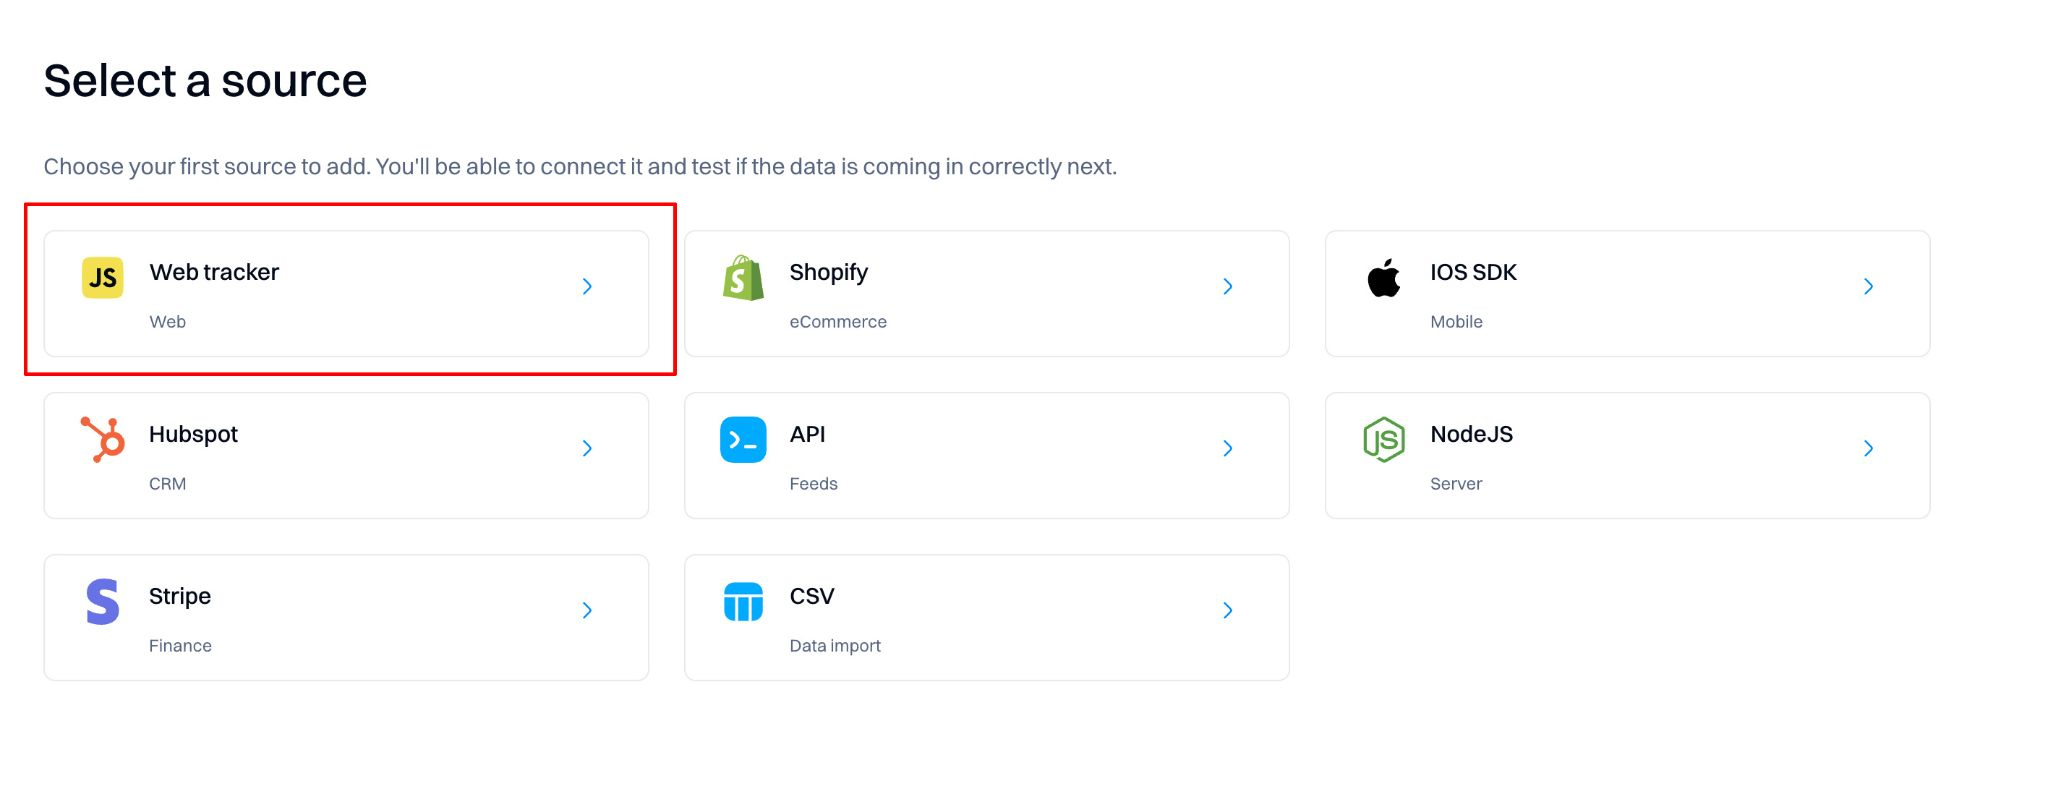
Create a Web tracker source
Under the "Sources" page, select the "Create source" button and then the "Web tracker" option.
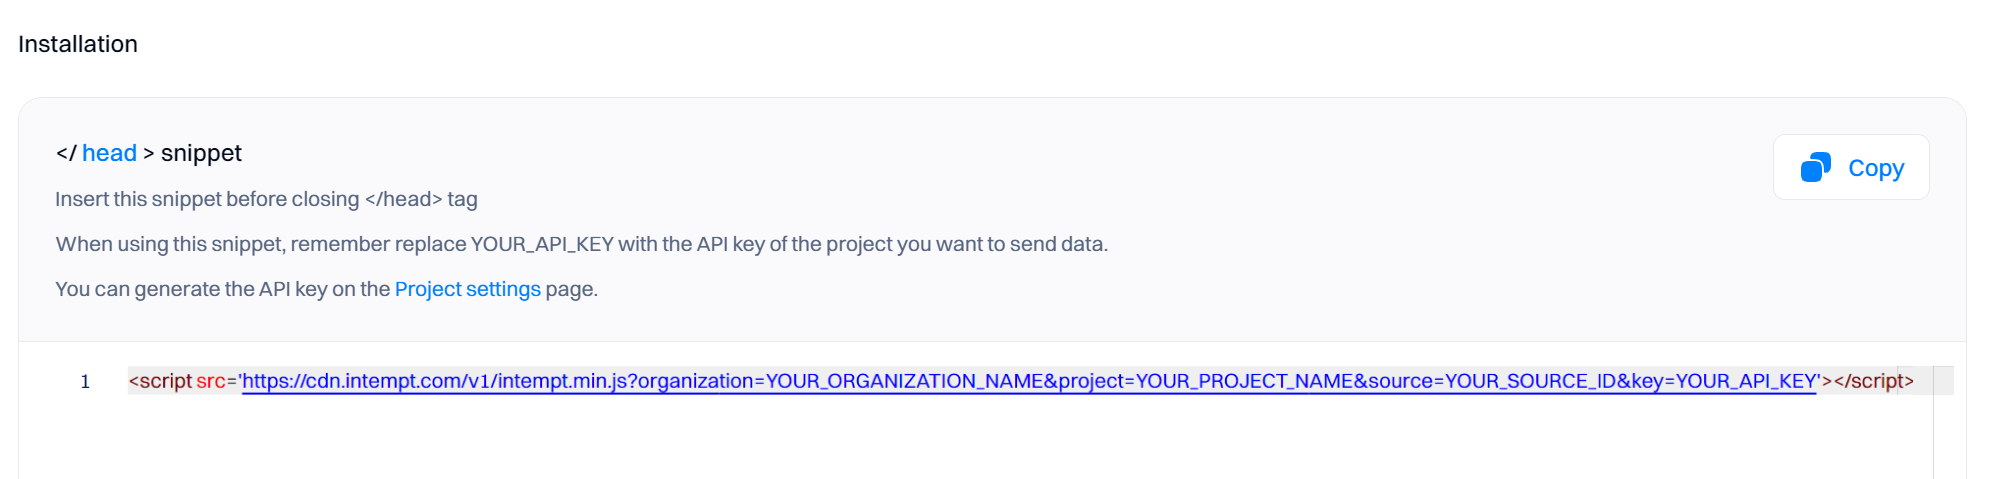
Under “Installation,” copy the code block snippet containing the script tags and Javascript function.
Create the API key
Refer to API keys to create unique API keys that you can use in your project to authenticate SDK access.
Don't miss out!
Remember to replace "YOUR_API_KEY" with the API key you generated via API keys section.
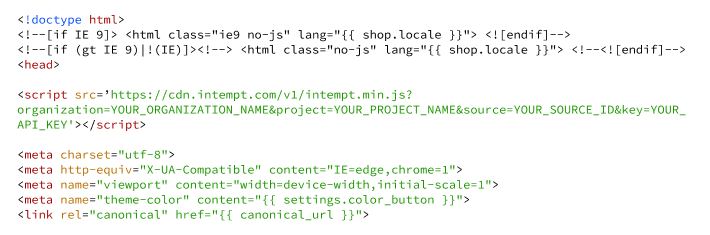
Initialize the SDK
Paste the snippet in the tag section of your website. This should be an HTML page that acts as a base or template page (with other scripts your page loads) to ensure all possible events are captured.
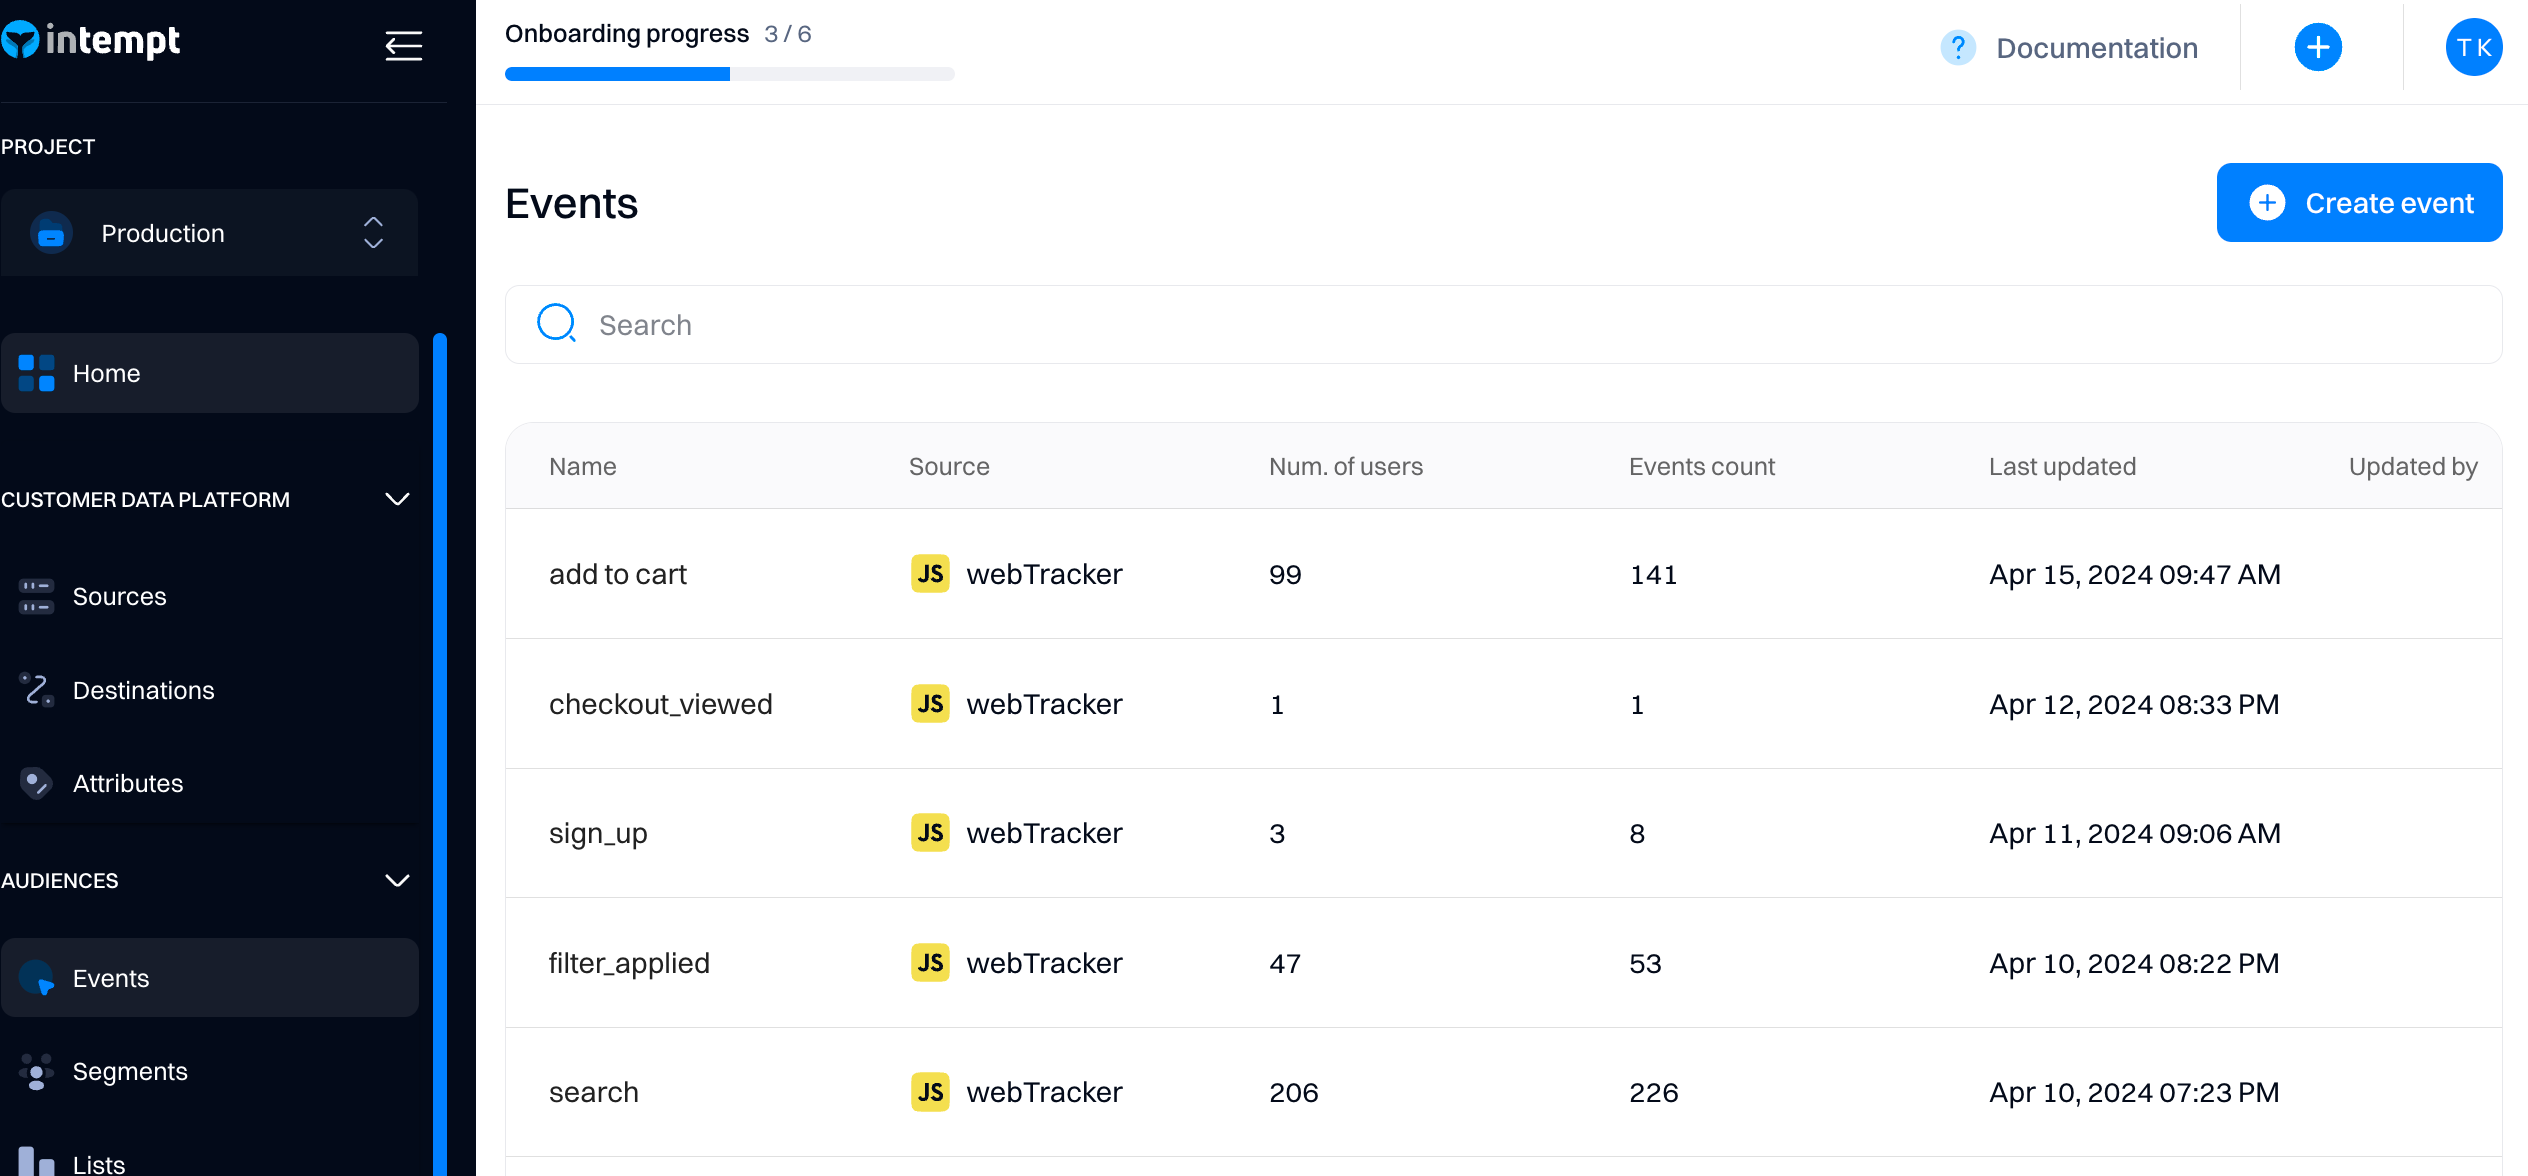
Supported event types
After the SDK is initialized, you can access two types of events tracked by the SDK.
Auto-tracked events
Some web tracker events are recorded automatically; you can use them as soon as the source is created.
| Event | Description |
|---|---|
| View page | This event is triggered every time a user opens a new page on your website. |
| Page leave | This event is recorded when a user leaves a page. |
| Click on | Capture this event every time a user clicks on a specific element, like buttons or links. It's crucial for understanding user behavior around key interactions on your site. |
| Change on | This event occurs whenever a user makes a change to a field in a form, such as selecting an option from a dropdown or toggling a switch. It helps track user preferences and input patterns. |
| Submit on | Triggered when a user submits a form, this event is vital for tracking conversions and understanding how effectively your forms lead to user actions. |
| Start session | This event marks the beginning of a user's session on your site. |
| End session | Recorded when a user's session ends, either by closing the browser, expiring the session timeout, or manually logging out. |
Custom events
Custom events are specific actions you define in your code that you want to track. Compared to autotrack events, which only require a tracking snippet to be added, custom events require advanced planning (refer to Complete guide to event tracking) and developer involvement to add the code to your website or application. After the custom event is tracked, it will automatically appear in the Events list.
Use the SDK methods below to perform custom event tracking.
SDK methods
Track
The track method is the simplest way to track events. It records event attributes present when the event was performed, including timestamps, IDs, amounts, and other event-specific information. Note that the track method does not allow tracking user attributes. Instead, use the identify or record methods.
Example
const trackParams = {
  eventTitle: 'Purchase Completed',
  data: {
    itemId: 'SKU12345',
    price: 29.99,
    quantity: 1
  }
};

intempt.track(trackParams);
In this example, the track method logs a product view event with additional data about the product, such as its ID, name, and price.
Declaration
The track method is declared as follows in TypeScript, highlighting that it does not return any value:
track(params: TrackParams): void
Parameters
The parameters for the track method are encapsulated within the TrackParams type, allowing for extensive customization and detailed event tracking:
type TrackParams = {
  eventTitle: string,             // Title of the event being tracked.
  data: {[key:string]: any}       // Additional data related to the event in a key-value pair format.
}
Record
The record method allows you to track everything about the event - including user or account attributes and identifying the user. We recommend using the record if you want to use a single method to track the event data.
Example
const recordParams = {
  eventTitle: 'login',
  userId: '[email protected]',
  userAttributes: {
    loginMethod: 'OAuth',
    attemptCount: 3
  },
  data: {
    ipAddress: '192.168.1.1'
  }
};

intempt.record(recordParams);
In the example above, the record method tracks login event and identifies the user with [email protected], track user's attributes (loginMethod, attemptCount) and event attributes (ipAddress).
Declaration
The record method is declared as follows in TypeScript, signifying that it does not return any output:
record(params: RecordParams): void
Parameters
The parameters for the record method are defined within the RecordParams type, which supports detailed tracking and rich data collection:
type RecordParams = {
  eventTitle: string,                // Mandatory title of the event.
  accountId?: string,                // Optional account ID involved in the event.
  userId?: string,                   // Optional user ID related to the event.
  accountAttributes?: {[key:string]: any},  // Optional attributes associated with the account.
  userAttributes?: {[key:string]: any},     // Optional attributes specific to the user.
  data?: {[key:string]: any}         // Optional additional data relevant to the event.
}
Identify
The identify method allows you to tie a user to their actions and record attributes about them. It includes a unique user ID and any optional attributes you know about the user, like their email, name, and more.
Identifying users helps us understand who they are and what they are doing. Once identified, Intempt connects events related to formerly anonymous IDs with the unique set IDs.
Example
function loginRequest(user) {
  return authUser(user)
    .then(authorizedUser => {
        intempt.identify({userId: user.email})
    })
}
This usage scenario involves calling the identify function after successfully authenticating the user, ensuring that all subsequent actions are correctly associated with the identified user.
Declaration
The identify method is declared as follows in TypeScript, indicating that it does not return any value:
identify(params:IdentifyParams):void
Parameters
The parameters for the identify method is defined by the IdentifyParams type, which allows for detailed user tracking and event categorization:
type IdentifyParams = {
   userId: string,
   eventTitle?: string,
   userAttributes?:{[key:string]:any}
   data?:{[key:string]:any}
}
Group
The group method associates an individual user with a group, such as a company, organization, account, project, or team.
The Group method enables you to identify what account or organization your users are part of. Two IDs are relevant in a Group call: the userId, which belongs and refers to the user, and the accountId, which belongs and refers to the specific group. A user can be in more than one group, which would mean different group IDs, but the user will only have one user ID that is associated with each of the different groups.
In addition to the accountId, which is how you’d identify the specific group or company, the group method receives attributes specific to the group, like industry or number of employees that belong to that specific account. Like the attributes of an identify method, you can update these when you call the same attribute with a different value.
Example
const groupParams = {
  accountId: '12345',
  eventTitle: 'New User Group',
  accountAttributes: {
    leader: 'John Doe',
    size: 10
  }
};

intempt.group(groupParams);
In this example, the group method is used to log information about a new user group, including details about the group leader and size.
Declaration
The group method is declared as follows in TypeScript, indicating that it does not return any value:
group(params:GroupParams):void
Parameters
The parameters for the group method are defined by the GroupParams type, which allows for detailed user tracking and event categorization:
type GroupParams = {
  accountId: string,
  eventTitle?: string,
  accountAttributes?: {[key:string]:any}
}
Alias
The alias method associates two user IDs together, typically when you want to merge multiple profiles or sessions under a unified identity. This method is crucial for maintaining continuity when a user has changed their identification method or has multiple accounts.
Example
const aliasParams = {
  userId: 'user123',
  anotherUserId: 'user456'
};

intempt.alias(aliasParams);
In this example, the alias method associates the user ID 'user123' with another user ID 'user456'. This can help in cases where the same individual has used different login methods or has multiple accounts that need to be treated as a single entity.
Declaration
The alias method is declared as follows in TypeScript, indicating that it does not return any value:
alias(params: AliasParams): void
Parameters
type AliasParams = {
  userId: string,           // The primary user ID.
  anotherUserId: string,    // The user ID to be merged with the primary ID.
}
optIn
The optIn method enables tracking of user interactions within an application and reverses any previous tracking restrictions set by the optOut method.
Example
intempt.optIn();
After this method is called, the application will begin to track user activities, assuming no other restrictions are in place.
Declaration
optIn(): void
optOut
The optOut method disables the tracking of user interactions, ensuring that the user's actions are not recorded.
Example
intempt.optOut();
Declaration
optOut(): void
isUserOptIn
The isUserOptIn method checks whether the user has consented to tracking. It is primarily used to ensure compliance with user preferences before performing any tracking operations.
Example
if (intempt.isUserOptIn()) {
  console.log("Tracking is enabled.");
} else {
  console.log("Tracking is disabled.");
}
This example demonstrates verifying if tracking is enabled before logging or collecting any data.
Declaration
isUserOptIn(): boolean
Returns
- Boolean: Returns true if tracking is enabled (optIn has been called) and false if tracking is disabled (
optOuthas been called). The default state is true, indicating that tracking is enabled unless explicitly disabled.
Consent
You can use consent method to track if the user has provided consent to use his data for consent purposes.
This functionality is critical that you only use the data complying with privacy regulations like GDPR and CCPA.
Example
const consentParams = {
  action: 'agree',
  validUntil: 1691823151000, // Unix timestamp for consent expiry
  email: '[email protected]',
  message: 'User agreed to marketing emails.',
  category: 'marketing'
};

intempt.consent(consentParams);
In this example, the consent method logs a user's agreement to receive marketing emails, specifying the duration of the consent and additional details about the consent given.
Declaration
The consent method is declared as follows in TypeScript, showing that it does not produce a return value:
consent(params: ConsentParams): void
Parameters
The parameters for the consent method are specified in the ConsentParams type, which supports comprehensive tracking of consent-related information:
type ConsentParams = {
  action: ConsentAction,    // The type of action taken (e.g., 'agree', 'decline').
  validUntil: number,       // Unix timestamp indicating when the consent expires.
  email?: string,           // Optional: User's email address, if applicable.
  message?: string,         // Optional: A message detailing the consent scenario.
  category?: string         // Optional: Category of consent (e.g., 'marketing', 'analytics').
}
Troubleshooting
1. How do you verify if the event is being tracked?
There are two ways to verify if your events were tracked successfully.
A. Check via the browser console's network tab.
Use the browser's inspect tool, select the network tab, and enter "track" into the search bar.
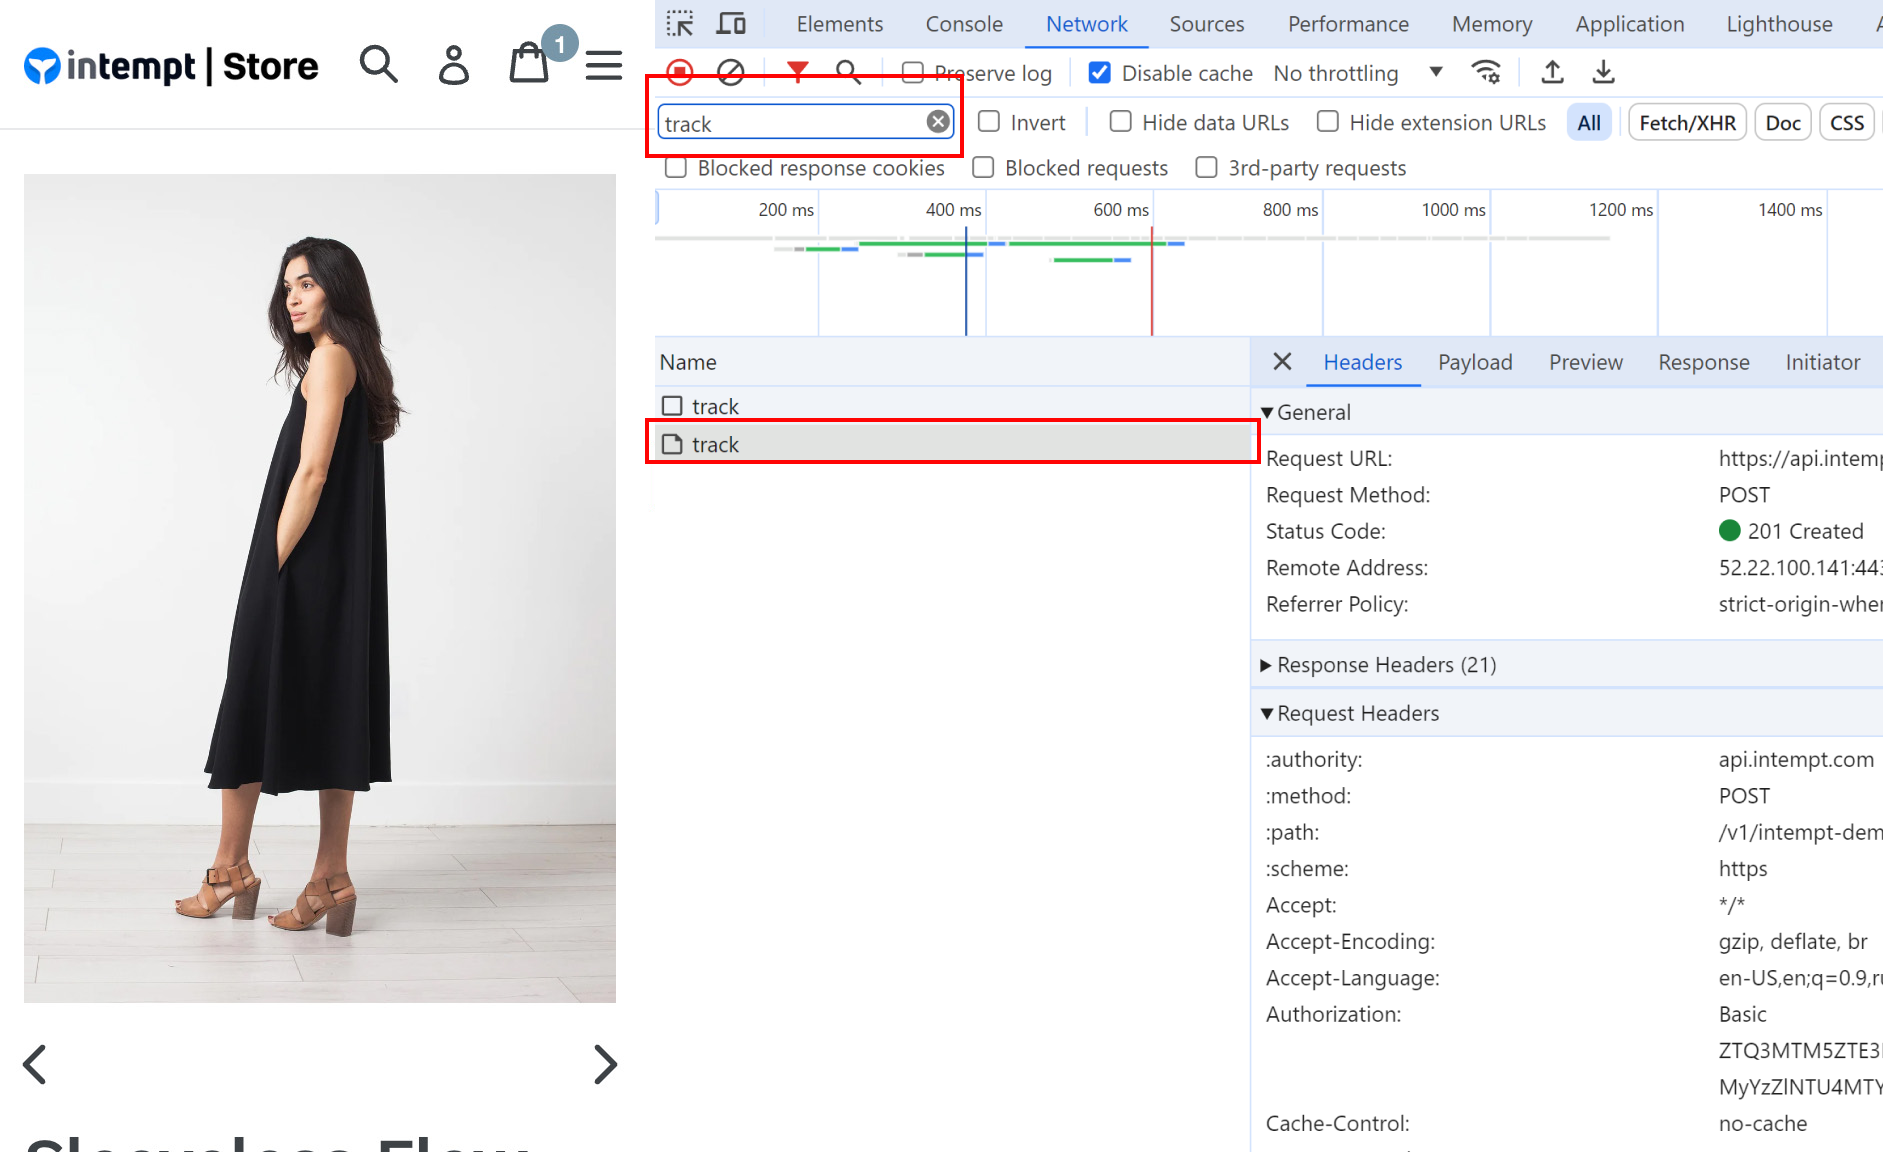
This will only show network events related to event tracking via Intempt.
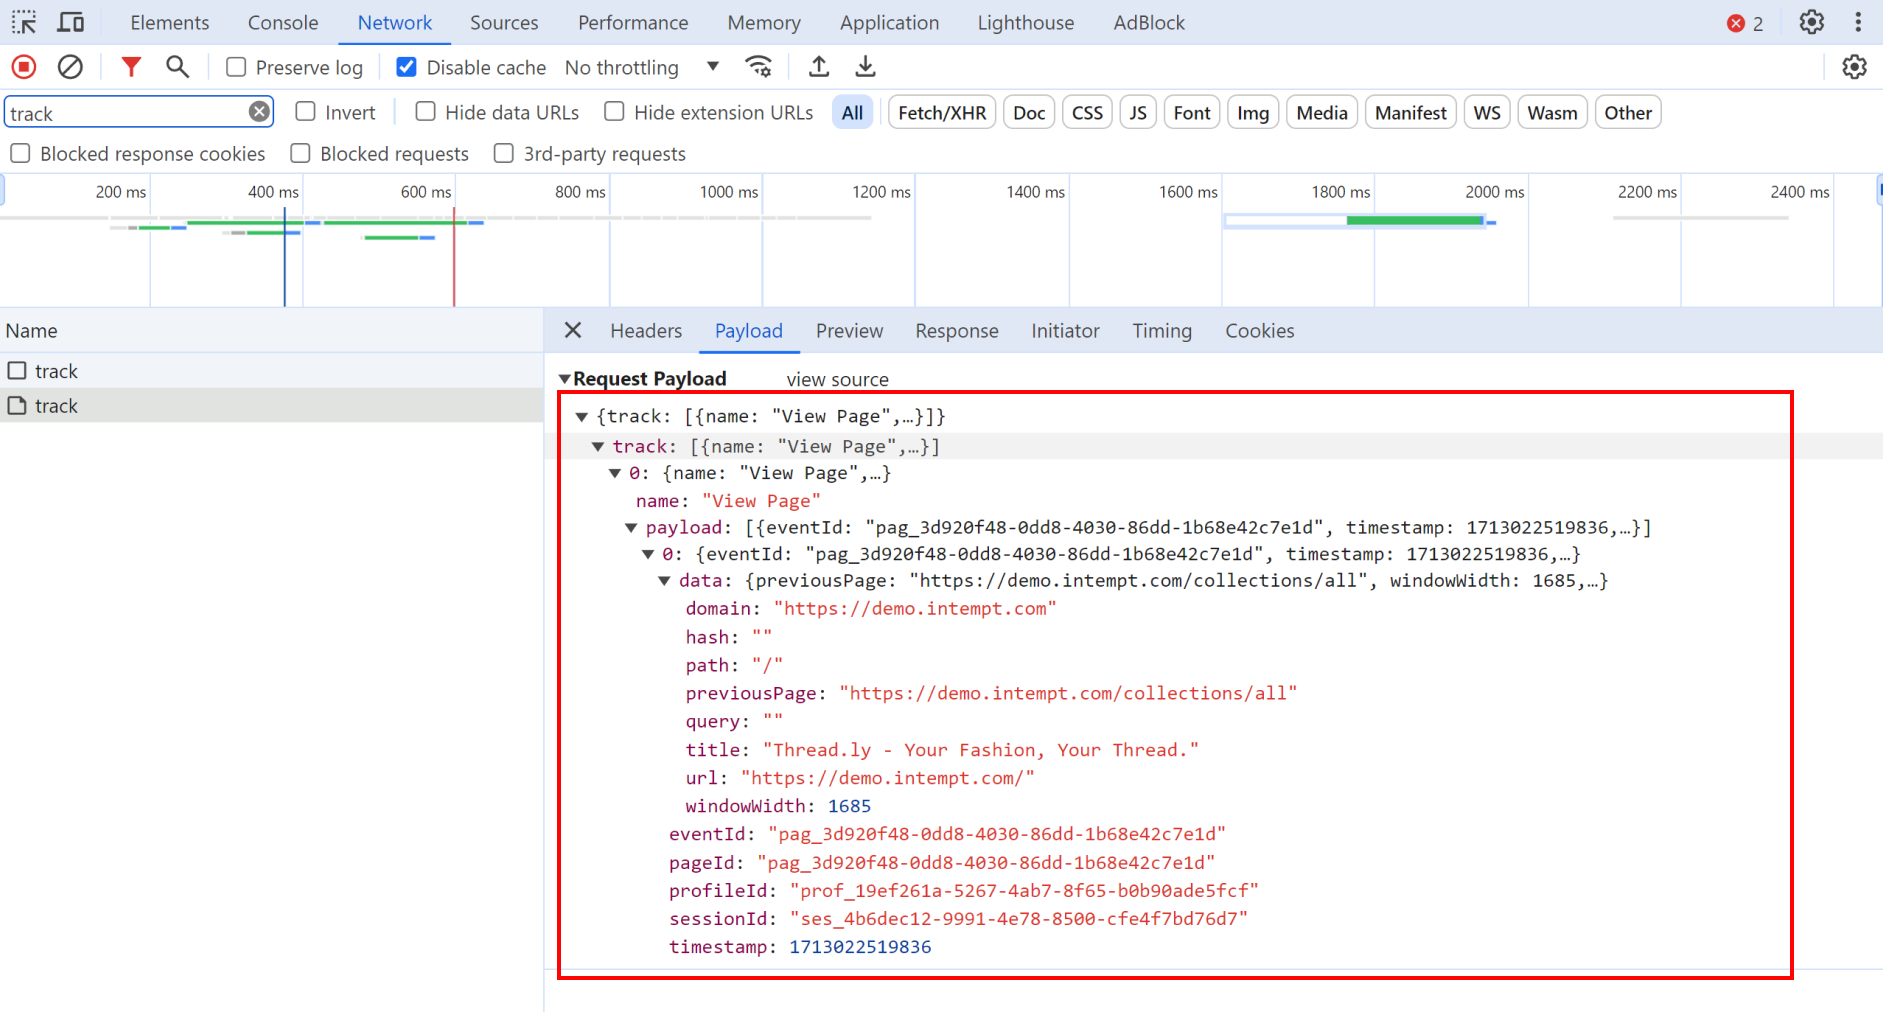
If the request is successful (returns 200 or 201), the event was tracked successfully. You can verify this by clicking on the "Payload" tab.
B. Check via your project user list.
You can visit your project user list and check the latest user data.
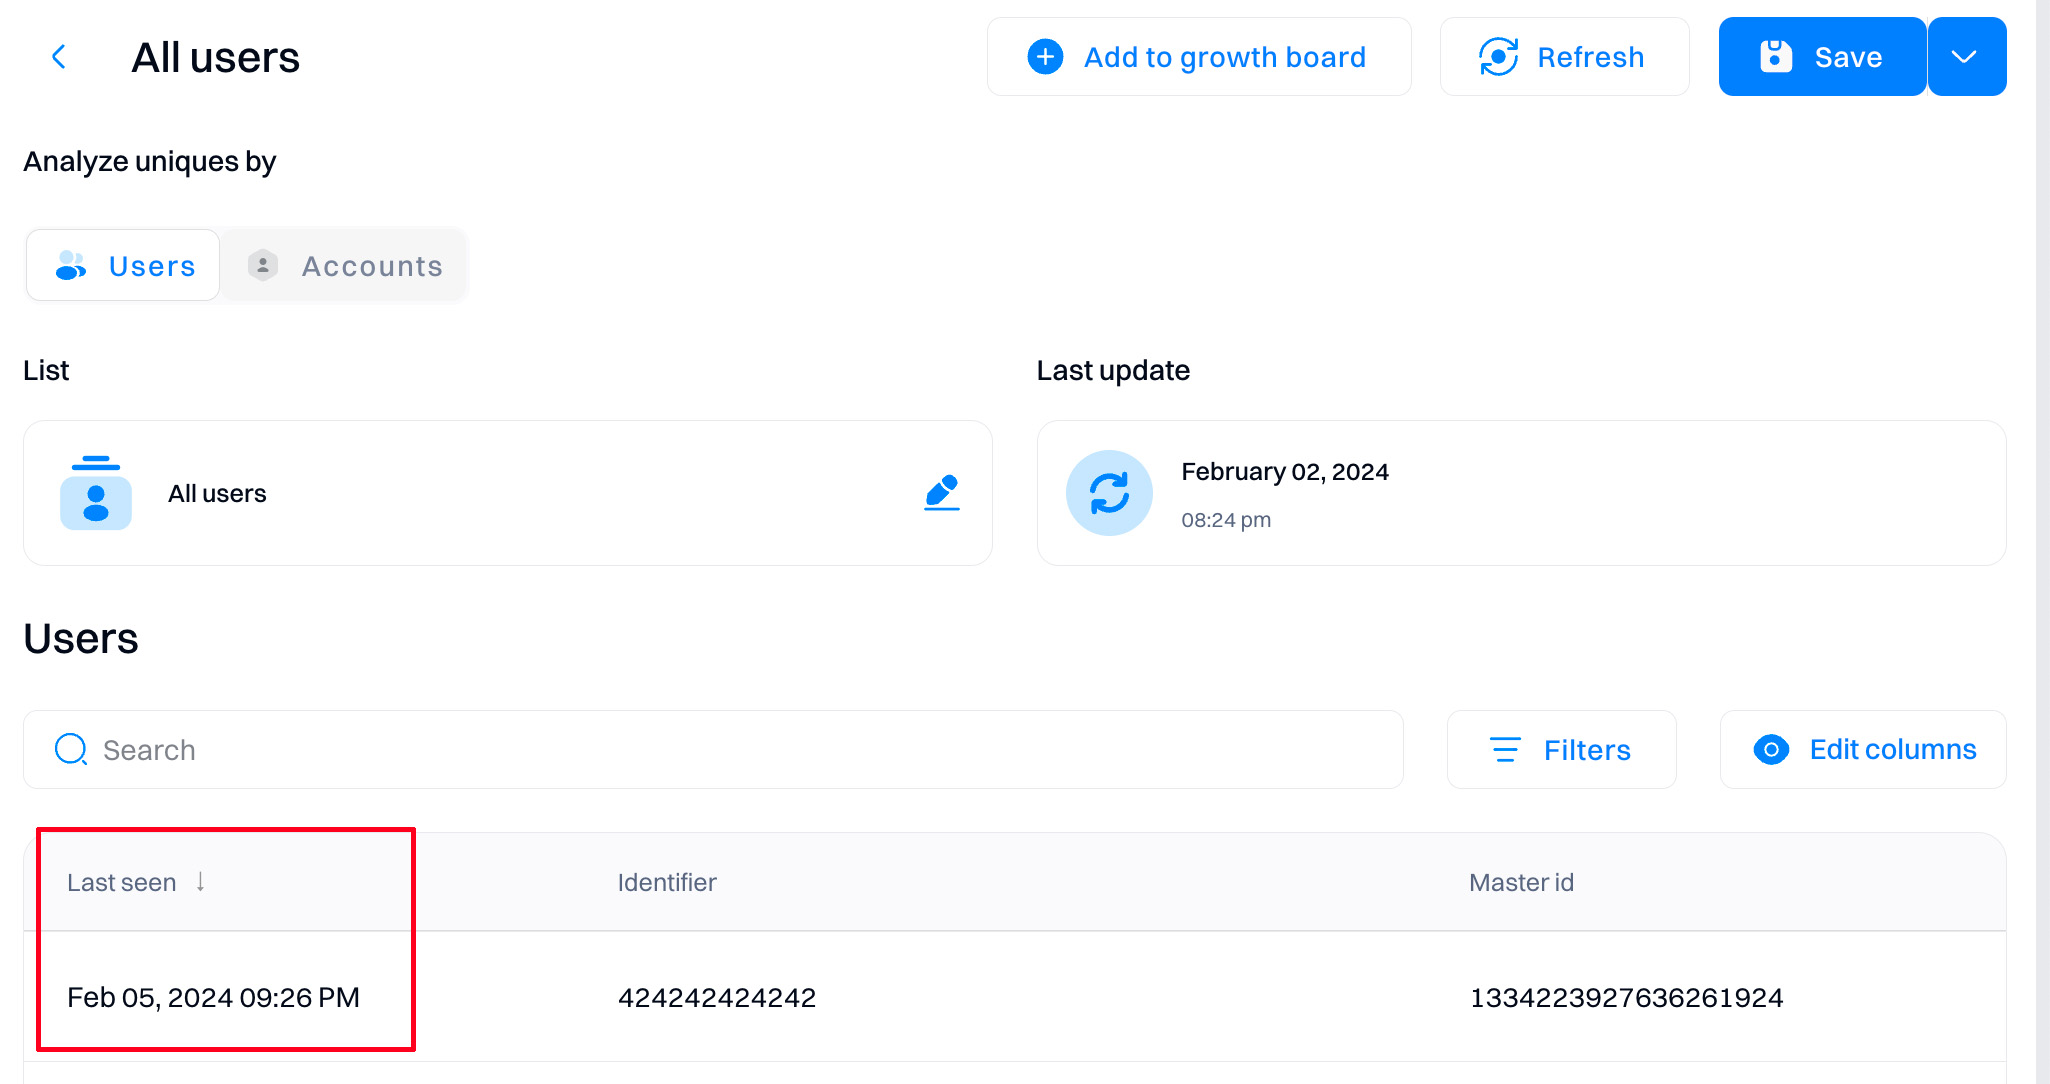
If under "Event stream," it matches the event performed, it means it was tracked successfully.
2. Why aren't my events showing up in Intempt?
-
Make sure you've disabled ad blockers and your Do Not Track (DNT) browser settings are set to false when testing your JavaScript implementation. If the DNT setting is set to true, then Intempt won't collect information from that Intempt project.
-
Double-check if you are using the correct event listeners. You need to use event listeners to track each custom event when it occurs.
First, you need to use a specific HTML element (, , etc.) and add an event listener to it.
Then, you can include the custom event you define in the following example.<button id="regBtn">Sign up</button>const regBtn = document.getElementById("regBtn") regBtn.addEventListener("click", () => { intempt.record({ eventTitle:"signed_up", data: { "first_name": document.getElementById("first_name_input").value, "last_name": document.getElementById("last_name_input").value, "email": document.getElementById("email_input").value, "consented": document.getElementById("consent_input").checked, "discount_card_number": document.getElementById("card_number_input").value, } });Don't miss out!
Make sure that you use a unique ID values for HTML elements that you are using.
3. Does Intempt use third-party cookies?
No, our Intempt JavaScript SDK does not set or use any third-party cookies.
4. Field Type Validation
- When sending custom events, it’s important that each field matches the data type defined in your event schema. If a field’s type changes (e.g., from a string to an object), the event will be rejected. This ensures data consistency and prevents errors.
Example:
If the field name is defined as a string in the schema:
const event = { name: “John Doe” }; // ✅ Accepted
const event = { name: { first: “John”, last: “Doe” } }; // ❌ Rejected
What to do?
Always ensure that event fields retain the same type as defined in your schema.
- Adding New Fields to Custom Events
You can now safely add new fields to your custom event schema without impacting existing fields. This allows you to extend your event tracking capabilities while keeping previous fields intact and functional.
Example:
Original event - After adding a new field
const event = { name: “John Doe” }; // ✅ Accepted
const event = { name: { first: “John”, last: “Doe” } }; // ❌ Rejected
Existing fields will remain usable even after schema updates.
Updated 2 months ago