
Server-side personalizations
Server-side personalizations allow you to deliver targeted content to visitors to your site using REST API, which is called from the rendering web application (server) before the page is served. Requests and responses to REST APIs use the JSON format for data, a widely adopted and efficient way of representing data.
| Category | Description |
|---|---|
| Overview | Uses REST API as the method of testing and personalizing site content. All dynamic action is taken server-side. |
| Where does content get changed? | On the server, before the page is rendered. |
| Advantages | - Faster page load, without re-rendering - More developer control - Integrates well with proprietary frameworks - Increased data security – sensitive data does not need to be stored client-side |
| Disadvantages | - Requires higher technical involvement - Longer implementation period - Can be harder for business stakeholders to use |
| Examples | - Major structural changes to the page - Full-page redirects - Secure access to back-end systems (pricing models, real-time inventory) - Pre-render personalization of Single Page Apps |
In pure server-side integration, your server securely interacts with an API Gateway, passing the details of the page request and asking for relevant personalization experiences.
The response is typically a JSON payload. It is then the caller’s responsibility to parse the response and act on it. You will also need to report back any engagement with the chosen experiences or significant user events. Engagement and events are reported in a similar manner (POST to and API endpoint) to personalization.
Because server-side personalization occurs within your web application stack on the back end, successful implementation requires thoughtful design and development by your tech team.

Prerequisites
The main things you need to make sure of to start your server-side personalizations are:
- You have developer resources to work with.
- You're in an area served by one of our data centers.
- If you work with a CDN, make sure you can deliver dynamic content (vs. fully cached, static pages).
Key terms
-
Personalization is a set of Experiences organized around a single goal/website change strategy.
-
Server-side personalization is a subtype of personalization that refers to how the content on your website is changed. Server-side personalization sses REST API as the method of testing and personalizing site content. All dynamic action is taken server-side.
-
Experience is a set of website changes applied to a selected audience within the personalization.
-
Control is the percentage of whole personalization traffic that will see the original website experience.
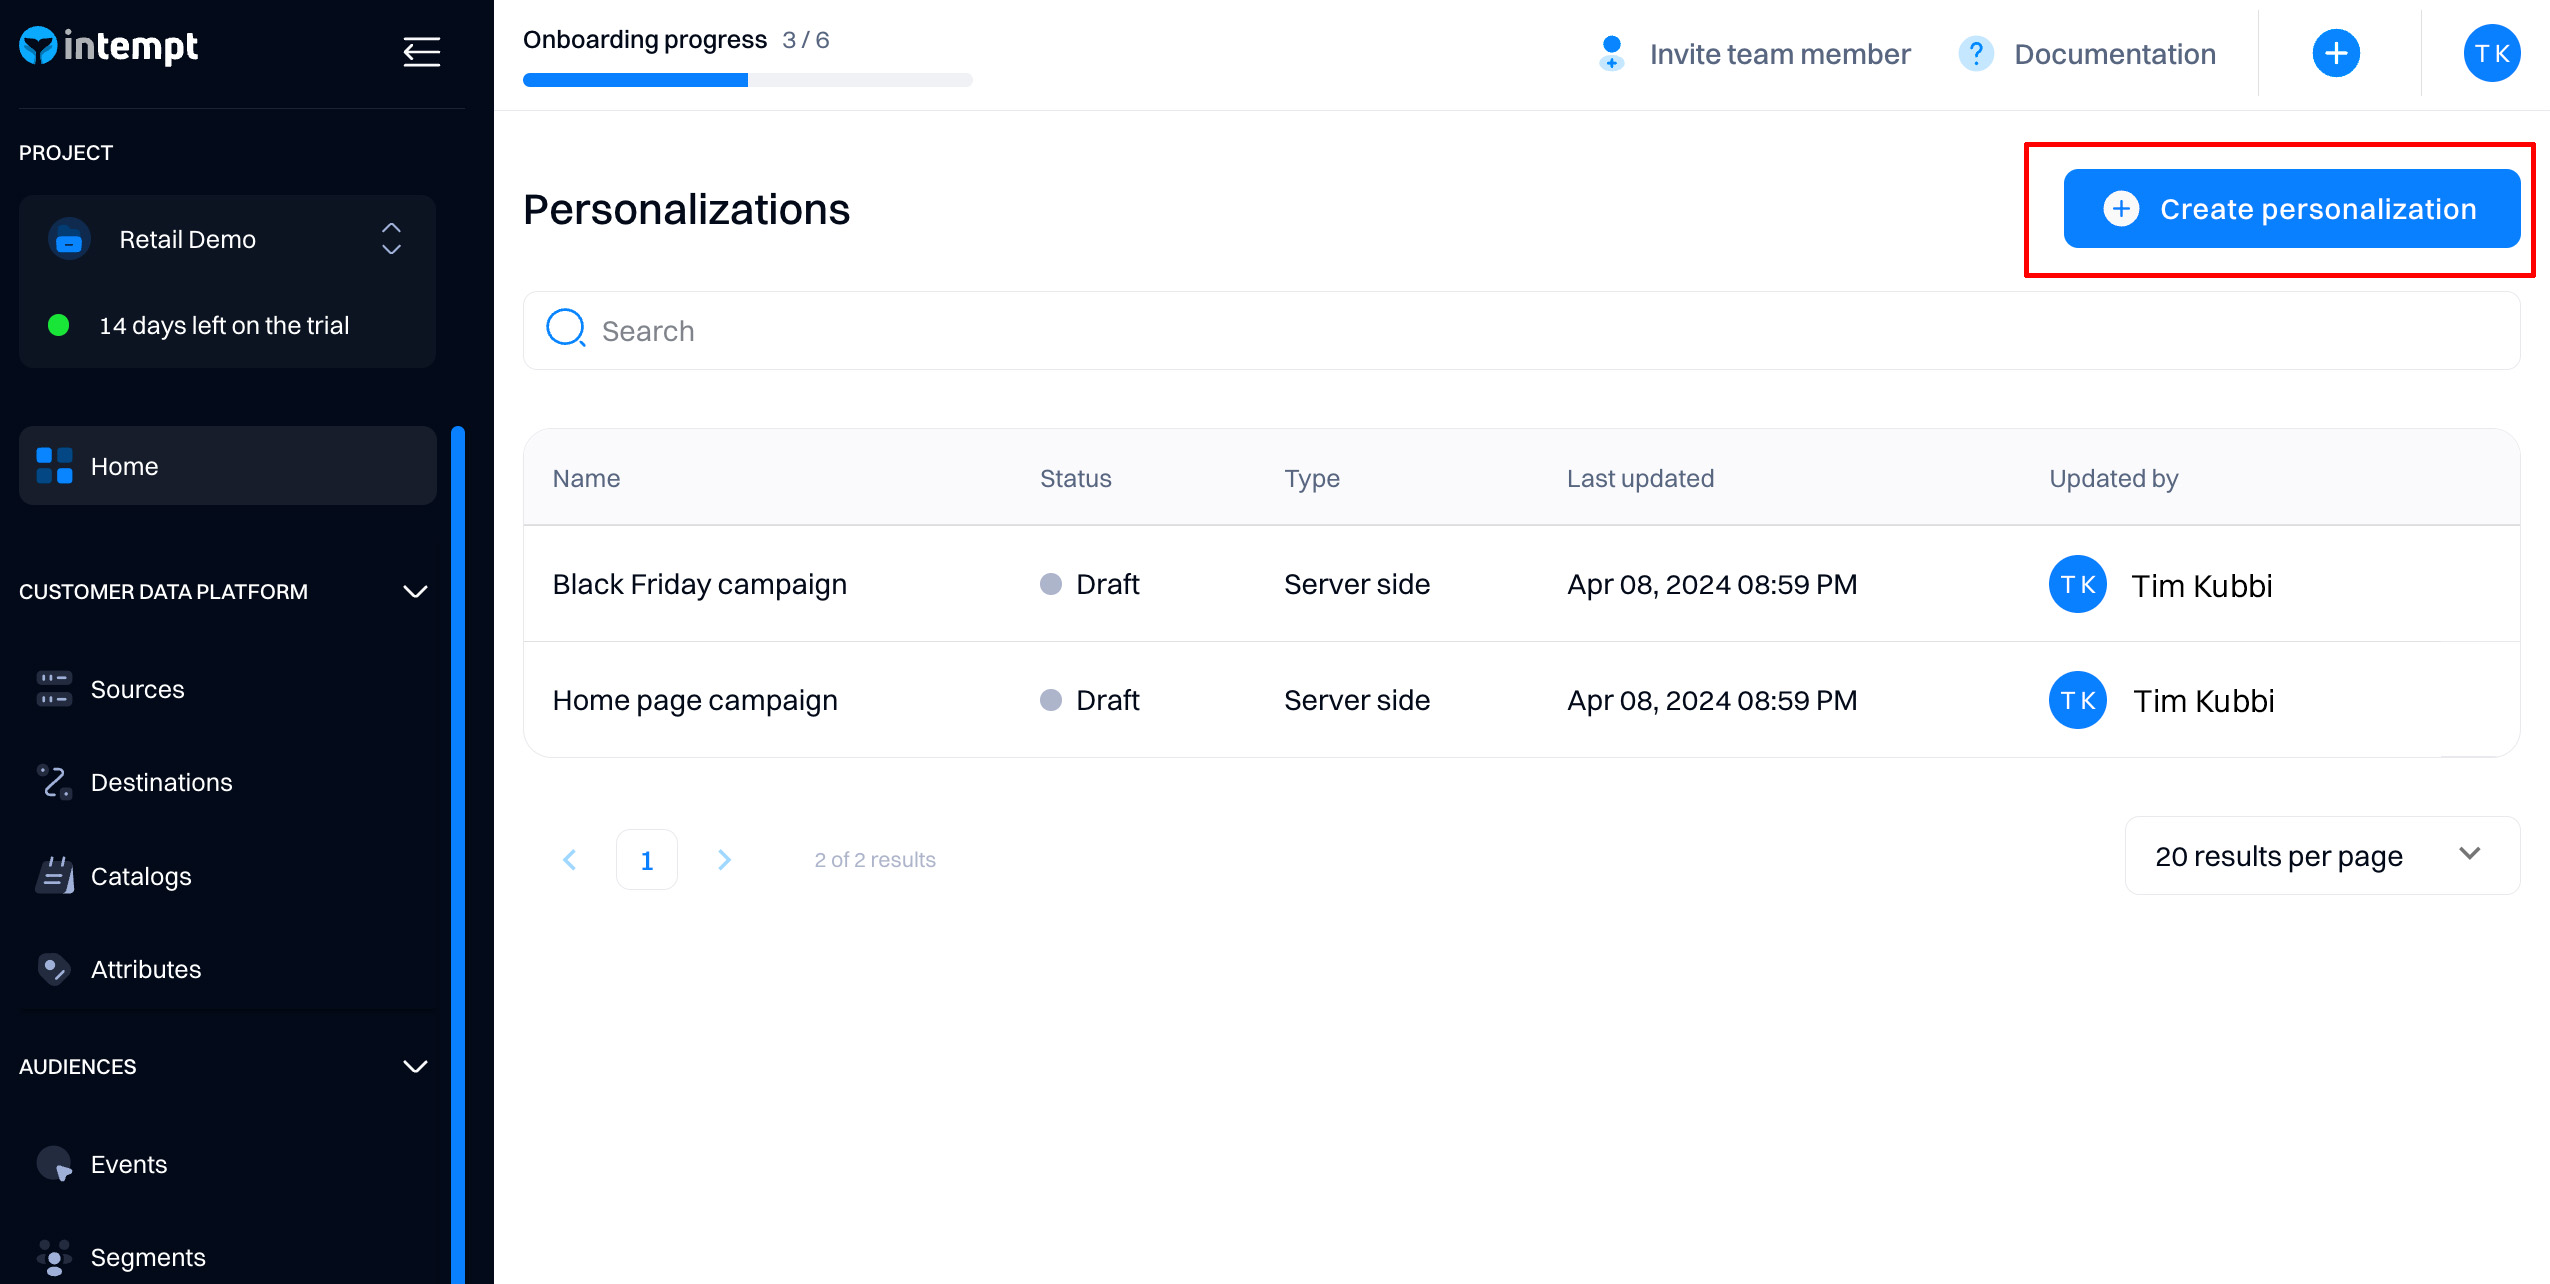
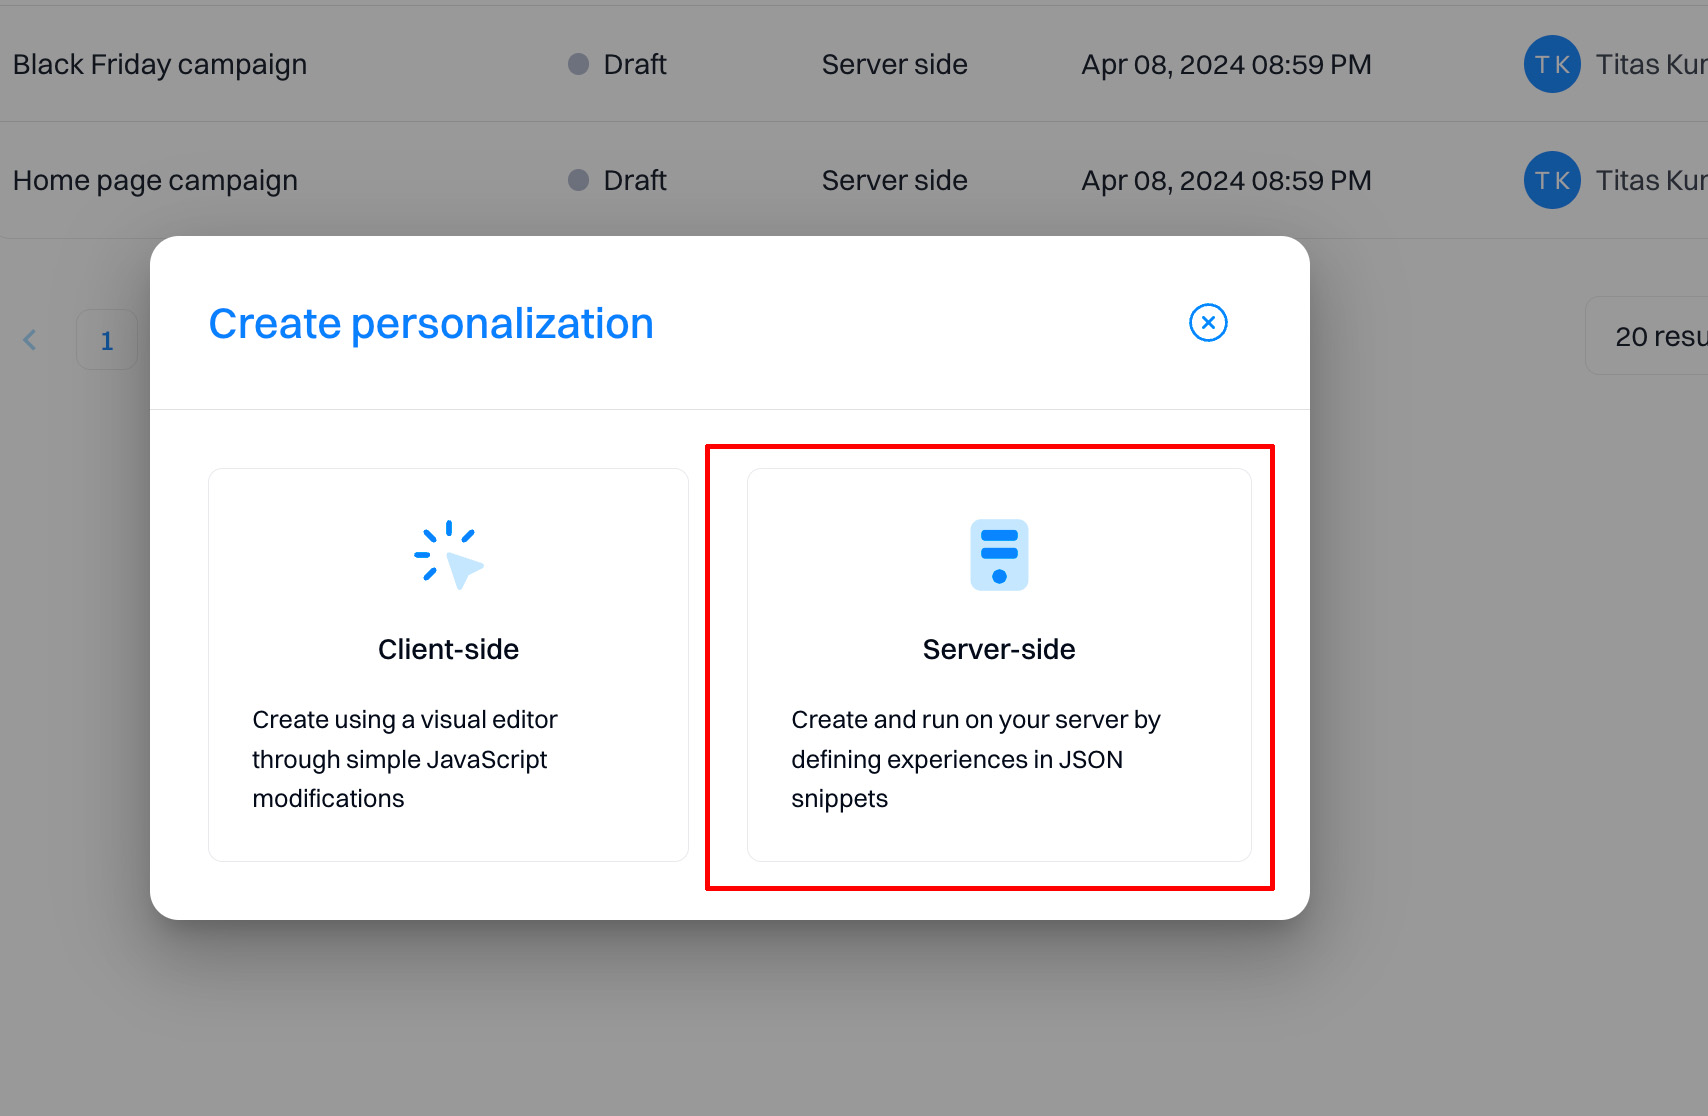
Creating a personalization
To create a personalization, go to Personalizations > Create Personalization
Next, select the type of personalization - "Server-side.”
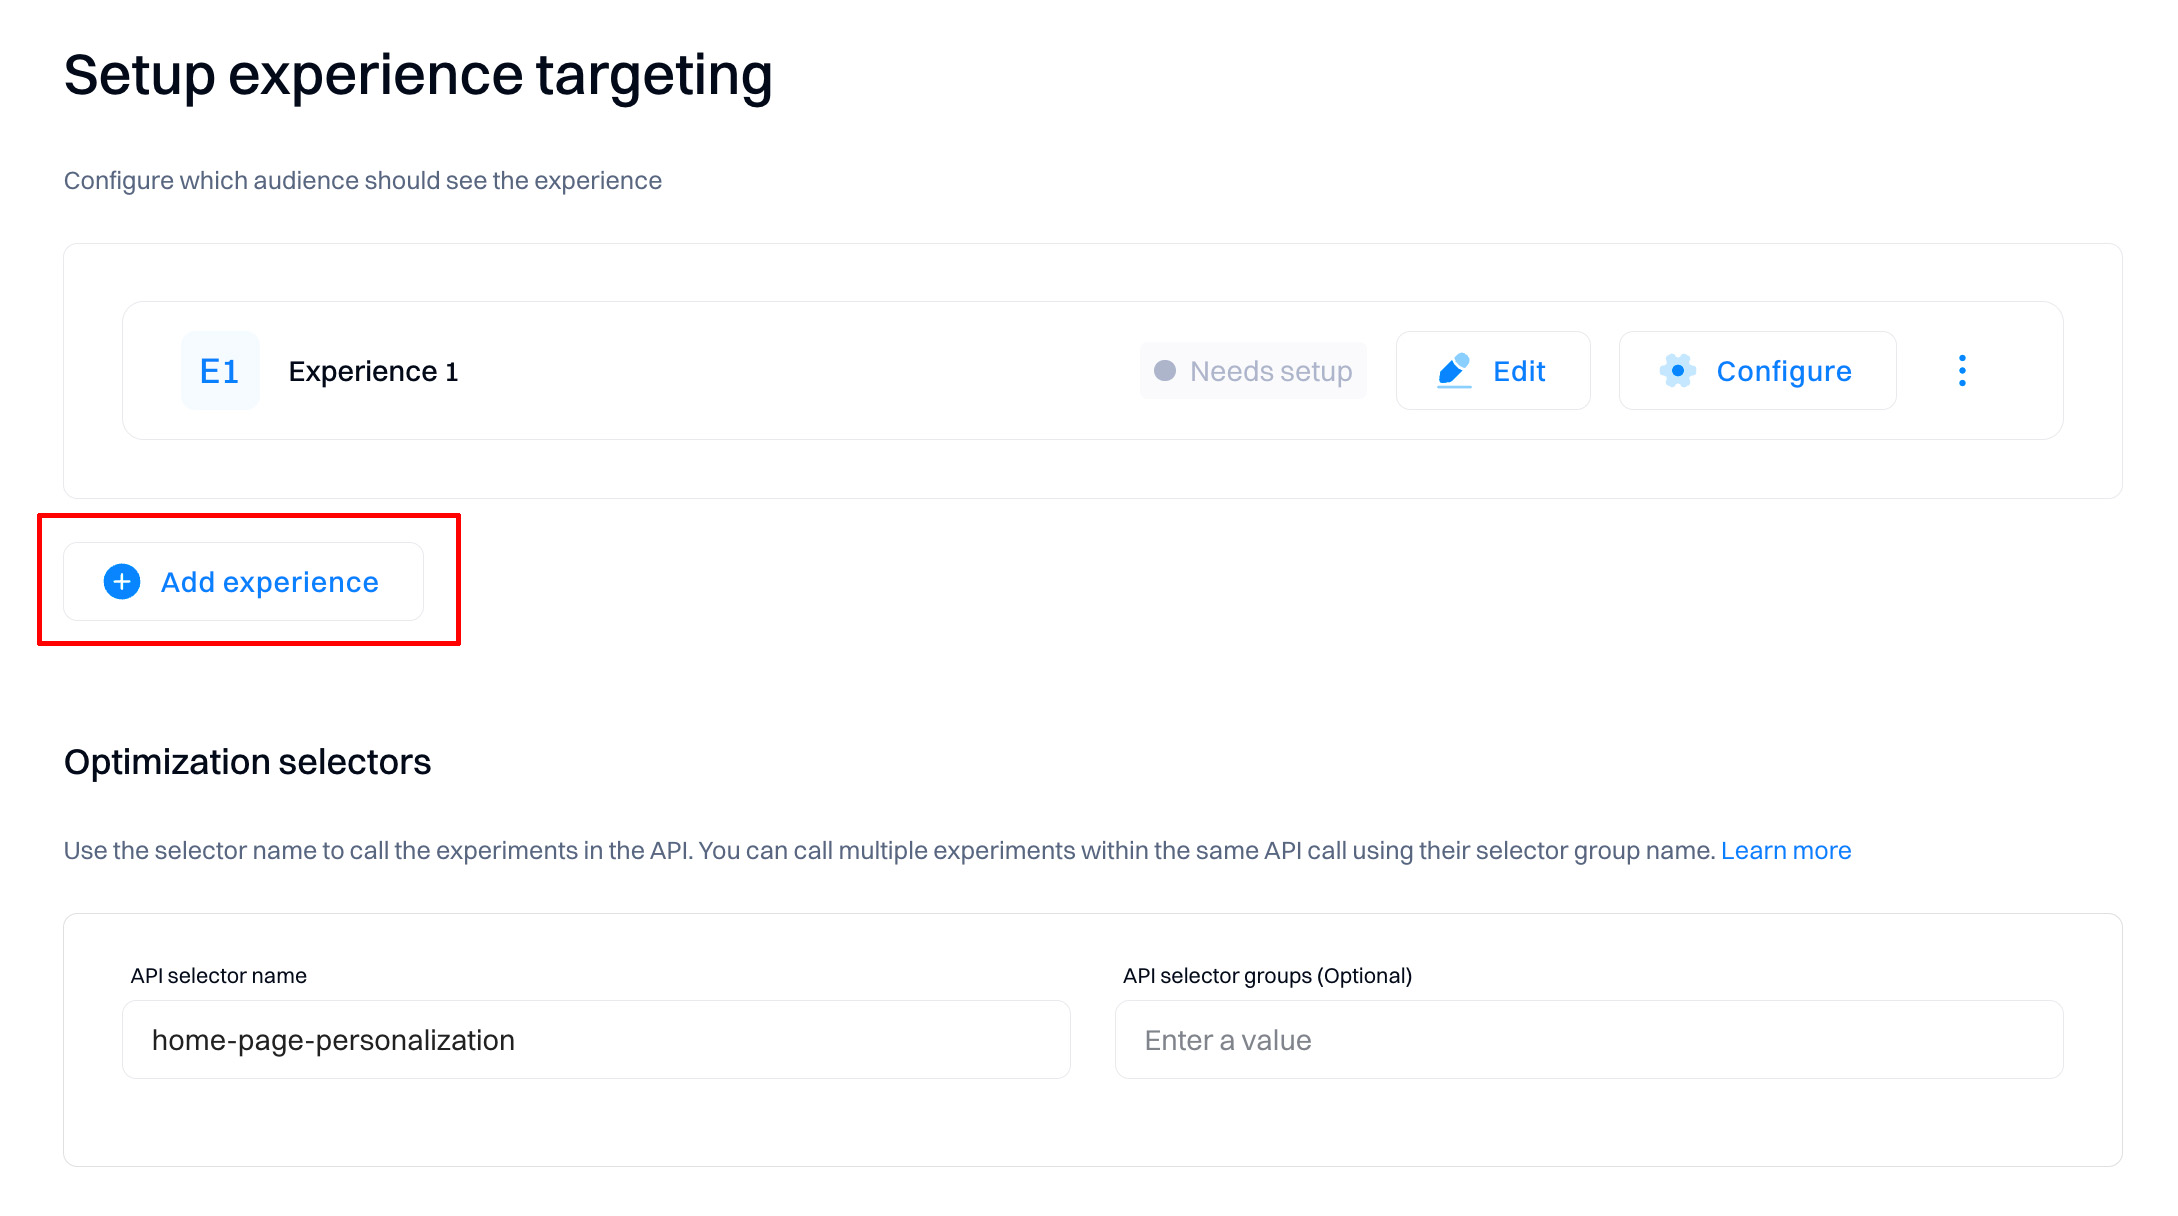
Create the experience
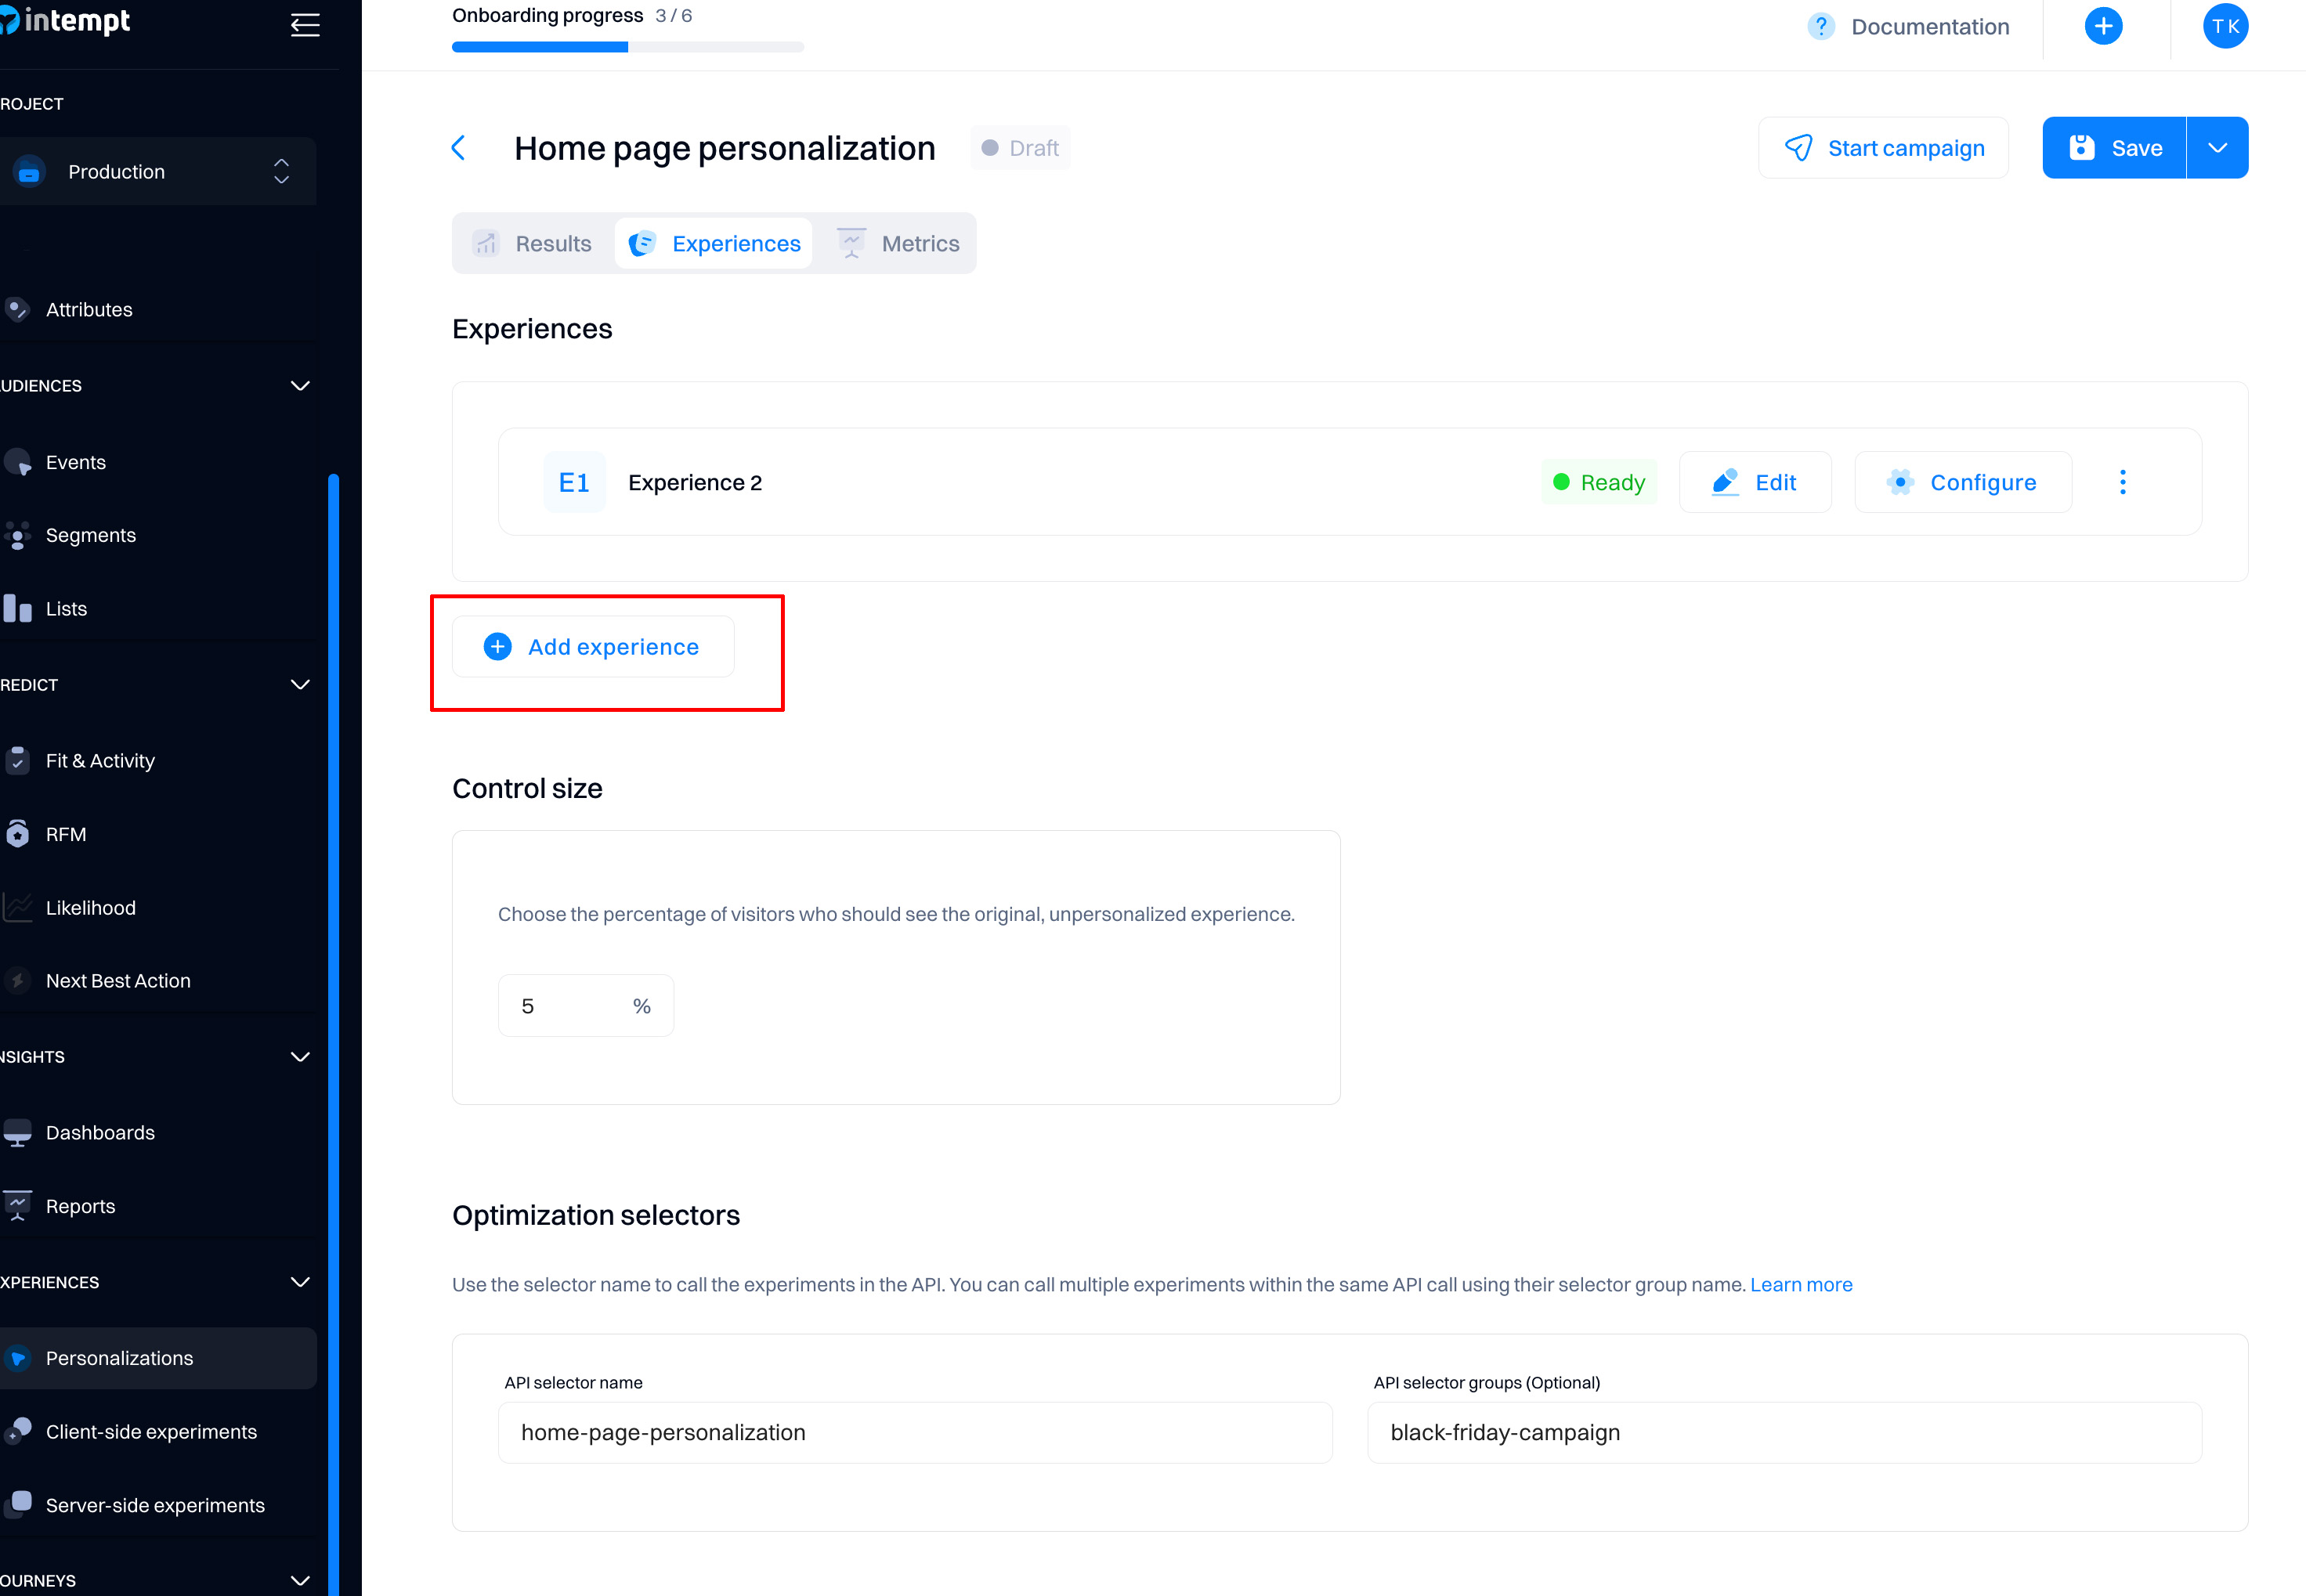
Your first experience is added by default. You can add multiple experiences by selecting "Add experience".
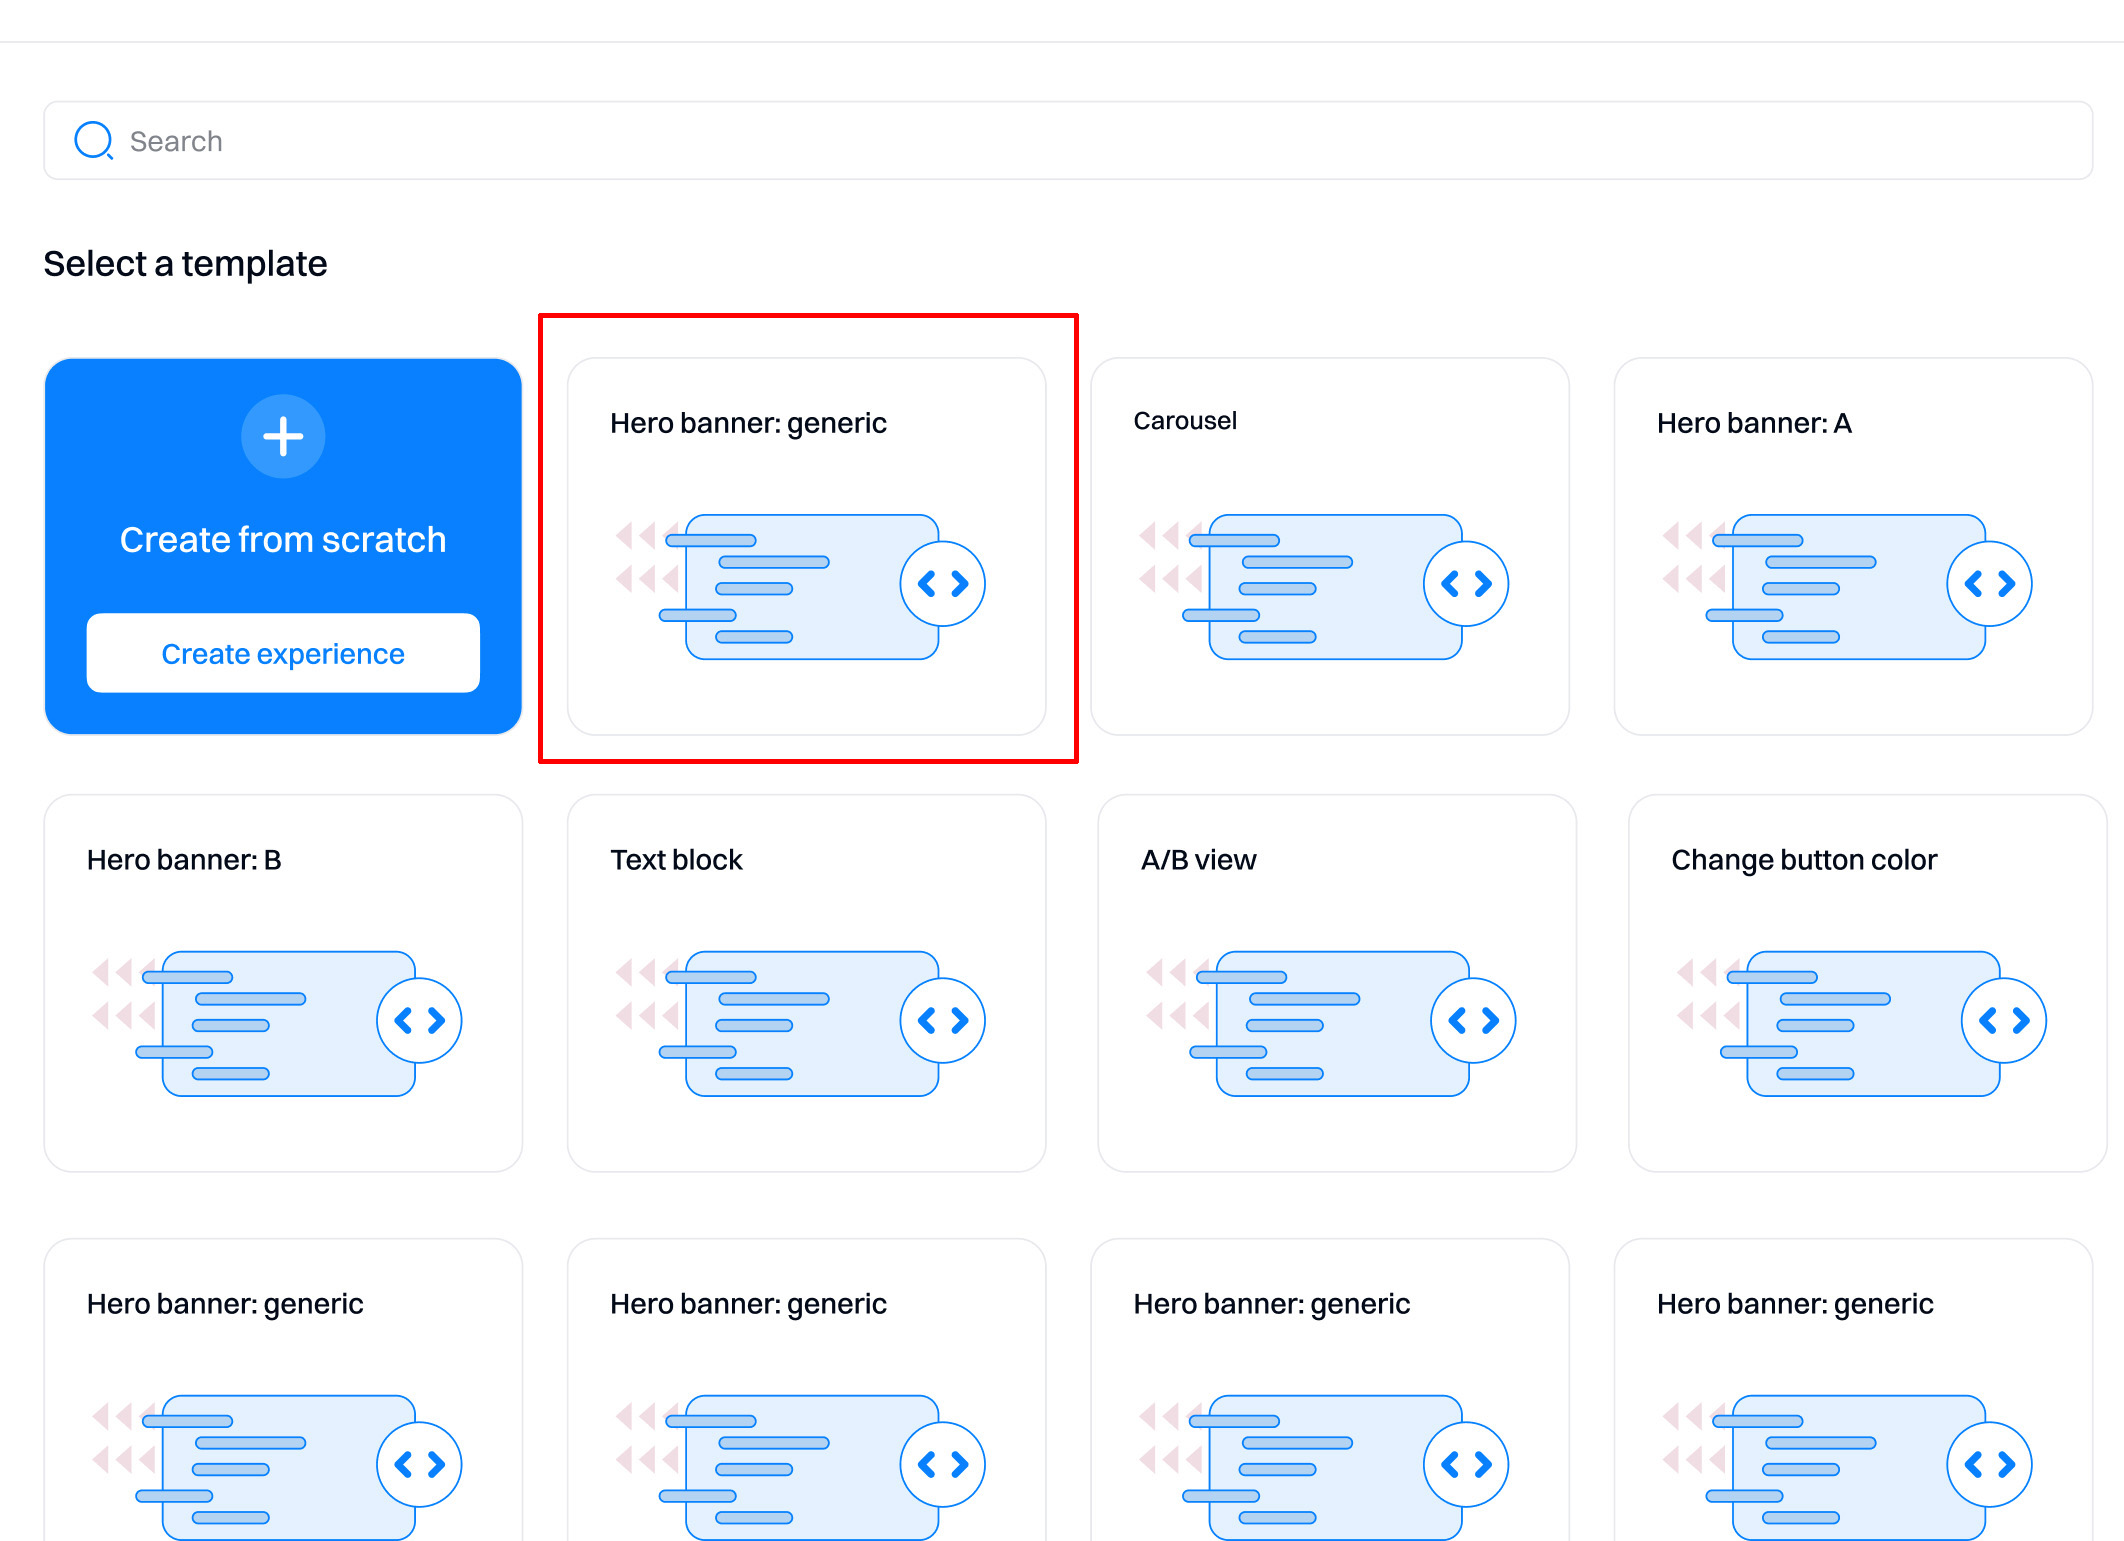
When you add a new experience, you must select whether to create it from scratch or use an existing template (if it was created before).

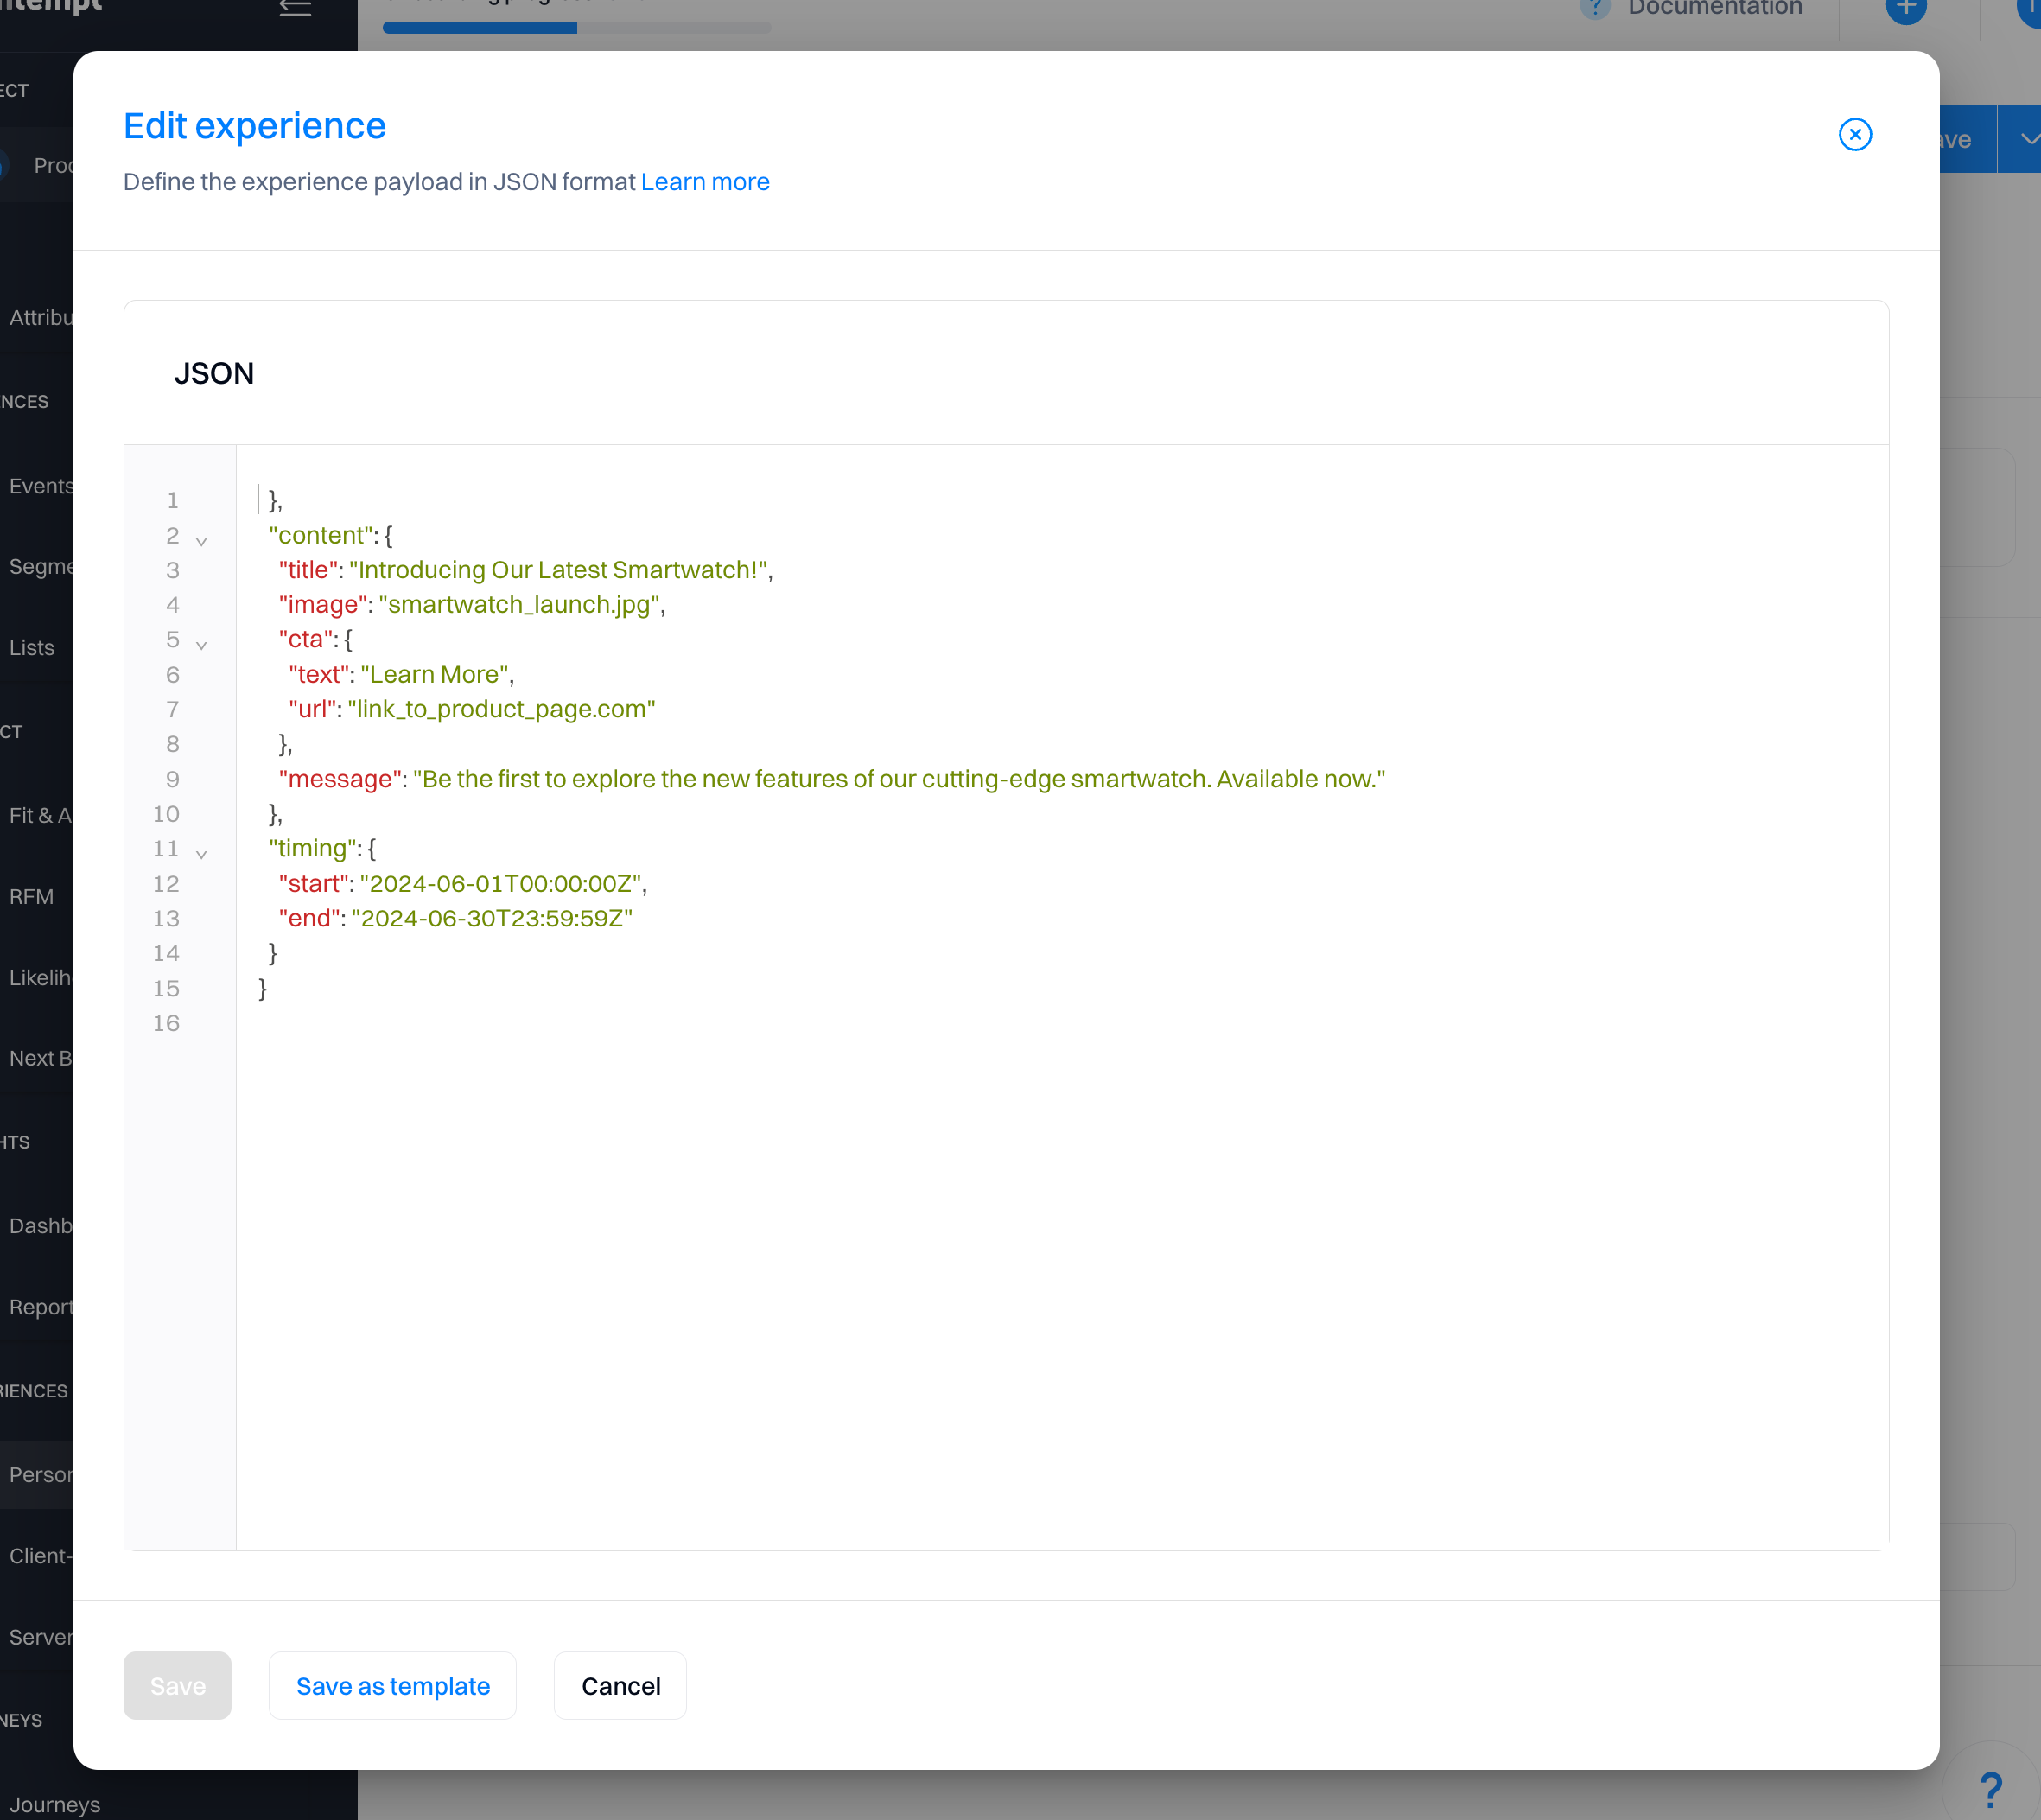
- Create from scratch. Create your variation from scratch using custom JSON payload. When you click this option, the Intempt code editor is displayed. After you enter your custom code, you can save it as a template and reuse it by clicking "Save as Template."
- Templates. These are templates you created and saved in your project.
Creating from scratch
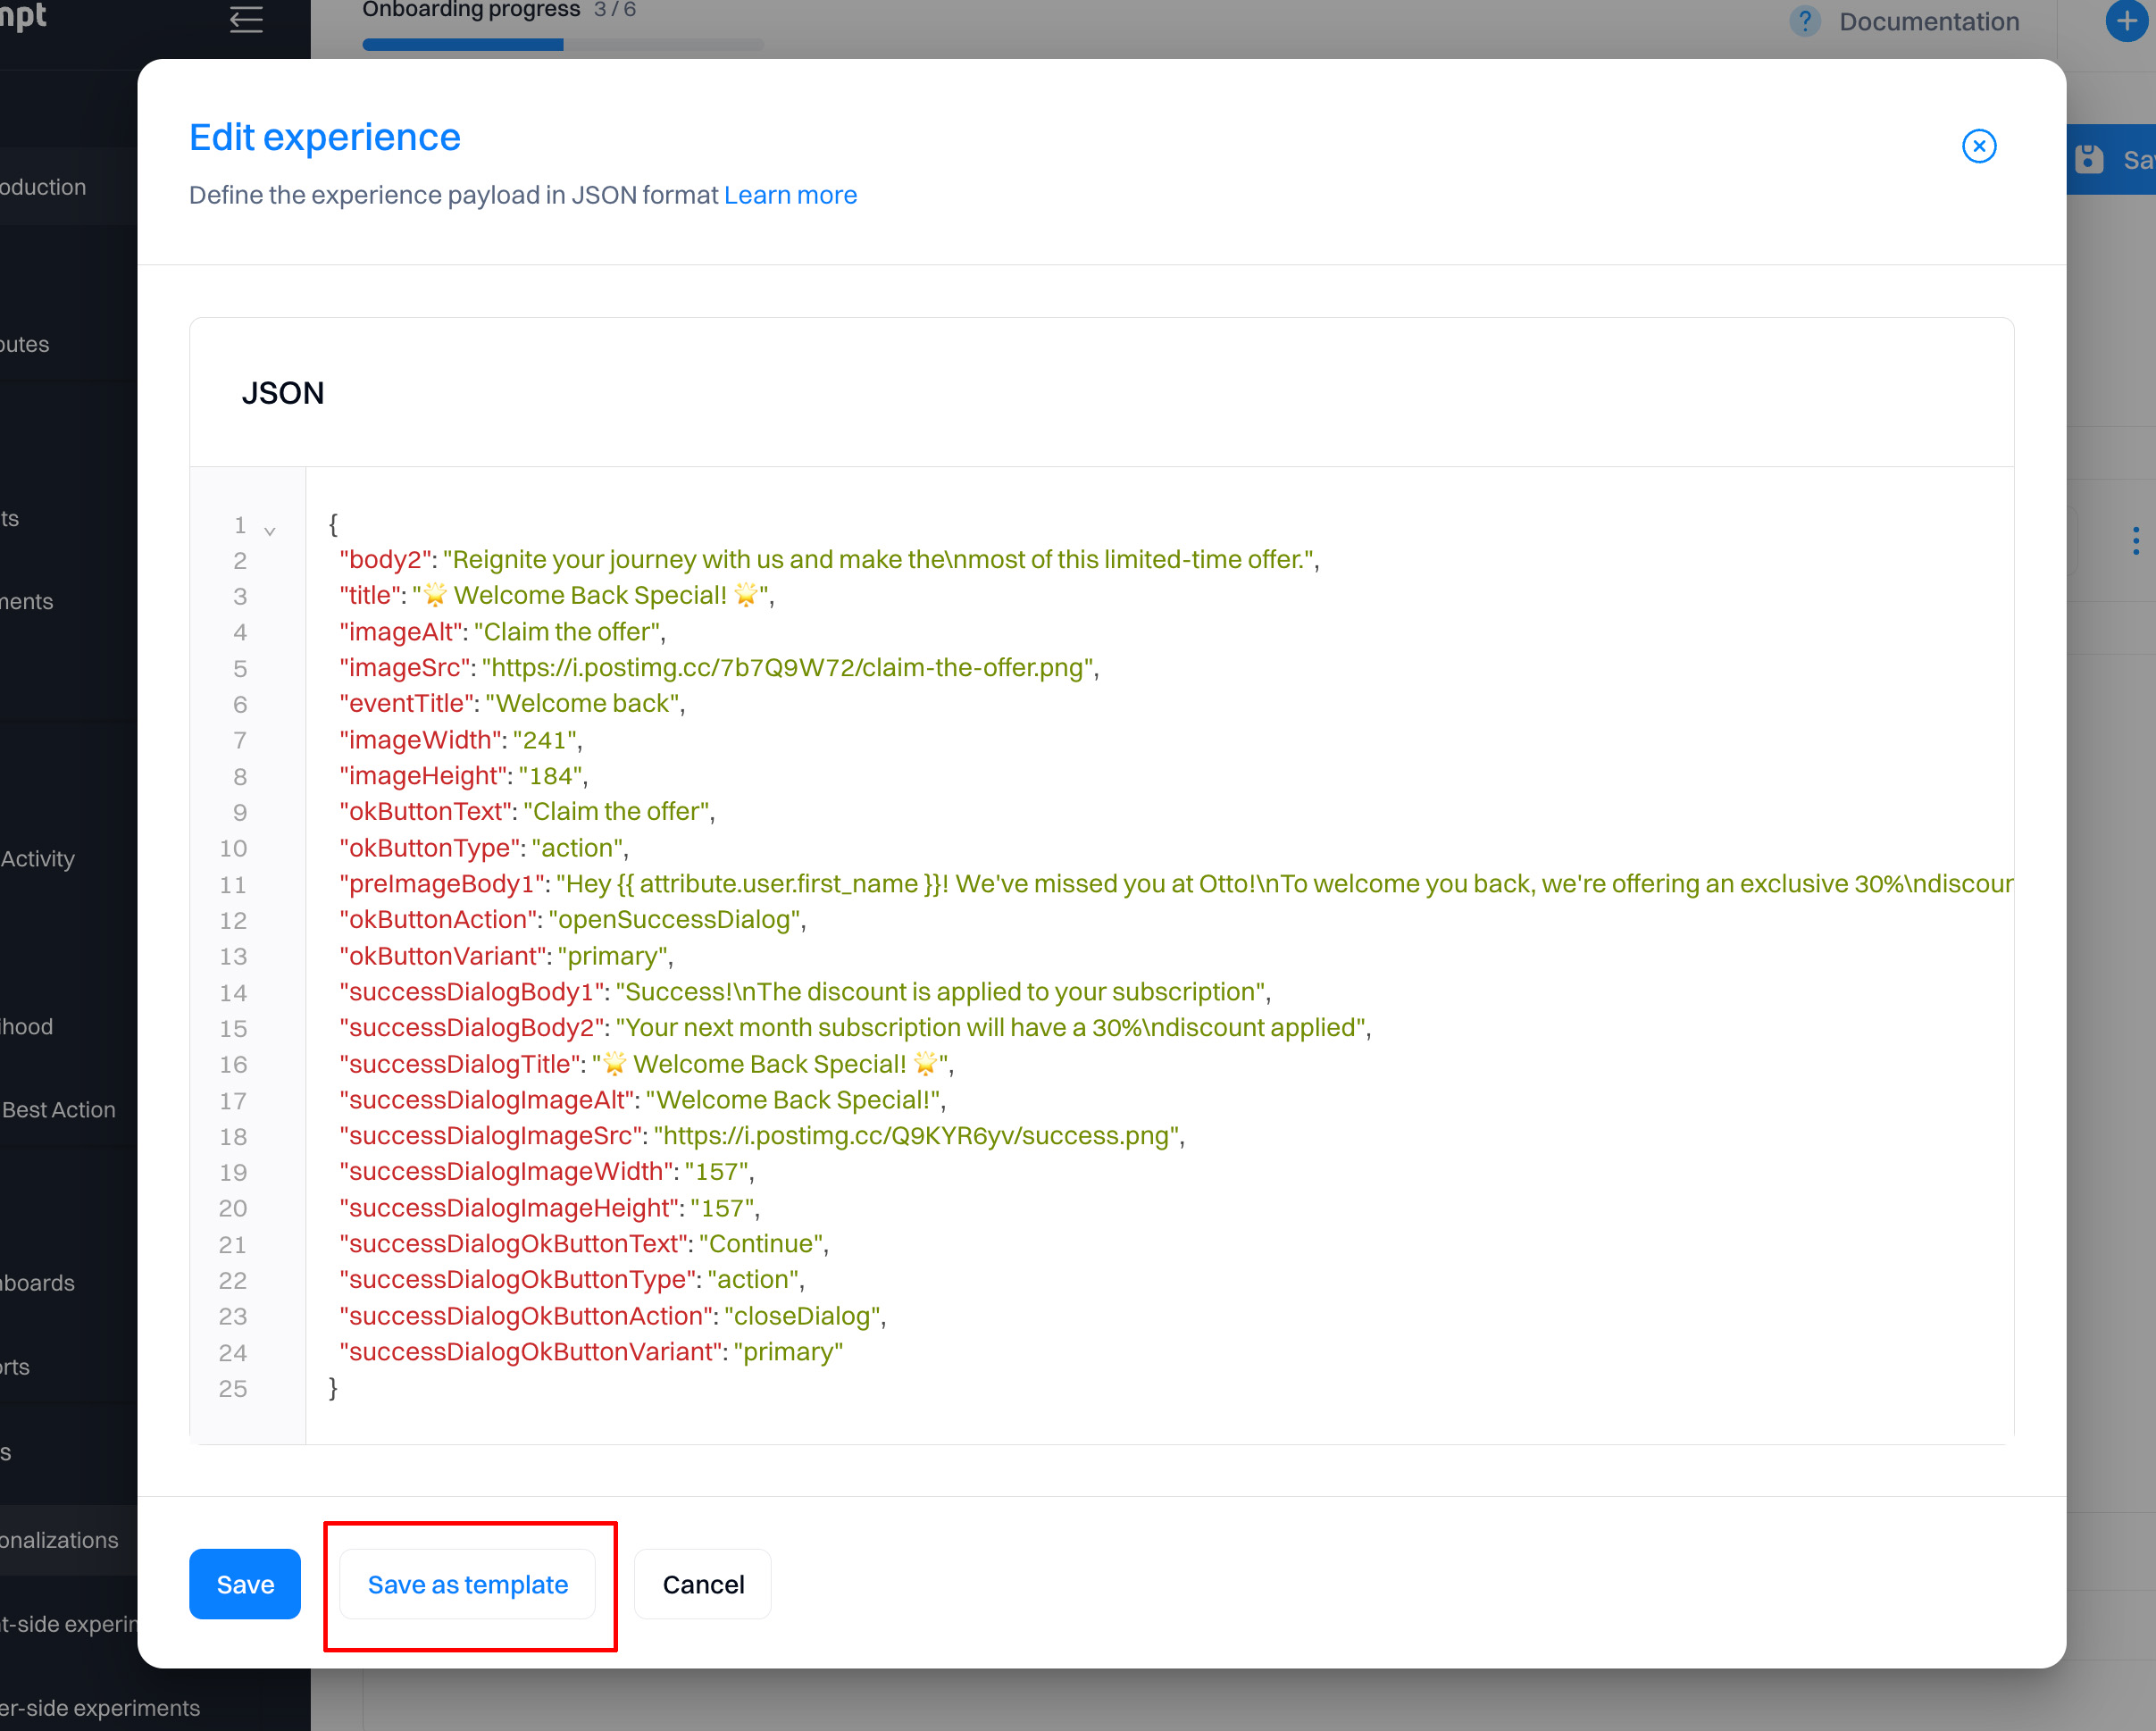
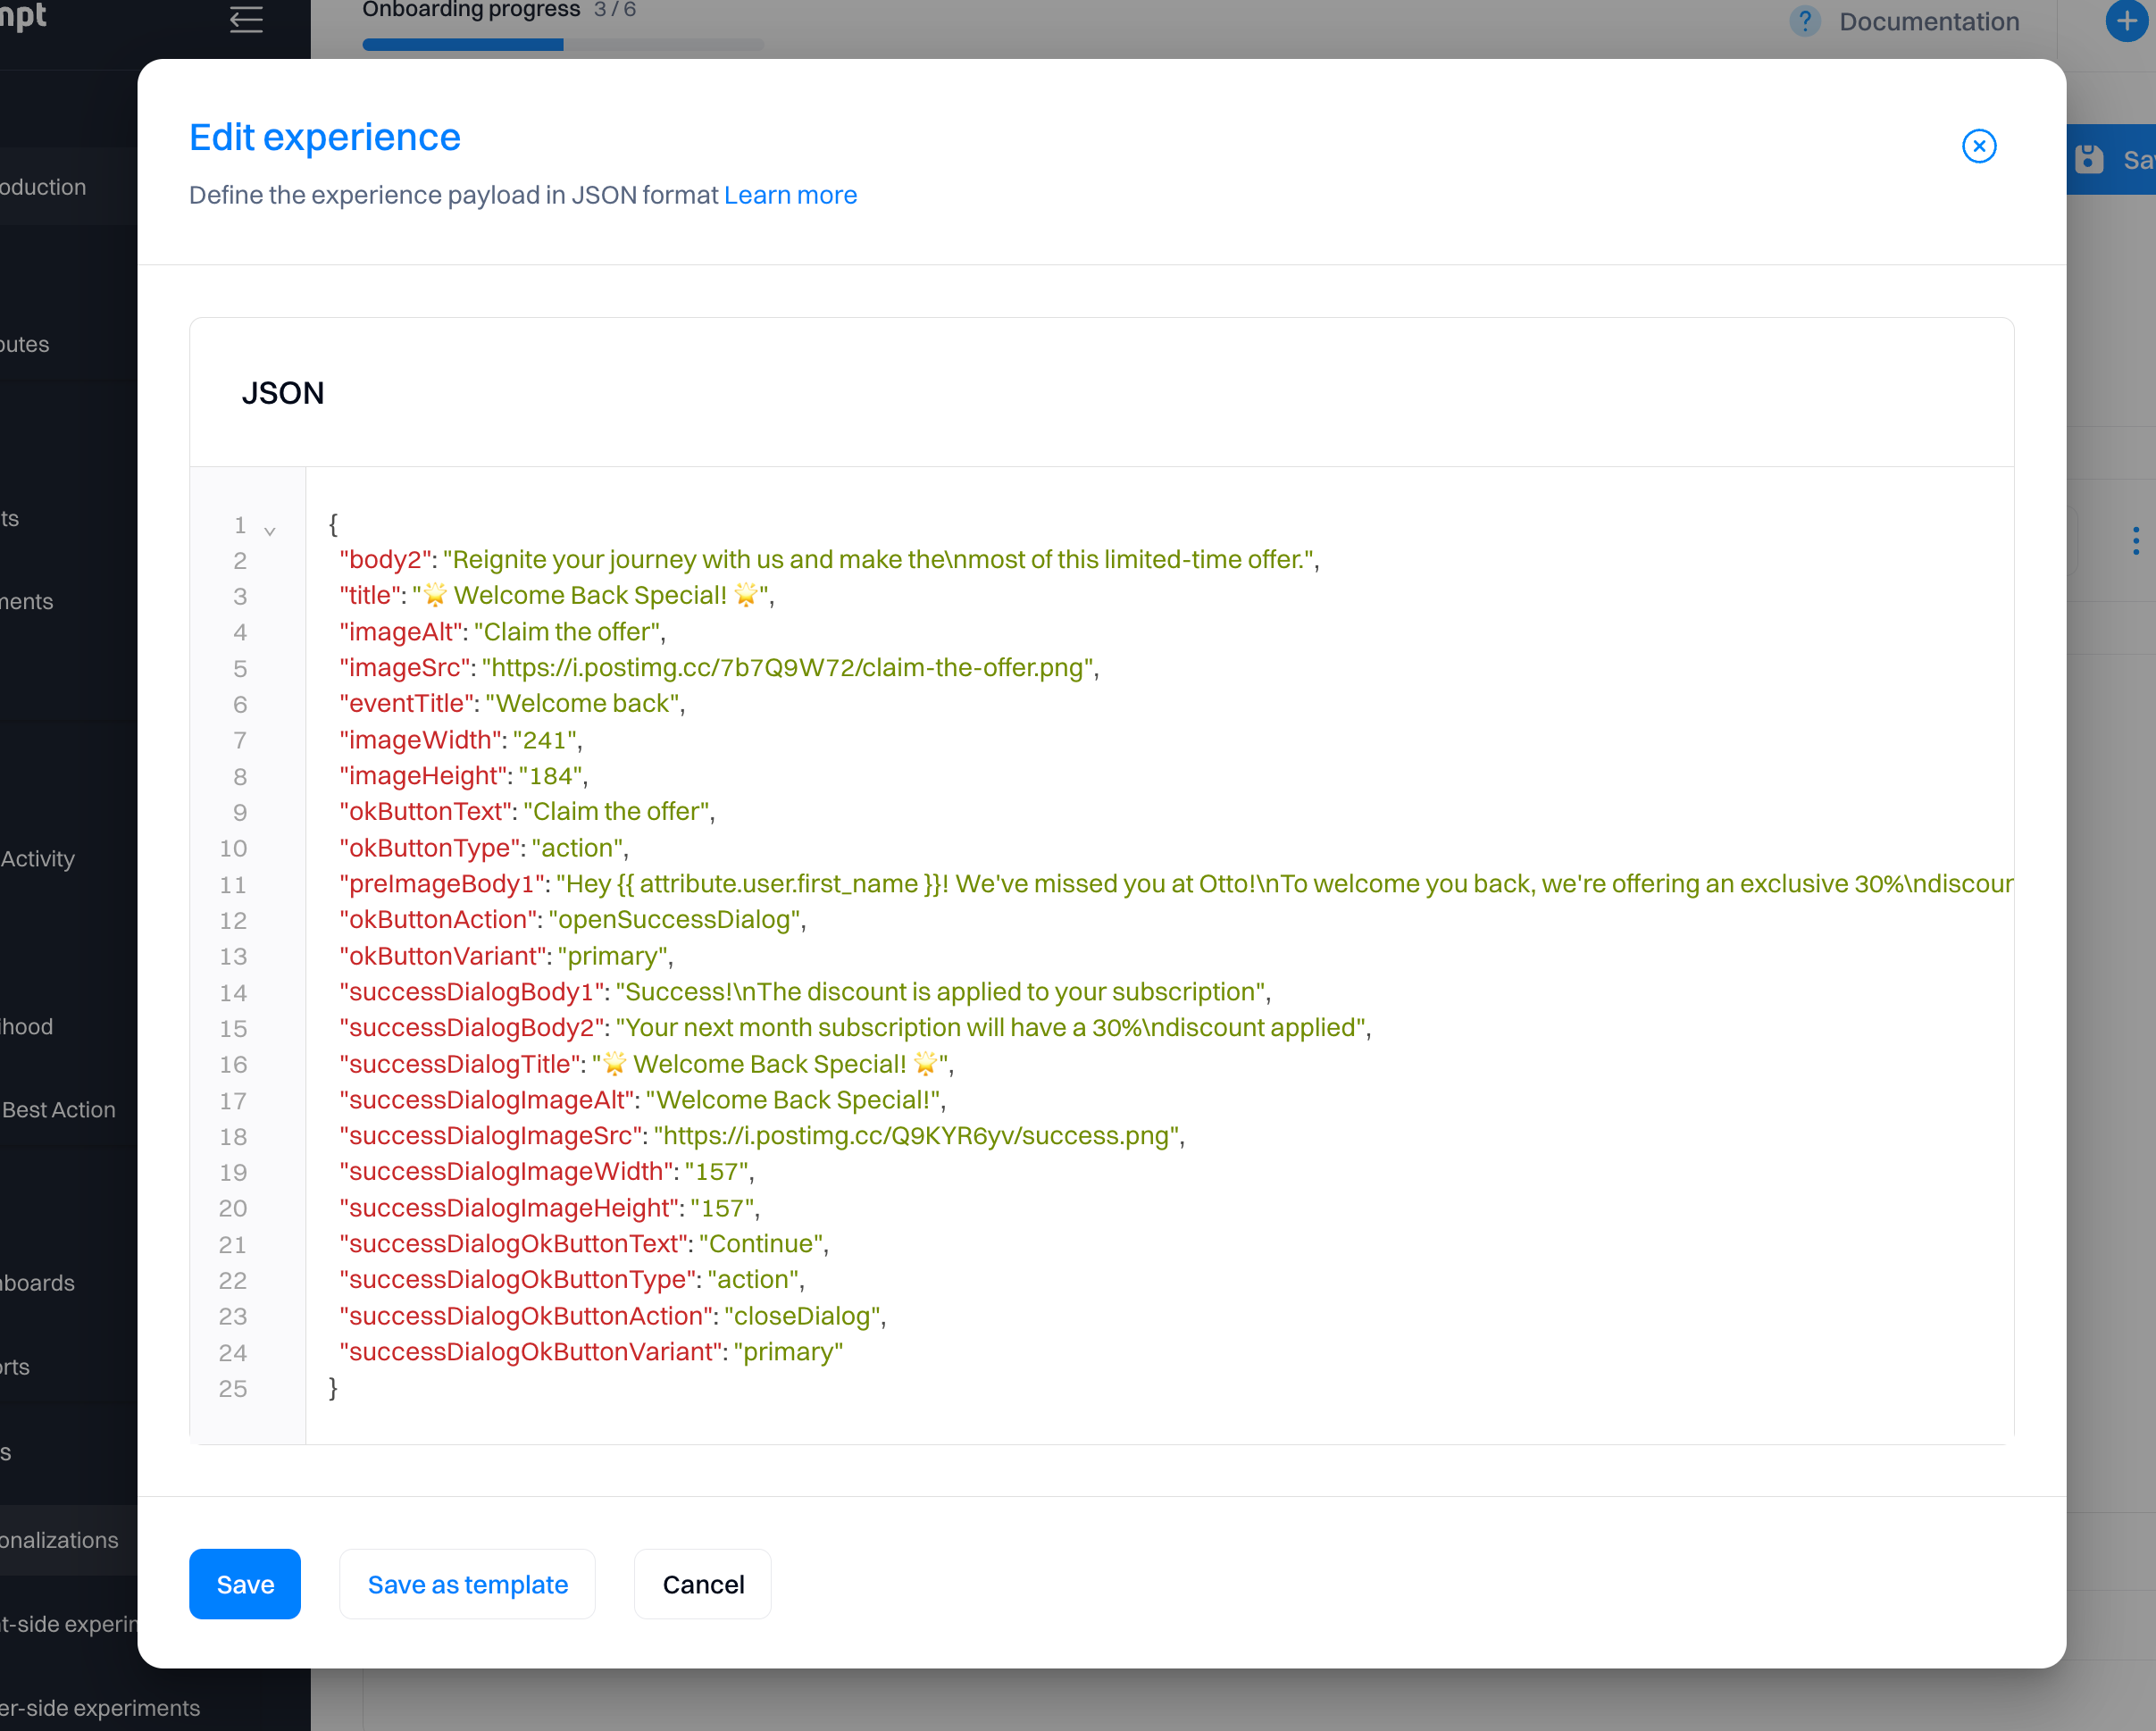
You need to enter the JSON payload of the experience to be sent when the personalization is triggered. This requires you to have access to your website or app's code to create different experiences (variations) based on the existing codebase. Intempt will replace specific sections of your website (or add new ones) by sending the payload you enter within the code editor.
Good to know
A JSON payload in the context of server-side personalizations is essentially a block of structured data. JSON (JavaScript Object Notation) is a lightweight data-interchange format, which is easy for humans to read and write, and easy for machines to parse and generate. In server-side personalizations, these JSON payloads define different experiences or variations of content that might be displayed to a user.
For example, if you want to have an experience that shows a popup in your app:
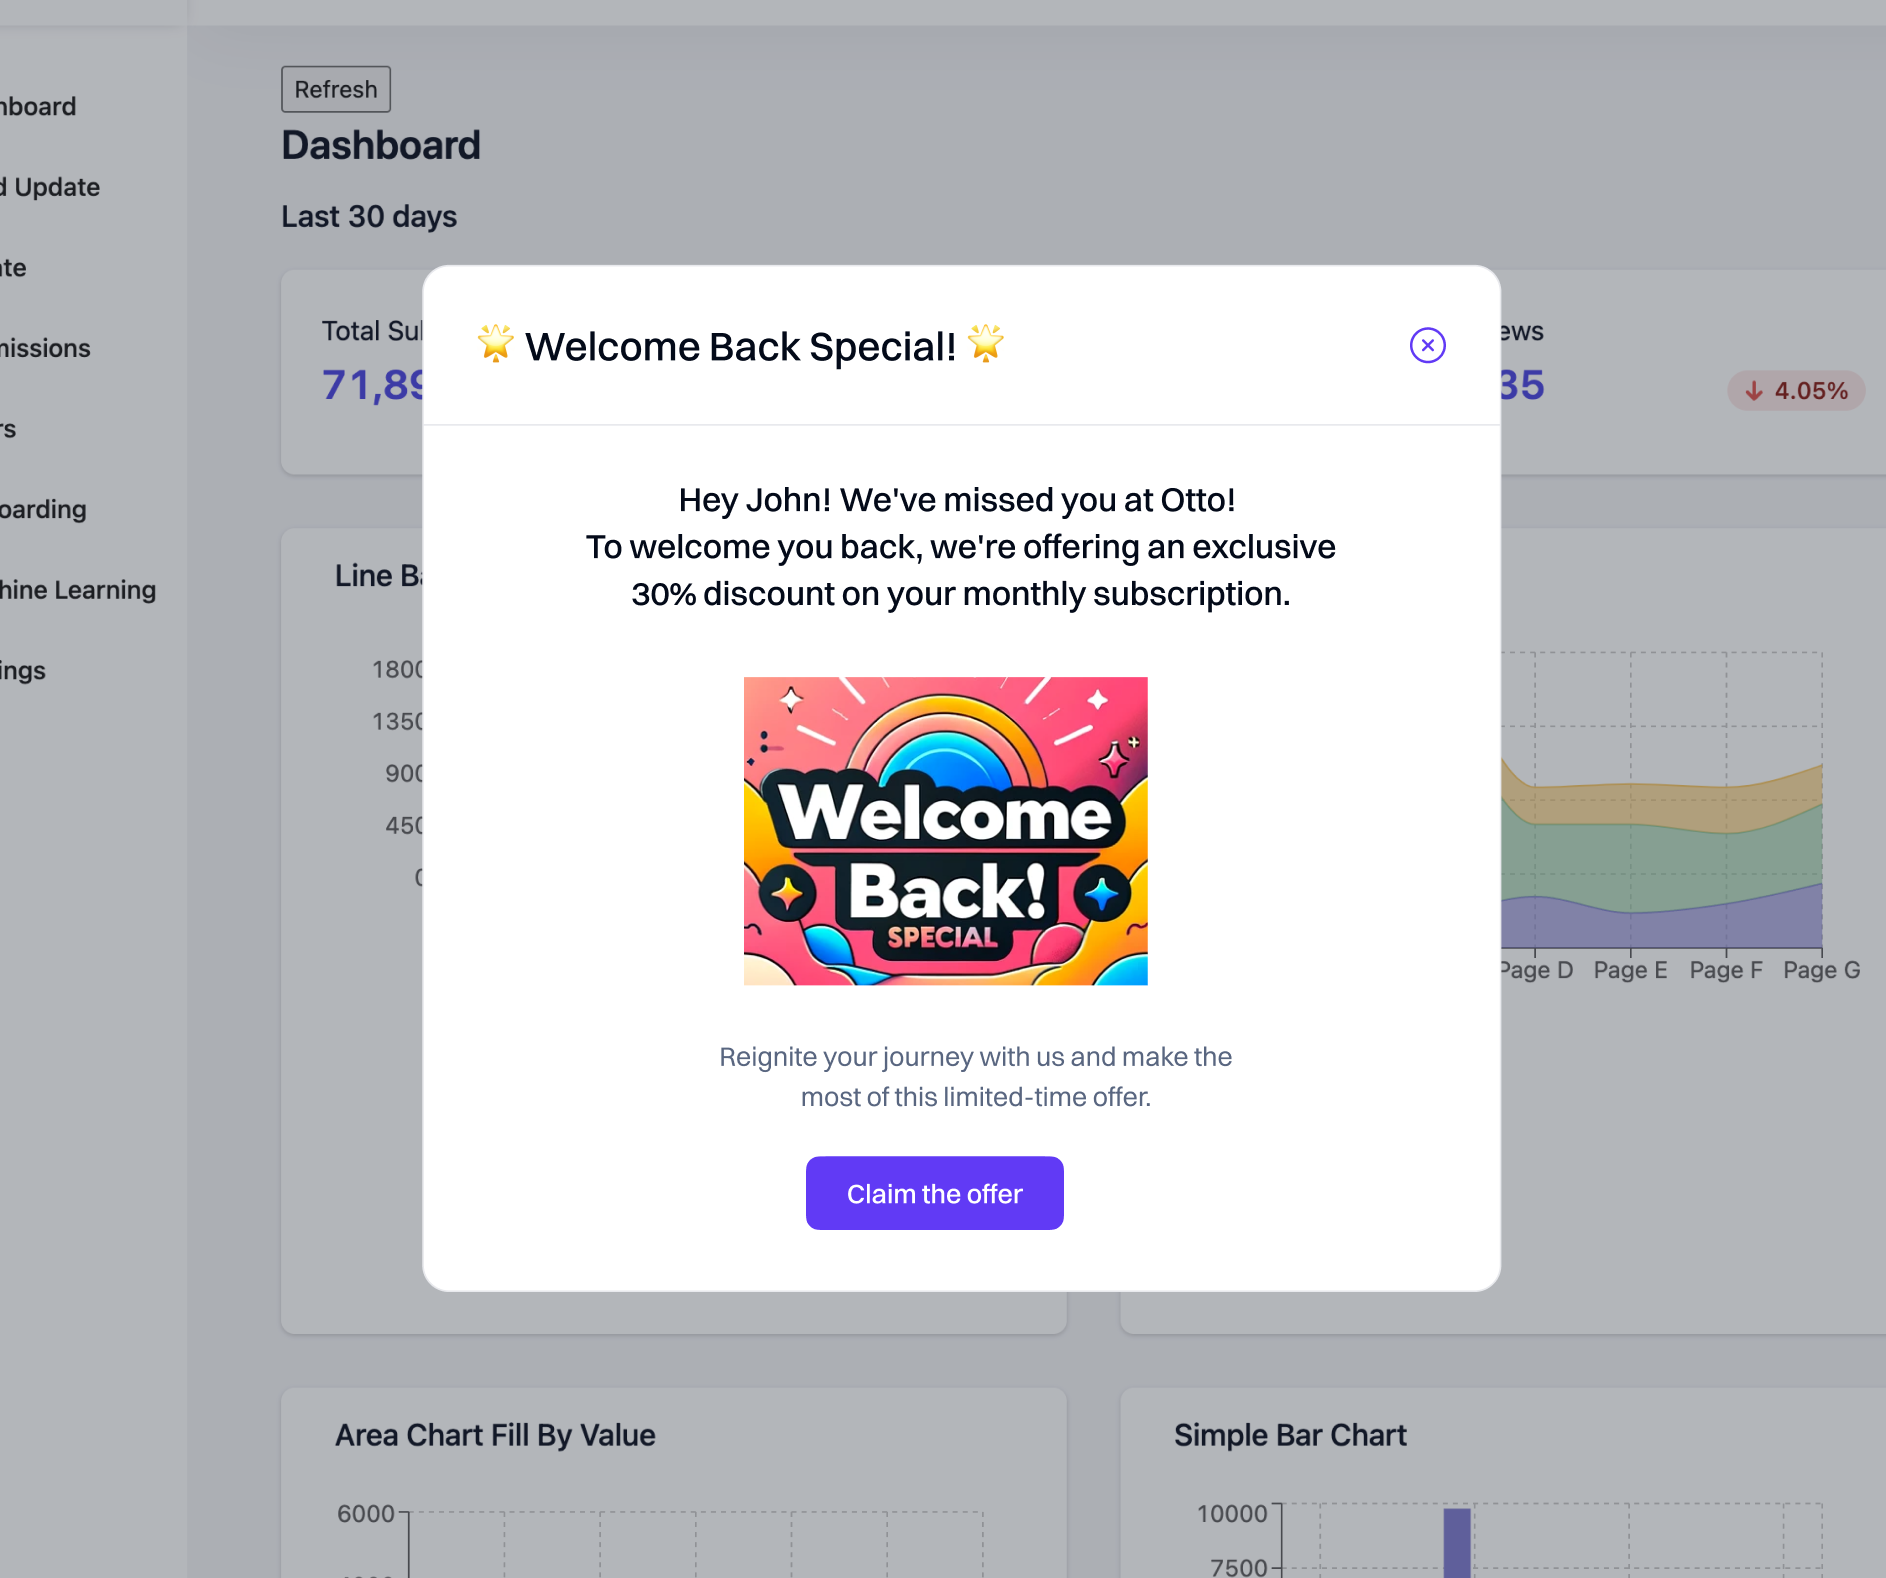
You would need to use this JSON payload.
{
  "body2": "Reignite your journey with us and make the\nmost of this limited-time offer.",
  "title": "🌟 Welcome Back Special! 🌟",
  "imageAlt": "Claim the offer",
  "imageSrc": "https://i.postimg.cc/7b7Q9W72/claim-the-offer.png",
  "eventTitle": "Welcome back",
  "imageWidth": "241",
  "imageHeight": "184",
  "okButtonText": "Claim the offer",
  "okButtonType": "action",
  "preImageBody1": "Hey {{ attribute.user.first_name }}! We've missed you at Otto!\nTo welcome you back, we're offering an exclusive 30%\ndiscount on your monthly subscription.",
  "okButtonAction": "openSuccessDialog",
  "okButtonVariant": "primary",
  "successDialogBody1": "Success!\nThe discount is applied to your subscription",
  "successDialogBody2": "Your next month subscription will have a 30%\ndiscount applied",
  "successDialogTitle": "🌟 Welcome Back Special! 🌟",
  "successDialogImageAlt": "Welcome Back Special!",
  "successDialogImageSrc": "https://i.postimg.cc/Q9KYR6yv/success.png",
  "successDialogImageWidth": "157",
  "successDialogImageHeight": "157",
  "successDialogOkButtonText": "Continue",
  "successDialogOkButtonType": "action",
  "successDialogOkButtonAction": "closeDialog",
  "successDialogOkButtonVariant": "primary"
}
For this to work, you must use Optimization API to call Intempt APIs. These will serve the dynamic payload based on the specified targeting conditions, triggering the content on your site or app to load.
Creating from a template
If you select to create from a template, you can re-use and edit saved JSON payloads for accelerated setup.
To create a new template, you can save any existing experience by selecting "Save as a template." The template will then be available to select from the creation screen.
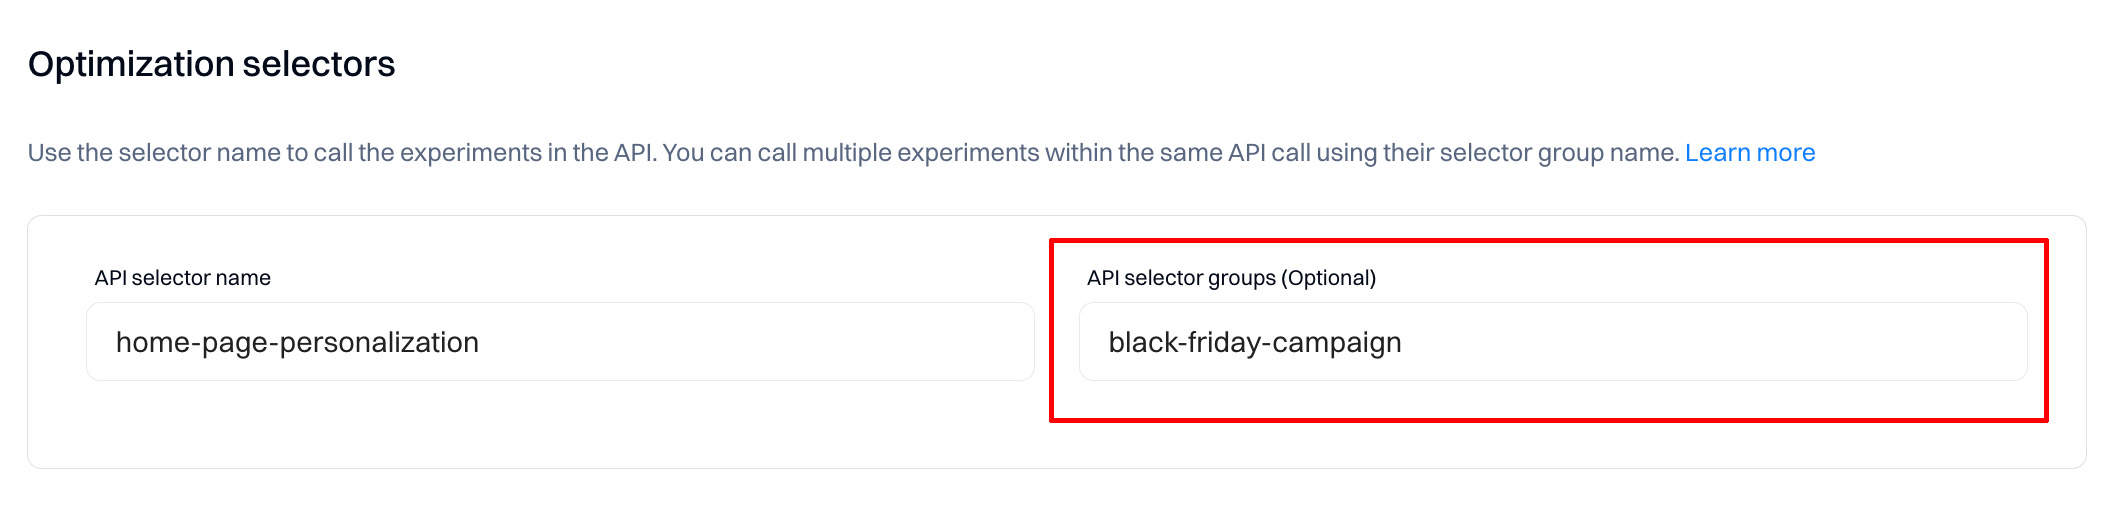
Set the Optimization selectors
To fully set the personalization, specify the API Selector needed in Optimization API calls to activate one or more personalizations by name. The activation automatically resolves to target rules and group allocations and returns the correct user experience. Typically, you would make this call as part of your larger page and content rendering pipeline. The personalization settings are all controlled in the Intempt console.
Good to know
The initial API selector name is auto-created based on the personalization name. You can change it at any time based on your requirements.
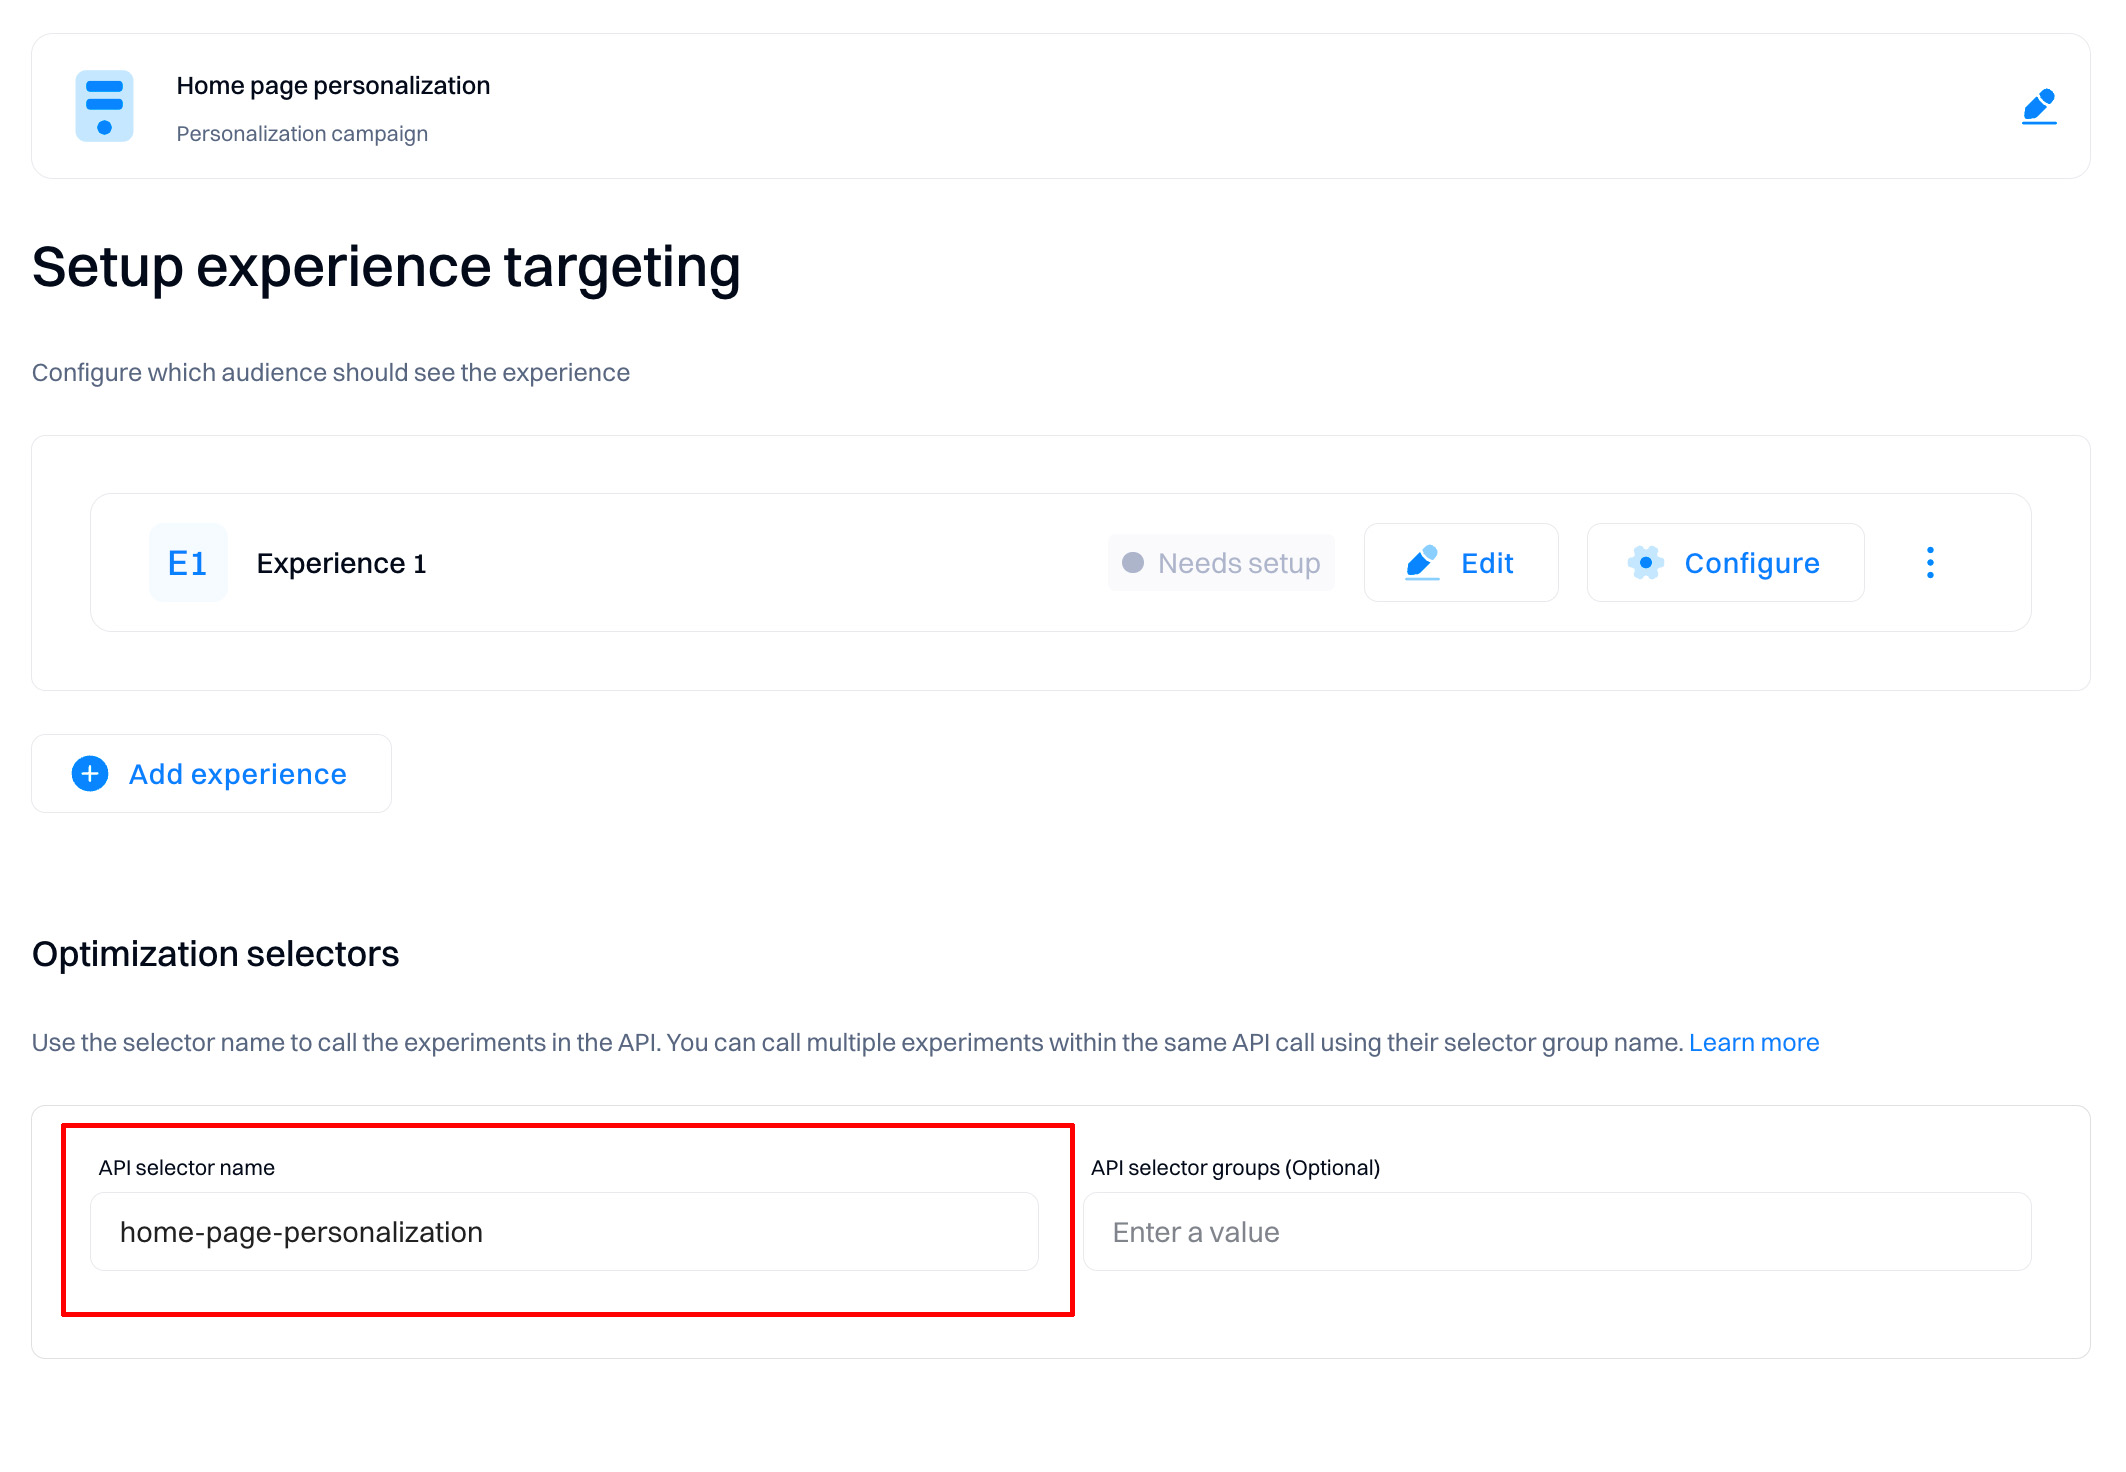
Set the Optimization selector groups (optional)
You can group and apply the grouping in your chosen calls to streamline the process of calling specific server-side personalizations. Your developers can refer to a static Optimization selector group without worrying about changes made to a specific personalization's selector name. All the active selectors in the group are sent back in response to your chosen call, enabling you to call relevant personalizations using their correct selector names as usual.
Good to know
Selector groups only allow entering values without spaces (use "-,_" seperators). Note that special characters like "*,/+=" are not supported
Optimization selector groups are defined and assigned in the Intempt console, and you can see which personalization is assigned to which group on the personalizations page.
How is the content replaced on the website or app?
- Data Delivery: Once the appropriate JSON payload is selected, it is sent from the server to the user’s browser or app. This is typically done through an API call.
- Reading the JSON: The client-side of the website or app (the part running in the user’s browser or on their device) reads the JSON payload.
- Dynamic Content Replacement: Scripting on the client-side then dynamically modifies the HTML or app content based on the data in the JSON payload. For example, if the payload includes a different headline or a promotional banner, the script finds the relevant part of the current page or app view and replaces it with the new content specified in the JSON.
Configure experience settings
In the next step, you can configure settings for all experiences created.
Each experience will have its status - “Needs setup” or “Ready.” The minimum requirement is to set at least one audience targeting condition to change the status from “Needs setup” to “Ready.”
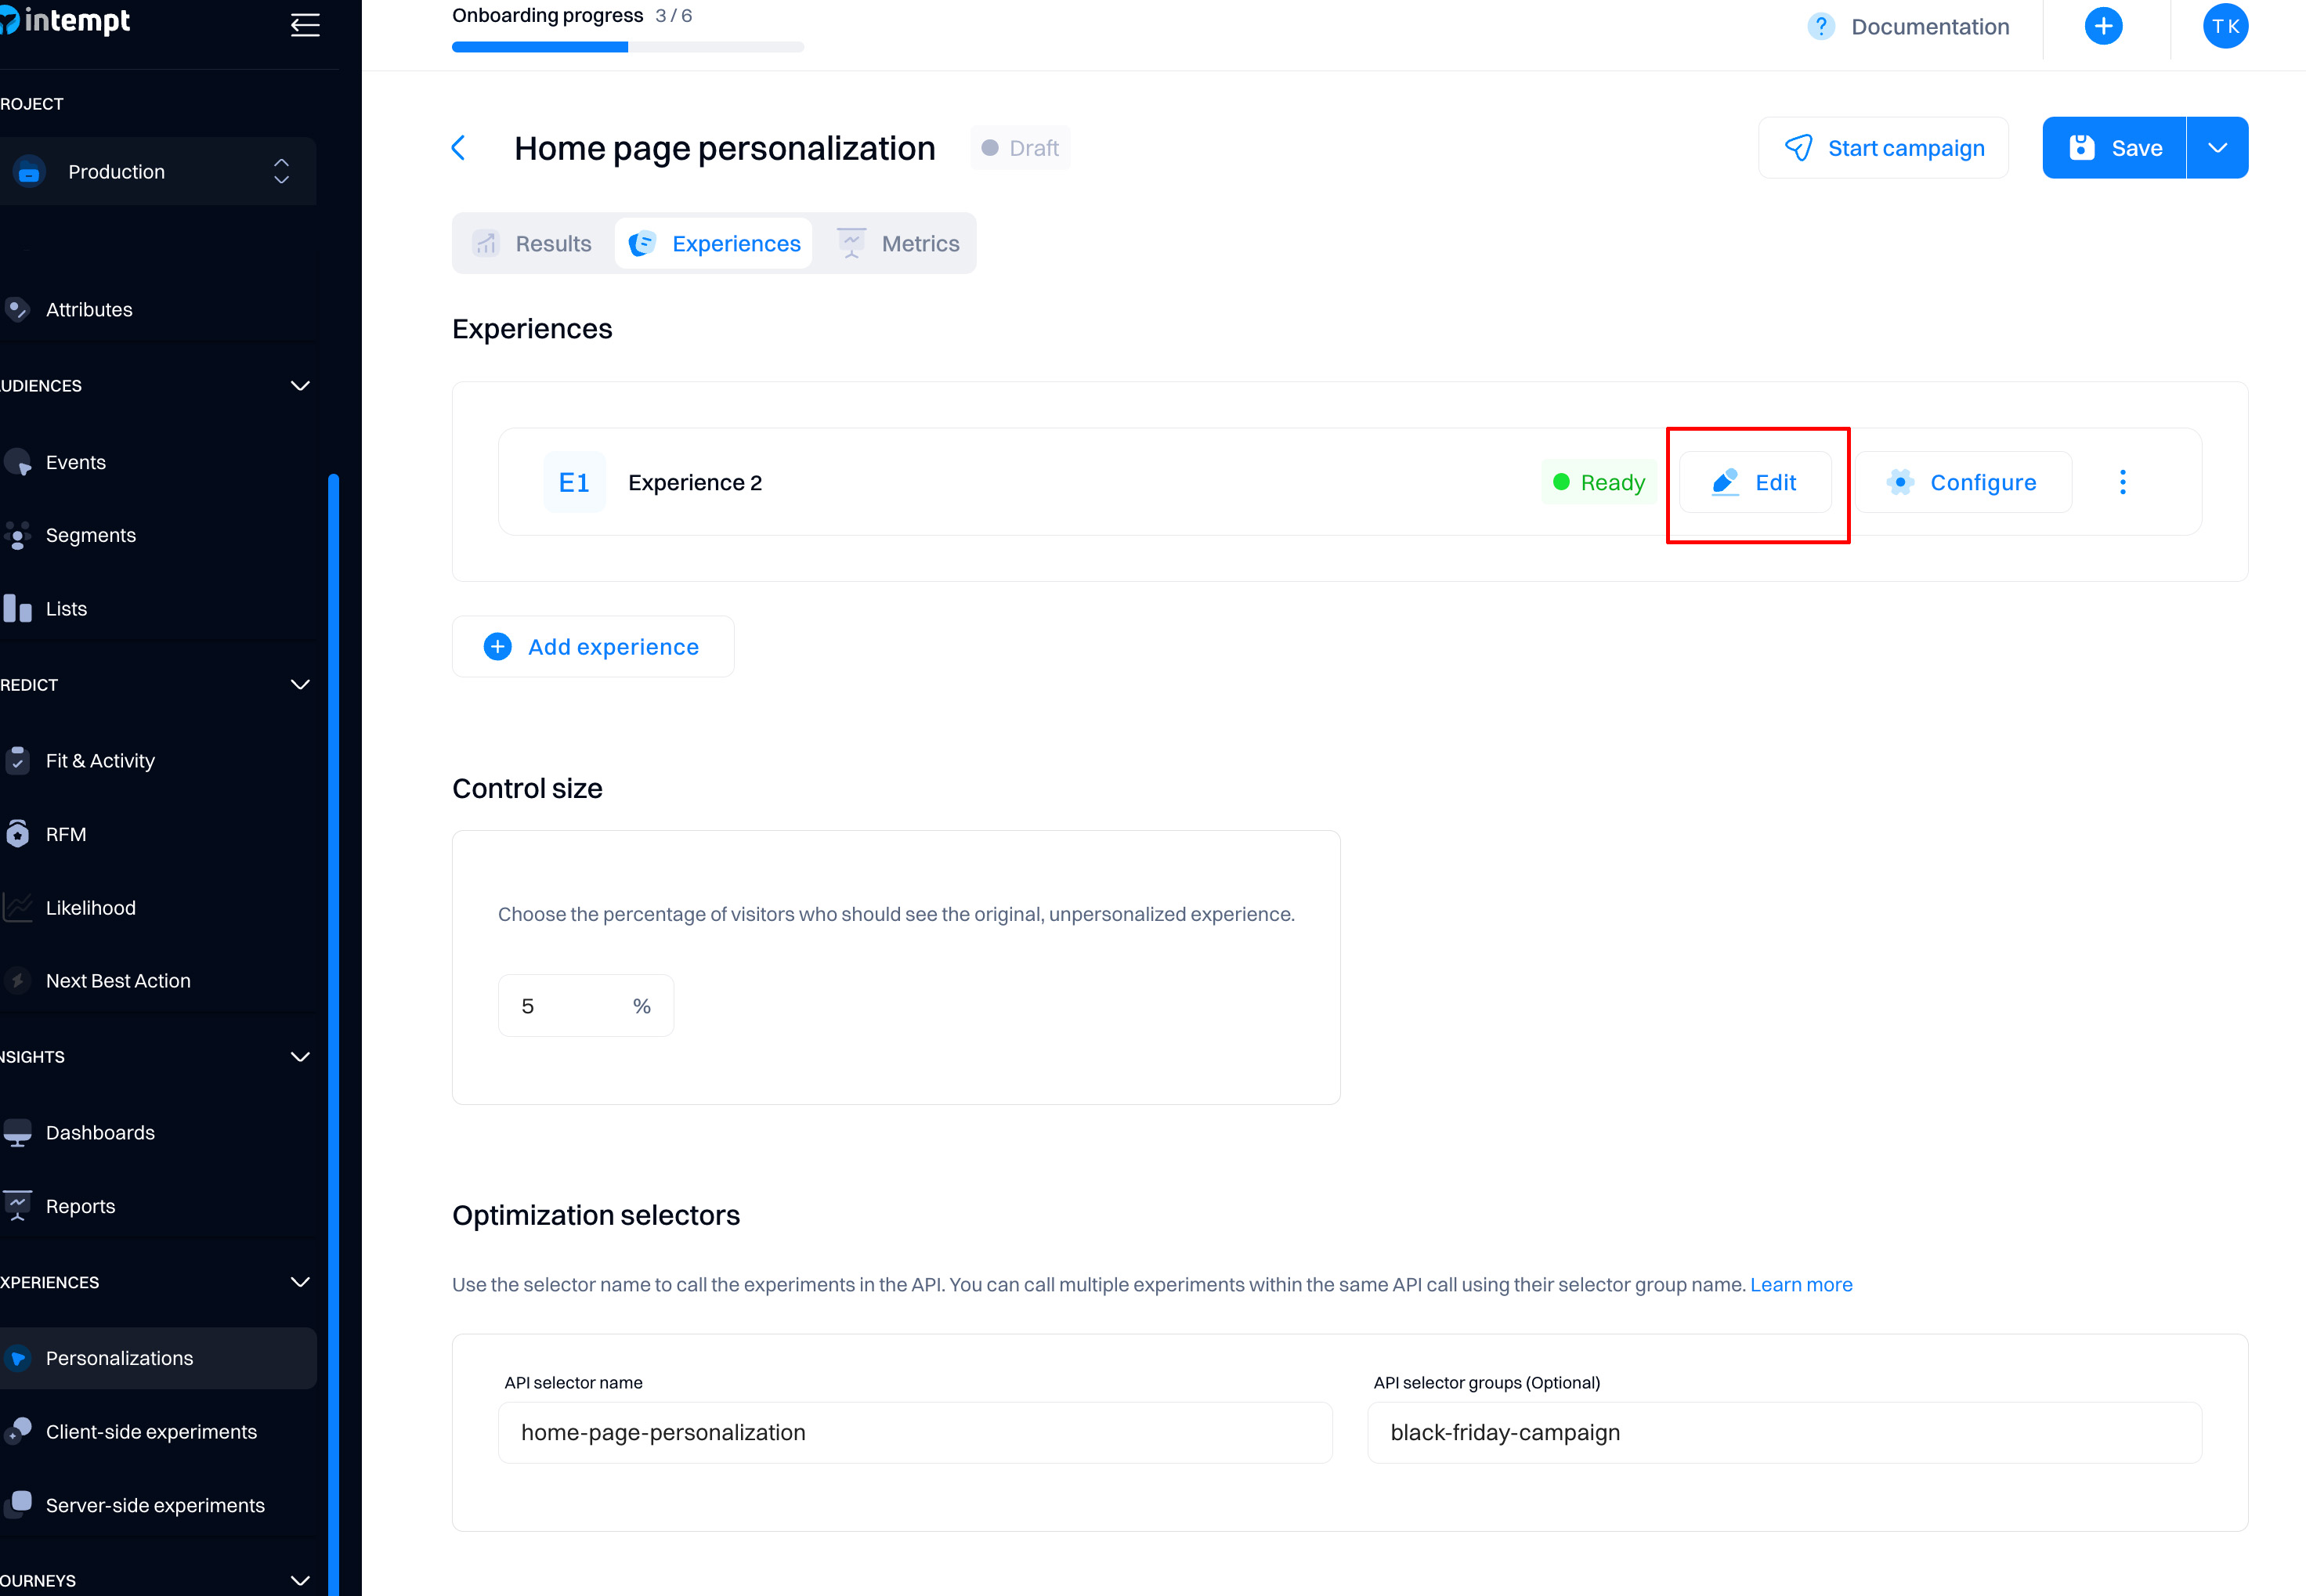
Note that the “Edit” button will return you to the visual editor view if you want to make additional changes.
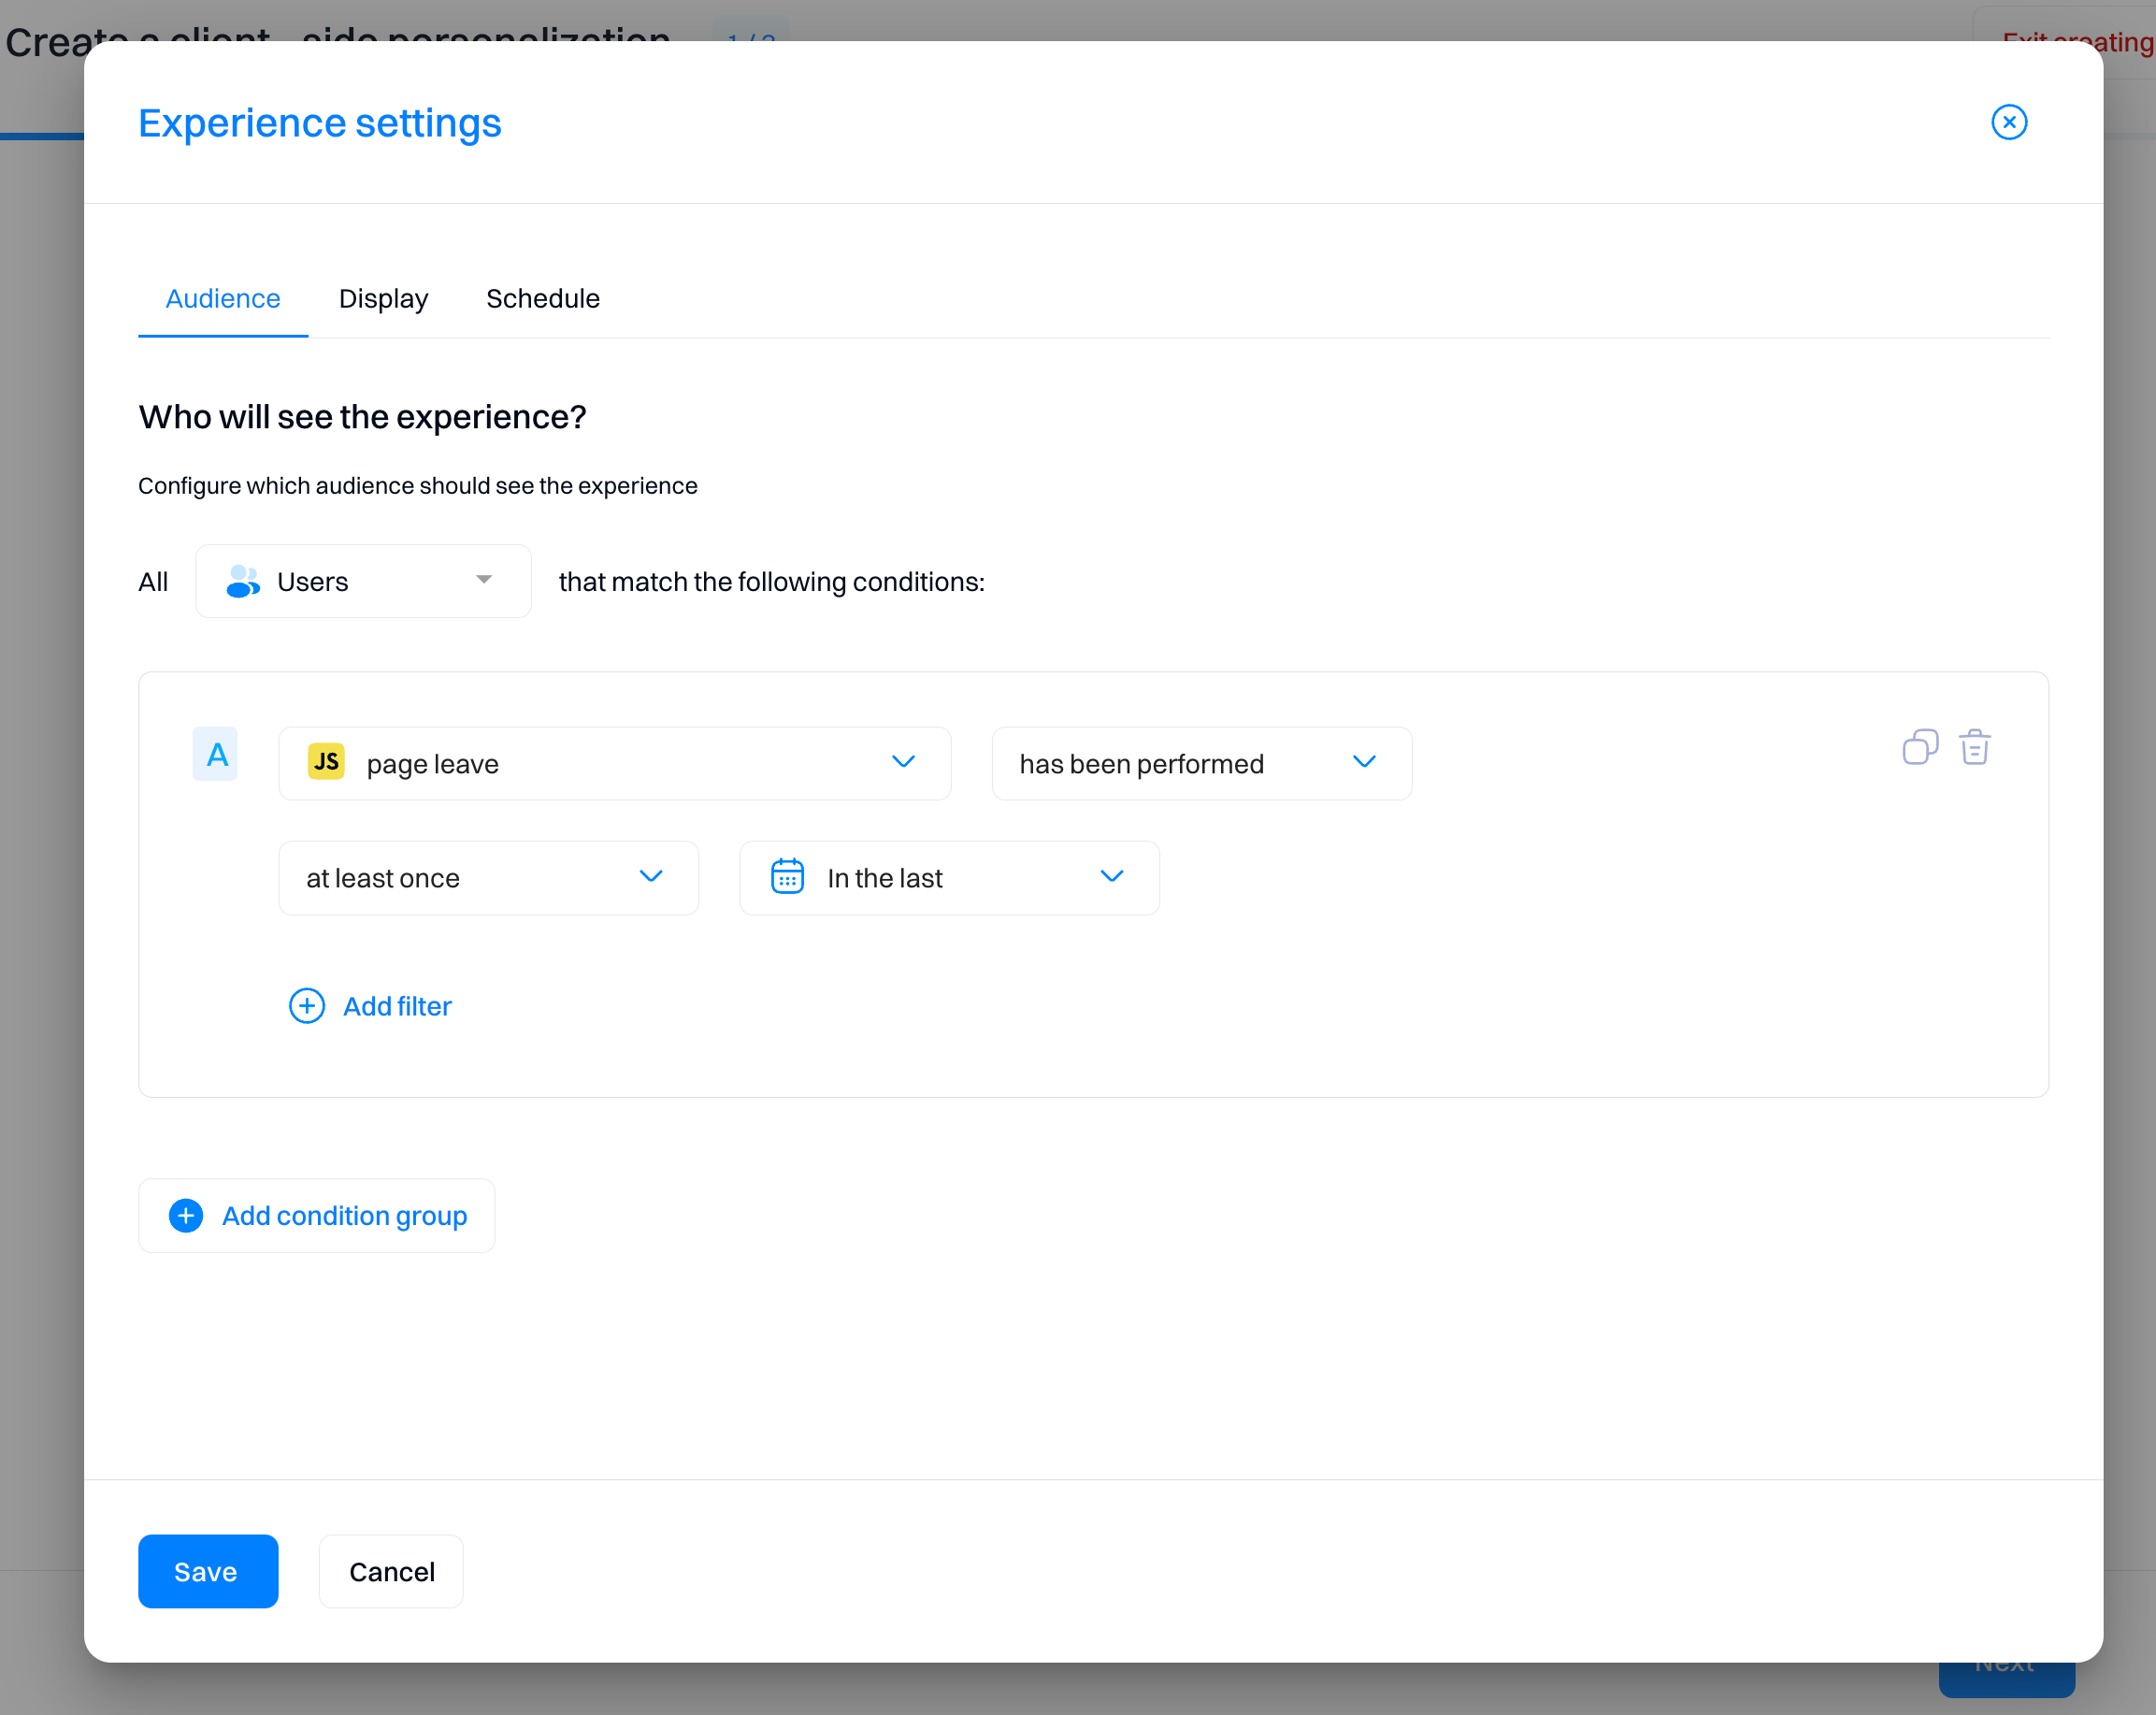
Click “Configuration” to access the settings window.
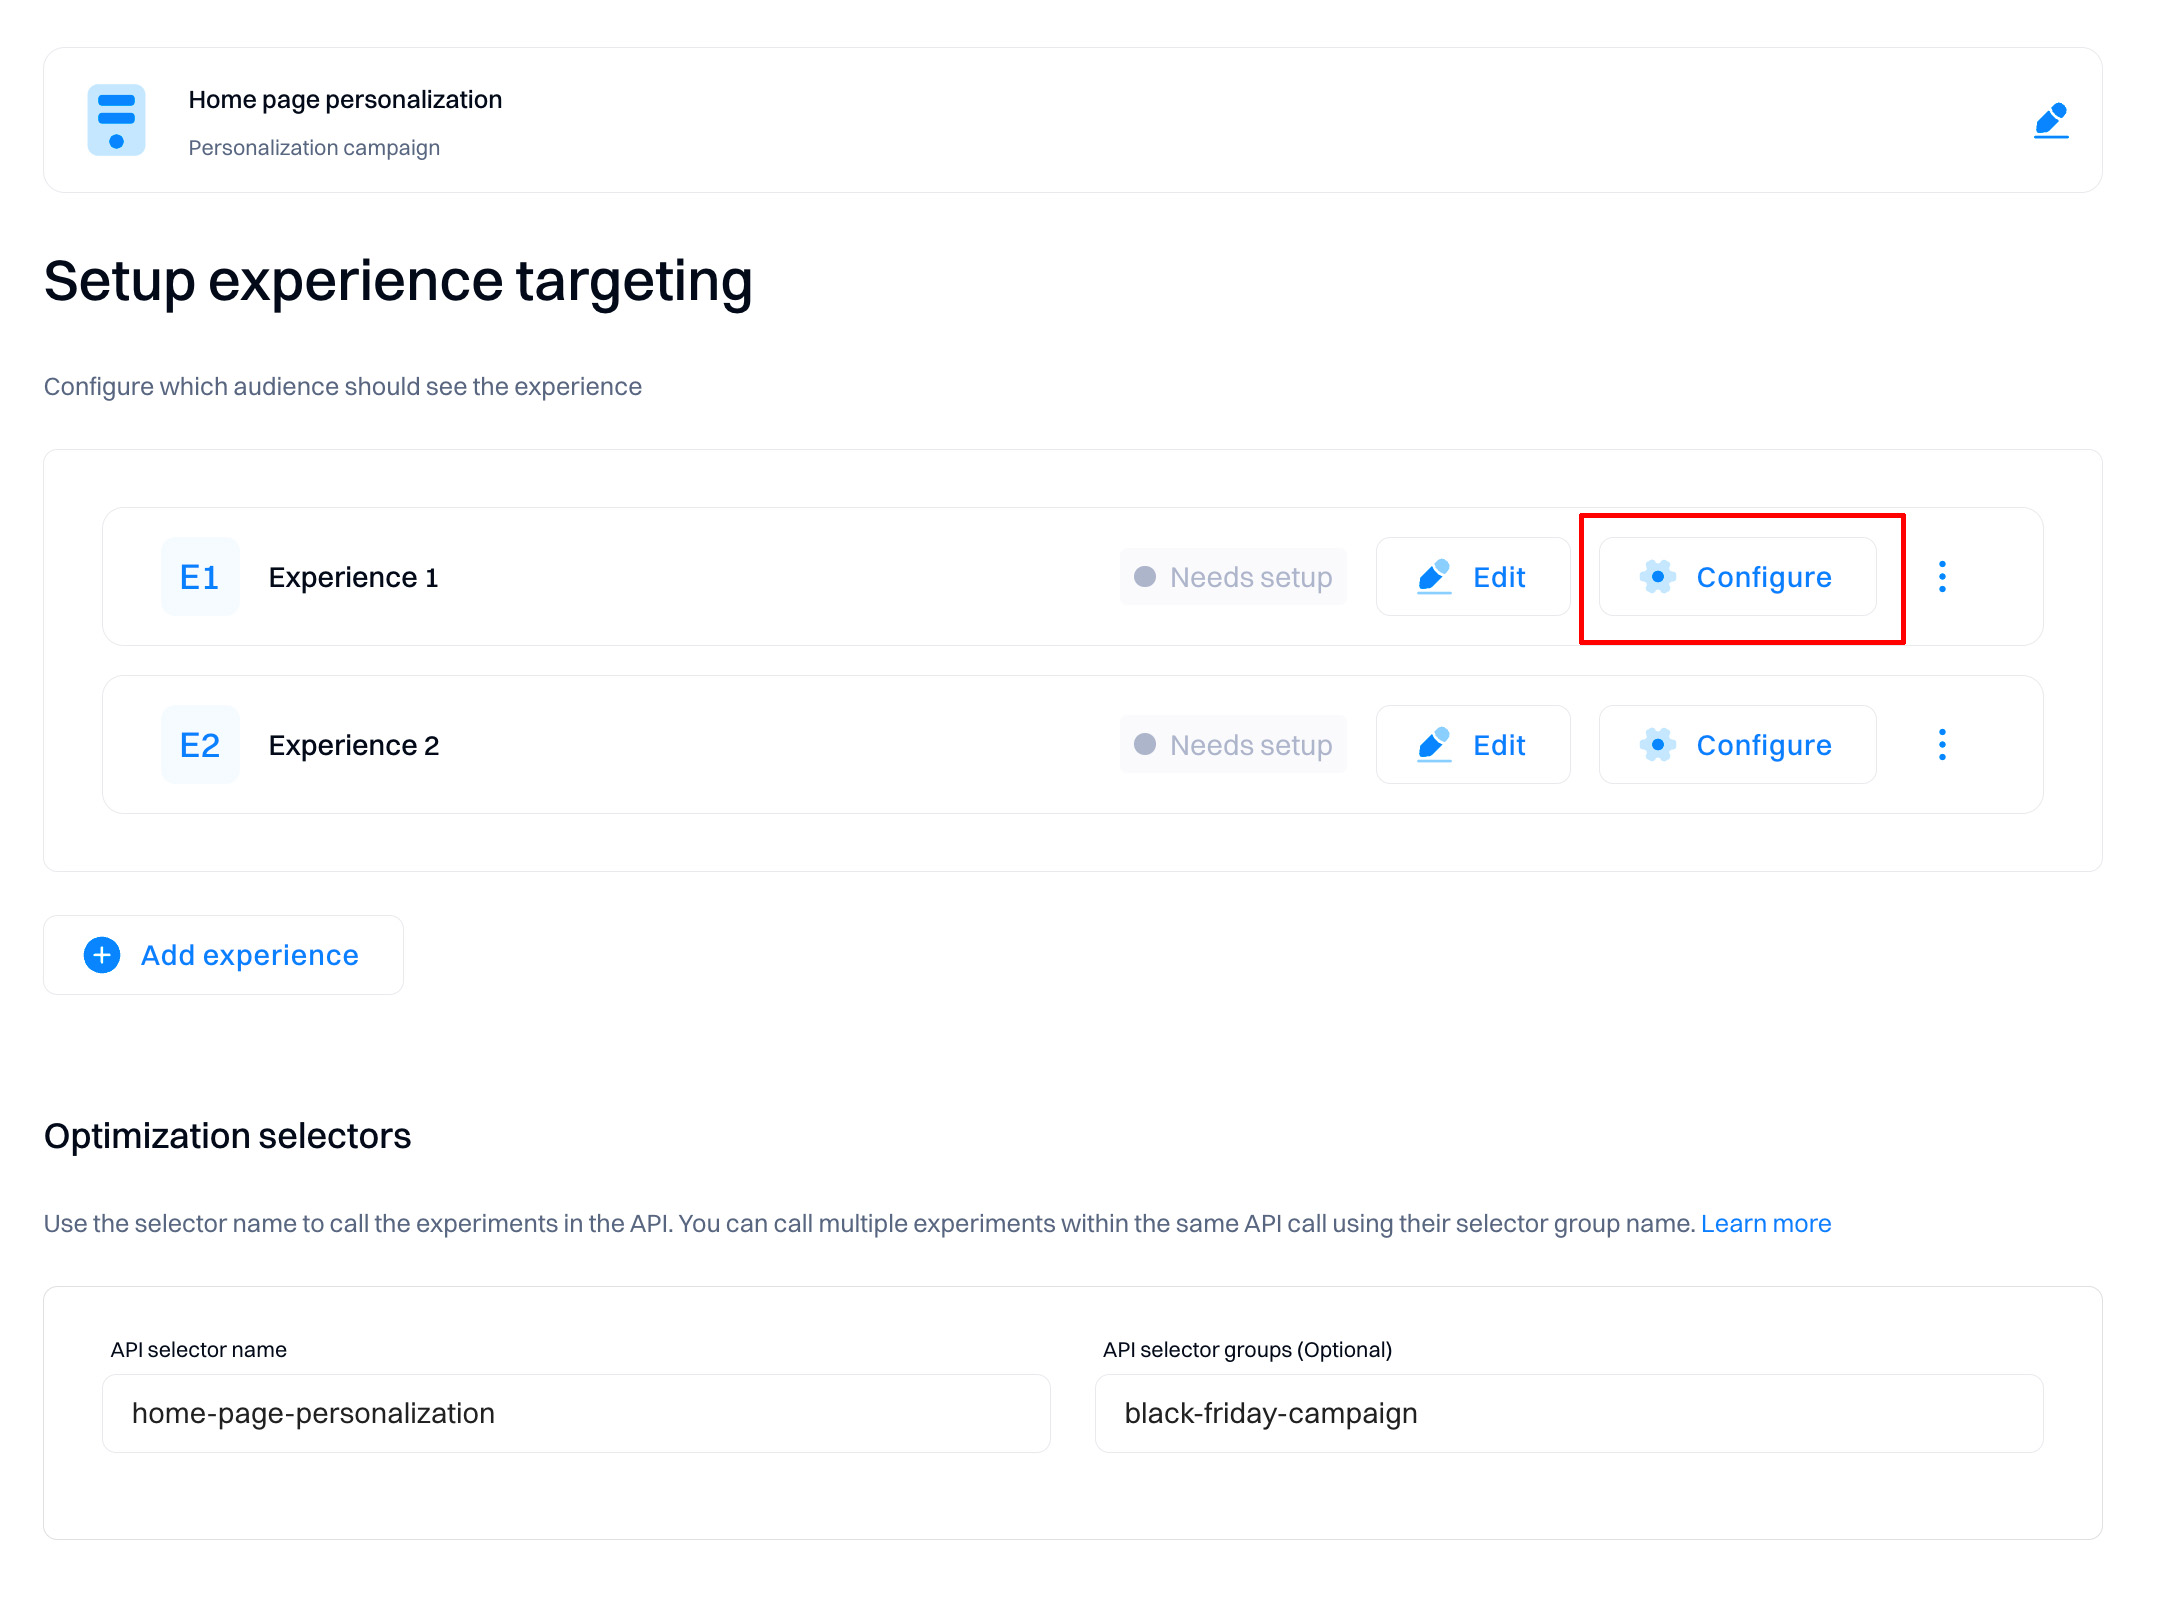
You can edit individual experiences in these sections:
Audience
Configure who will see the experience. Select from events, segments, and attributes to refine your targeting criteria.
Important
Selecting the targeting conditions is mandatory to start the personalization. Without targeting conditions defined, the experiences wiill not be displayed.
Display
Display - how frequently the experience will be displayed.
- Set "Always" if you want the experience displayed on each page load (if the user matches other conditions)
- Use "Once" to only allow the experience to be displayed for the user once per lifetime.
- "Once per visit" means that the experience will be displayed once per session
Target devices - define filters for devices that can render the experience. Configuration depends on whether you want different experiences for mobile vs desktop users.

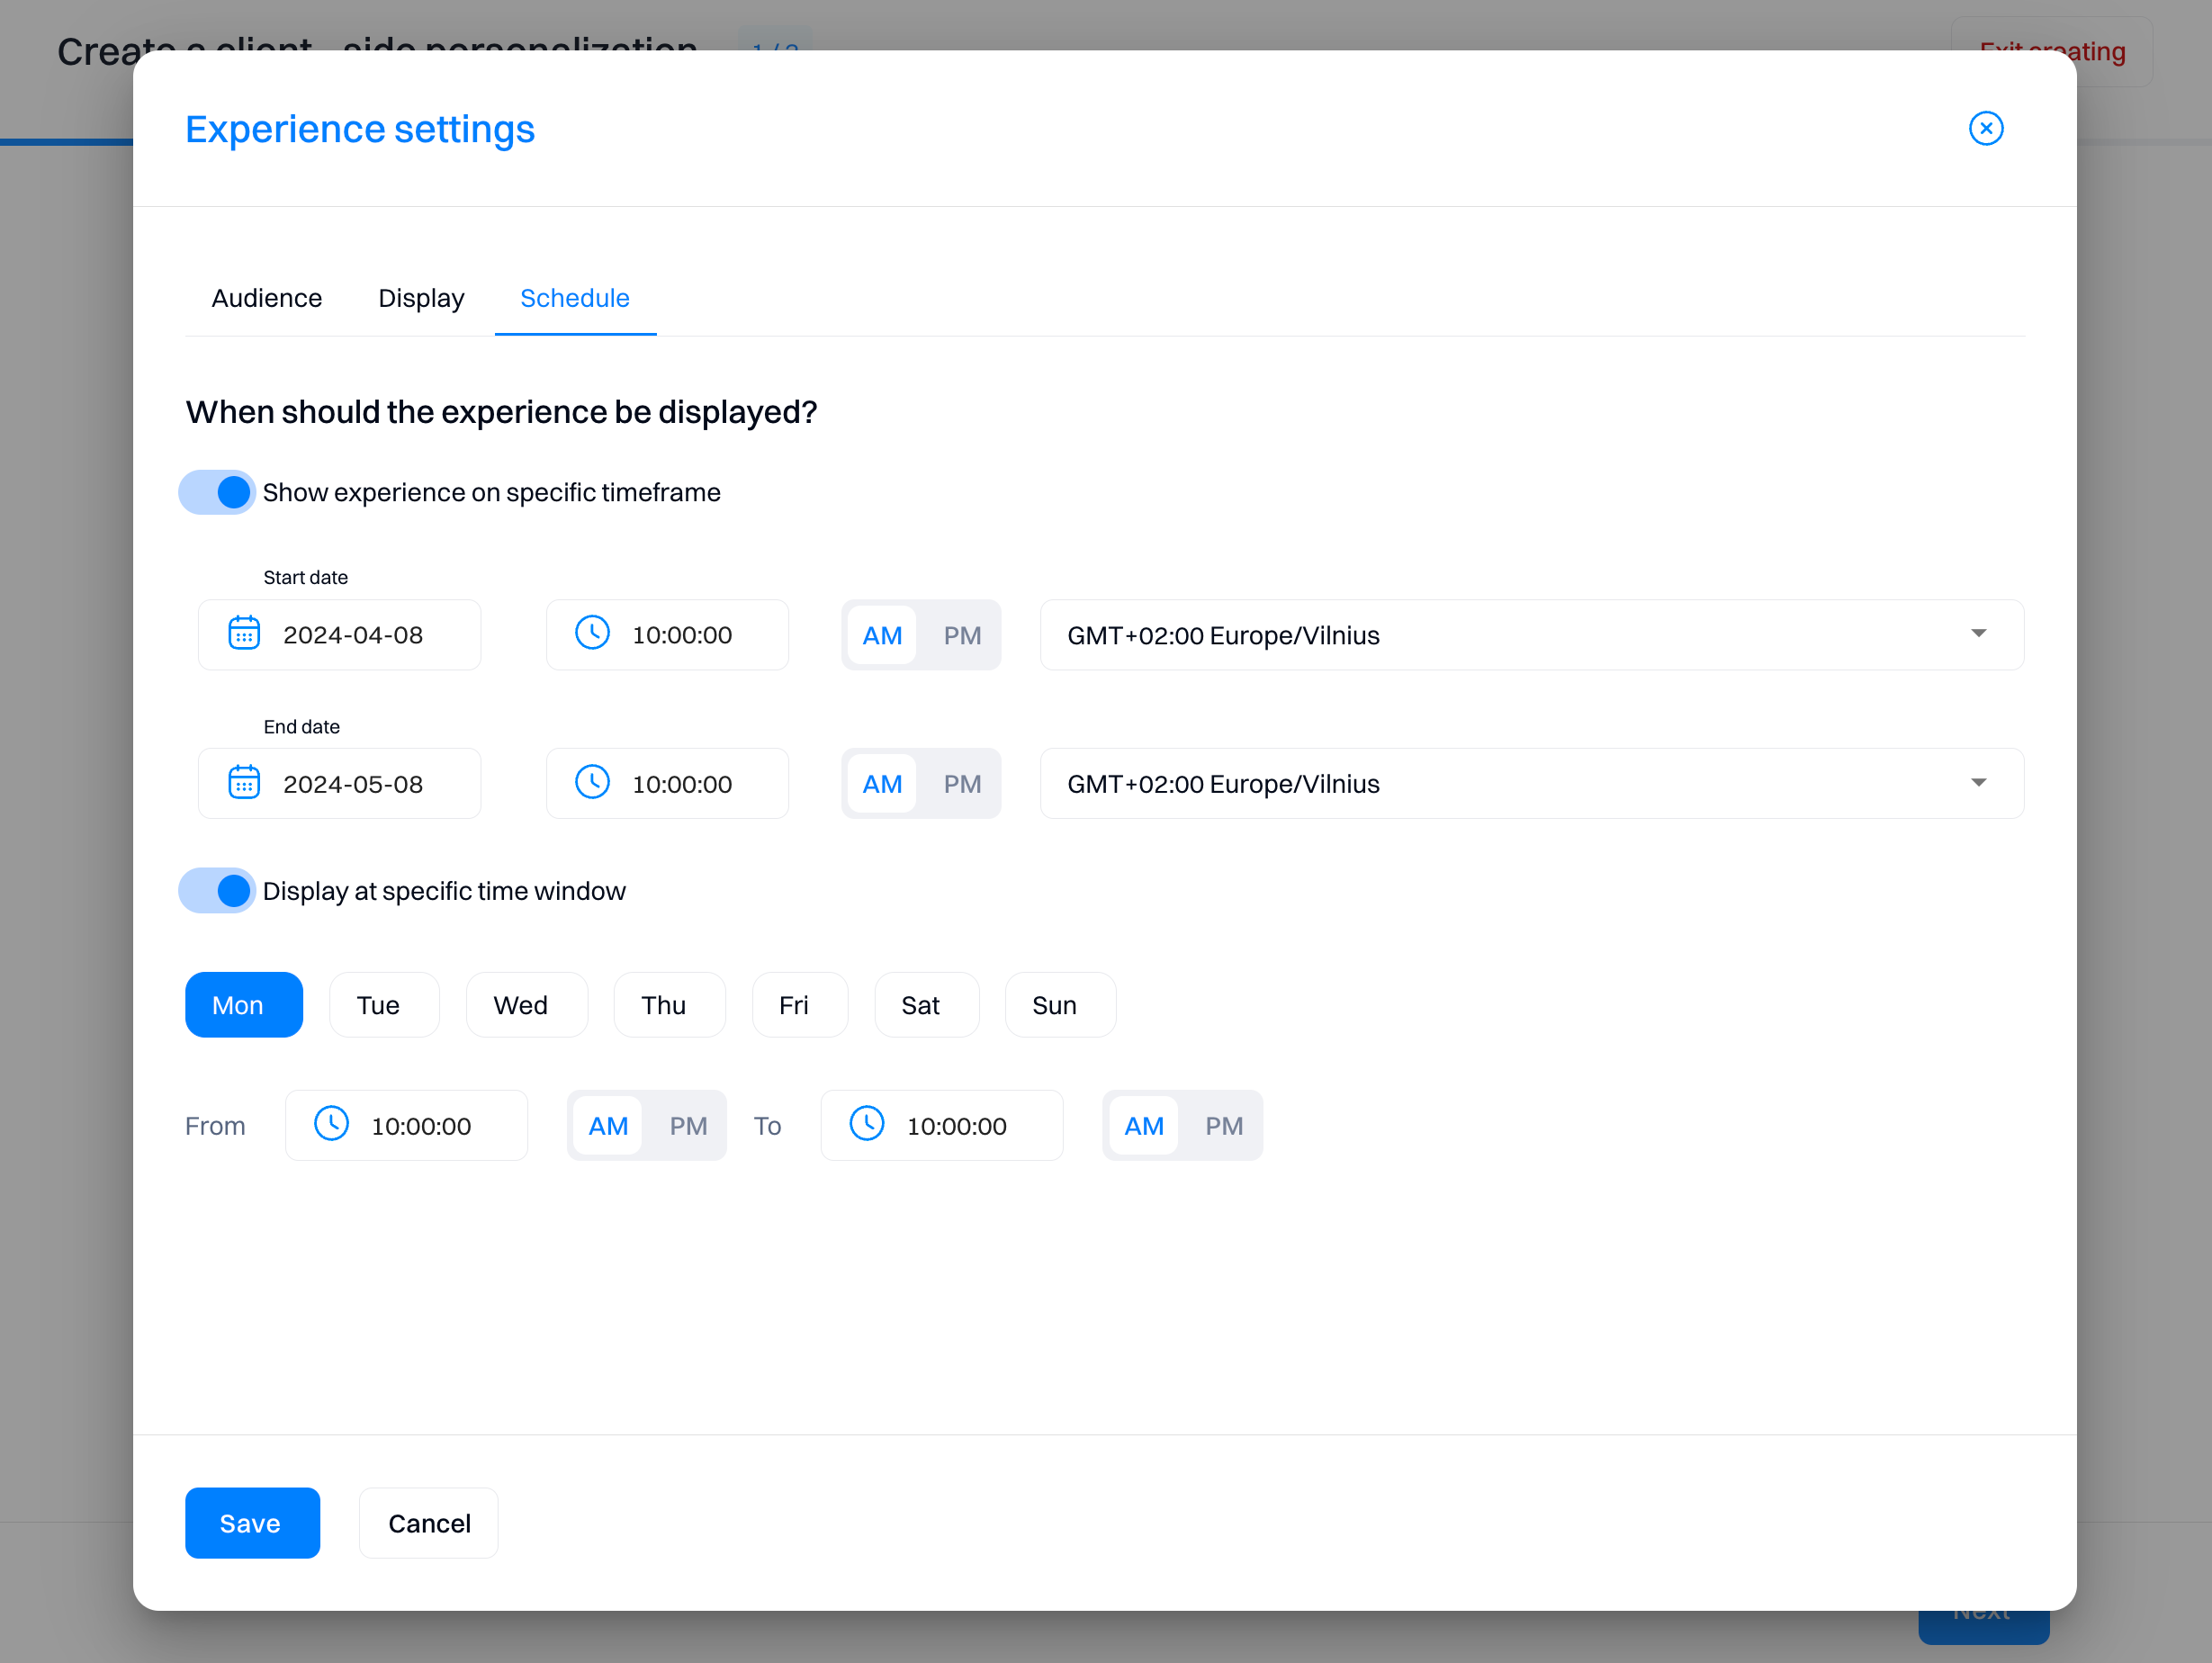
Schedule
Show experience on a specific timeframe - if enabled, the experience will be displayed within the indicated date range.
Display at a specific time window - select which days of the week and/or hours of the day the experience should be displayed. This is useful if you want the experience to run only on specific days or times of the day (e.g., Happy Hour sale).
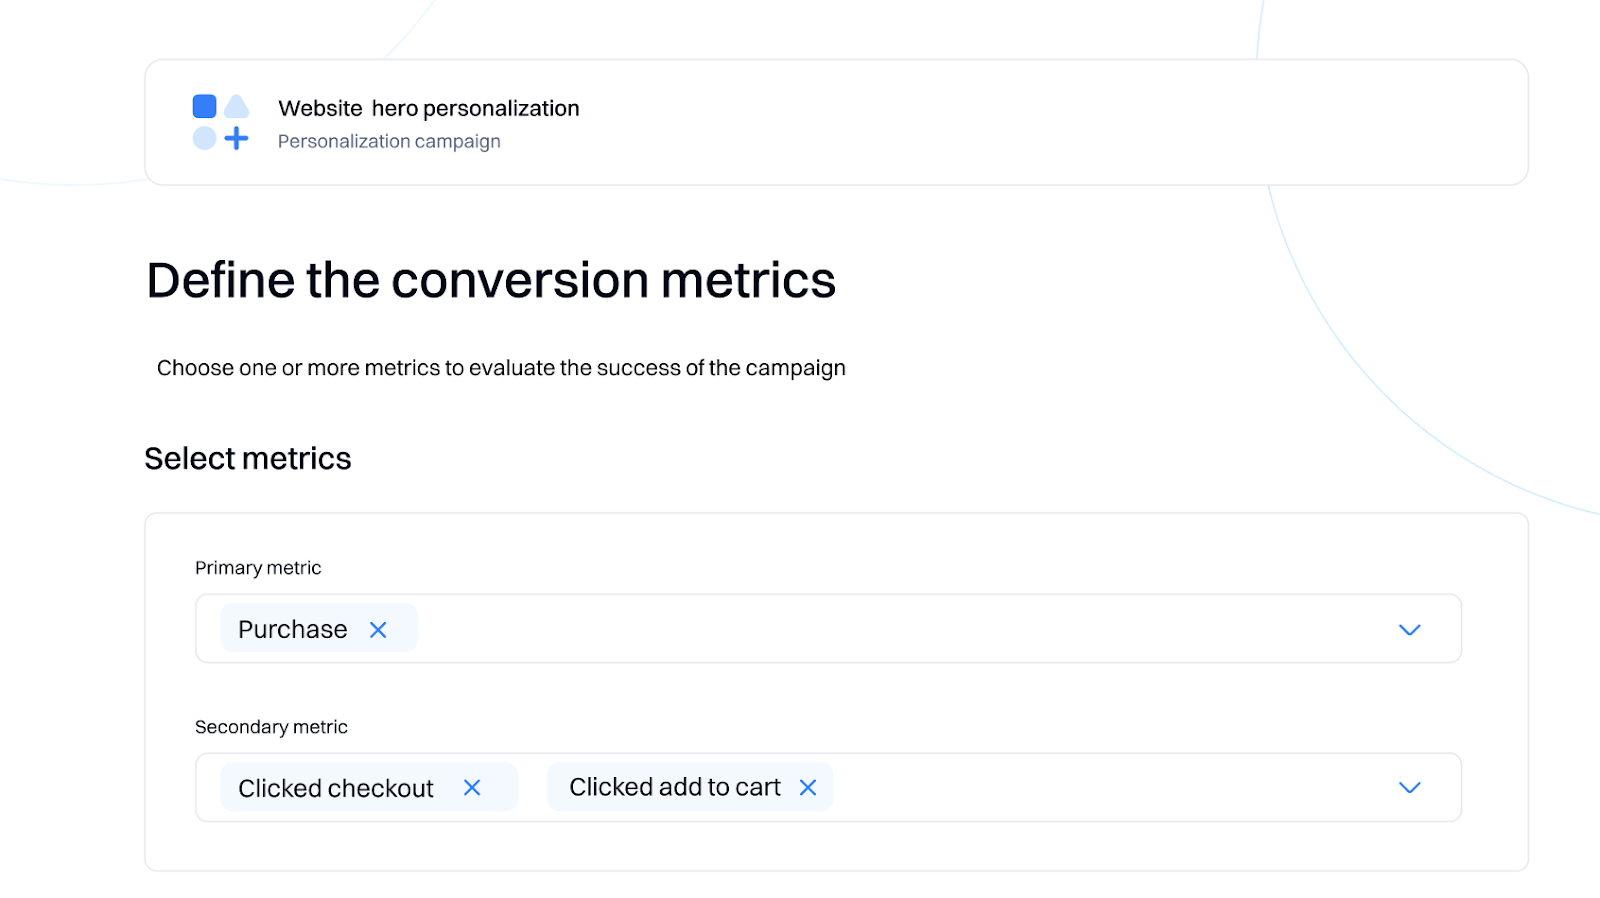
Configure conversion metrics
Metrics are conversion goals that allow you to track your personalization performance across all experiences. You can select multiple metrics per personalization, but at least one metric is required to create the personalization.
Note that you can only have one Primary and multiple Secondary metrics when selecting metrics.
The primary/secondary metric dropdown will allow you to access all events created in your project.
After selecting metrics, you must configure how they will be used to evaluate personalization performance.
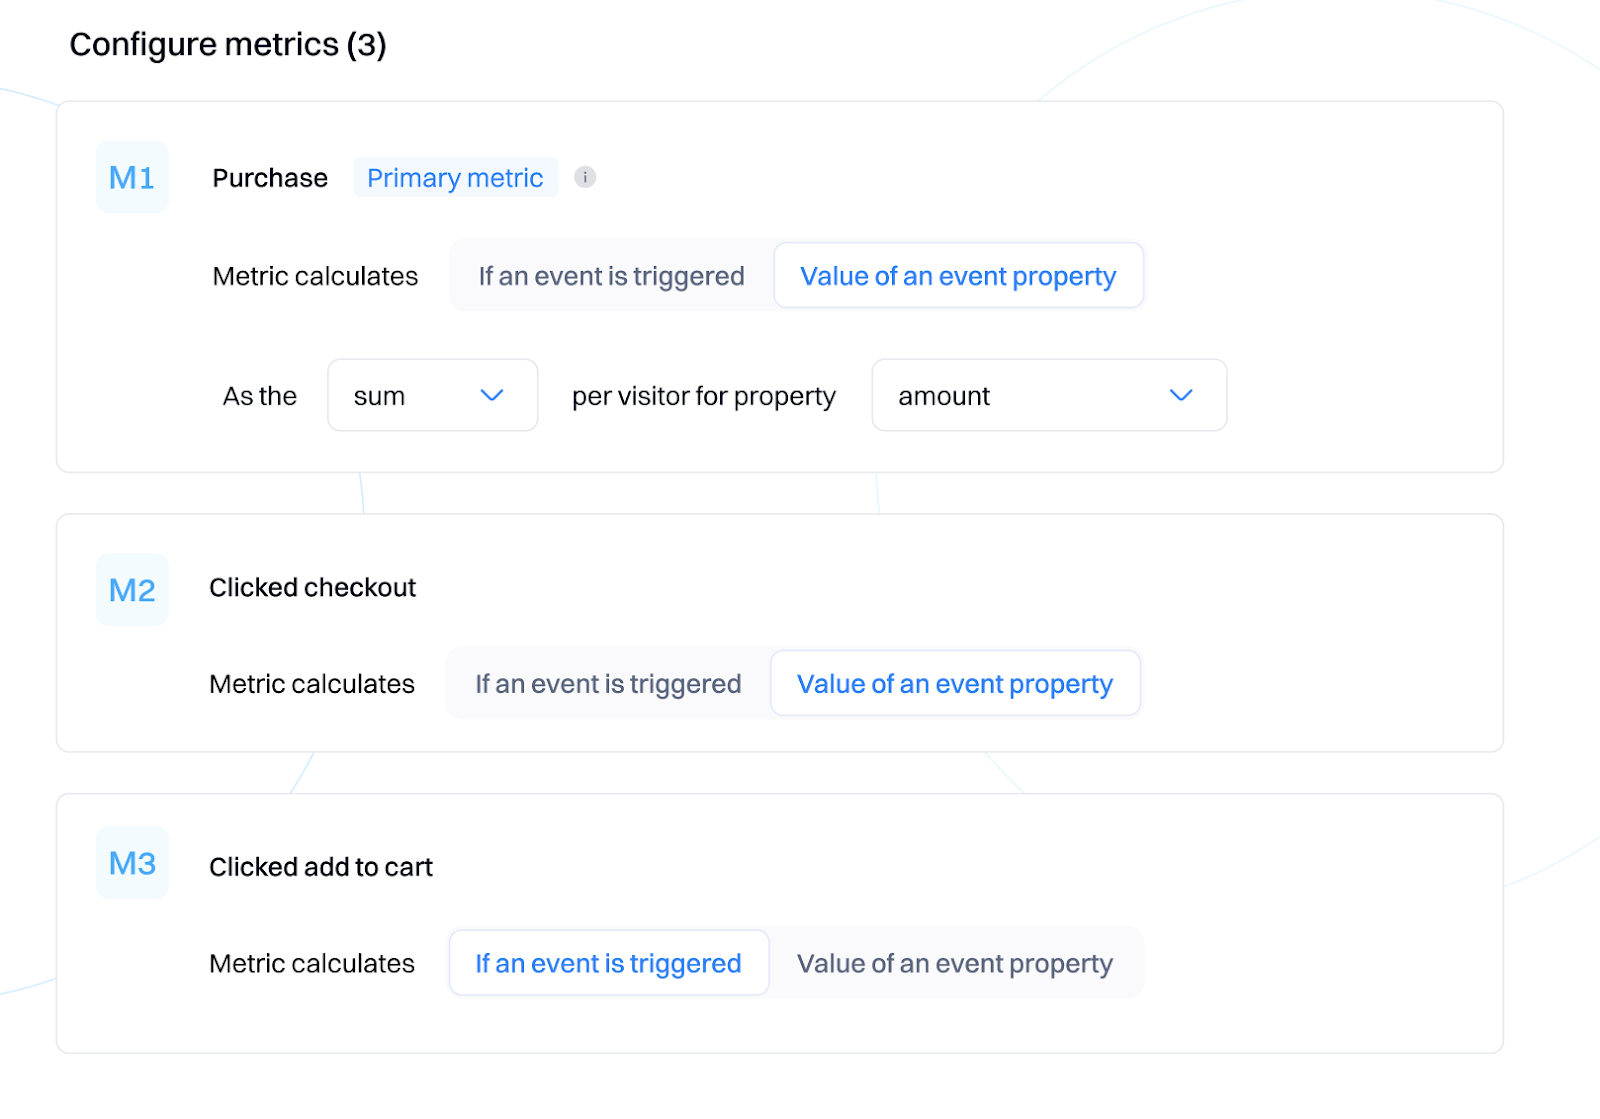
-
If an event is triggered. Intempt calculated how often the event occurred when the experience was served.
-
Value of an event property. Intempt calculates the value of an event property that you select.
For example, in the scenario above, Intempt would display the number of revenue generated (amount field in purchase event) to those customers serving the experience.
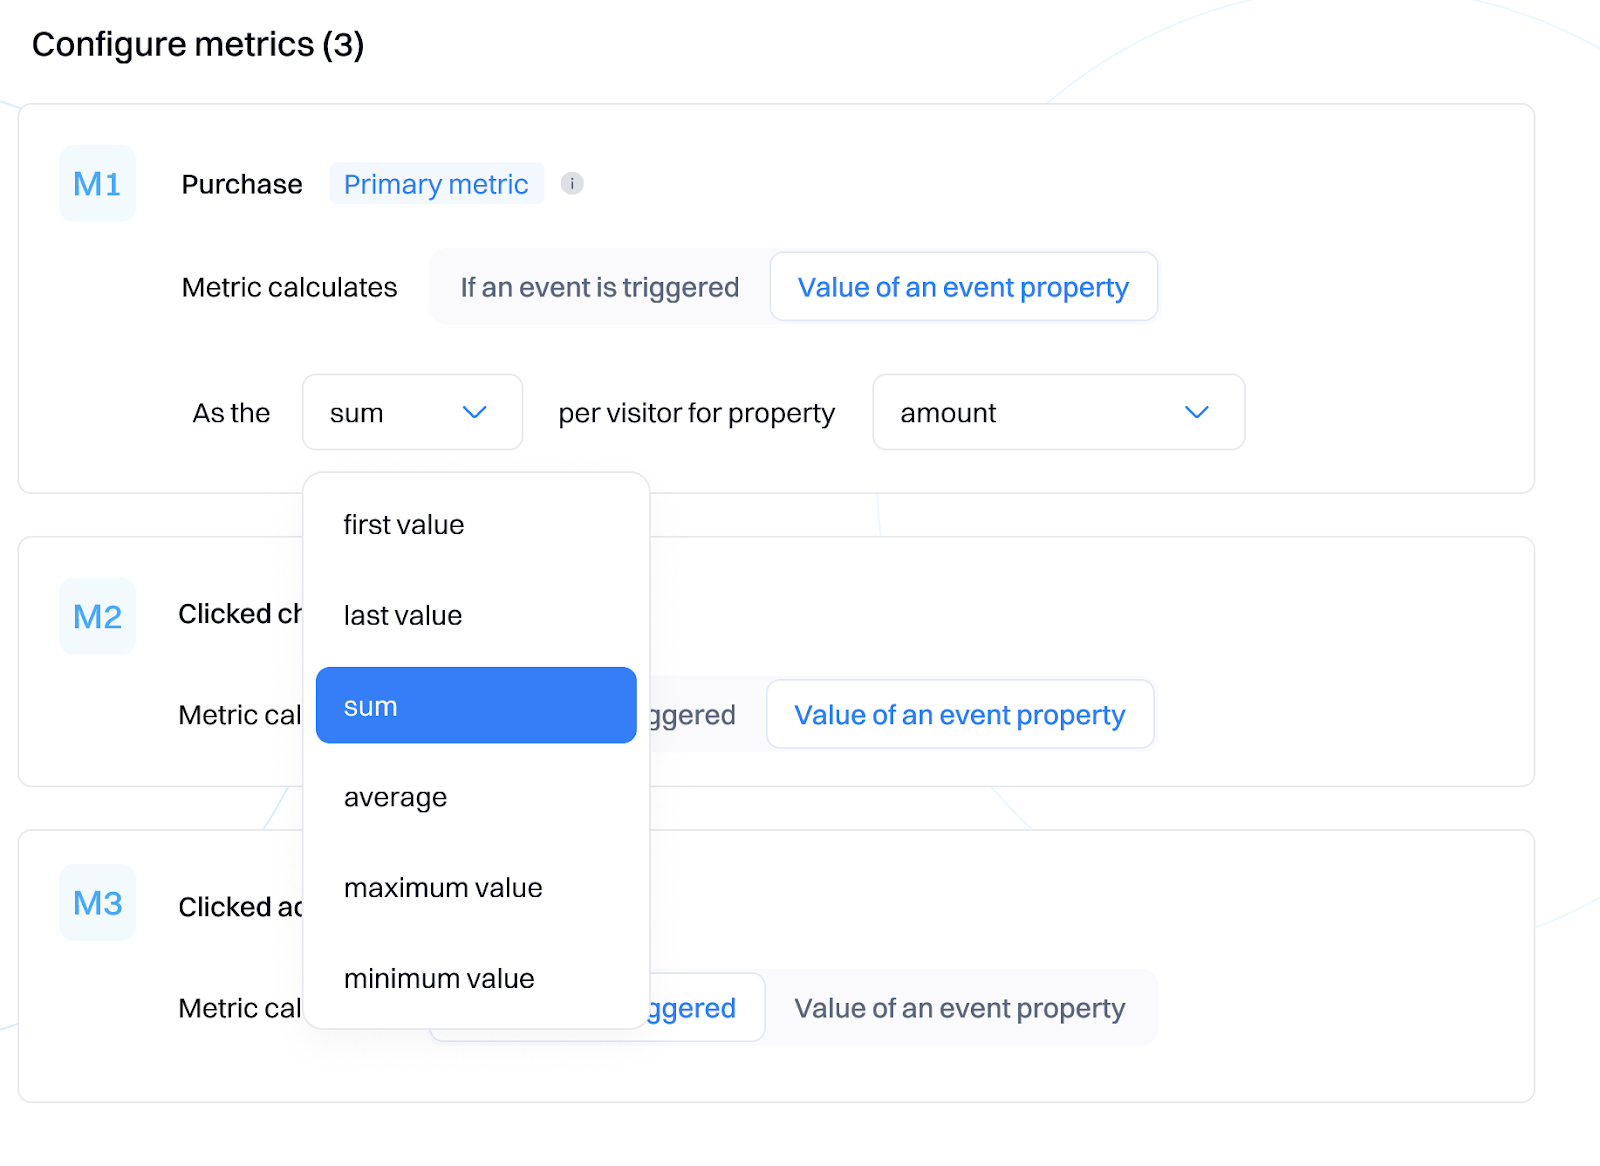
You can select any property within the event configuration and possible aggregation types:
-
First value
-
Last value
-
Sum
-
Average
-
Maximum value
-
Minimum value
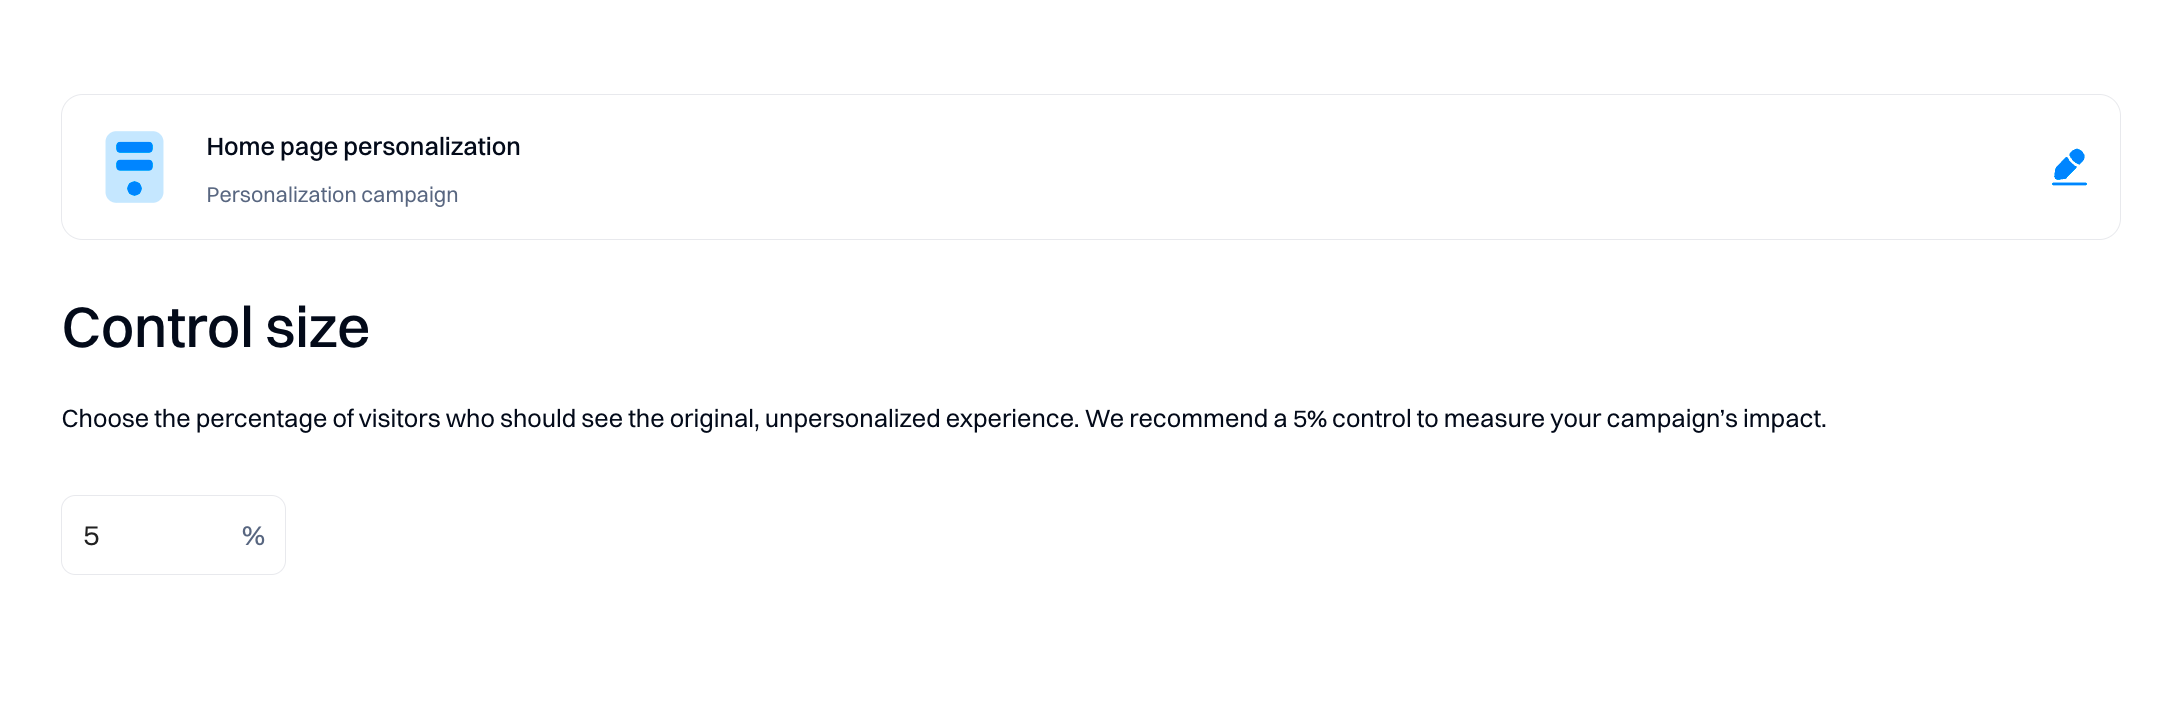
Setup control size
Control size will allow you to set a percentage of how many users would see the original, unpersonalized experience. This setting is configured at the personalization level and applied to all experiences with the same configuration.
We recommend a 5% control to measure your personalization’s impact.
Managing personalizations
You can create multiple experiences within the personalization on the configuration tab.
Click on the “Create Experience” button will open the web editor to configure a new experience.
Editing the content of the experience
Click the “Edit” button next to the variant name to access the visual editor and apply the changes to the already-created experiences.
You will be presented with the code editor to make the changes.
Editing the settings of the experience
Click on the “Configure” button to access the experience settings.
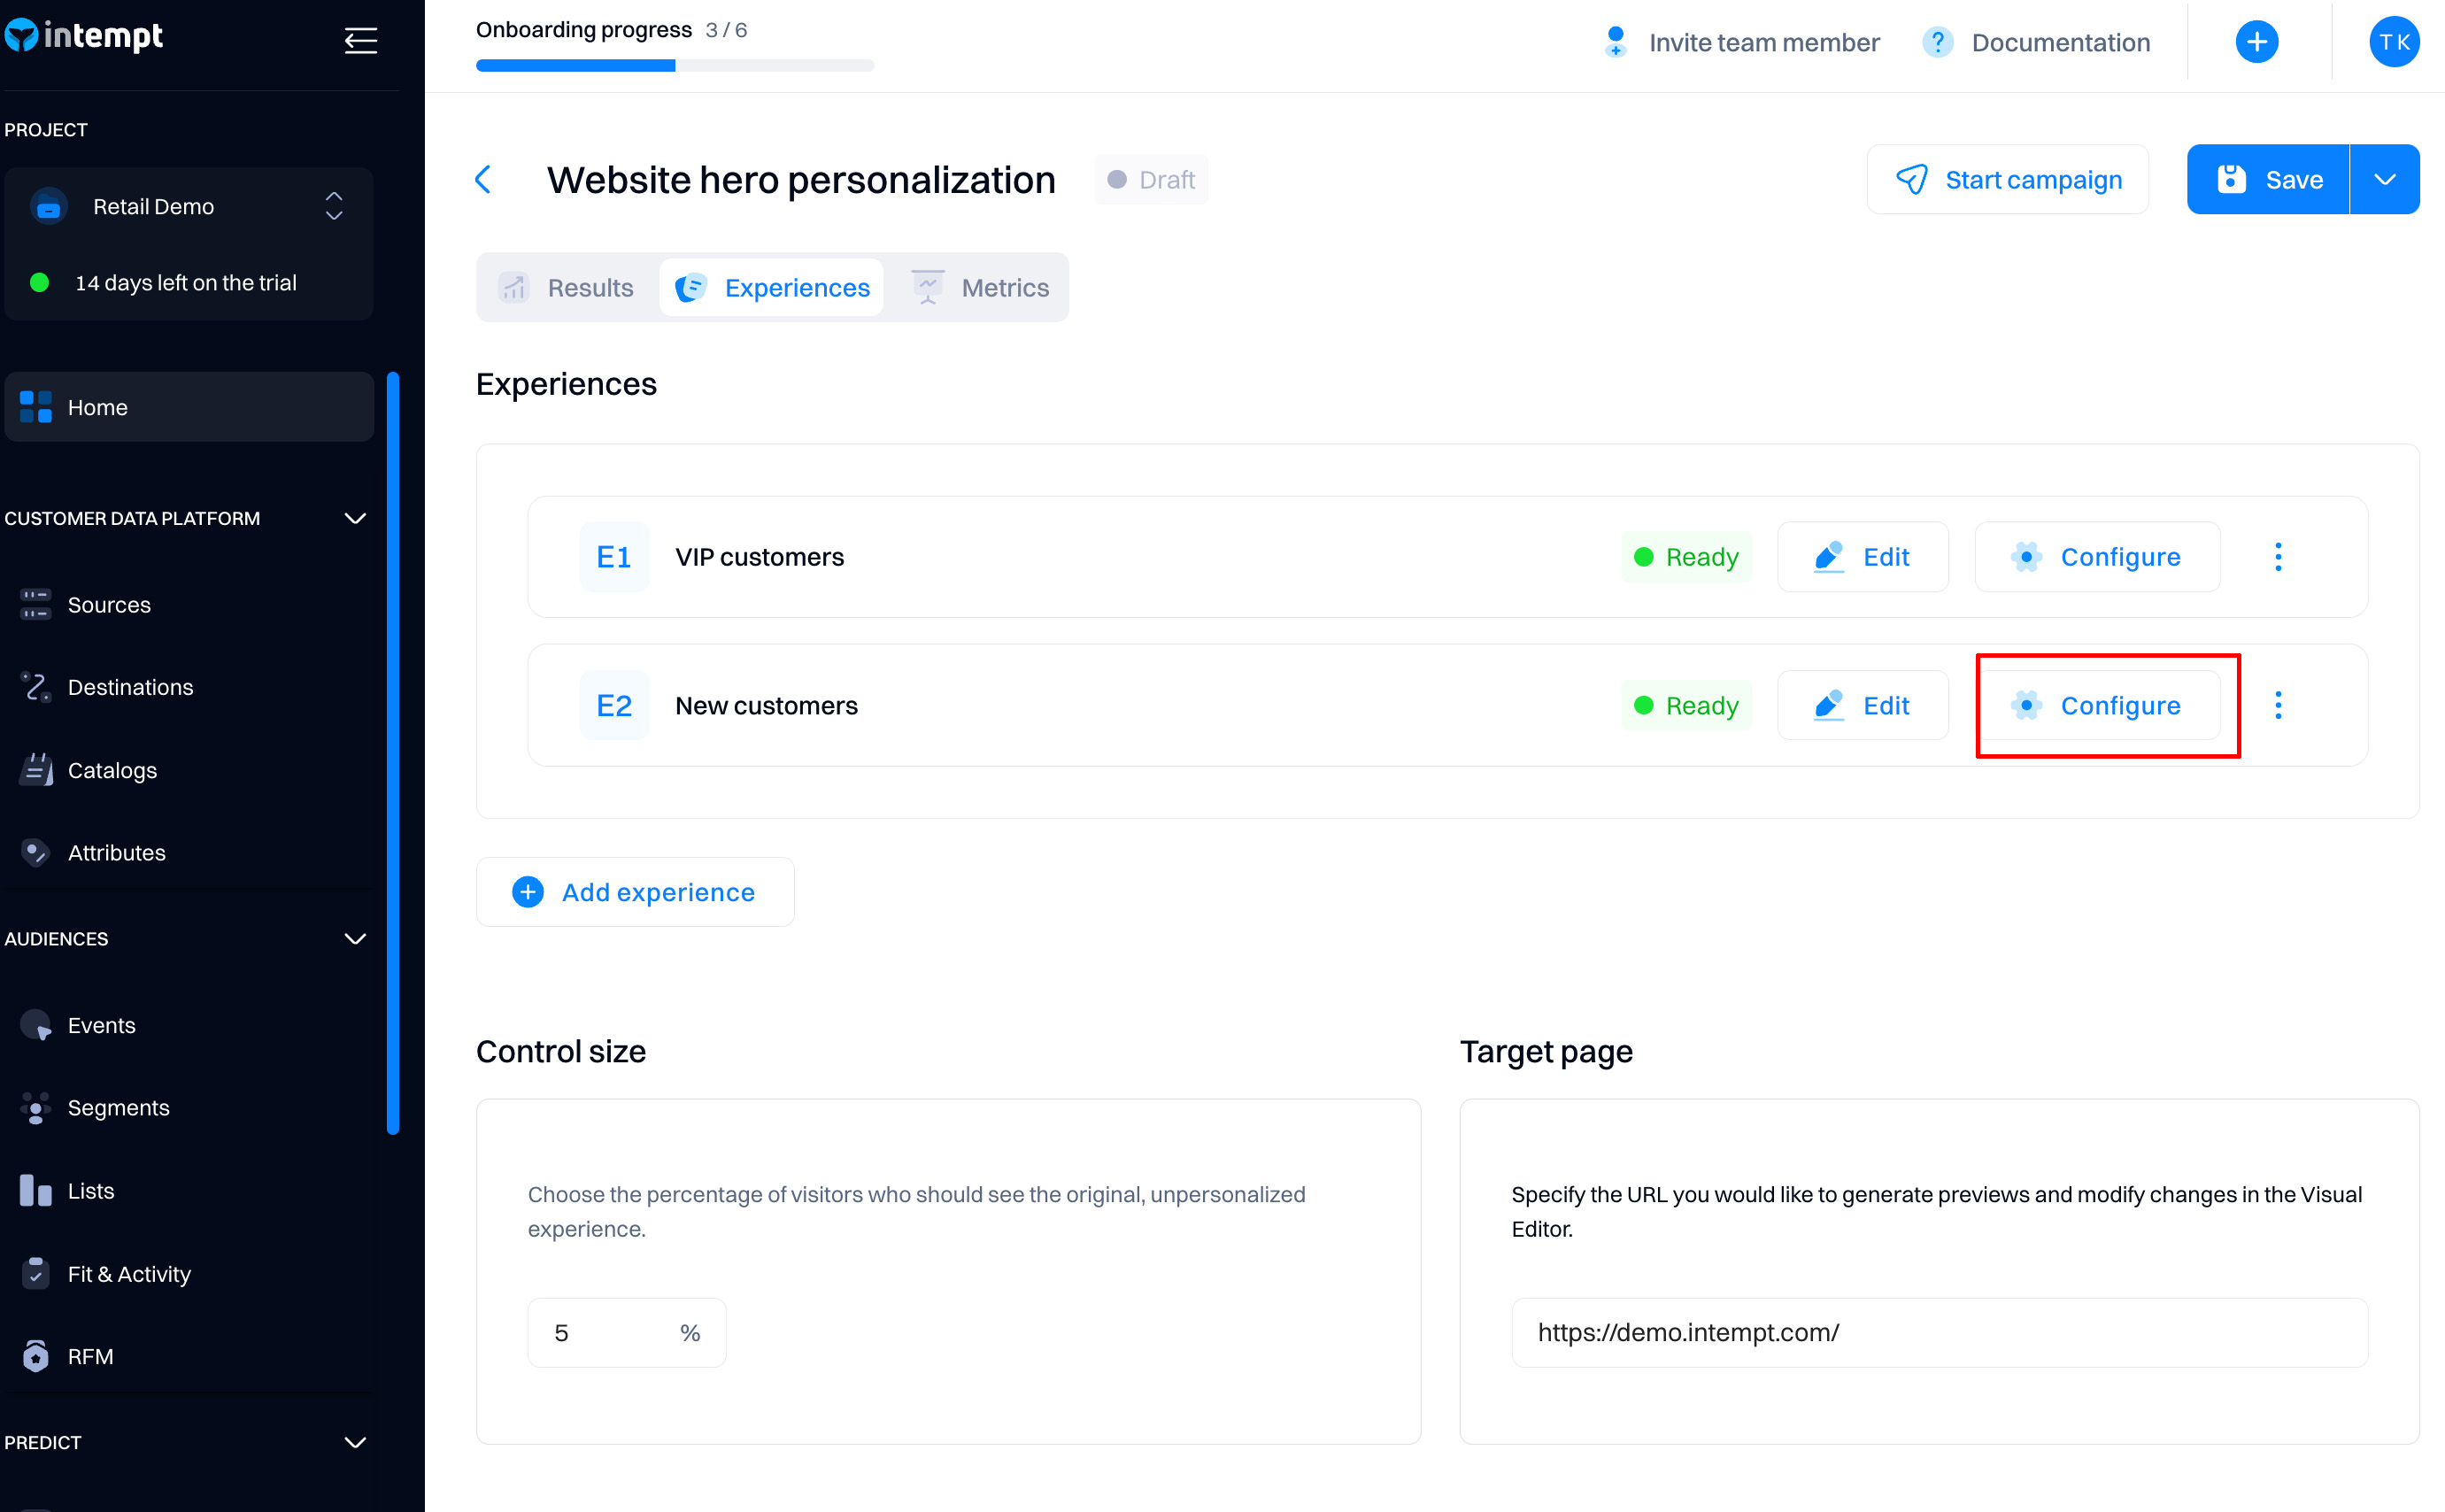
You will see the same experience configuration popup as in the previous section.

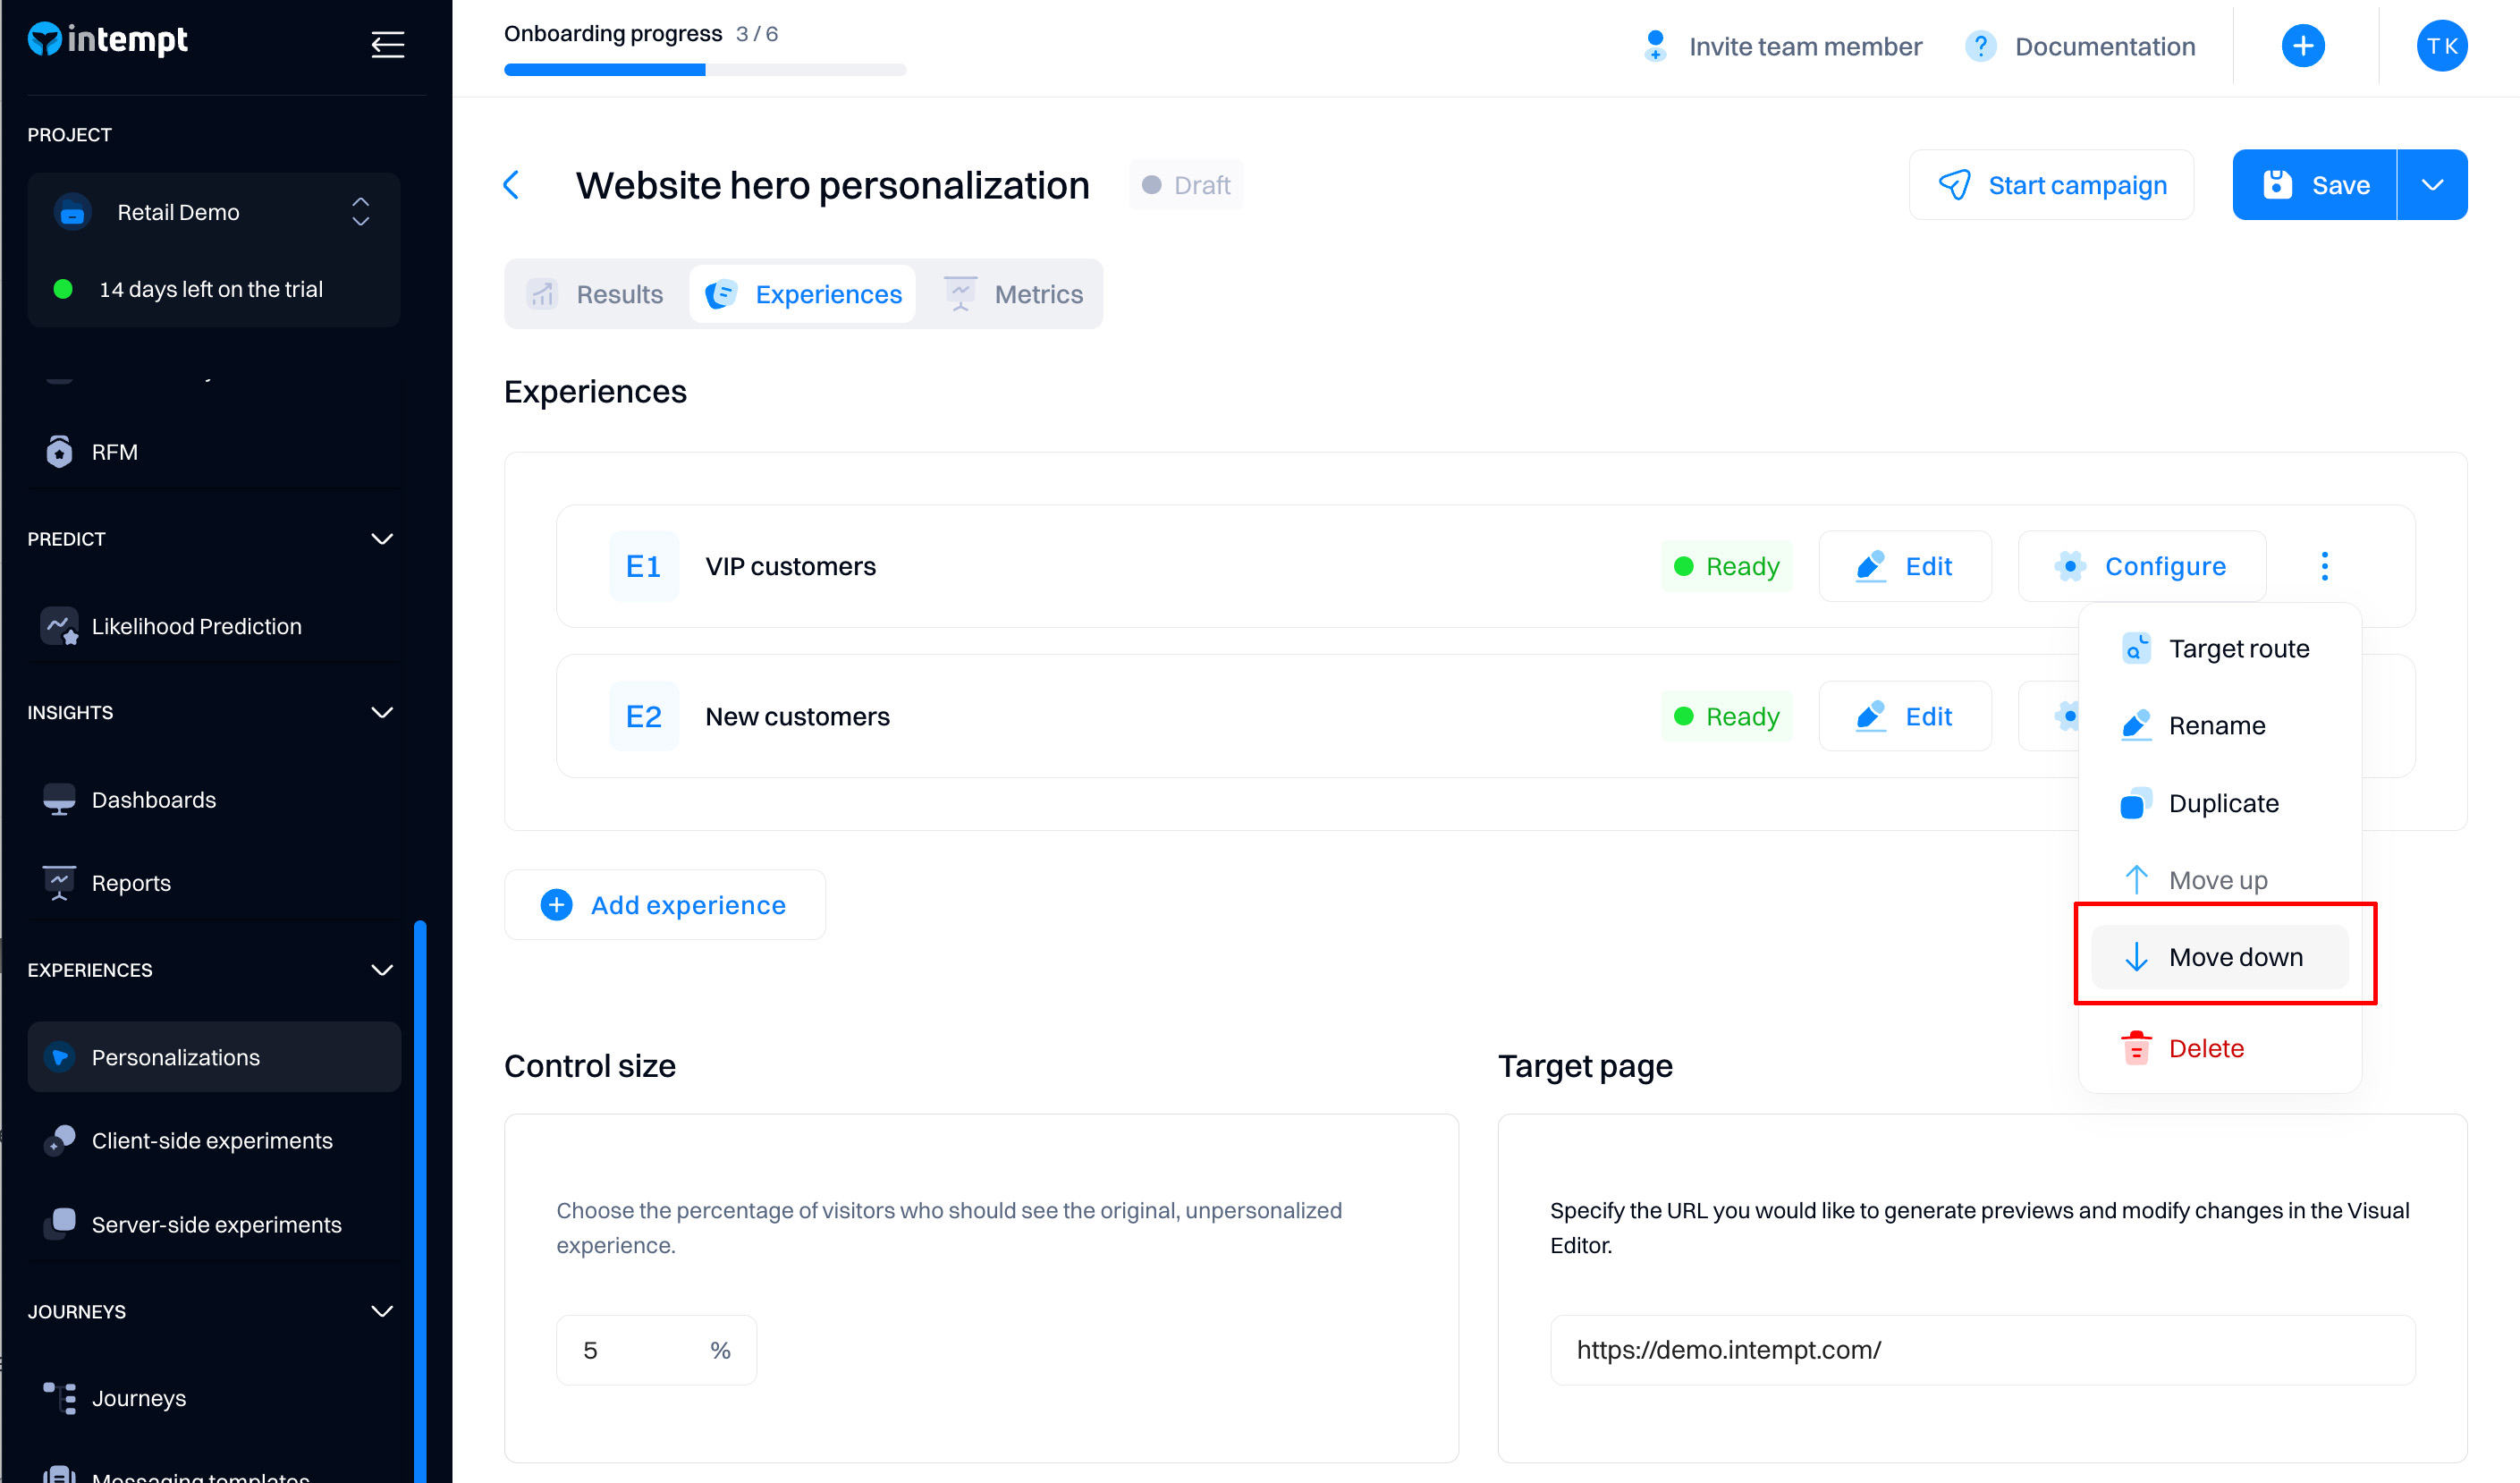
Experience prioritization
If a single visitor qualifies for multiple experiences (audiences) in the personalization, they will see only one experience by default.
To ensure this rule is applied accurately, you need to rank experiences by priority.
After you create more than experiences within the personalization, you need to rank them by priority. Click on the three dots icon on the experience and select “Move up” or “Move down” so that the most important experiences remain at the top.
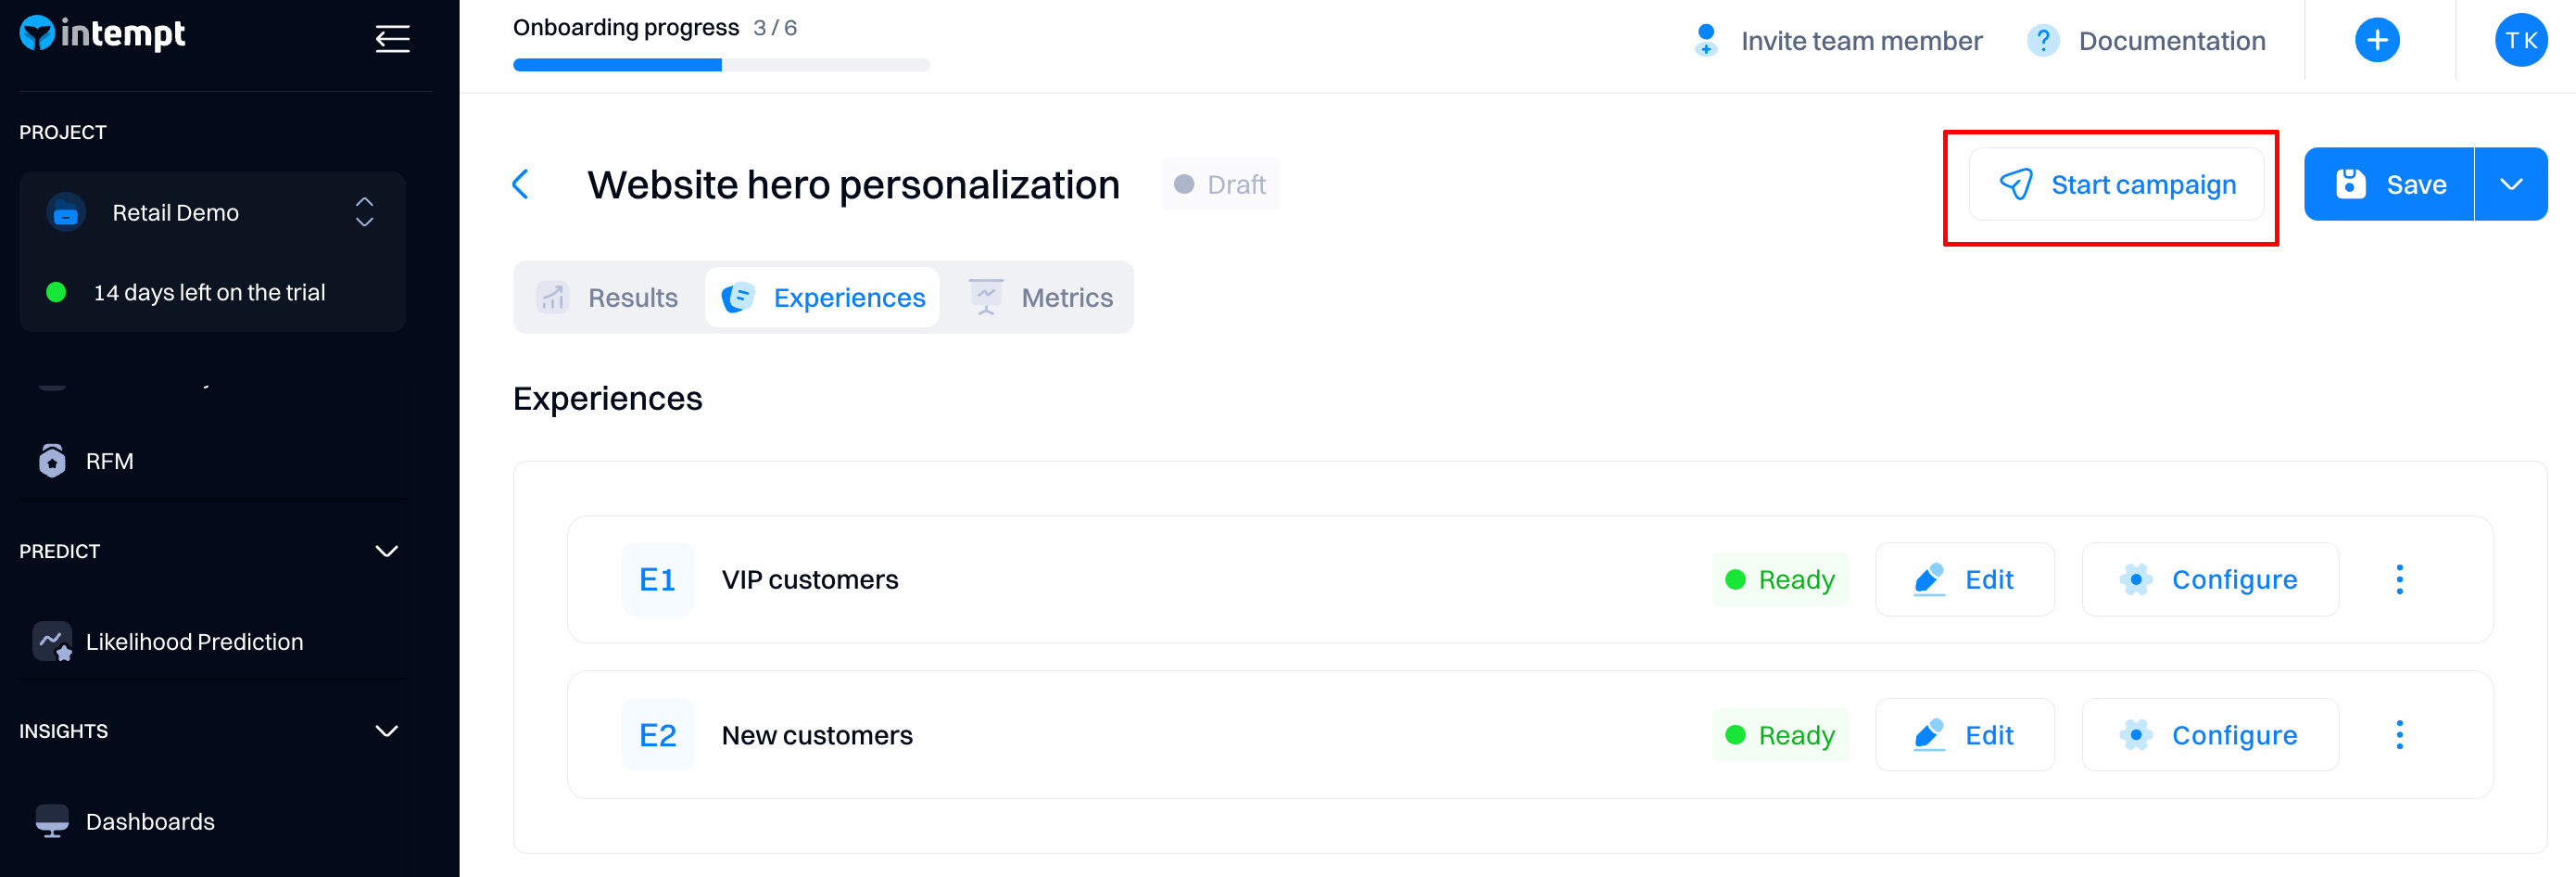
Starting the personalization
Once you set up all the experiences, you can start the personalization by clicking “Start.”
After the personalization is started, you can pause it at any time. After that, all experiences will be stopped, irrespective of their targeting and display conditions.
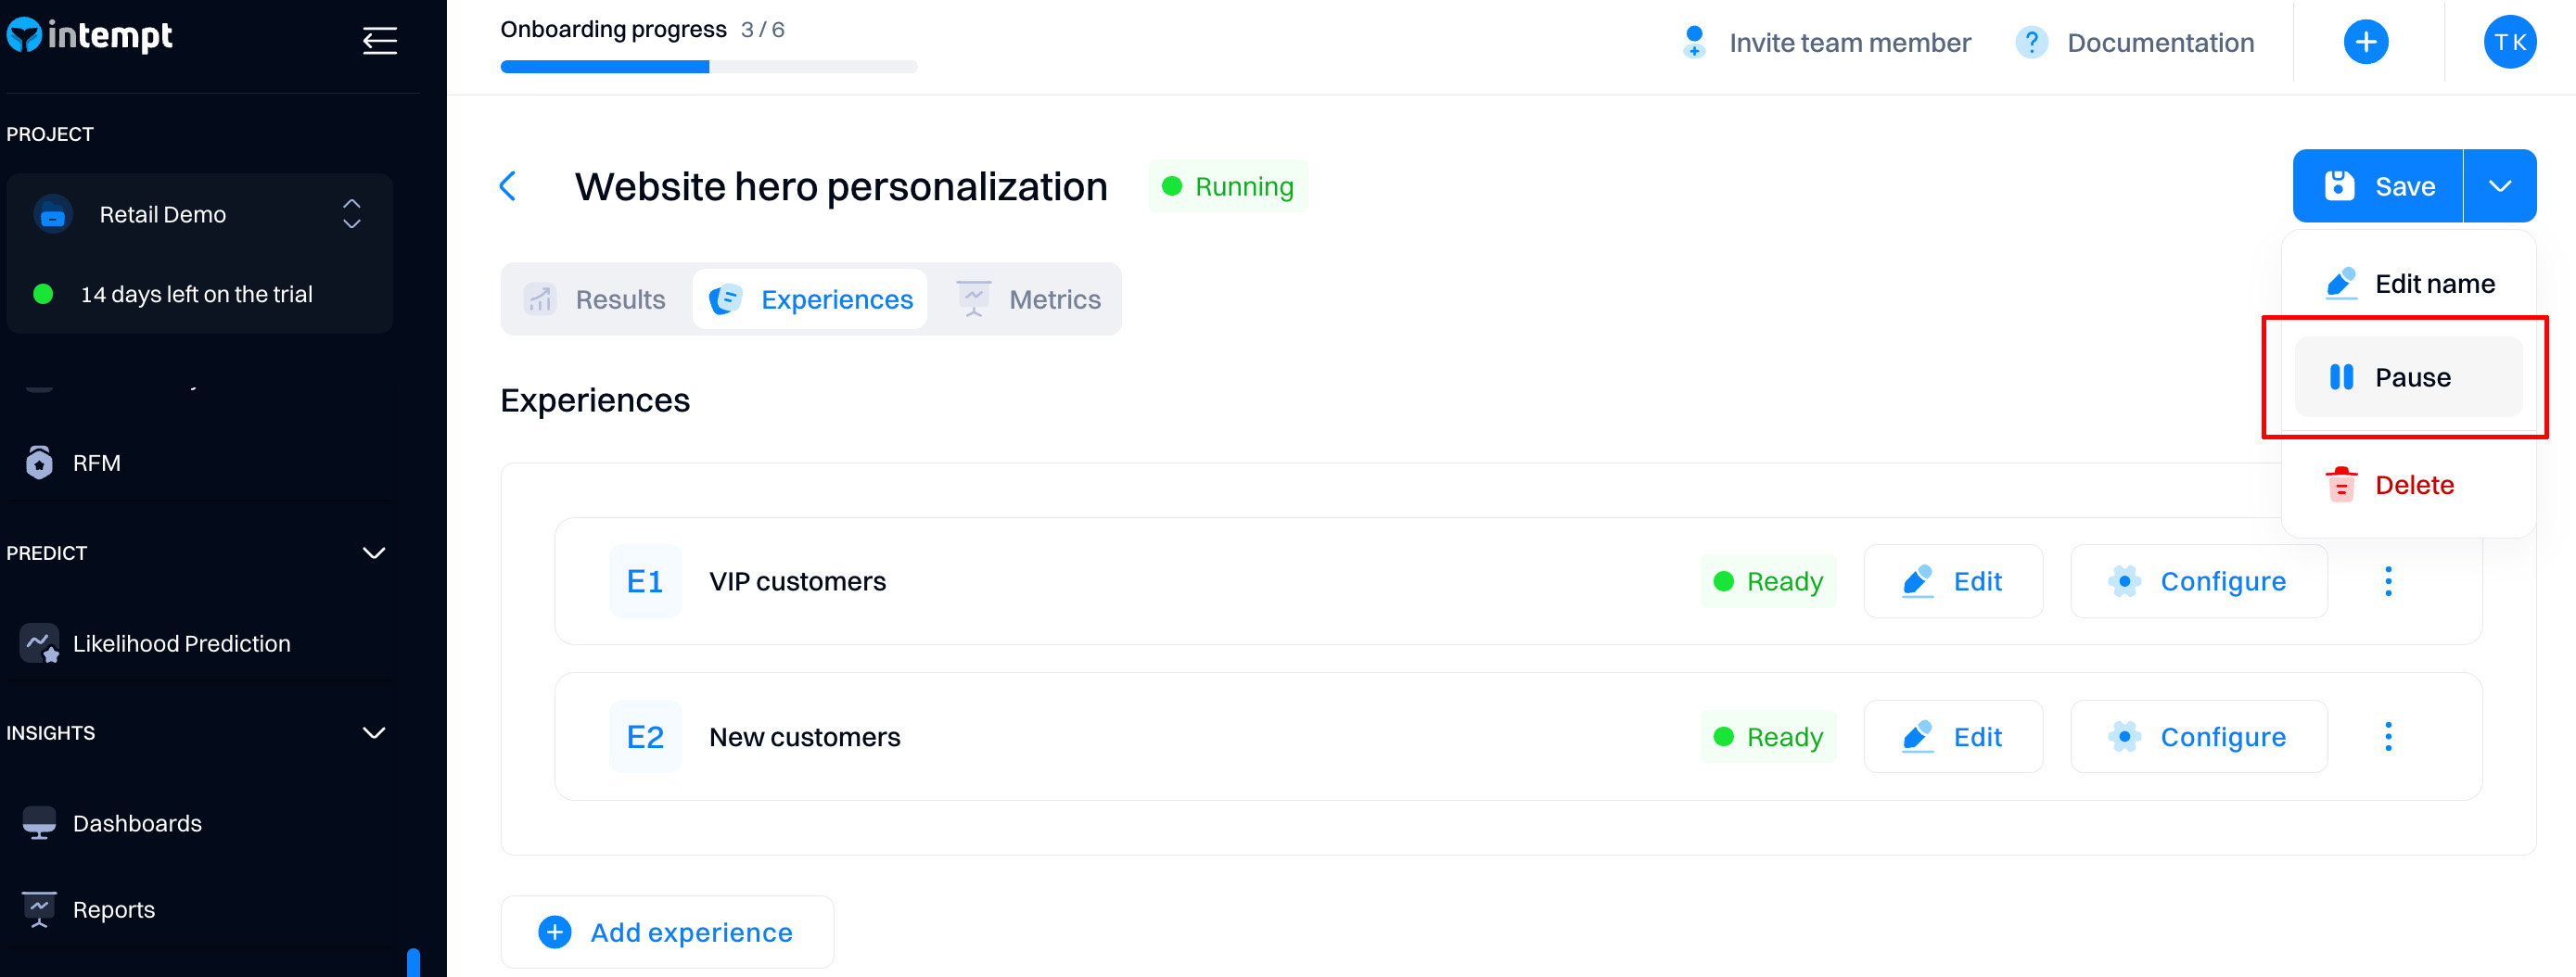
You can create new experiences at any personalization status (draft, running, or paused). Still, we recommend adding new experiences when the personalization is paused so you don’t accidentally serve content to the wrong audiences in case of misconfiguration.
Personalization results
For a complete overview of how personalization performance and metrics are evaluated, refer to Personalizations analytics.
Calling a server-side personalization
Rest API
In your code, use .choose() to request a personalization experience.
For more details, see the [API reference](For more details, see the).
Path
https://api.intempt.com/v1/{orgName}/projects/{projectName}/optimization/choose-api
Parameters
| Parameter | Type | Required | Description |
|---|---|---|---|
orgName | string | Yes | The name of the organization |
projectName | string | Yes | The name of the project |
identification | object | Yes | An object containing identifiers for the user |
-> sourceId | int64 | - | A unique identifier for the source |
-> profileId | string | - | A unique identifier for the user profile |
-> userId | string | - | A unique identifier for the user |
names | array of strings | Yes | An array of personalization or experiment selector names |
groups | array of strings | Yes | An array of personalizations or experiments that are grouped by the same group selector name |
device | string | No | The device used by the user. Possible values: all, mobile or desktop |
sessionId | string | No | A unique identifier for the session |
optimizationType | string | No | The type of optimization to be performed. It can be either a personalization or an experiment-type optimization. |
url | string | No | The URL to which the optimization is related |
Node.js and iOS SDKs
Intempt supports using Optimization APIs via our Node.js and iOS SDK libraries. Once initialized, these SDKs will allow you to use the Optimization APIs via simple methods.
The methods are explained in the Node.js SDK and iOS SDK documentation.
Updated 9 months ago