
Client-side personalizations
Overview
Client-side personalizations allow you to deliver targeted content to visitors to your site using a simple Javascript snippet. This enables a fast setup for marketers without relying on engineers to create the required experiences.
Client-side approach
| Category | Description |
|---|---|
| Overview | Uses Javascript as the method of testing and personalizing site content. Therefore, all dynamic action is taken client-side, from the browser. |
| Where does content get changed? | On the client-side |
| Advantages | - Easy and fast to make changes - Easy for business stakeholders to use - Quicker implementation |
| Disadvantages | - A minor increase in page footprint and load time - Less developer control - Doesn’t integrate well with IT/web deployment frameworks |
| Examples | - Identifies one or more elements on the page via DOM selectors, then executes Javascript code to modify such element(s). Examples: hide, remove, move, duplicate, change attributes, change CSS styling, and so on - Identifies one or more elements on the page via DOM selectors, then executes Javascript code to replace the element(s) with new content - Identifies one or more elements on the page via DOM selectors, then executes Javascript code to insert new content before or after the element(s) - Injects global CSS styles onto the page, changing the styling of elements on the page |
Key terms
-
Personalization is a set of Experiences organized around a single goal/website change strategy.
-
Client-side personalization is a subtype of personalization that refers to how the content on your website is changed. Client-side personalization uses Javascript to test and personalize site content. Therefore, all dynamic action is taken from the client's side of the browser.
-
Experience is a set of website changes applied to a selected audience within the personalization.
-
Control is the percentage of whole personalization traffic that will see the original website experience.
Creating a personalization
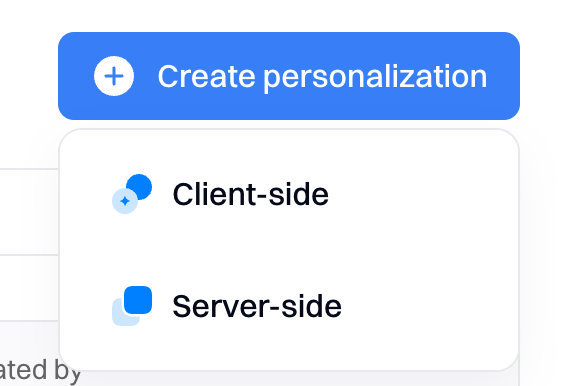
To create a personalization, go to Personalizations > Create Personalization

Next, select the type of personalization - "Client-side.”
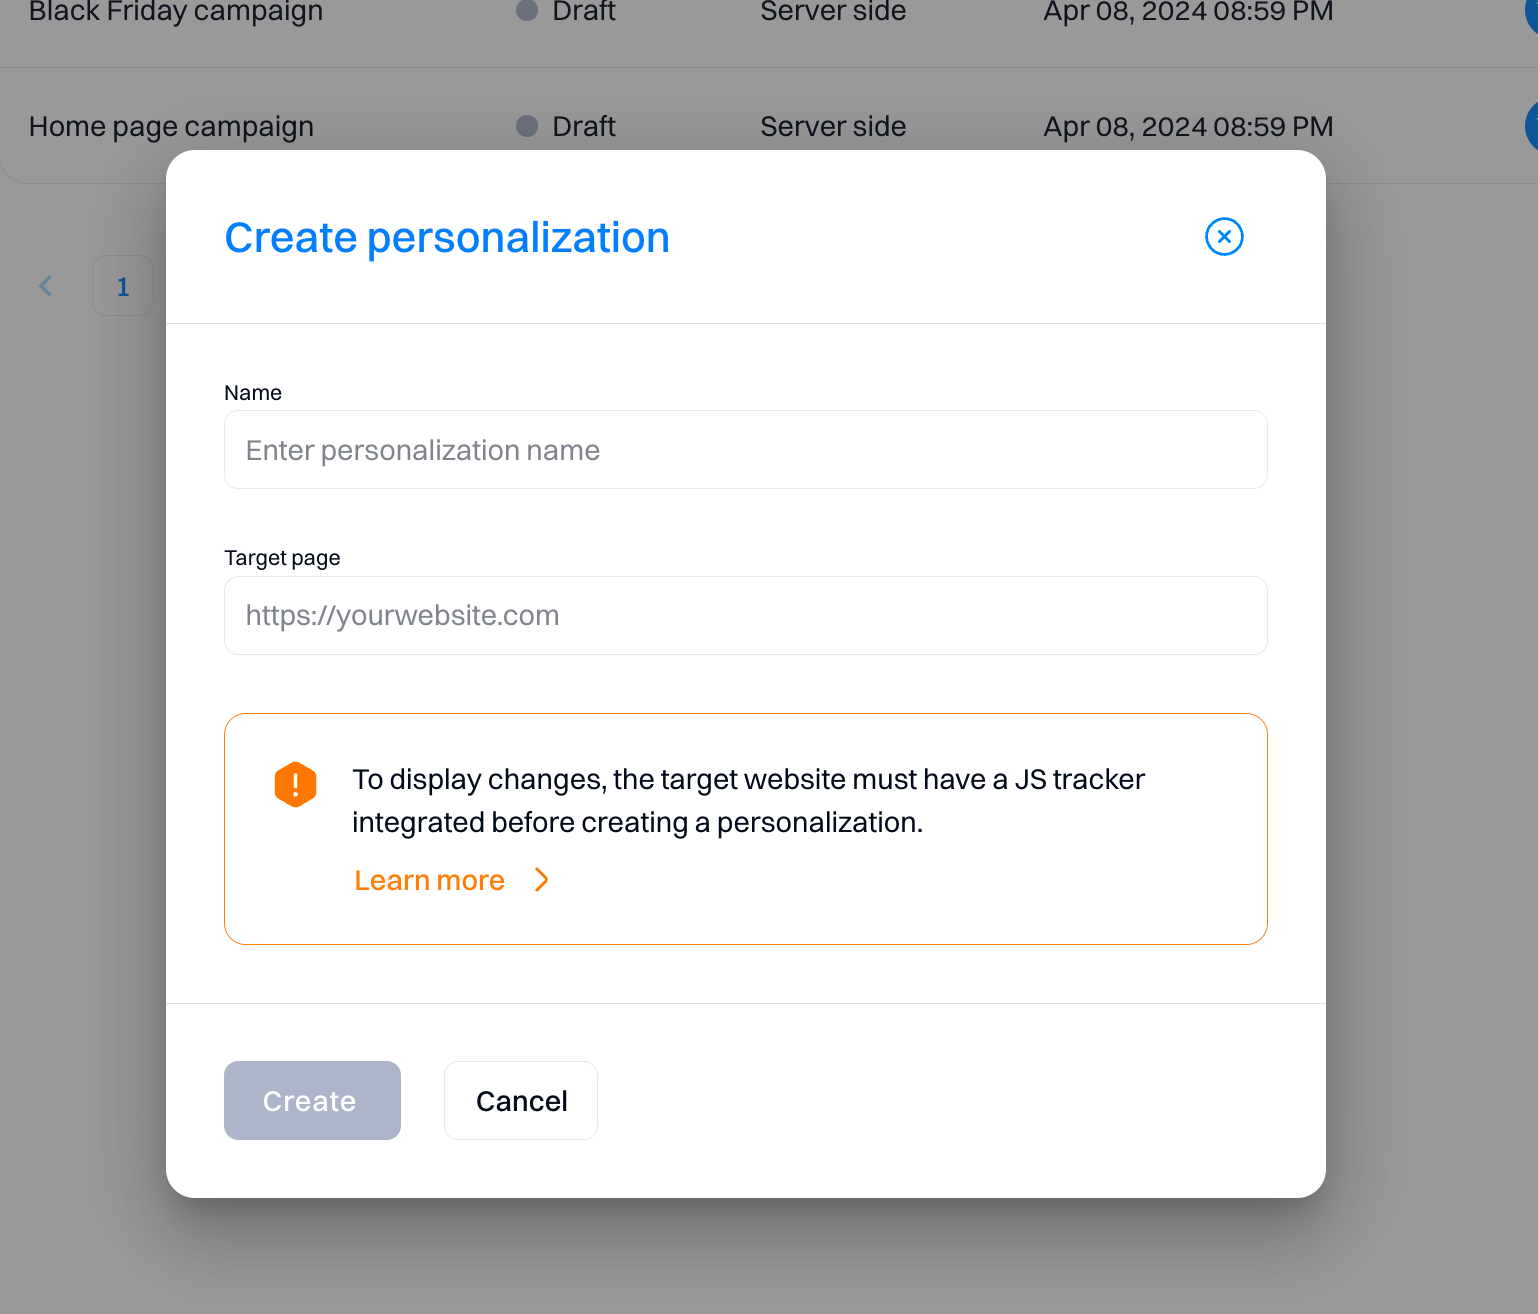
Enter name and target page URL
Name your personalization based on the type of targeted content you are delivering. For example, if you want to personalize the hero banner on your homepage, you might name it “Website hero personalization.”
Select the Target page - URL where the personalization will be served by default. This will be your starting page, where you will create your first experience. Later, you can configure individual experiences for different URLs.
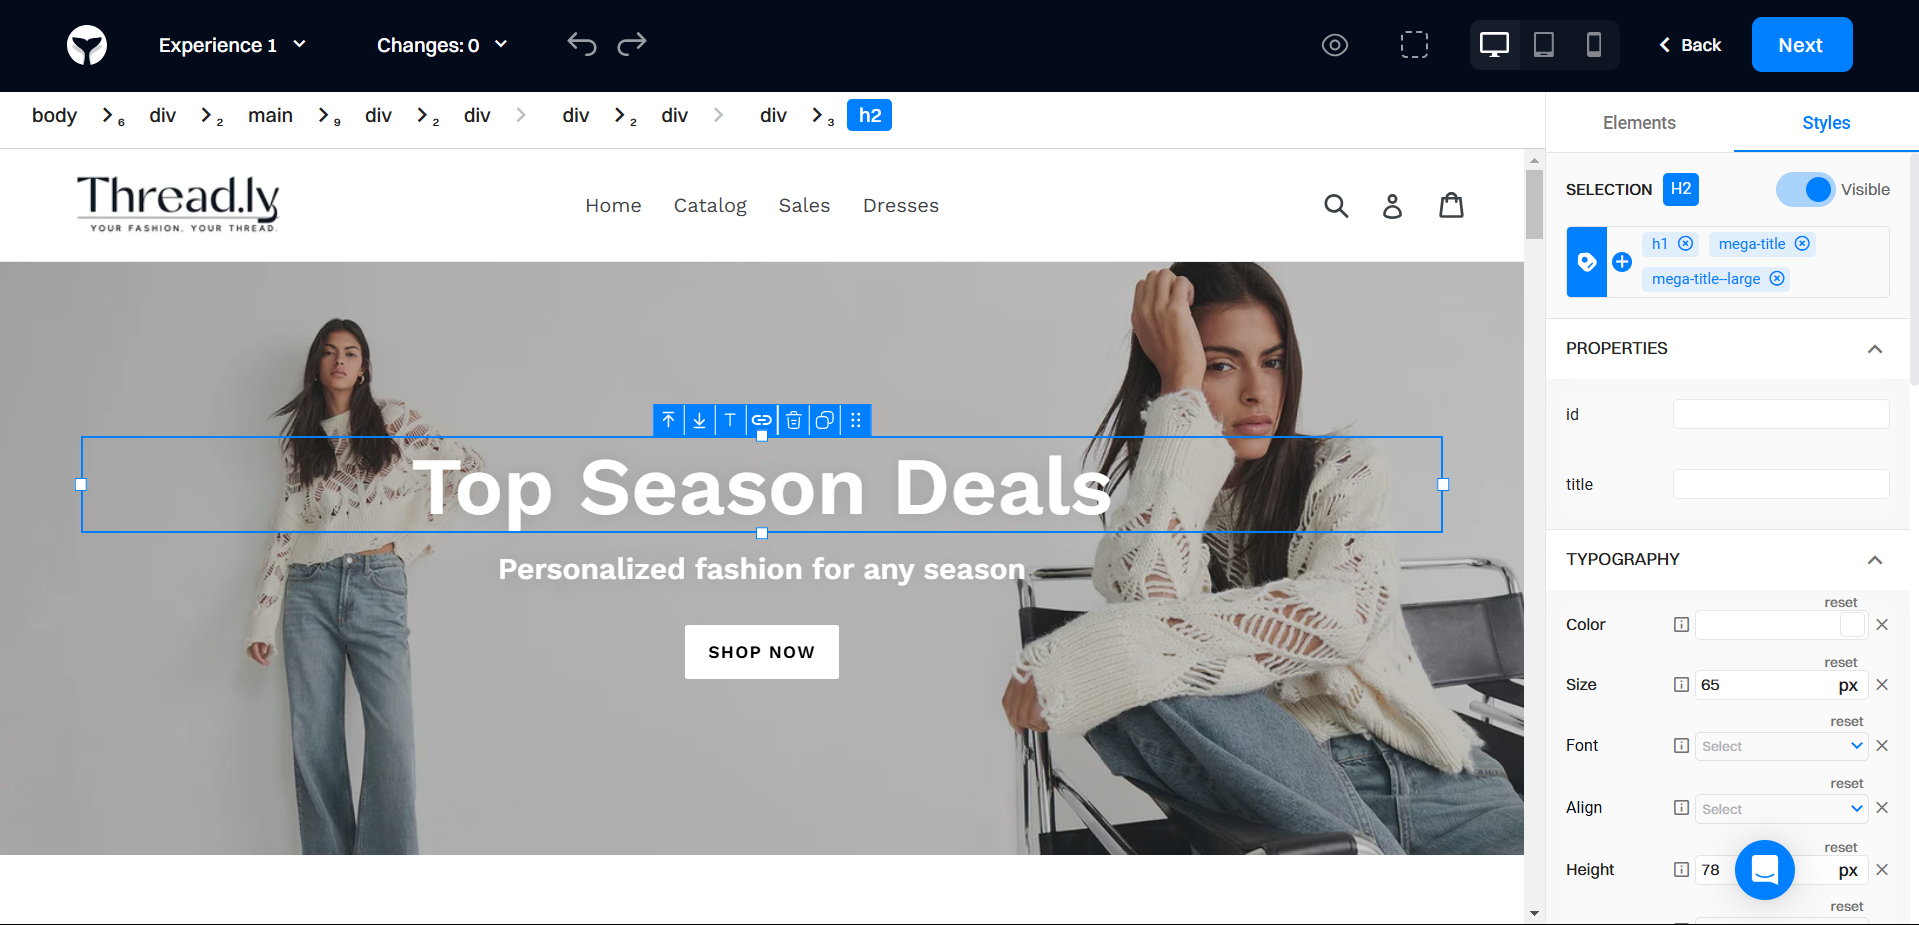
Create experience changes
You will be redirected to your target page, where you can set up the experience you want to personalize. The setup flow allows you to create multiple experiences within the editor.
For a detailed guide on using the visual editor, visit Using the visual editor
Once you are done with the changes, click “Next” to proceed.
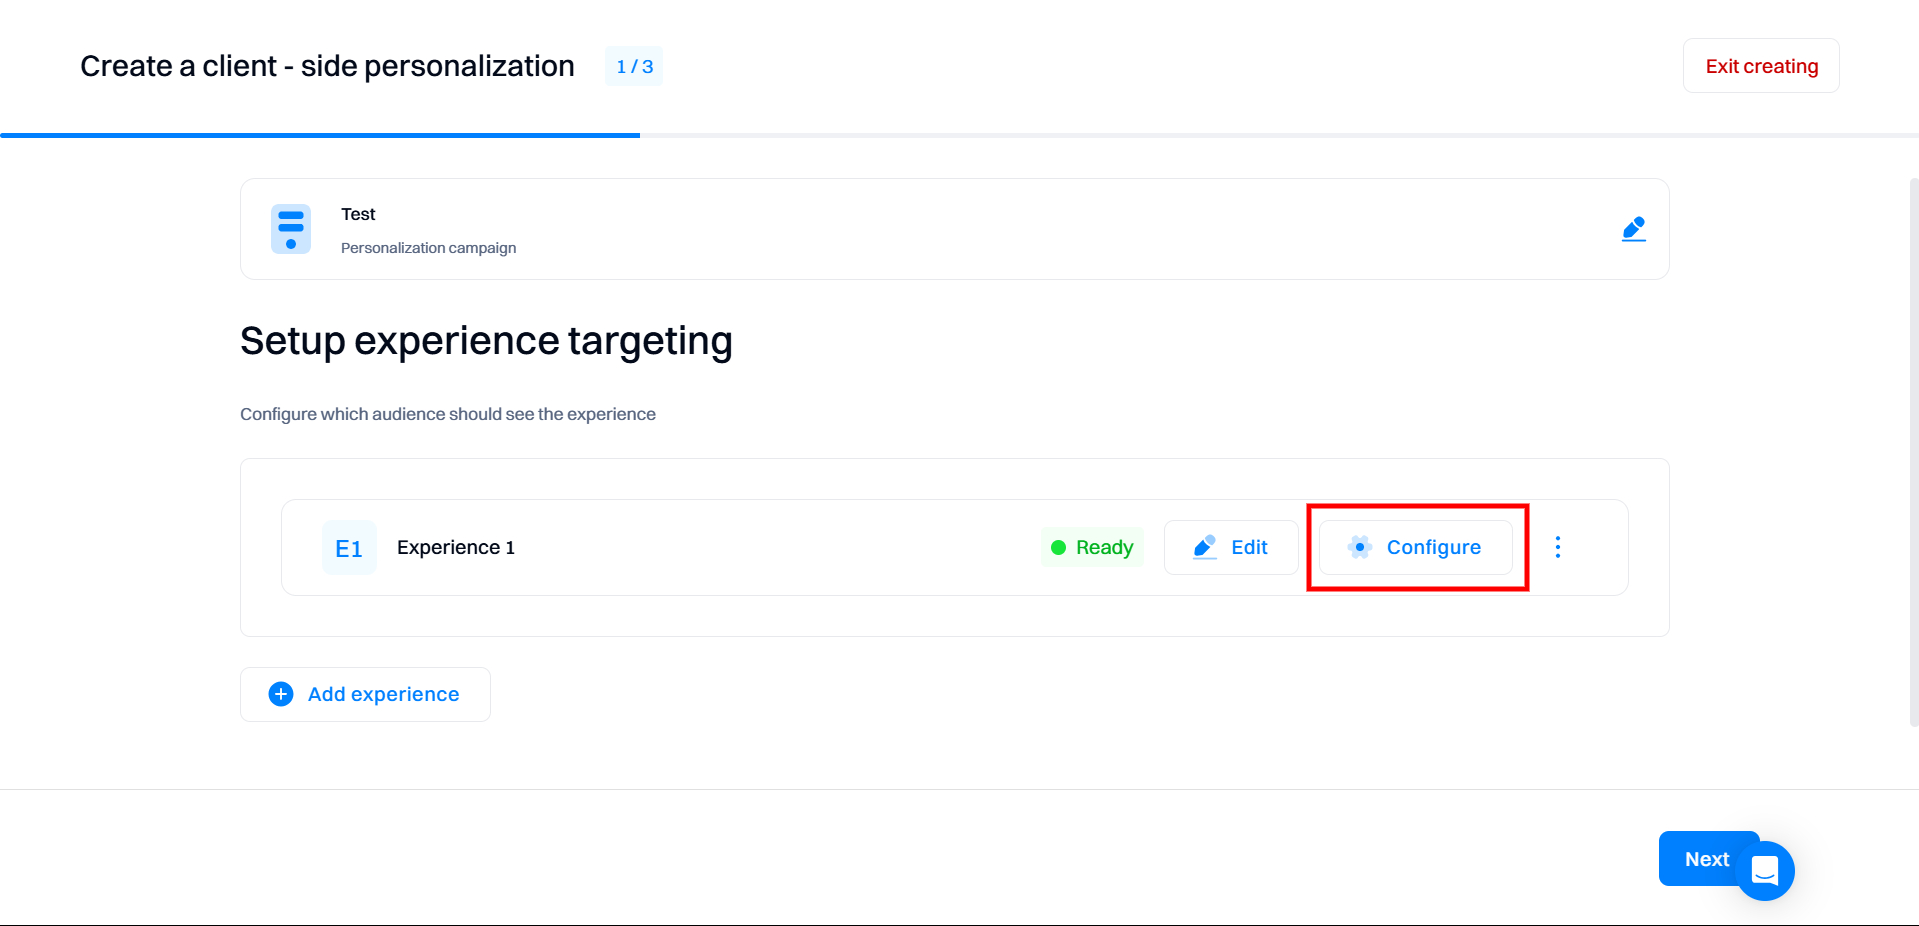
Configure experience settings
In the next step, you can configure settings for all experiences created.
Each experience will have its status - “Needs setup” or “Ready.” The minimum requirement is to set at least one audience targeting condition to change the status from “Needs setup” to “Ready.”
Note that the “Edit” button will return you to the visual editor view if you want to make additional changes.
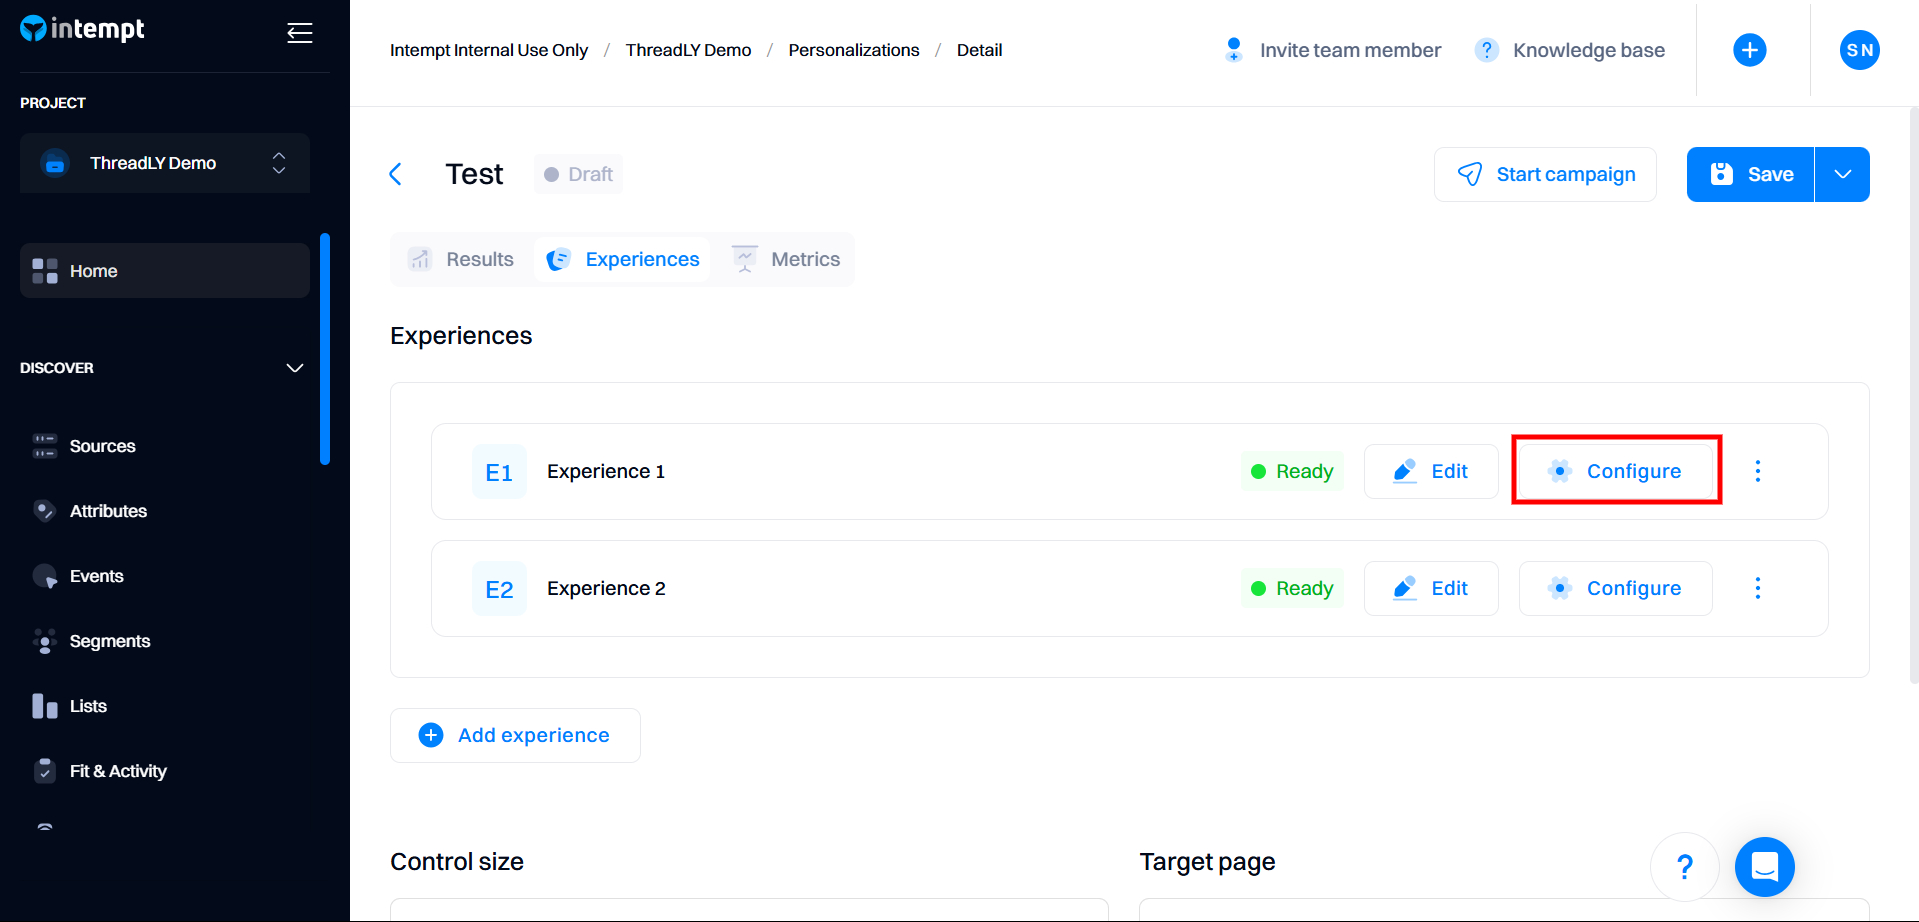
Click “Configure” to access the settings window.
You can edit individual experiences in these sections:
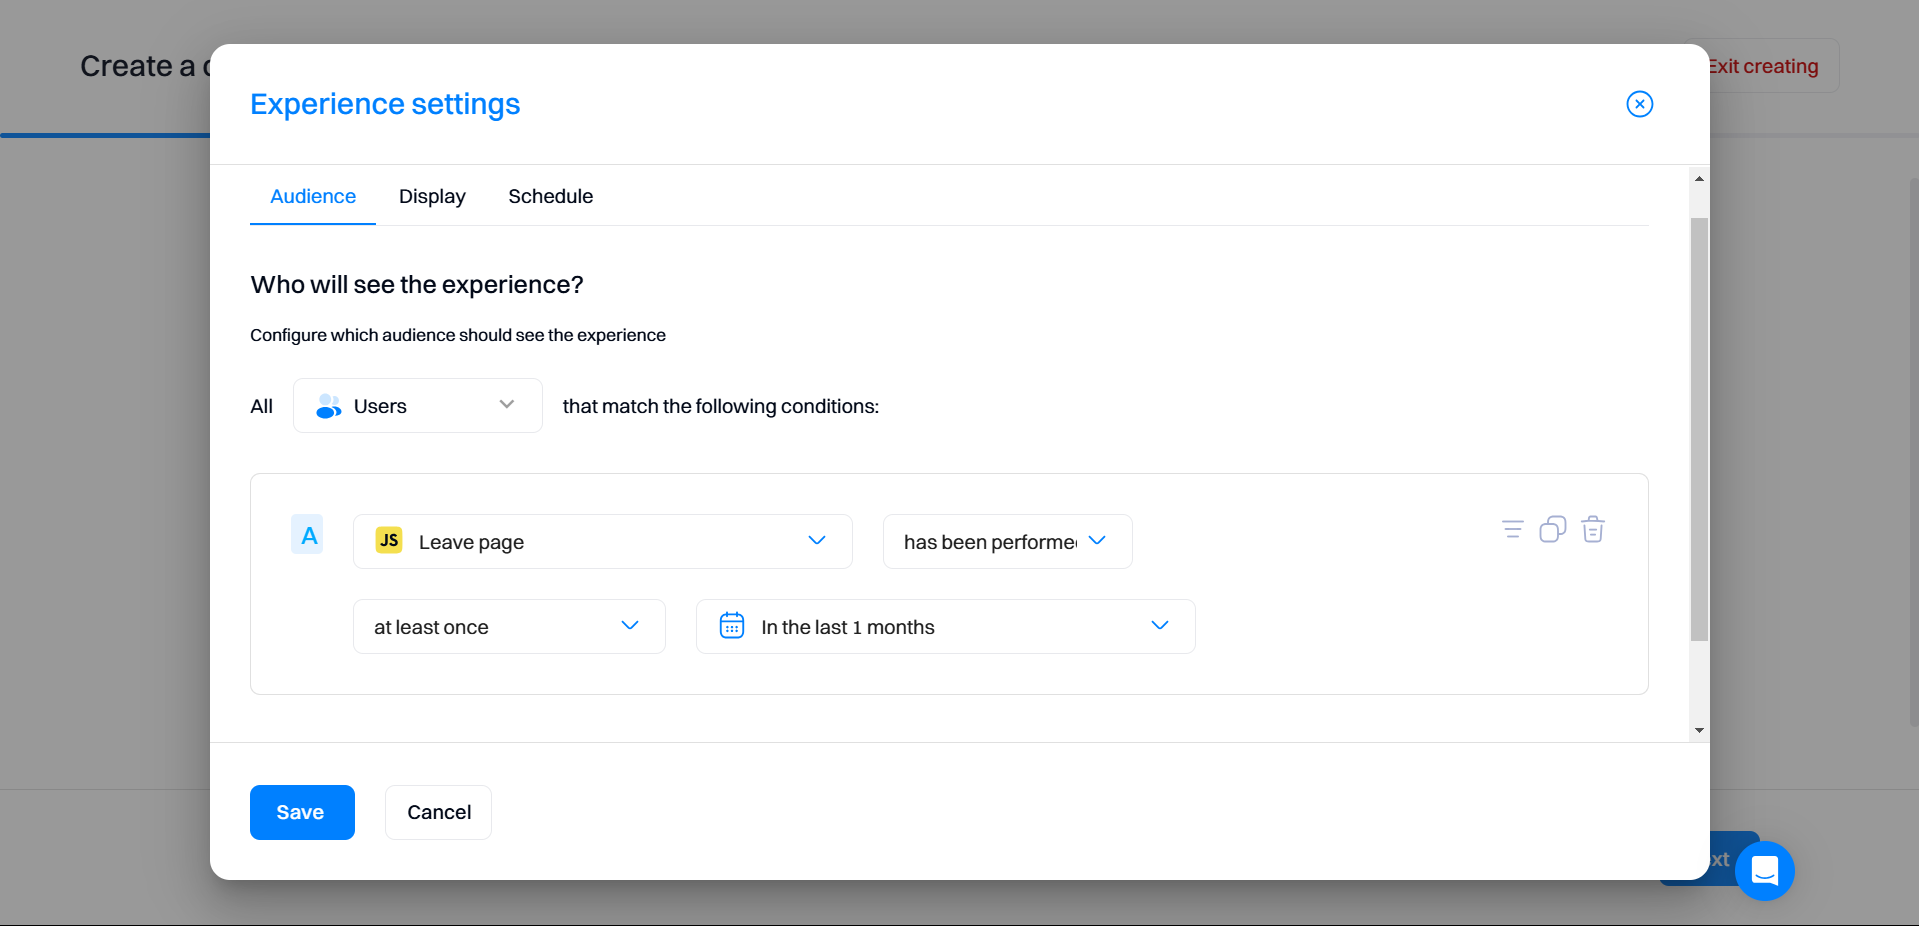
Audience
Configure who will see the experience. You can select from events, segments, and attributes to refine your targeting criteria.
Important
Selecting the targeting conditions is mandatory to start the personalization. Without targeting conditions defined, the experiences will not be displayed.

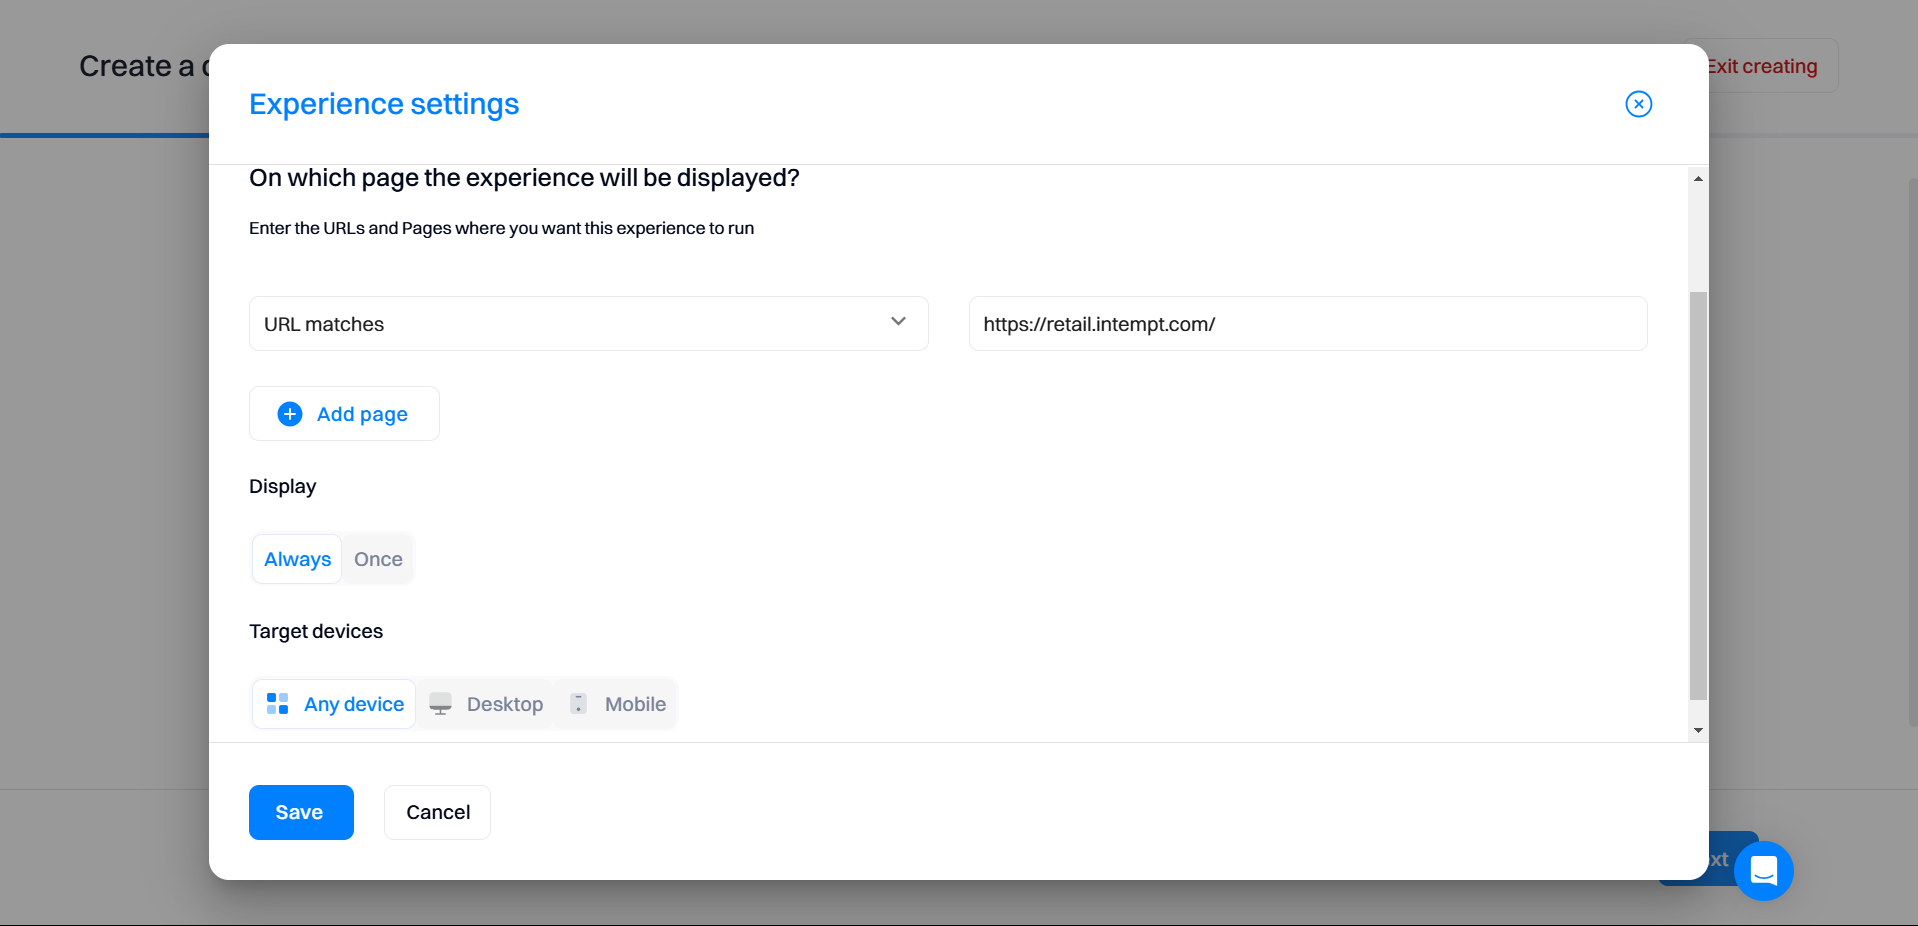
Display
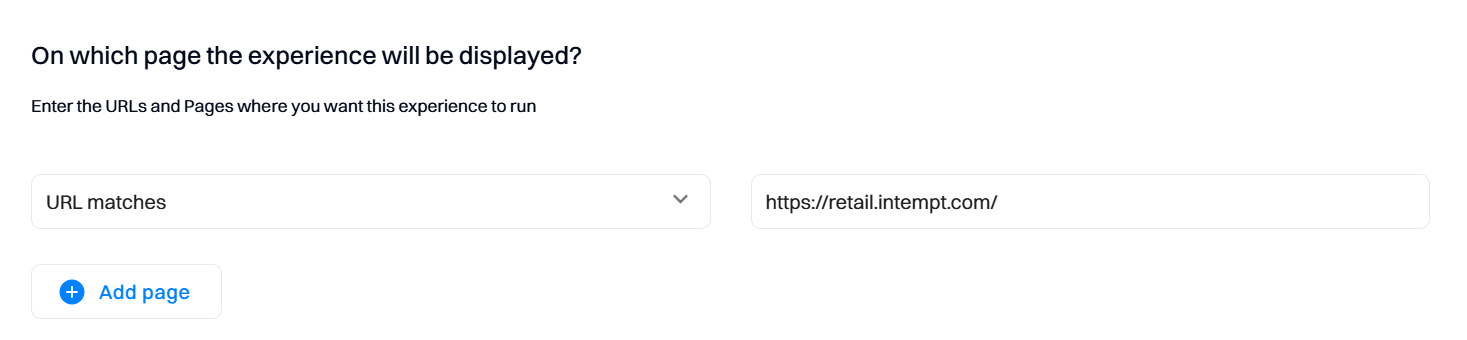
Target URL - Set up the rules on which pages the experience should be displayed. Ensure that you use the correct URL-matching conditions.:
- URL matches - the experience will only load if it will match the exact URL parameters
- URL contains - the experience will be displayed if a specified parameter exists within the URL that the user is viewing (for example, "product" within full URL https://demo.intempt.com/products/a-line-mini-dress-blue).
- URL starts with - only consider the start of the page URL. This is useful if you want to target pages nested within a specific category, like https://demo.intempt.com/collections/ -> display on all collection pages within the site.
- URL ends with - only consider the end parameters of the page URL. This is useful if you have a specific UTM parameter to target.
Display - how frequently the experience will be displayed.
- Set "Always" if you want the experience displayed on each page load (if the user matches other conditions)
- Use "Once" to only allow the experience to be displayed for the user once per lifetime.
Target devices - define filters for devices that can render the experience. Configuration depends on whether you want different experiences for mobile vs desktop users.
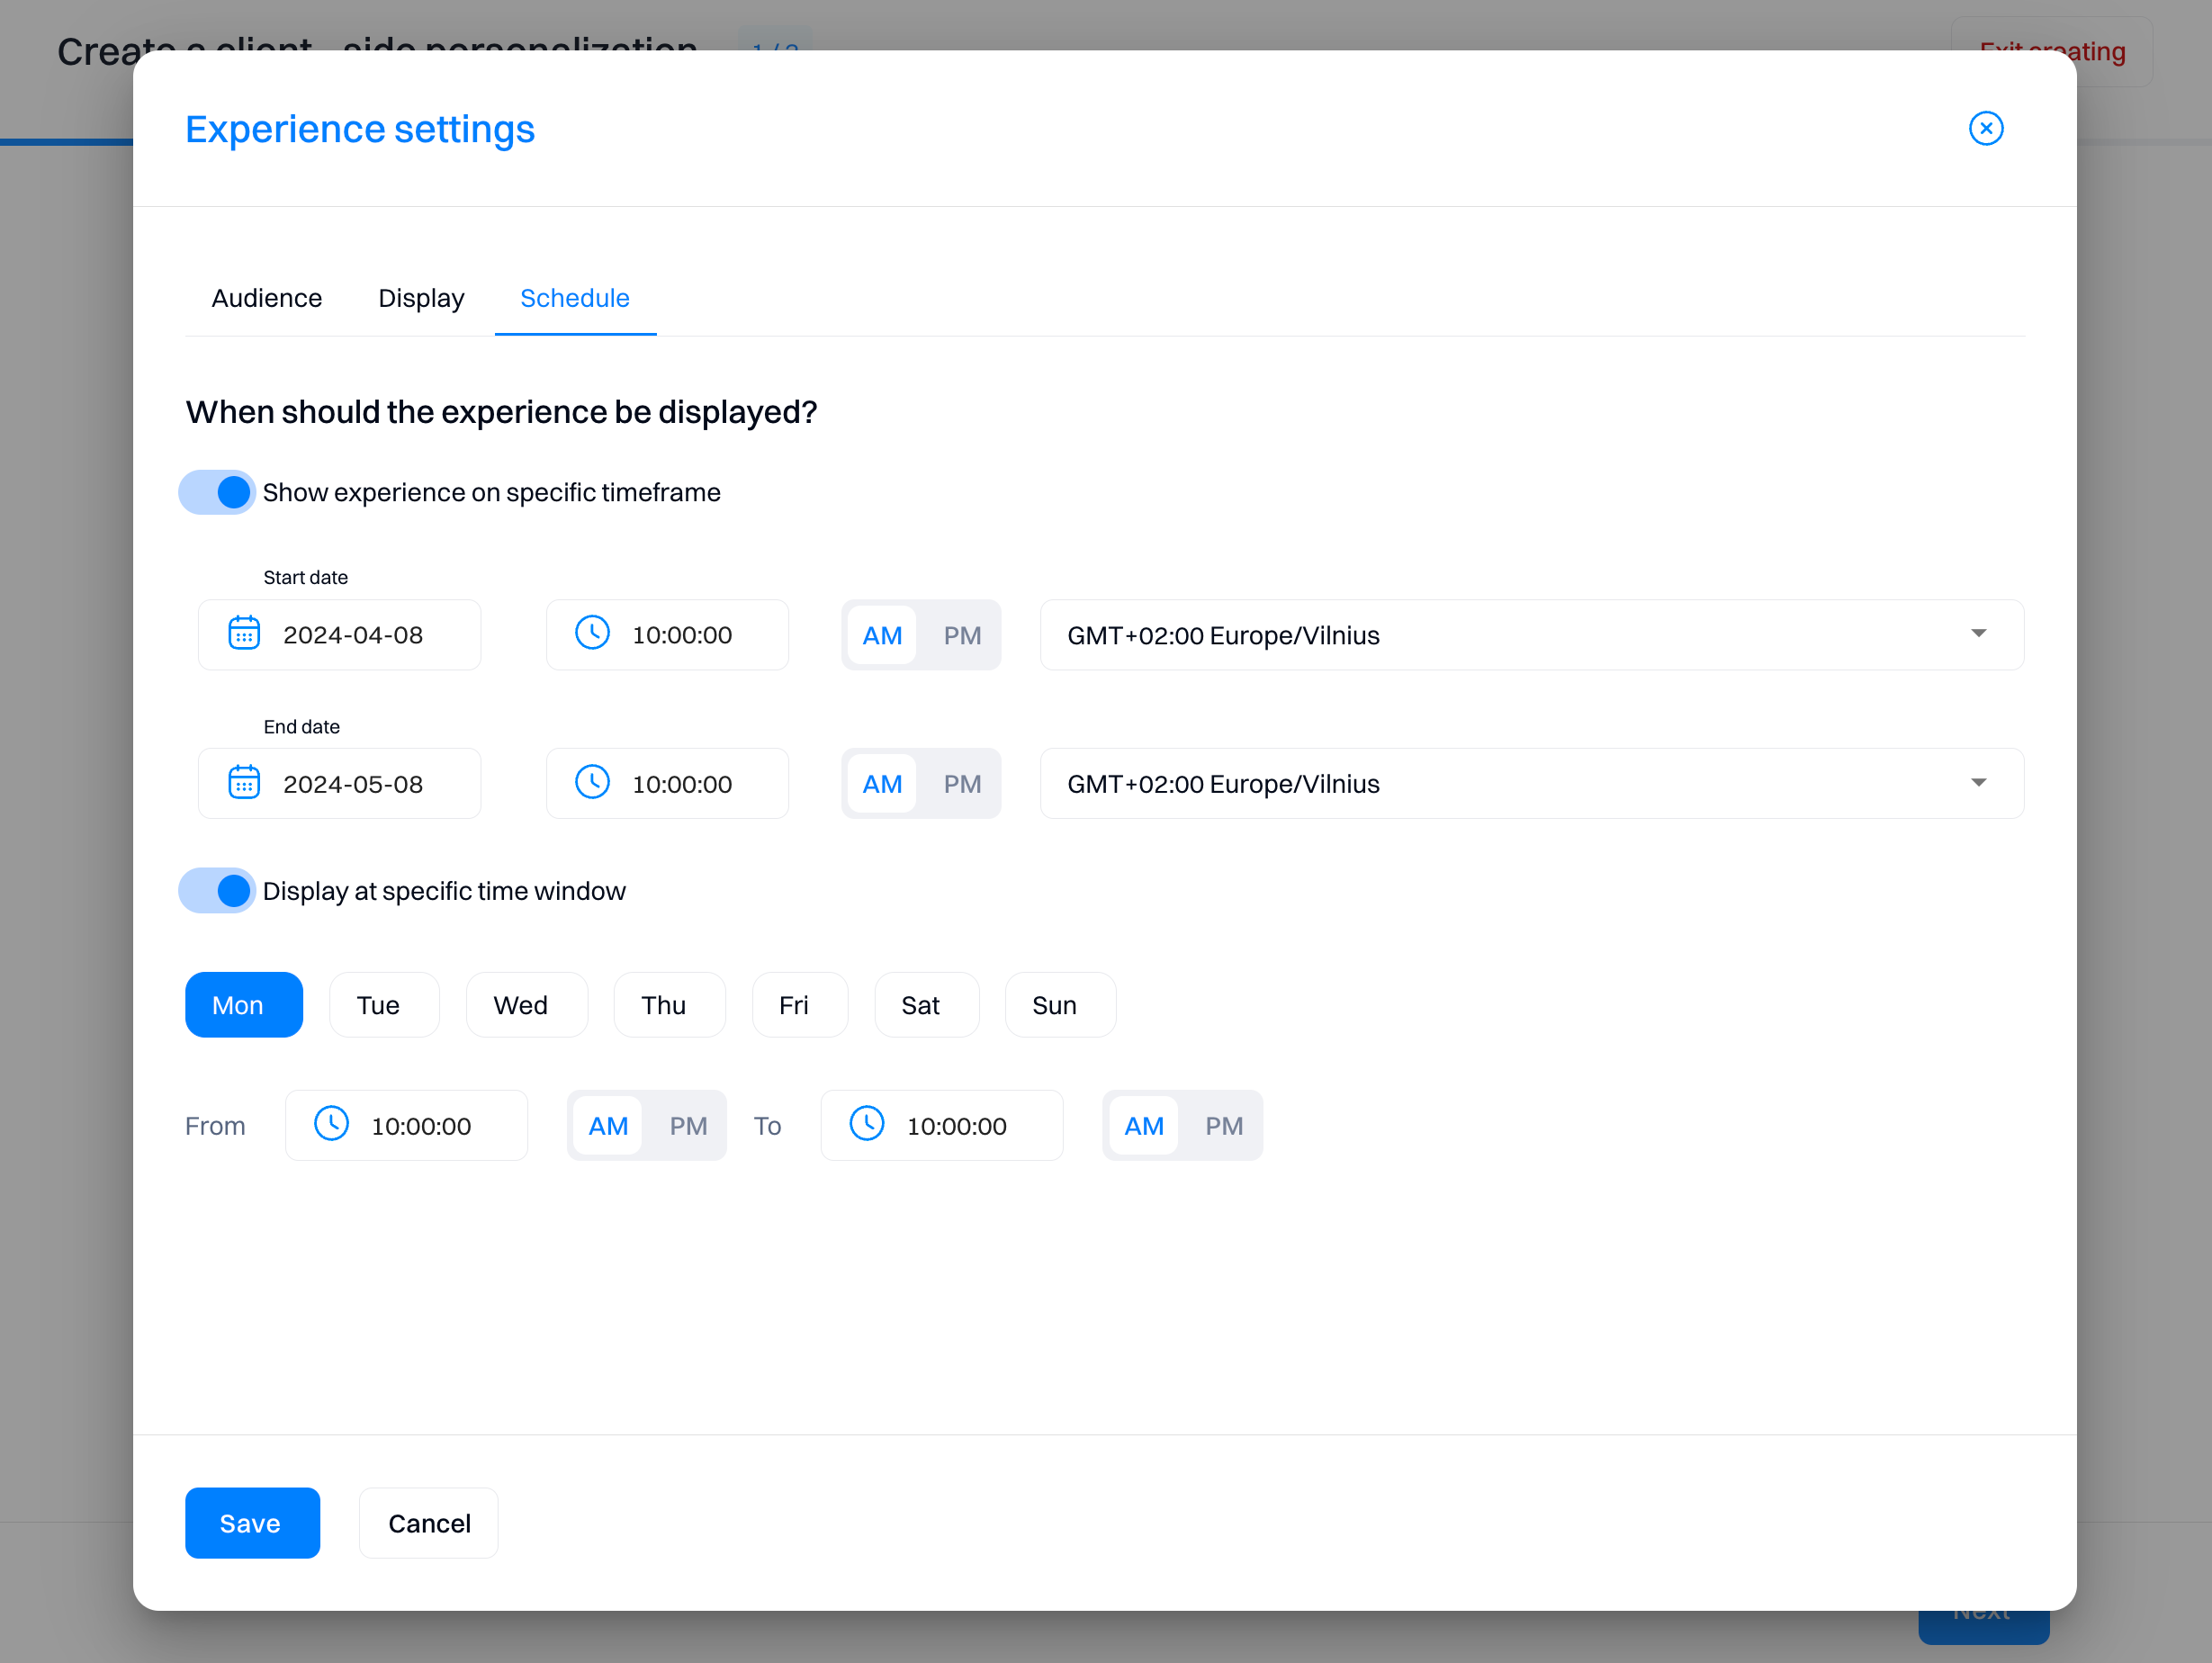
Schedule
Show experience on a specific timeframe - if enabled, the experience will be displayed within the indicated date range.
Display at a specific time window - select which days of the week and/or hours of the day the experience should be displayed. This is useful if you want the experience to run only on specific days or times of the day (e.g., Happy Hour sale).
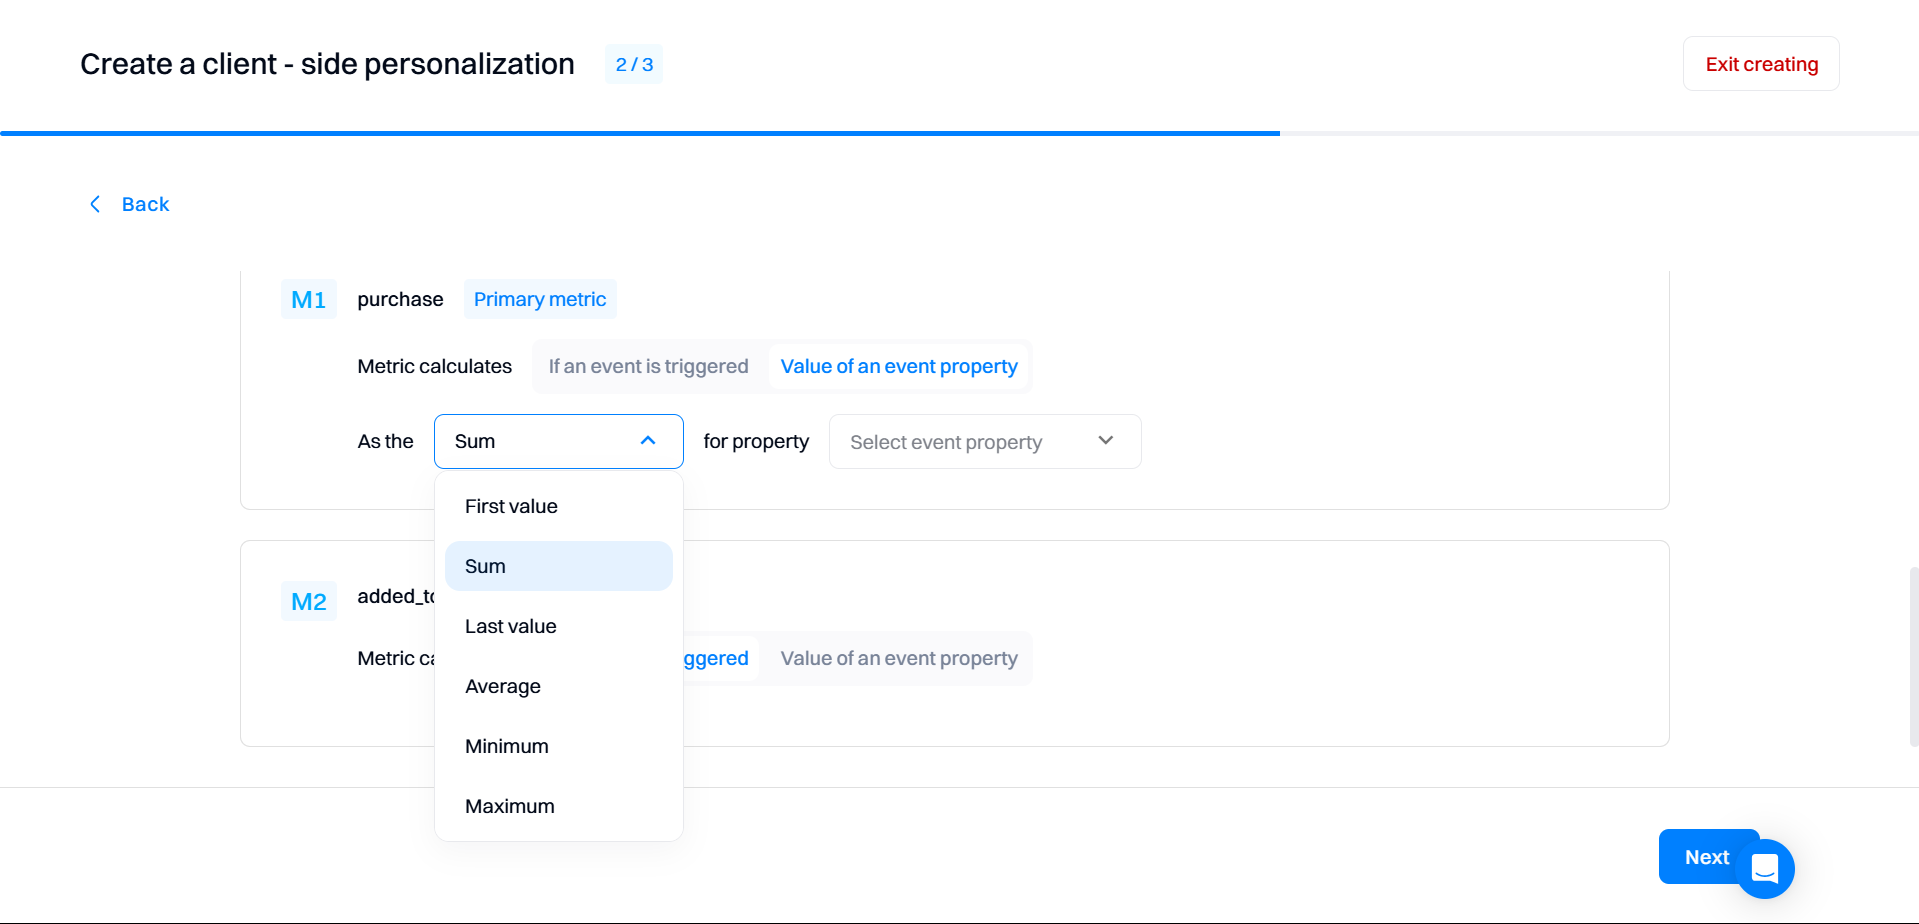
Configure conversion metrics
Metrics are conversion goals that allow you to track your personalization performance across all experiences. You can select multiple metrics per personalization, but at least one metric is required to create the personalization.
Note that you can only have one Primary and multiple Secondary metrics when selecting metrics.
The primary/secondary metric dropdown will allow you to access all events created in your project.

After selecting metrics, you must configure how they will be used to evaluate personalization performance.
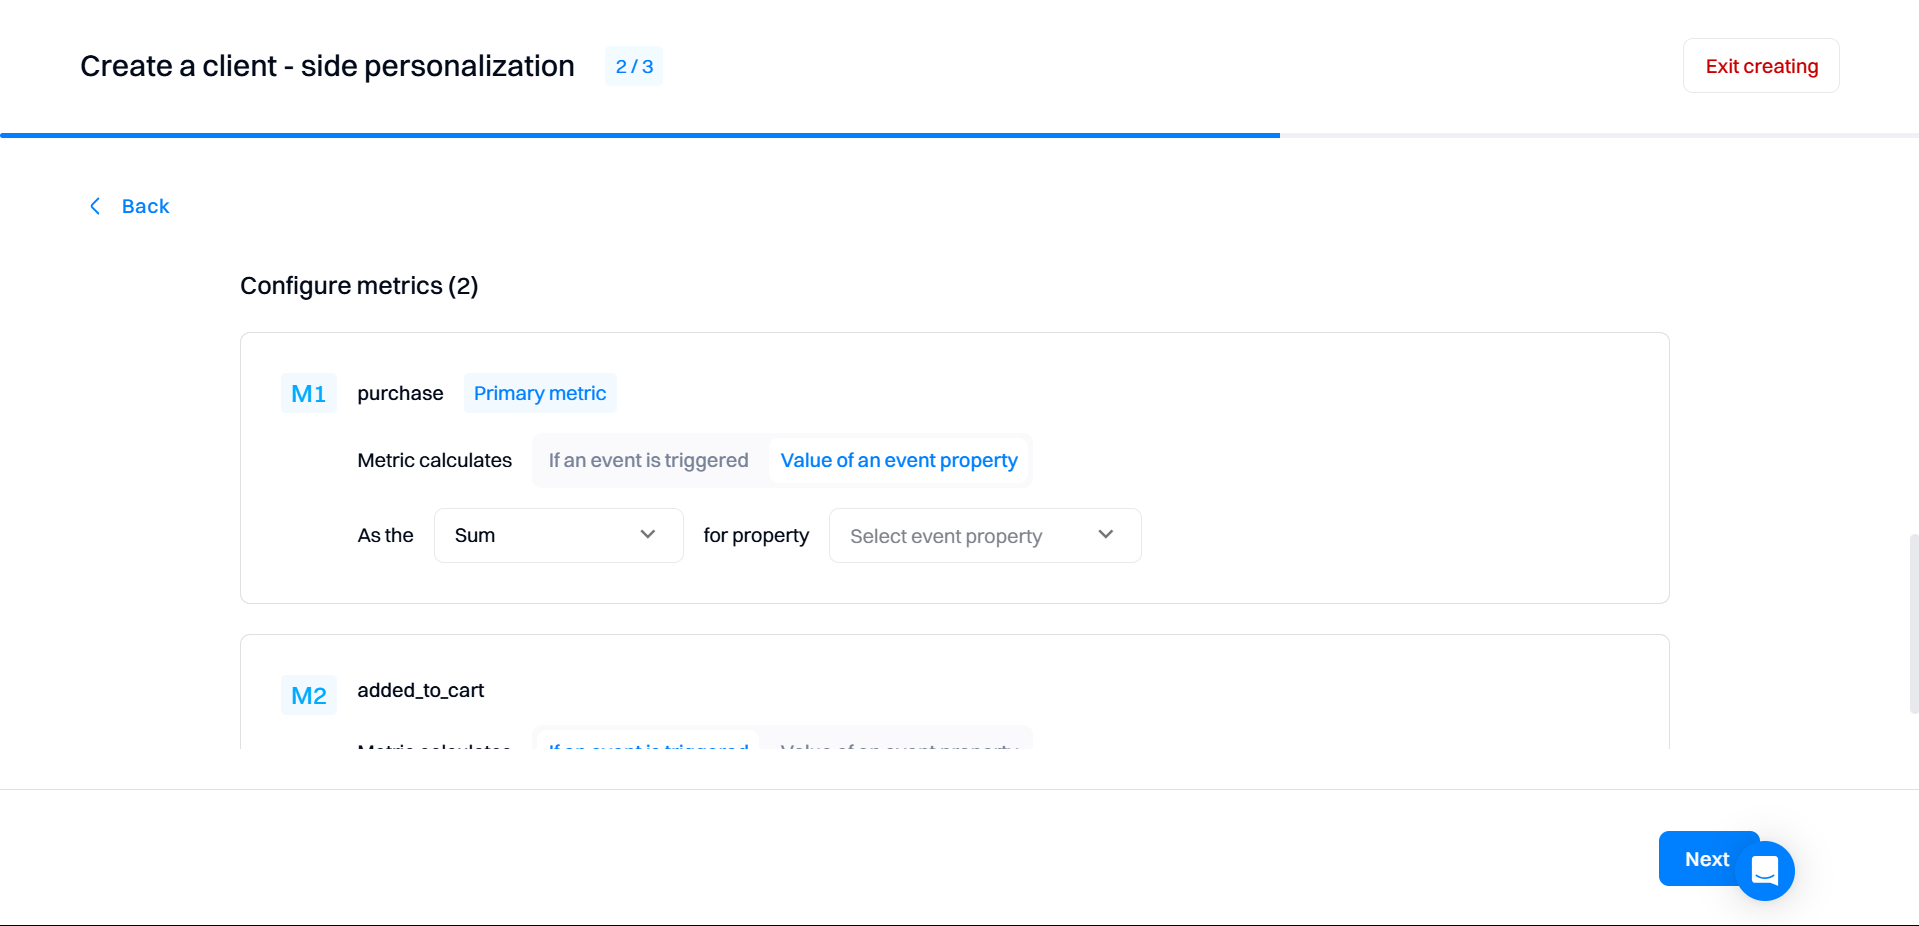
-
If an event is triggered. Intempt calculated how often the event occurred when the experience was served.
-
Value of an event property. Intempt calculates the value of an event property that you select.
For example, in the scenario above, Intempt would display the number of revenue generated (amount field in purchase event) to those customers serving the experience.
You can select any property within the event configuration and possible aggregation types:
-
First value
-
Last value
-
Sum
-
Average
-
Maximum value
-
Minimum value
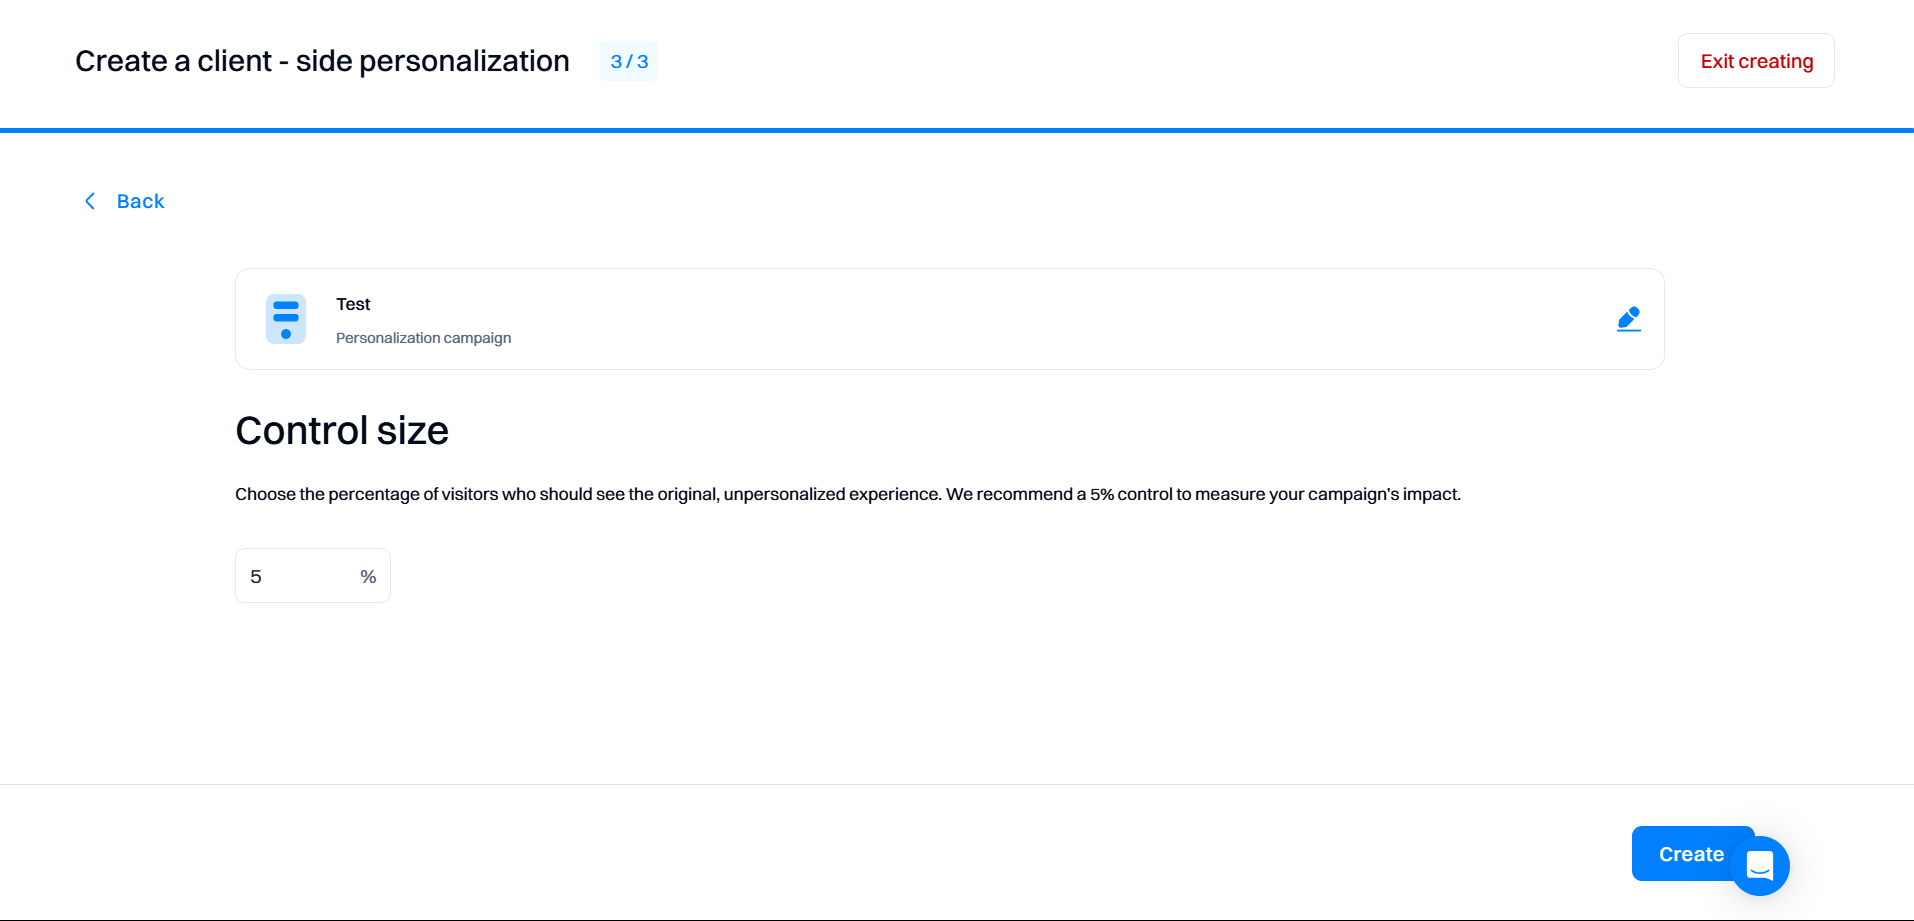
Setup control size
Control size will allow you to set a percentage of how many users would see the original, without personalized experience. This setting is configured at the personalization level and applied to all experiences with the same configuration.
We recommend a 5% control to measure your personalization’s impact.
Managing personalizations
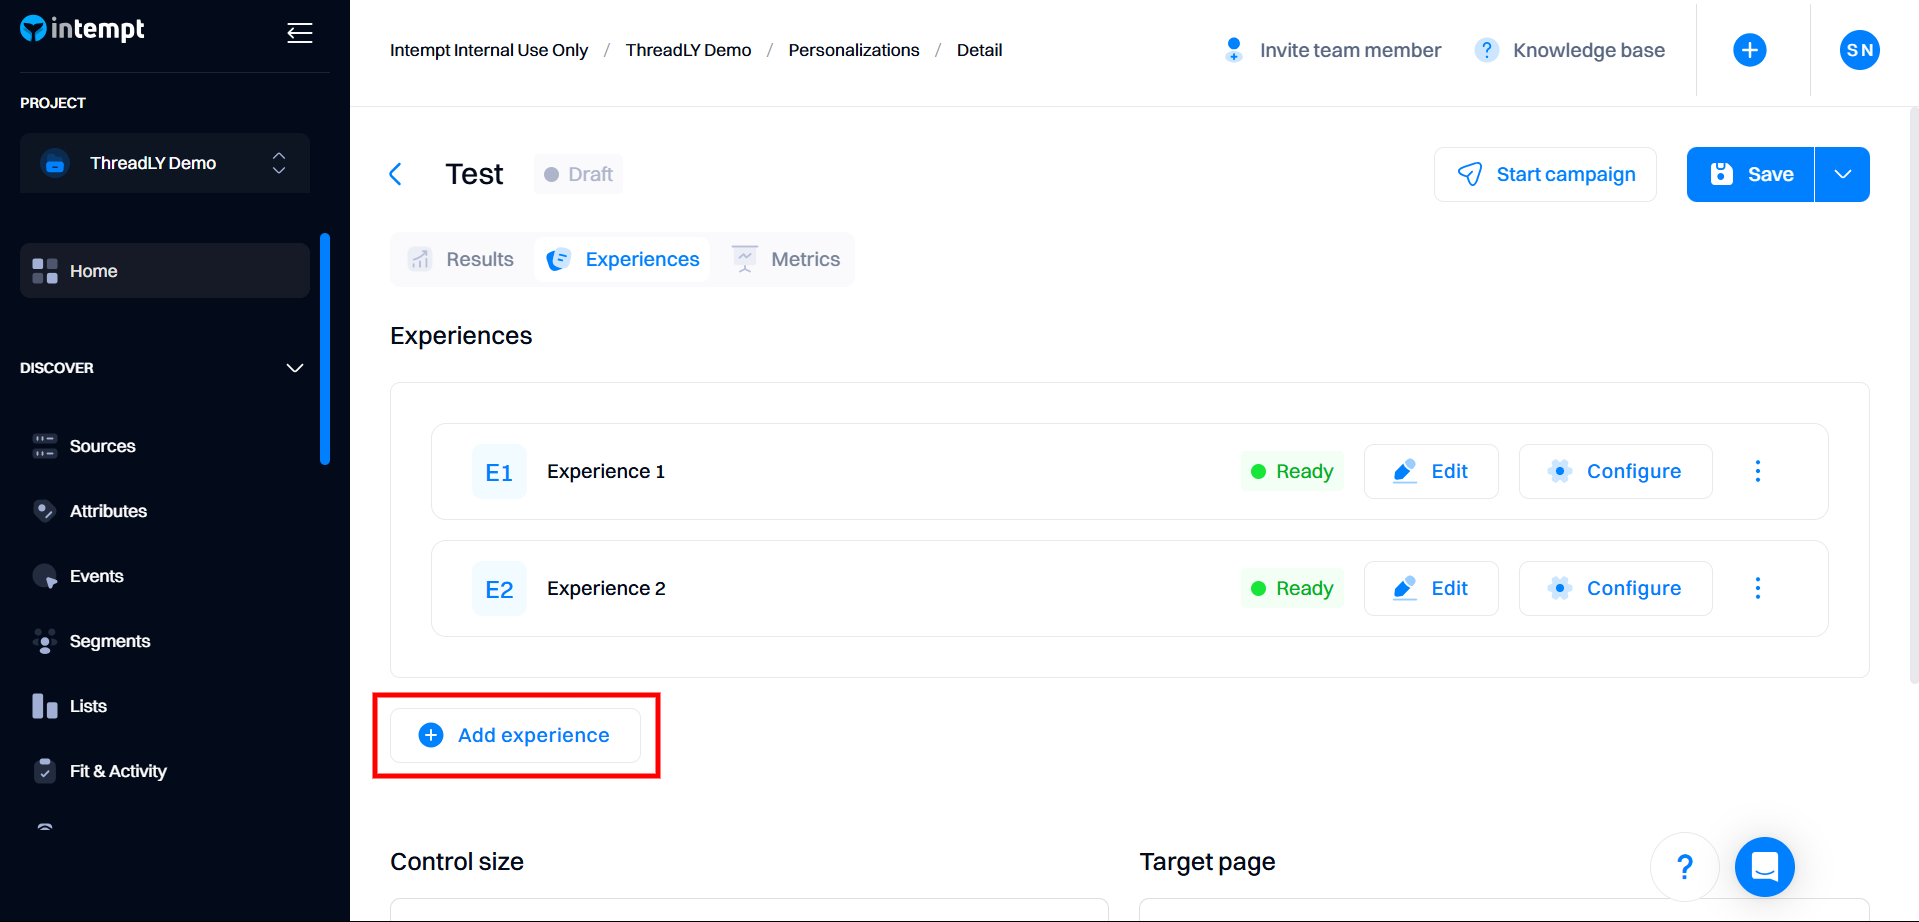
You can create multiple experiences within the personalization on the configuration tab.
Click on the “Add Experience” button will open the web editor to configure a new experience.
Editing the content of the experience
Click the “Edit” button next to the variant name to access the visual editor and apply the changes to the already-created experiences. You will be redirected to the visual editor to edit the experience UI.
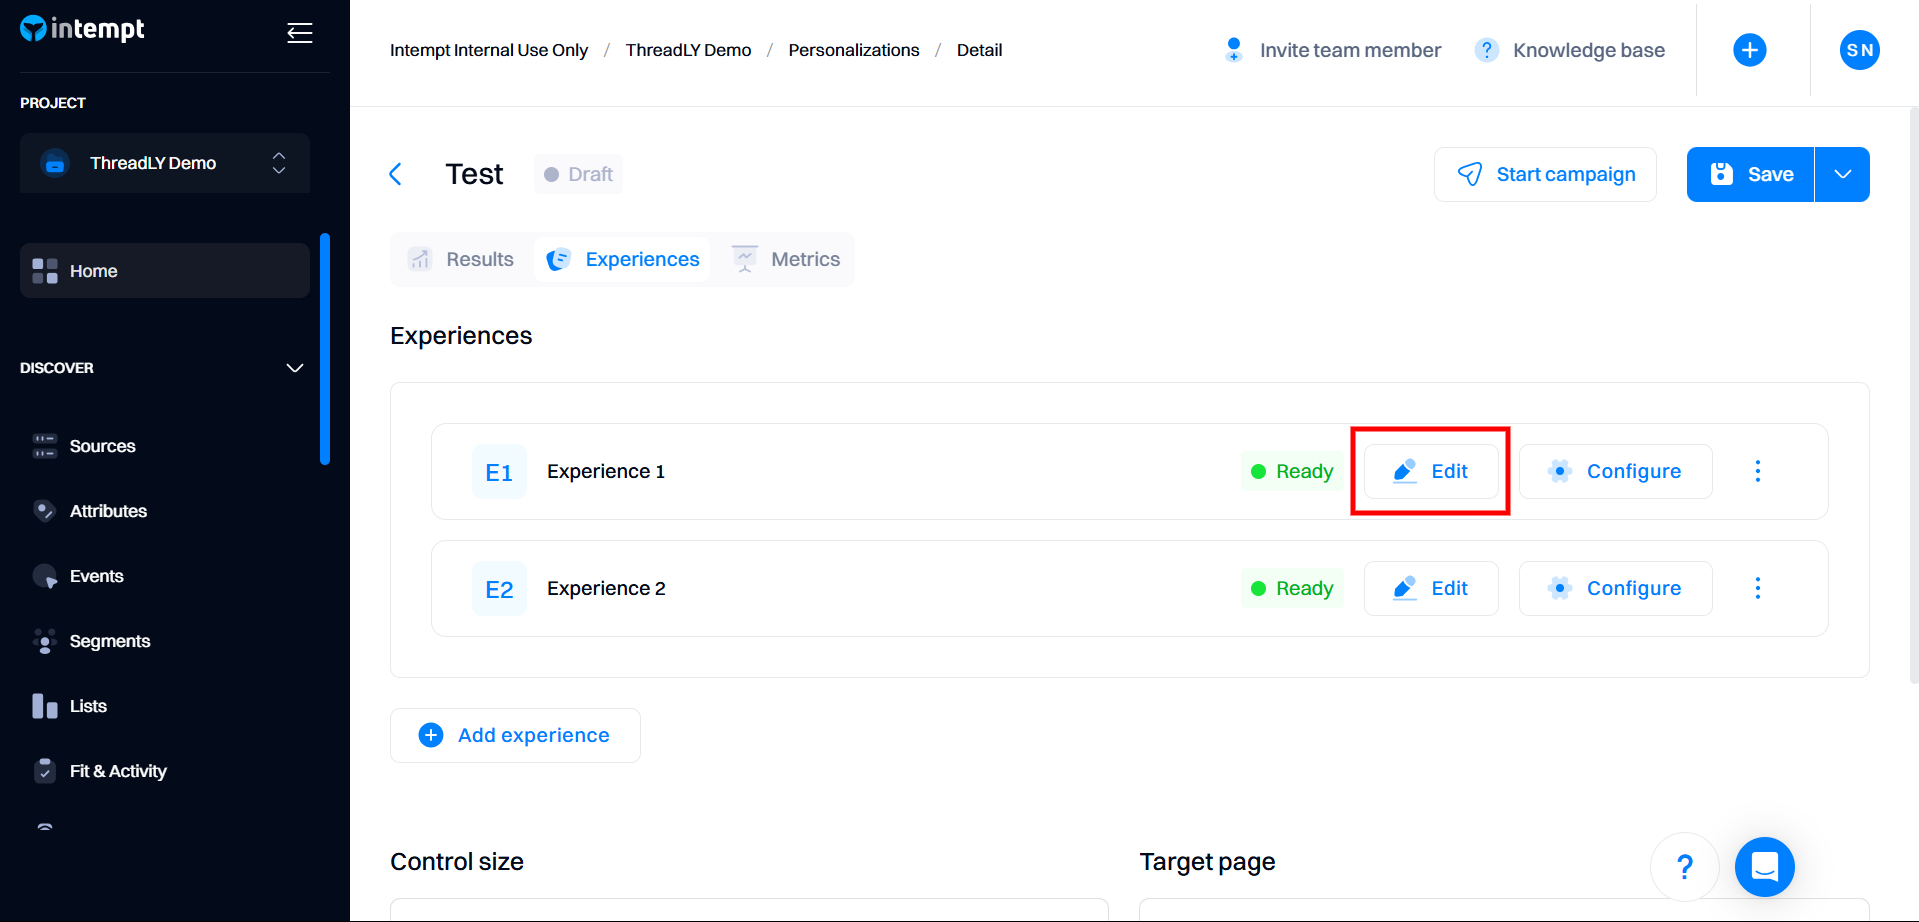
Editing the settings of the experience
Click on the “Configure” button to access the experience settings.
You will see the same experience configuration popup as in the previous section.
Experience prioritization
If a single visitor qualifies for multiple experiences (audiences) in the personalization, they will see only one experience by default.
To ensure this rule is applied accurately, you need to rank experiences by priority.
After you create more than one experiences within the personalization, you need to rank them by priority. Click on the three dots icon on the experience and select “Move up” or “Move down” so that the most important experiences remain at the top.

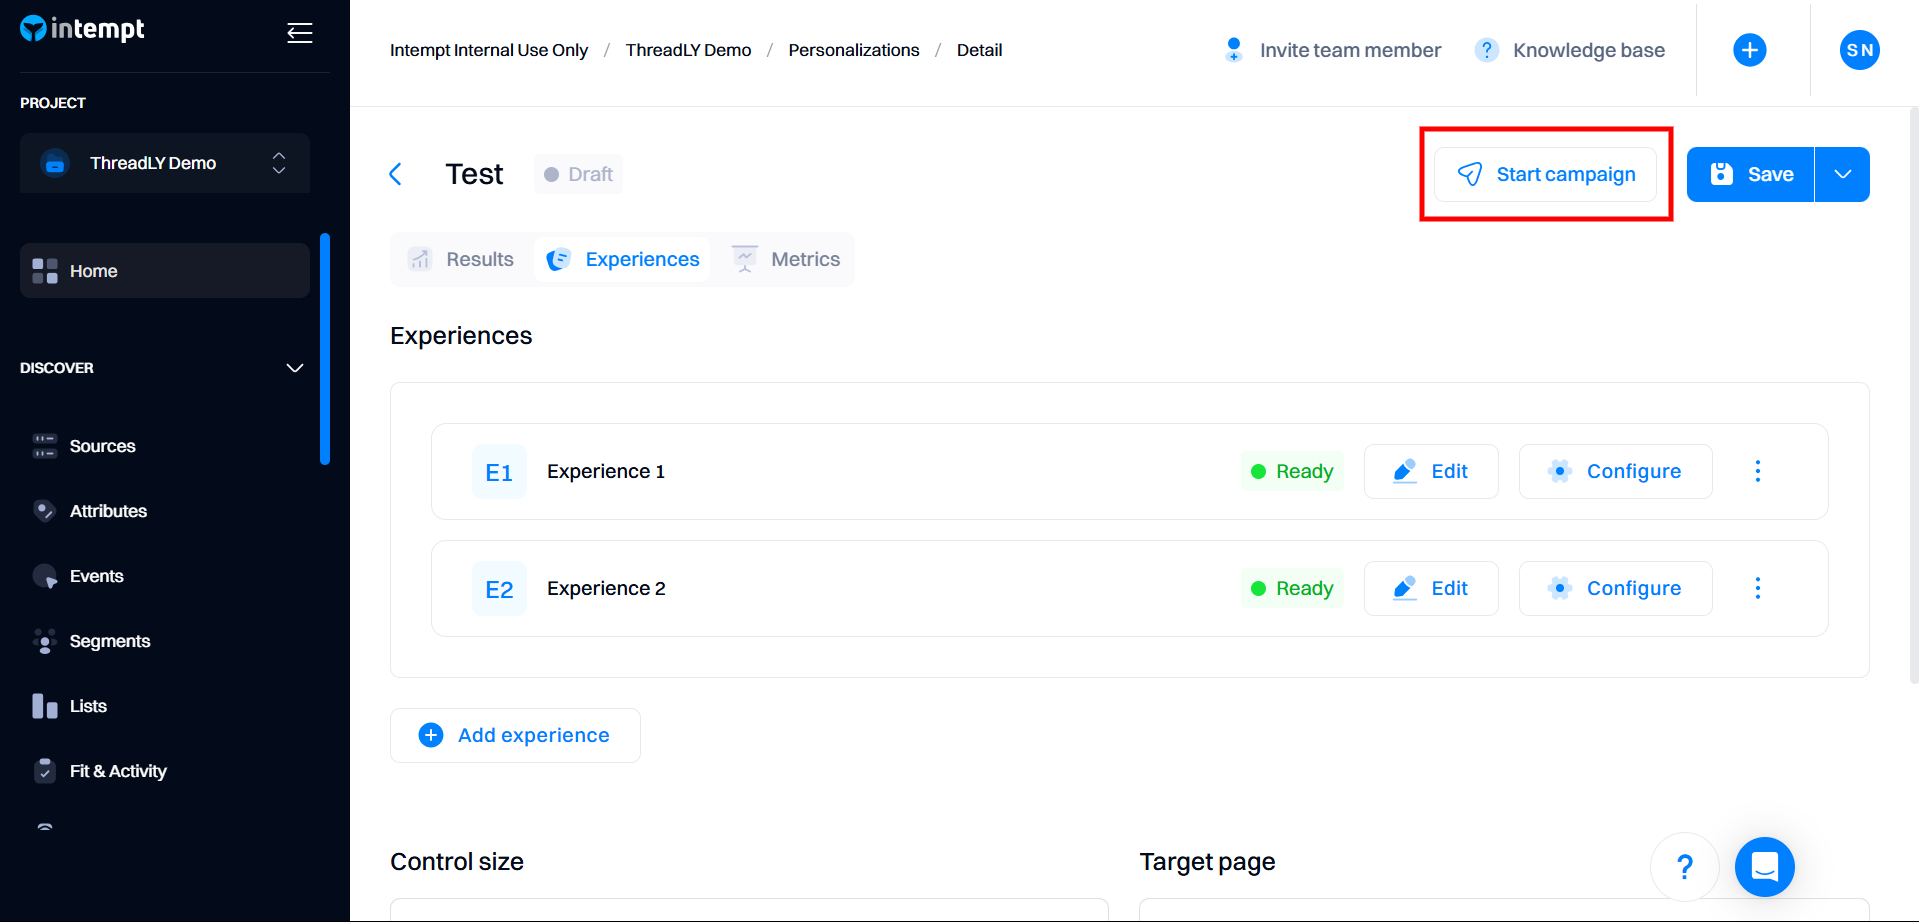
Starting the personalization
Once you set up all the experiences, you can start the personalization by clicking “Start.”
After the personalization is started, you can pause it at any time. After that, all experiences will be stopped, irrespective of their targeting and display conditions.
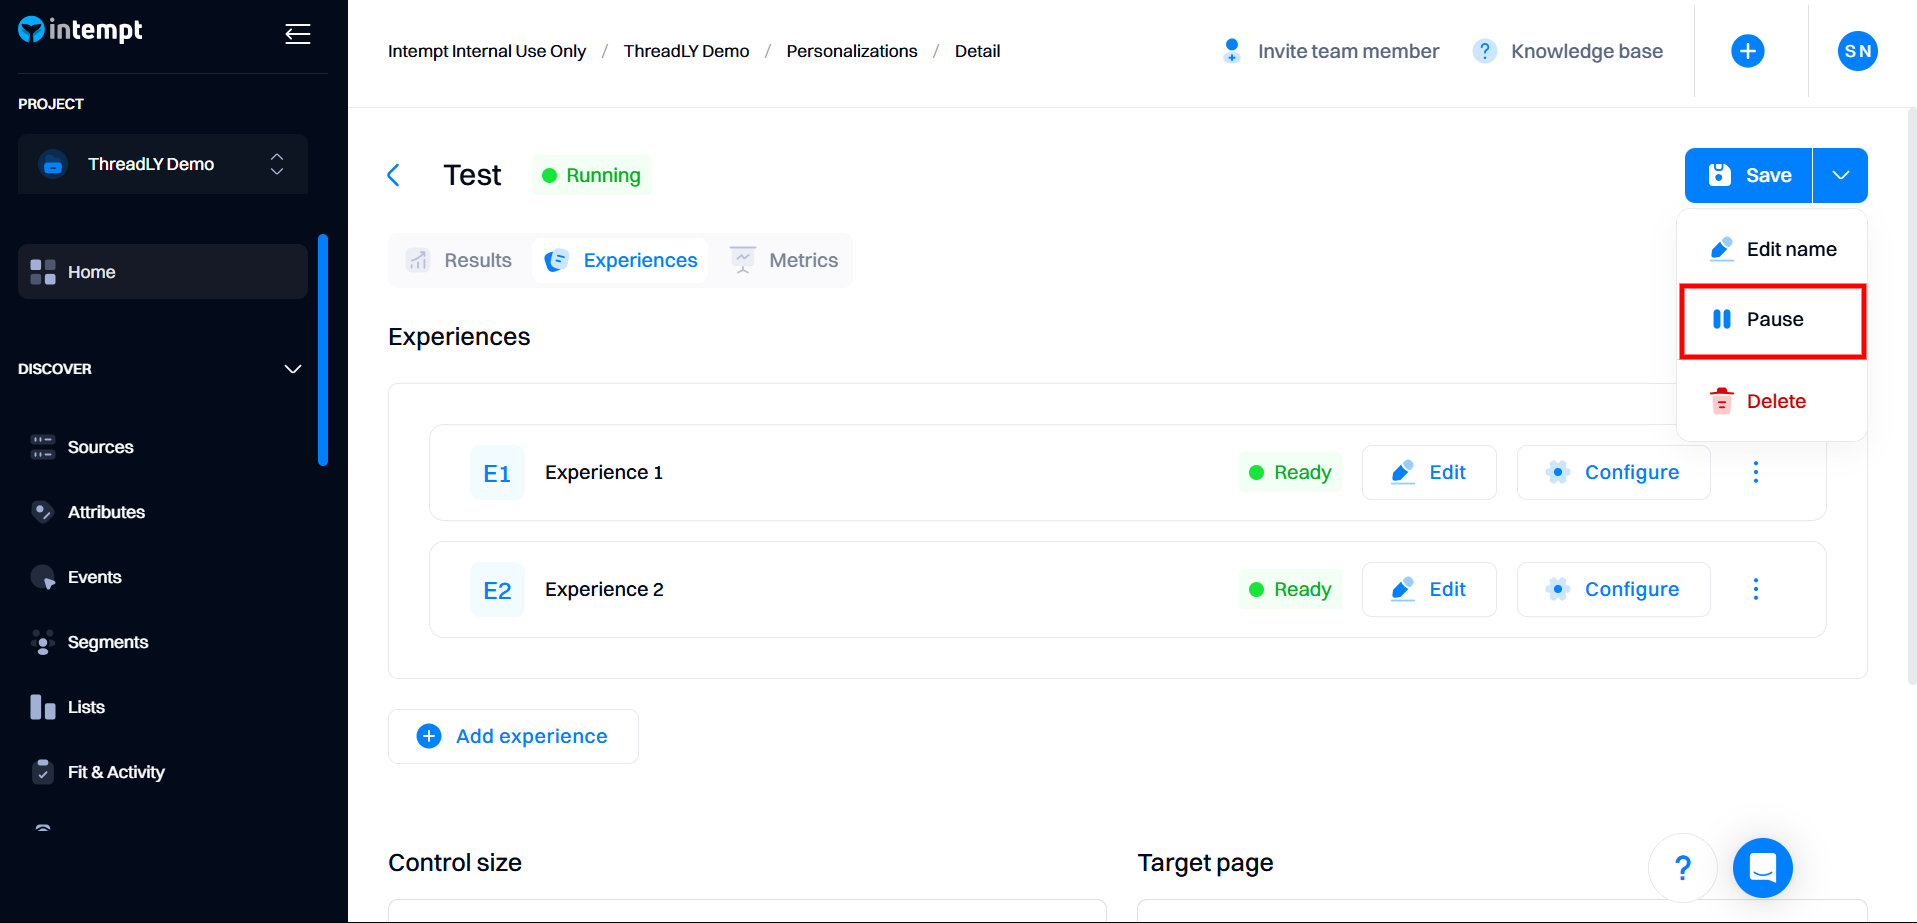
You can create new experiences at any personalization status (draft, running, or paused). Still, we recommend adding new experiences when the personalization is paused so you don’t accidentally serve content to the wrong audiences in case of misconfiguration.
Personalization results
For a complete overview of how personalization performance and metrics are evaluated, refer to Personalizations analytics.
Troubleshooting
Before starting your first client-side personalization, please ensure you follow these recommendations so the content is rendered properly:
- Don't apply changes on the same element or section on your website in more than one personalization. This can create content rendering conflict that will cause the personalization to fail.
- Create experience targeting, considering that only one experience will be served within any given personalization. This applies to situations when a user matches multiple experiences within the personalization. If there is a tie - experience with a higher priority will be served.
Updated about 2 months ago