
Complete guide to event tracking
Event tracking is the first step in getting insights into your customers' behavior on your website or application. This tutorial addresses both step-by-step, walking through setting up autocapture, then diving deeper into custom events, and finally refining those custom events to capture the right data you need.
Setting up autocapture
Autocapture makes it easy to get data such as page views, clicks, sessions and submissions from your site through a Javascript snippet. It doesn’t require setting up individual events and automatically captures data from new or changed components. This is useful, for example, if you restructure your frontend, autocapture continues to collect relevant events without you needing to update your codebase.
To set up autocapture:
- Go to “Sources”
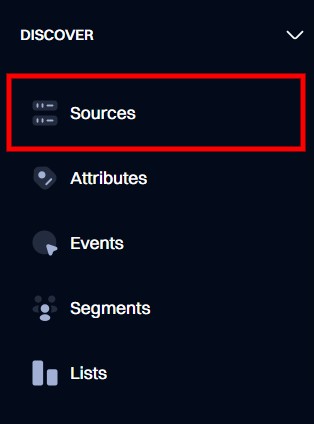
- Create a “Web tracker” source
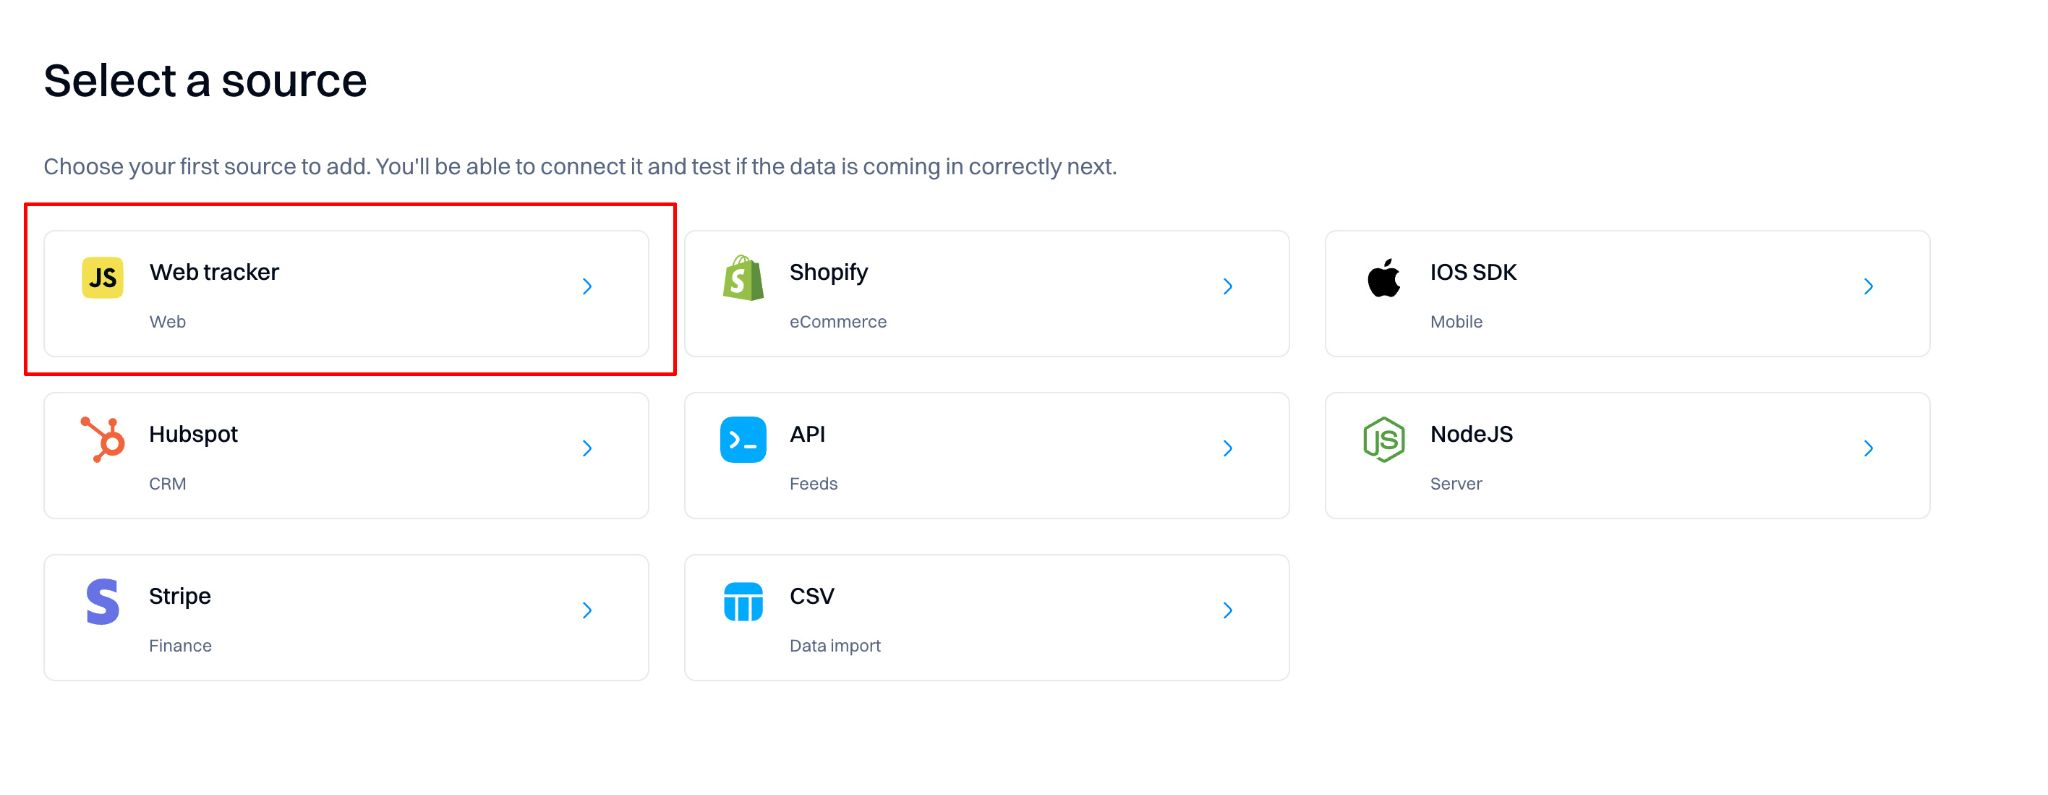
- Under “Insert a code snippet,” copy the code block snippet containing the script tags and Javascript function.
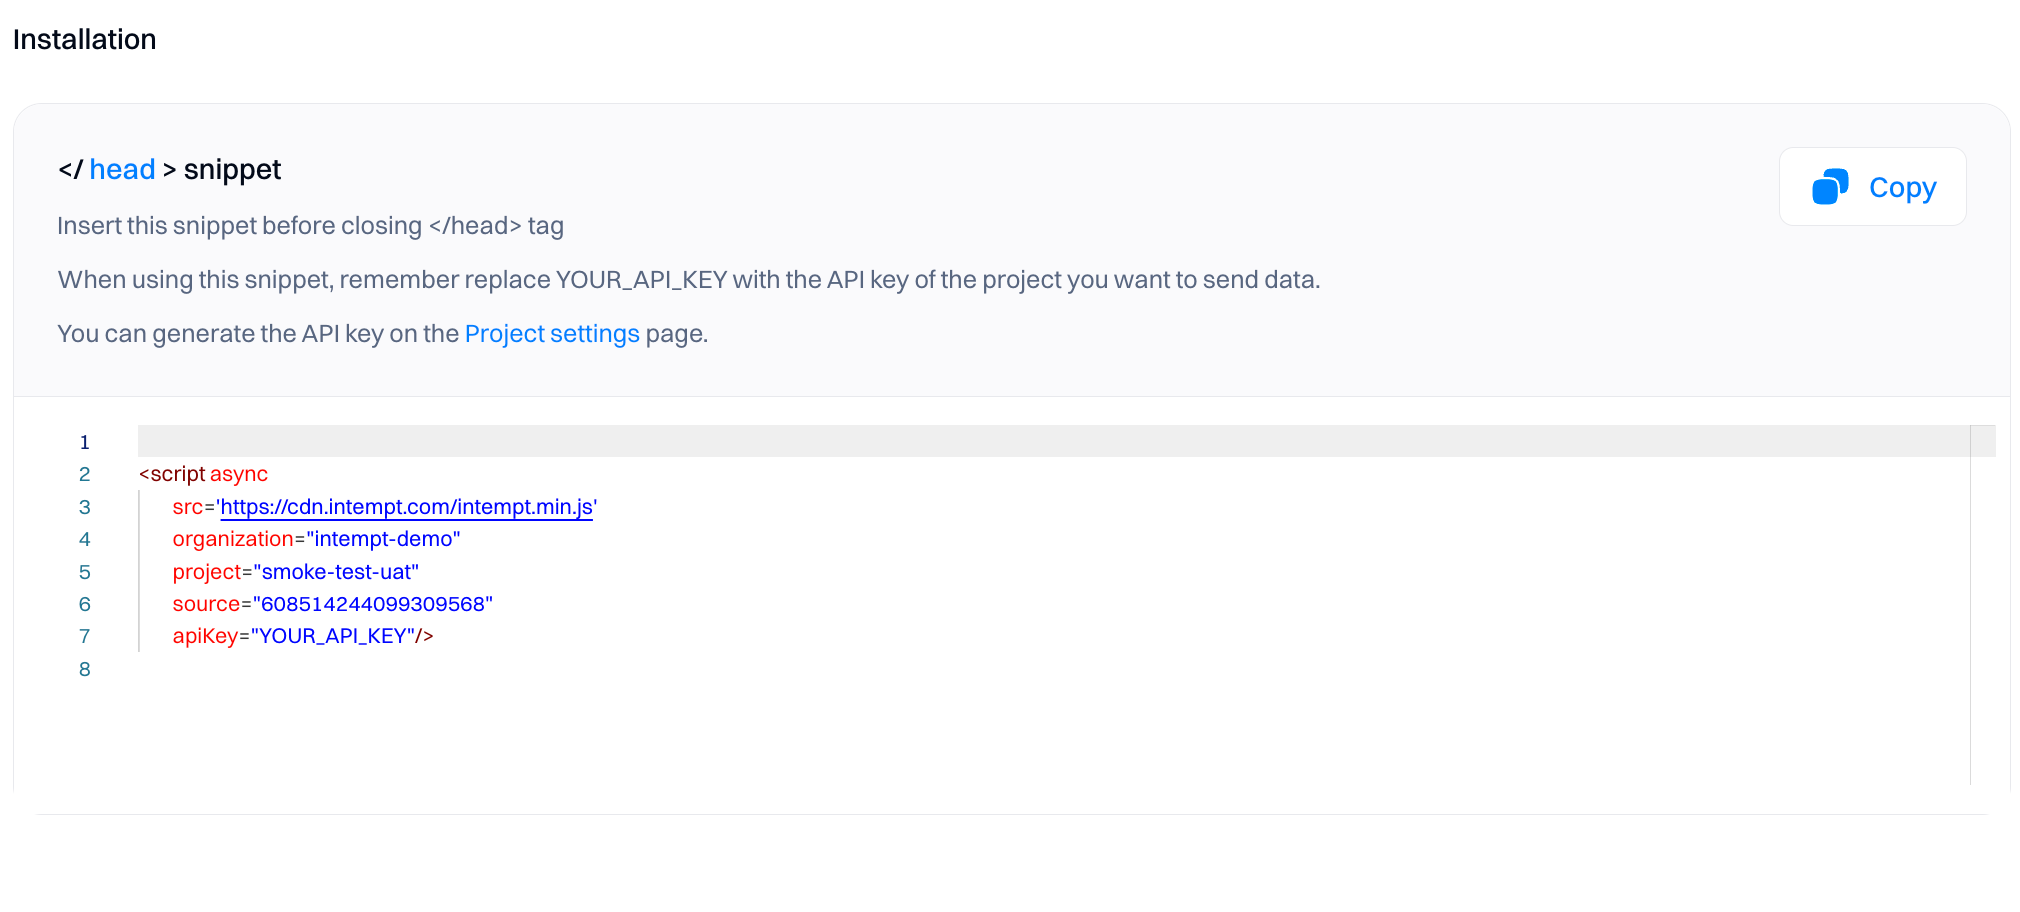
- Paste the block into your site’s HTML in the tags (ideally at the end). This should be an HTML page that acts as a base or template page (with other scripts your page loads) to ensure all possible events are captured.
This allows autocapture to capture events like clicks, change of inputs, or submission of a button, form, input, select text area, and label tags. Once set up, those events flow automatically into Intempt for you to see and analyze.
For a detailed guide on installing the snippet, read our installation guide.
Autocapture’s limitations
Although we are proud of our autocapture feature, we know it isn’t enough for more advanced product analytics. This is for two reasons.
First, event autocapture can be overwhelming. In high-volume instances, where events come in at a high rate, the live events table can contain so much information it can be difficult to determine exactly what you care about. Remember that every click, change of input, or submission is tracked here. Without proper filters, actions, and insights set up, this data can be overwhelming.
Second, autocapture is a general solution that provides value to many users. To get the most out of Intempt, you should be using custom events. Custom events let you track exactly the behavior you care about, ranging from a user hovering input to a function call in your backend.
Setting up custom events
To expand on autocapture, you can create and add custom events to your website or application. Custom events allow you to capture details from anywhere in the codebase, whether it is a button press on the frontend or a class method call on the backend. This ensures correct and comprehensive data capture.
To set up custom events, first install the Web tracker on your site (as indicated in the previous section).
Check before proceeding
We recommend creating a tracking plan before starting the custom event setup. You can read more about the tracking plan here .
Once the tracker is installed, customer events can be captured by calling library methods with user and event attributes.
If you want to track just event attributes, you can use the Intempt's track method by passing a set of key-value pairs.
intempt.track(”Verification”,
              {verified: false, type: "email"})
You can log a custom event by calling Intempt's "record" function, passing in a set of key-value pairs.
intempt.record({
	eventTitle: "eventName",
  data: {
  	key1: value1,
		key2: value2,
  }
});
The eventName refers to an event type that you defined in your JS source. For example, if you wanted to log every purchase made on your site, you might call that collection a "purchase." Then, when a purchase happens, you call track and pass in the details.
In the example below, we have a custom event with the purchase name and an object of key-value pairs.
intempt.record({
    eventTitle:"purchase",
    data: {
      "items": [{"item name": "item 1","price": 20}, {"item name": "item 2","price": 15}],
      "totalprice": 35,
      "ispaid": true,
      "timestamp": new Date().getTime(),
      "fixed.name": "John Smith",
      "fixed.age": 28,
      "intempt.visit.trackcharge": 35
    }
})
Don't miss out!
Make sure that you add the custom event in the related page section in your codebase.
For example if your event takes place in page A then you will need to add custom event method in the section of the page A.
In the other example below, in which specific user inputs may be required, the code snippet captures user sign-up data, such as their first name, last name, email, and discount card number.
 intempt.record({
 	eventTitle:"signed_up",
  data: {
    "first_name": document.getElementById("first_name_input").value,
    "last_name": document.getElementById("last_name_input").value,
    "email": document.getElementById("email_input").value,
   	"consented": document.getElementById("consent_input").checked,
    "discount_card_number": document.getElementById("card_number_input").value,
  }
 });
When this event is triggered, the data is extracted from the input fields and passed as an object to Intempt's "record" function. The data is passed to Intempt as an object and includes the user's first name, last name, email, consent, and discount card number.
intempt.record(”Verification”,
              {userId: "[email protected]", "accountId": "intempt.com"}
              {data: {verified: false, type: "email"}
               userAttributes: {"email": "[email protected]"}
               accountAttributes: {"mtuCount": "10000+"}})
Getting custom events right
With some custom events being sent, it is time to refine those events to capture the data you want. Getting this right requires multiple steps.
It starts with the product's goals, which inform what data is needed about users and their behavior.
Next is ensuring data is accessible in the right places in your codebase. This might require writing helper functions for access or formatting the data correctly.
Finally, ensuring all the data is captured and added to Intempt for use in your analysis, visualization, and optimization. This is where we’ll focus for the rest of this tutorial.
There are multiple places where more details can be added to events to make sure you are tracking the right data. Here are some key ones.
Using event listeners
You need to use event listeners to track each custom event when it occurs.
You need to use event listeners to track each custom event when it occurs.
First, you need to use a specific HTML element (, , etc.) and add an event listener to it.
Then you can include the custom event you define in the following example.
<button id="regBtn">Sign up</button>
const regBtn = document.getElementById("regBtn")

regBtn.addEventListener("click", () => {

 intempt.record({
 	eventTitle:"signed_up",
  data: {
    "first_name": document.getElementById("first_name_input").value,
    "last_name": document.getElementById("last_name_input").value,
    "email": document.getElementById("email_input").value,
   	"consented": document.getElementById("consent_input").checked,
    "discount_card_number": document.getElementById("card_number_input").value,
  }

});
Don't miss out!
Make sure that you use a unique ID values for HTML elements that you are using.
Verify event tracking
There are two ways to verify if your events were tracked successfully.
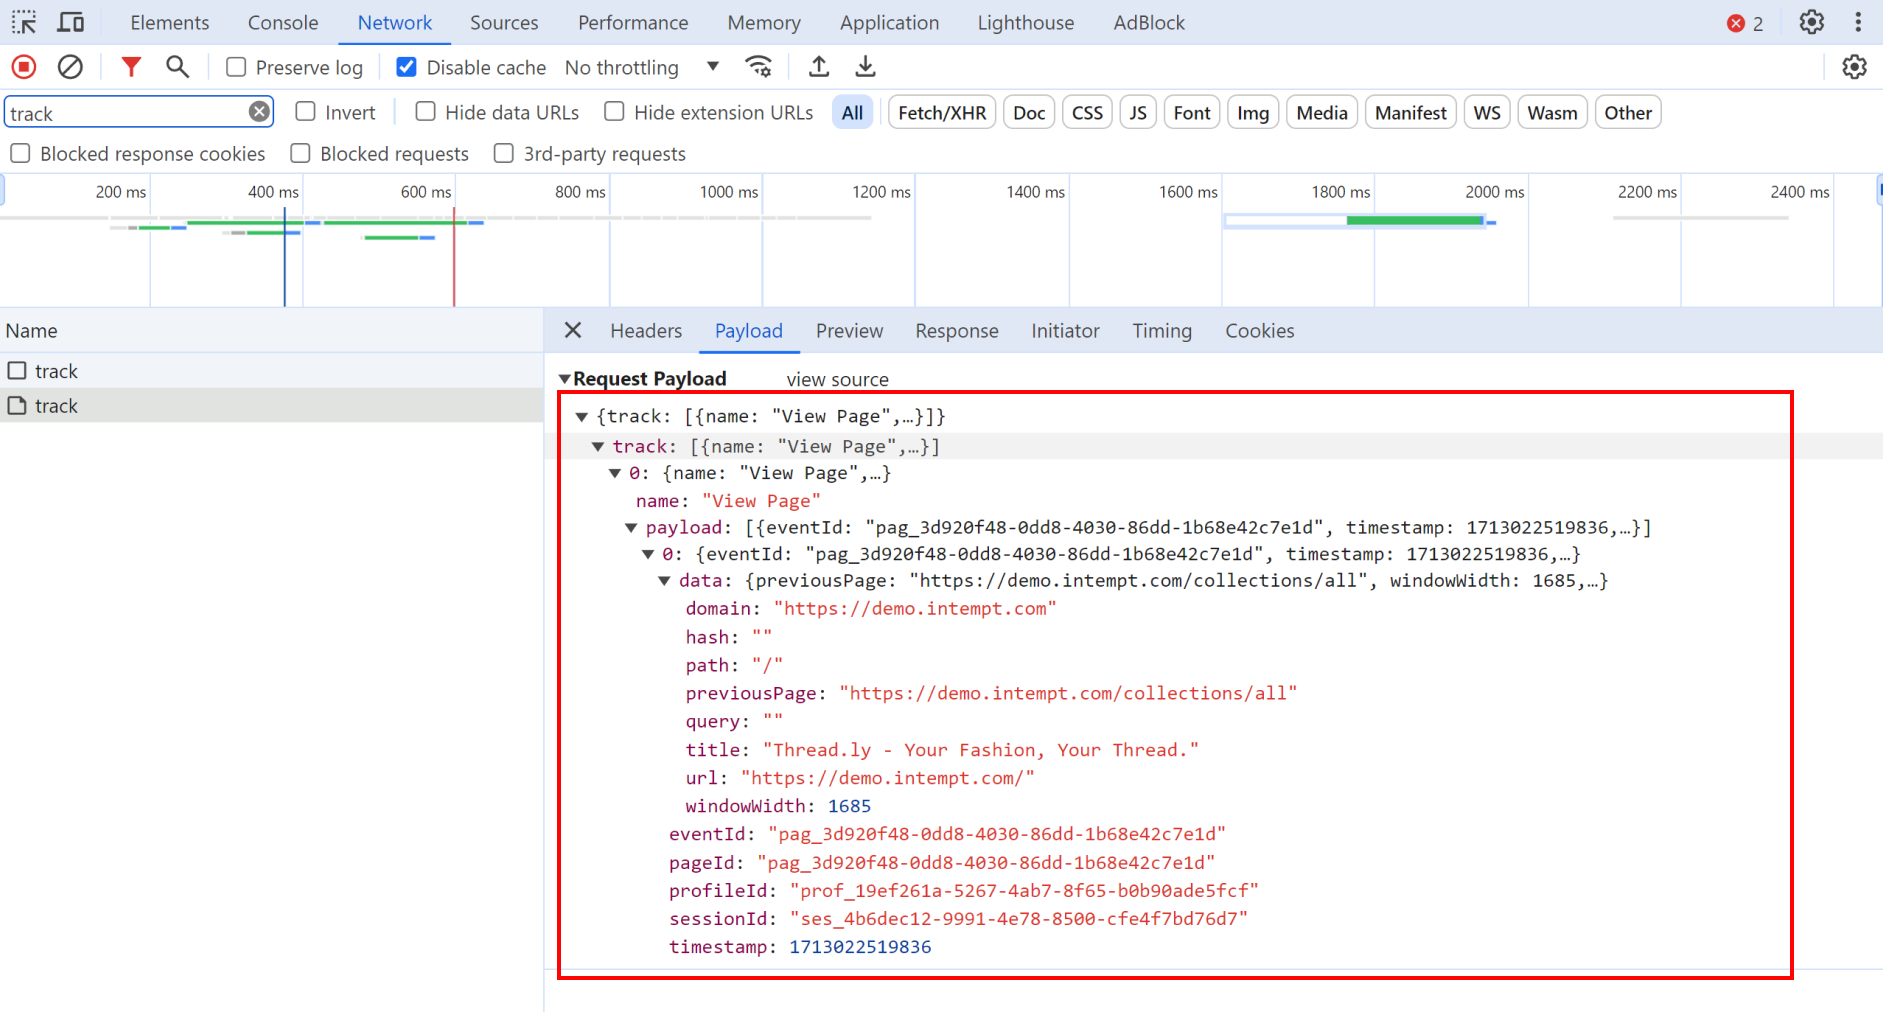
Check via the browser console's network tab.
Use the browser's inspect tool, select the network tab, and enter "track" into the search bar.
This will only show network events that are related to event tracking via Intempt.
If the request is successful (returns 200 or 201), it means that the event was tracked successfully. You can verify this by clicking on the "Payload" tab.
Check via your project user list.
You can visit your project user list and check the latest user data.
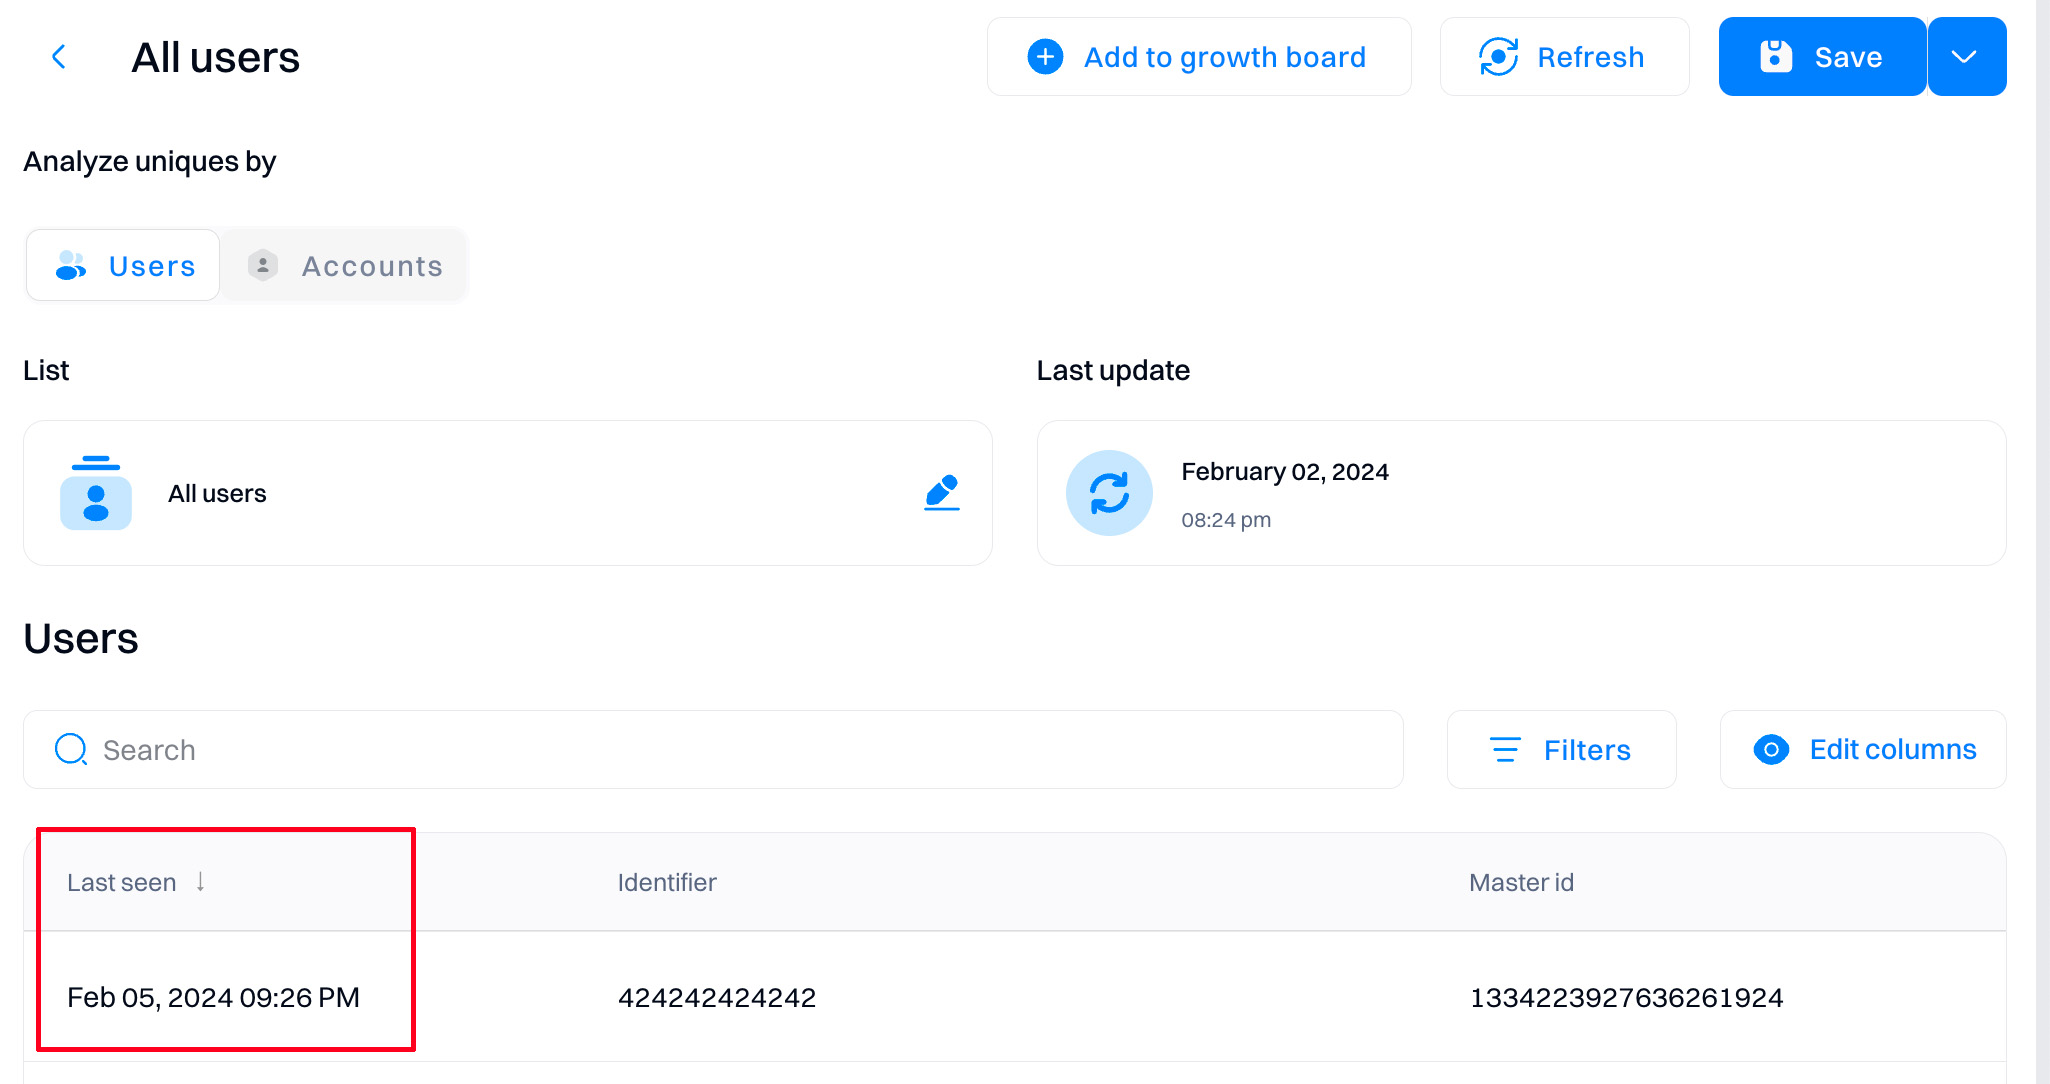
If under "Event stream," it matches the event performed, it means the event was tracked successfully.
Identifying users
To best capture user data, you must understand who those users are. Autocaptured events identify users for you, while custom events require manually setting that user identification.
Examples of user identifiers include session IDs and emails. Identifying a user by email using Javascript is as simple as calling intempt.identify() with a unique identifier (user email, unique user ID in your database, etc.).
intempt.identify(“[email protected]”, "CustomEventName",
                {first_name: "John", last_name: "Doe"})
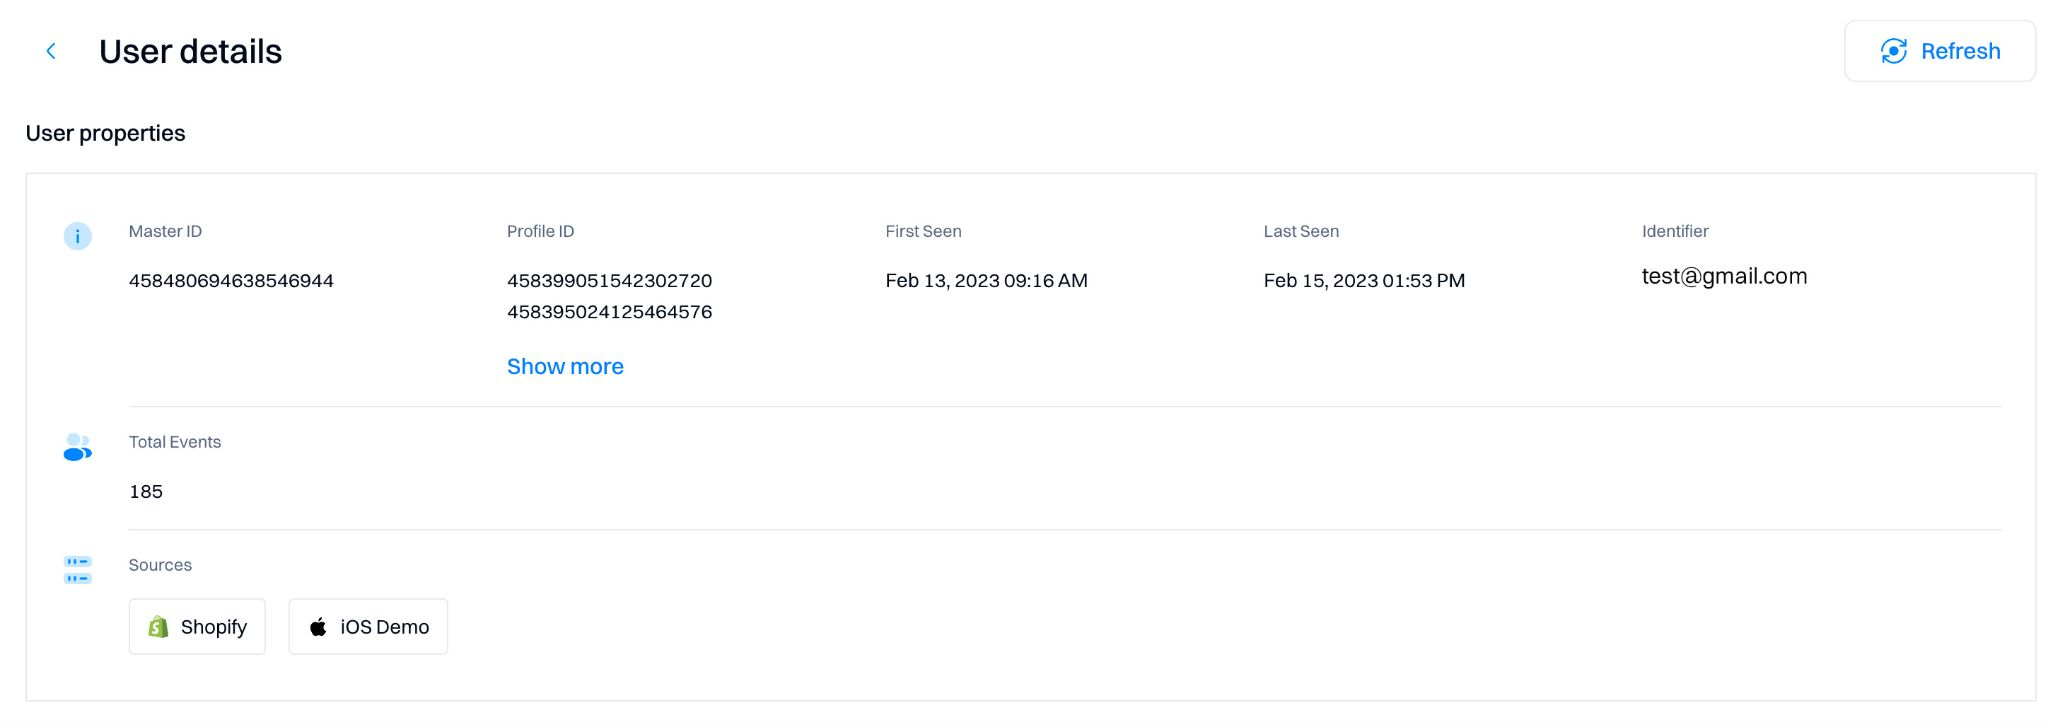
Identifying users helps understand who those users are and what they are doing. Once identified, Intempt connects events related to formerly anonymous IDs with the unique set IDs.
An example below is when the same identifier was used across two different sources. For this user, Intempt got a unified view of all of the events across the Shopify and iOS demo sources.
Attributes
Once a user has been identified and a basic event has been set up (with a name), attributes can also be set for that event. Attributes create more details about the event, such as the ID, category of the data, and other important data that differ between events. These attributes can then be used to filter and analyze event-tracking data.
As shown below, attributes are sent along with the Master ID and event. They can include as much data as you like. Common data formats such as booleans, dates, numerics, and more can be handled and utilized within Intempt to filter or adjust data when analyzing.
intempt.record(”Verification”,
              {userId: "[email protected]", "accountId": "intempt.com"}
              {data: {verified: false, type: "email"}
               userAttributes: {"email": "[email protected]"}
               accountAttributes: {"mtuCount": "10000+"}})
Group event tracking
Intempt provides the ability to aggregate events by groups. Groups allow you to track and manage events, not at an individual user level, but at a “company,” “organization,” “project” or another broader entity level.
For example, if you had multiple deployments for different companies in your product, you could group events by each company. Another example is instead of calling capture after using identify, you can call a group or add the group data to the capture call.
intempt.group(“intempt.com”, "company"
              {mtuCount: 12345, company: "Intempt"})
This allows these groups to be used for analyzing, filtering, and visualizing events in Intempt. An example of a metric that benefits from group event tracking is the unique number of organizations signed up (rather than individuals).
Combining events
Often a single event does not make up an entire behavior that you want to track. For example, a signup can include not only pressing the signup button, but entering the correct information and making it past the basic information input stage. To truly track all the events and behaviors, you can create events via the event editor.
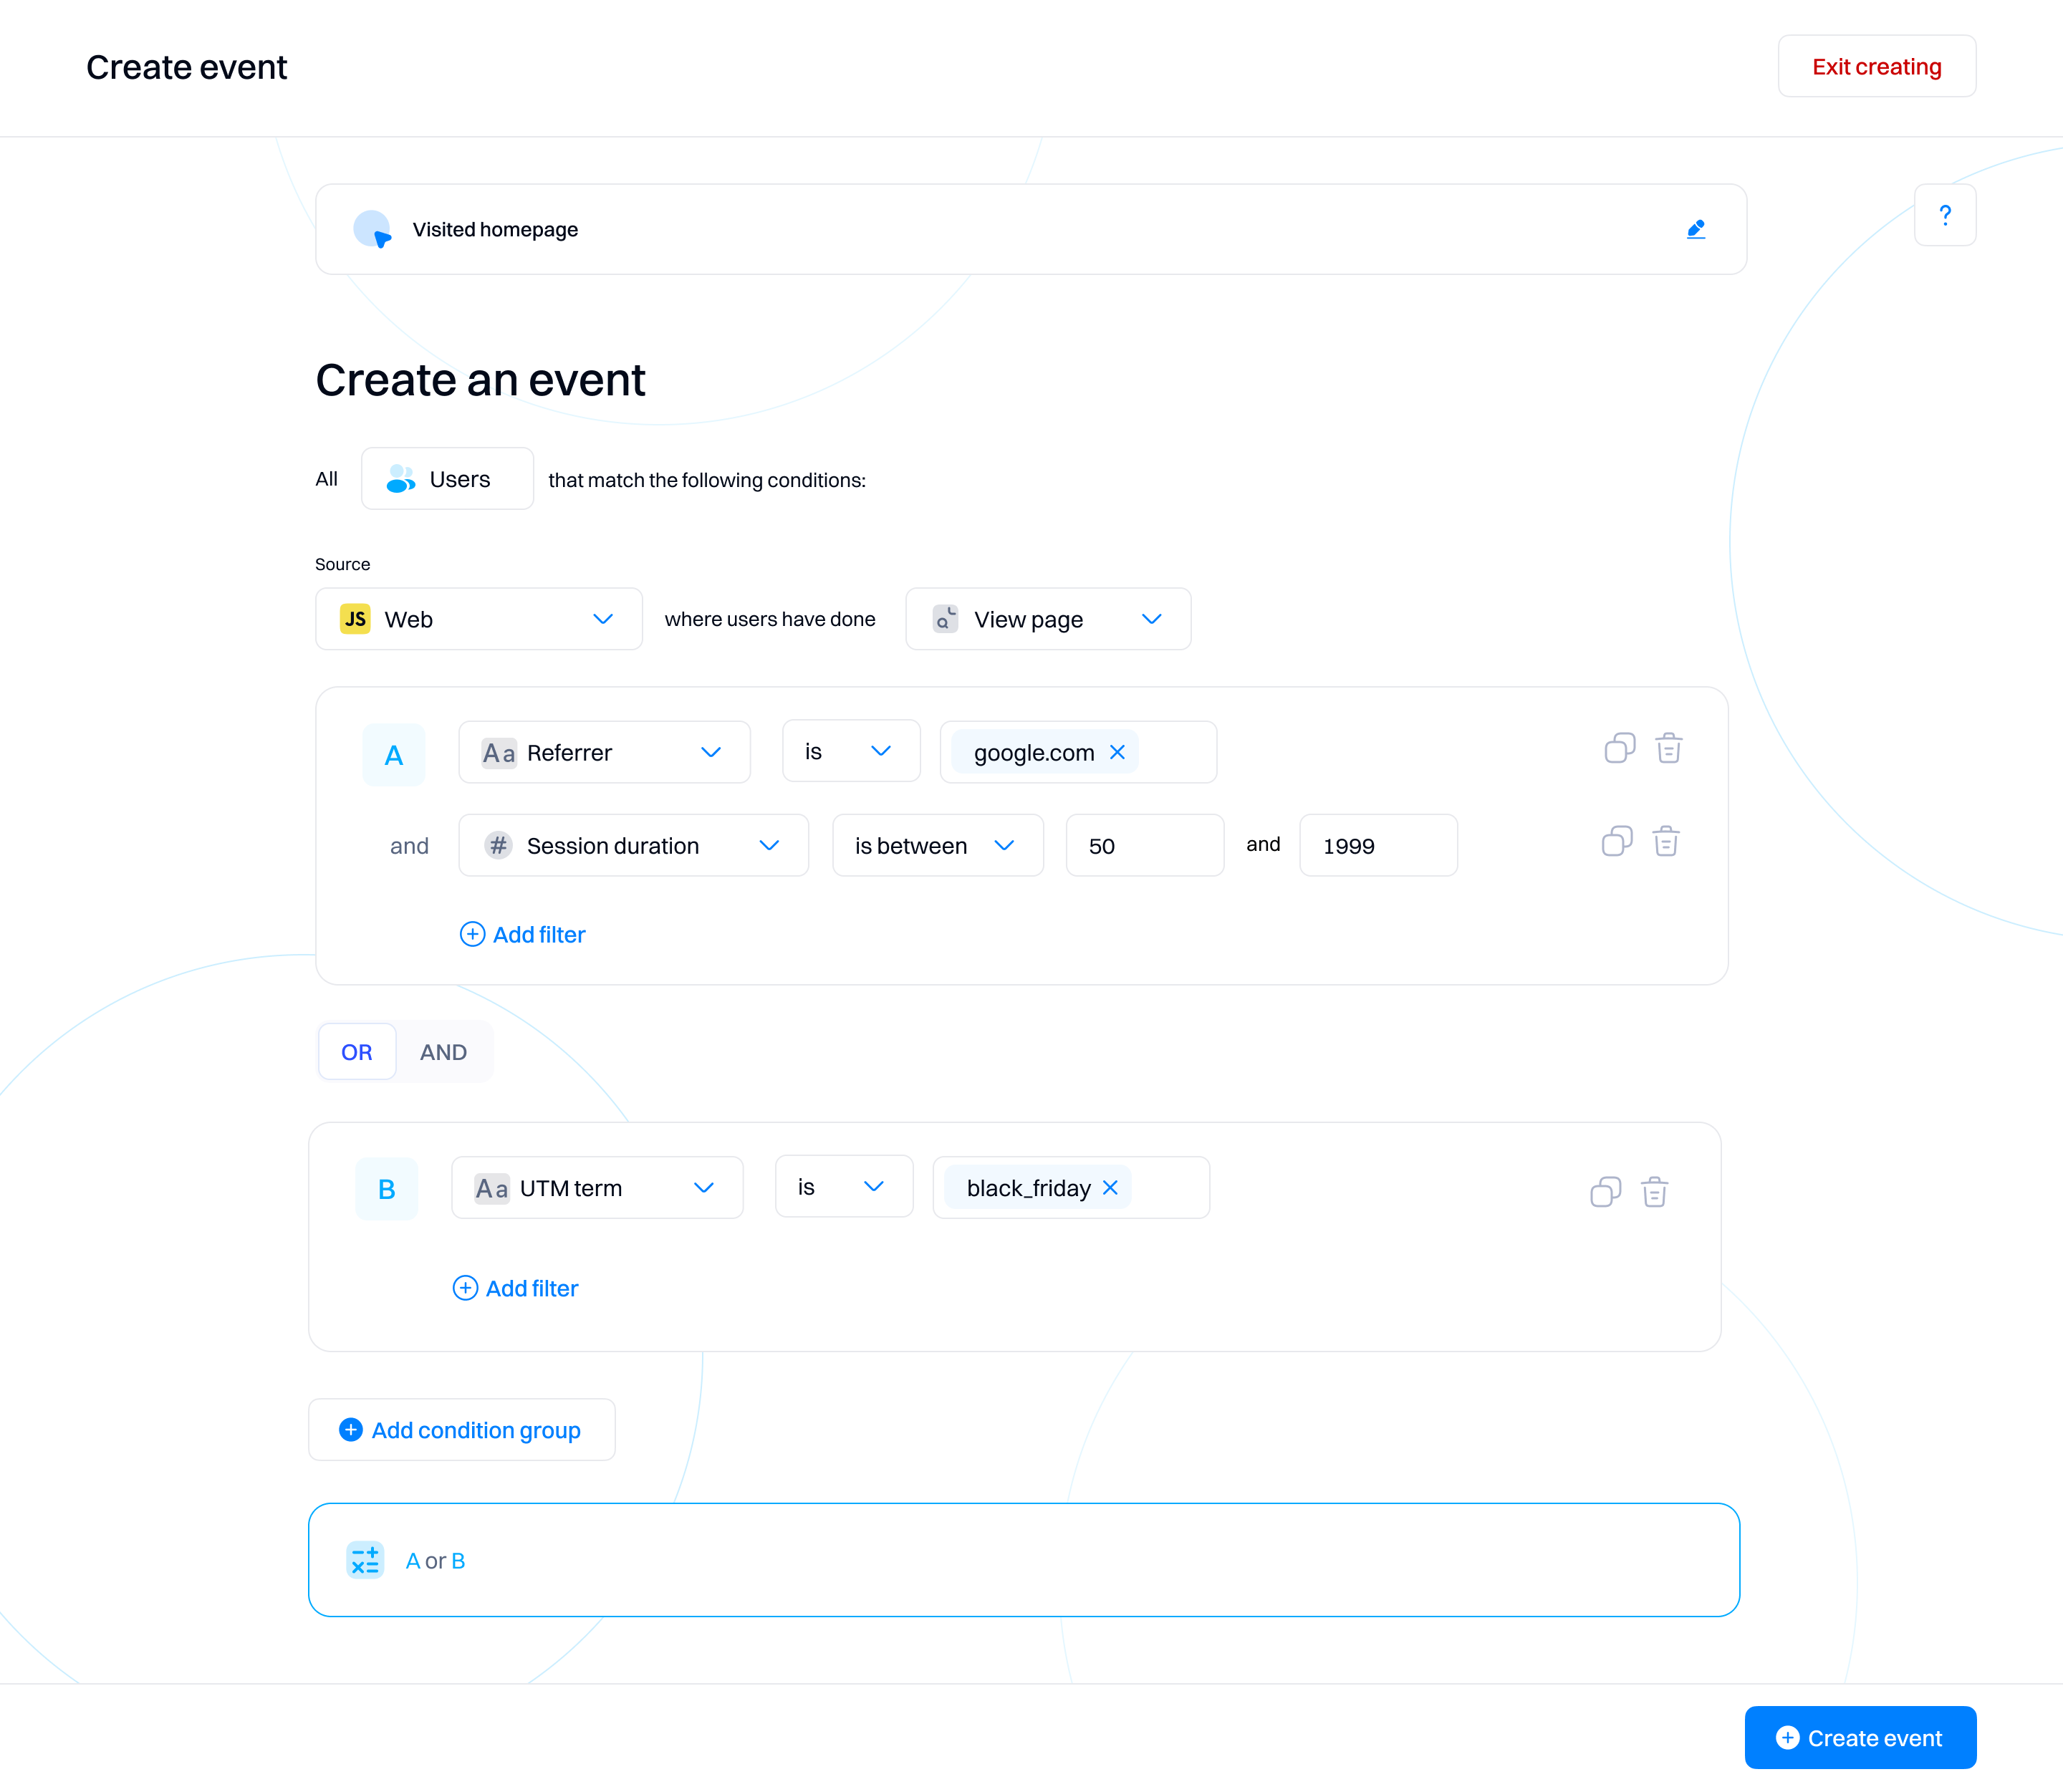
This way autocapture events, custom events, and page views can then be combined to track better the behavior you care about. You can find more about using the event editor here.
What’s next?
Now that you have set up autocapture, high-quality custom events, and actions, what’s next? If your website or application is active (we hope it is), you’ll get a flow of data into your Intempt instance. You can continue to expand the capturing and formatting of that data, or begin creating segments or reports to analyze it.
If you are looking for more options for where to send your events that aren’t covered by our client-side libraries, you can check out our API or server-side SDK libraries.
Updated about 2 months ago