
Basic Intempt installation
Installation guide for basic setup
When you implement Intempt, you add Intempt code to your website, app, or server. This code generates messages based on specific triggers you define.
In a basic implementation, the code can be a snippet of JavaScript that you copy and paste into the HTML of a website to track page views. It can also be as complex as a custom even tracked via server-side library.
The best way to learn about how Intempt works is to see it in action.
Before you begin
Before you start your Intempt implementation, you need:
- Intempt account and an organization + project created. If you’re not already part of any project with Intempt organization, you can sign up for a free account.
- Access to the code for a website, or an iOS app.
Tip! If you don’t have any of those things, consider creating a simple GitHub Pages website.
Create separate dev and prod projects
When you develop and test sources, we recommend you to create and use separate projects for each of your environments (production, development, staging) to prevent testing and development activities from filling production systems with invalid data.
You can give each project an environment label when you create it, and we strongly suggest that you use these labels to sort your projects.
Installing Intempt
Click a tab below to see the tutorial content for the specific library you chose.
Step 1: Create your API key
The API key is a unique identifier for a source that tells Intempt which source the data comes from, to which organization the data belongs.
To find your write key:
- Go to Project settings > API key
- Click “Add API key”
- Select “Full Access” permissions
- Create API key
- Copy API key, you will need in the next steps
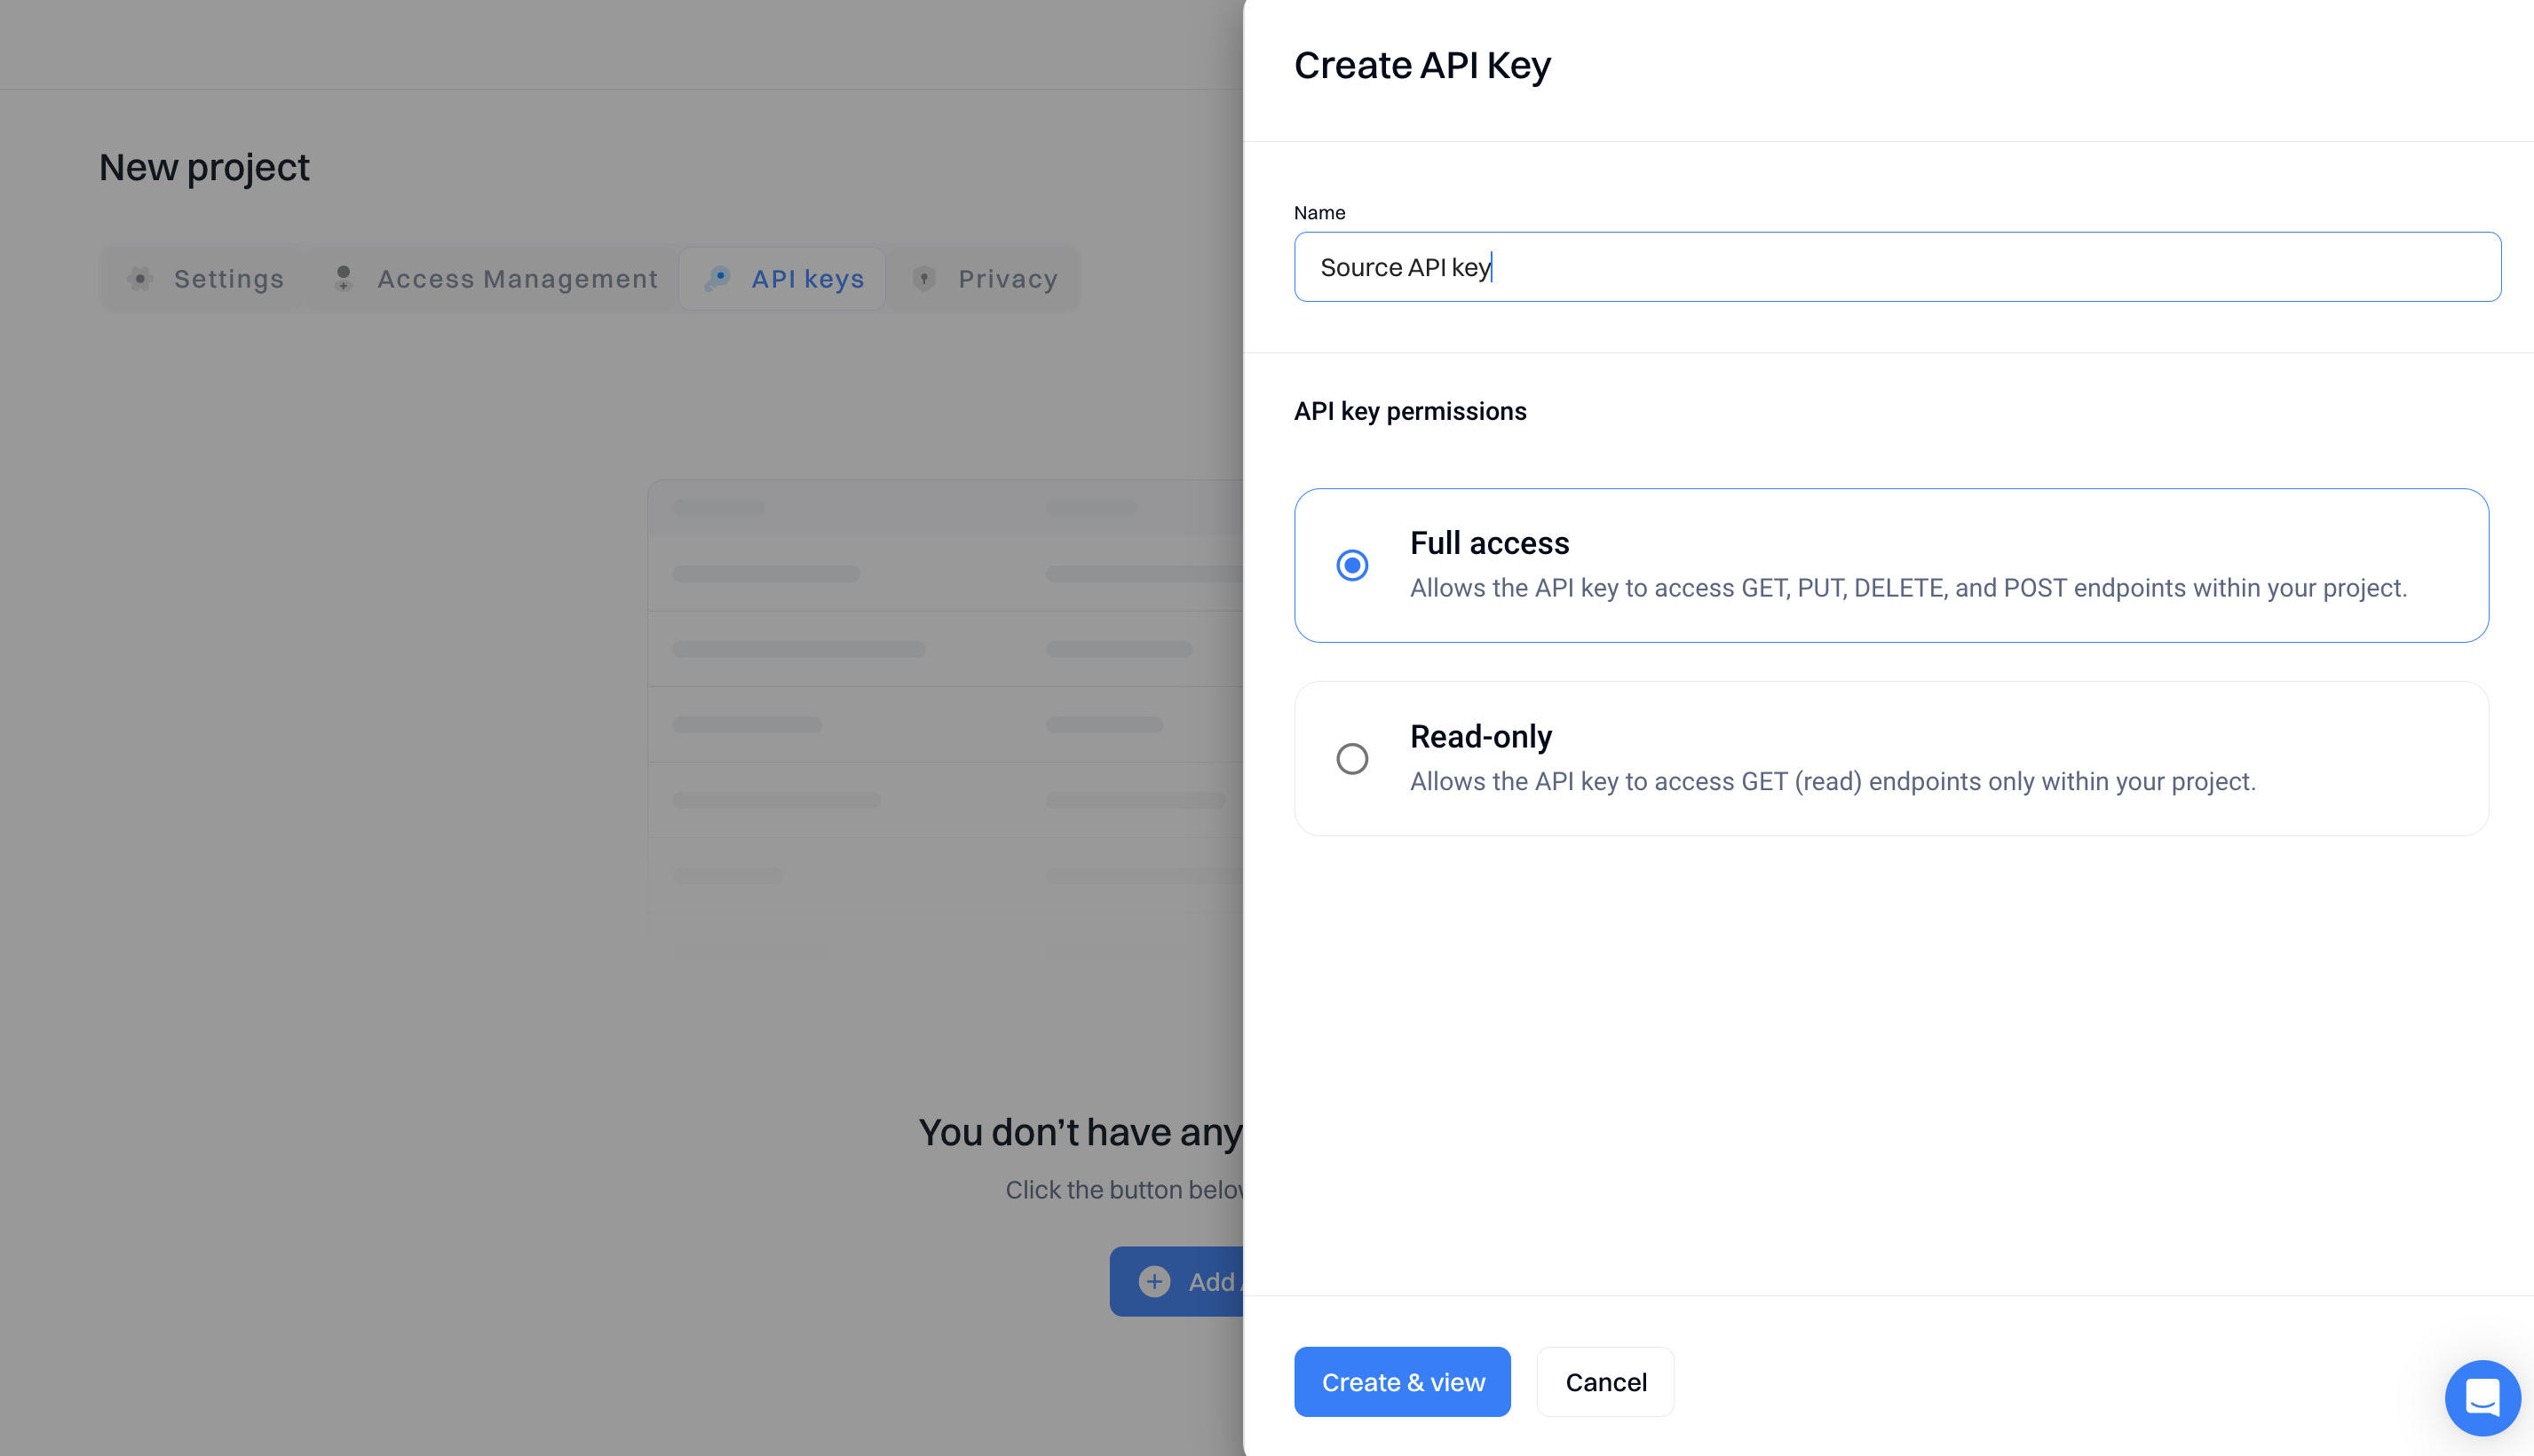
Attention
Make sure to save the API key in a secure file/folder - you will not be able to access it later
Important
Cloud-sources do not have write keys, as they use a token or key from your account with that service.
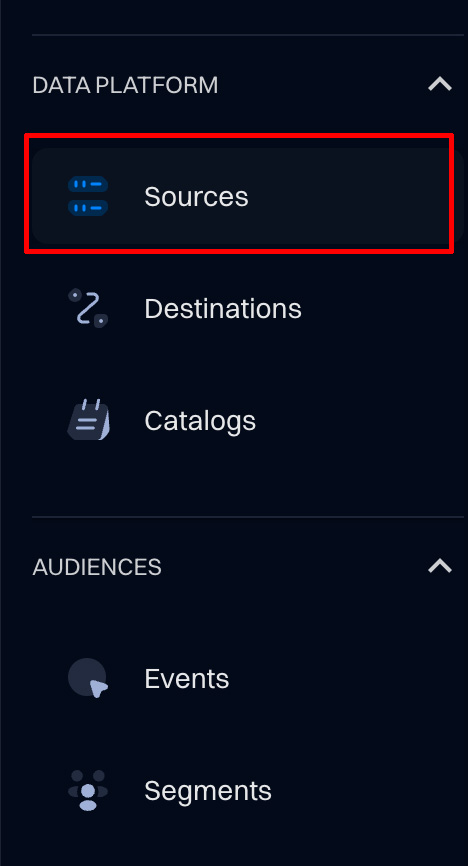
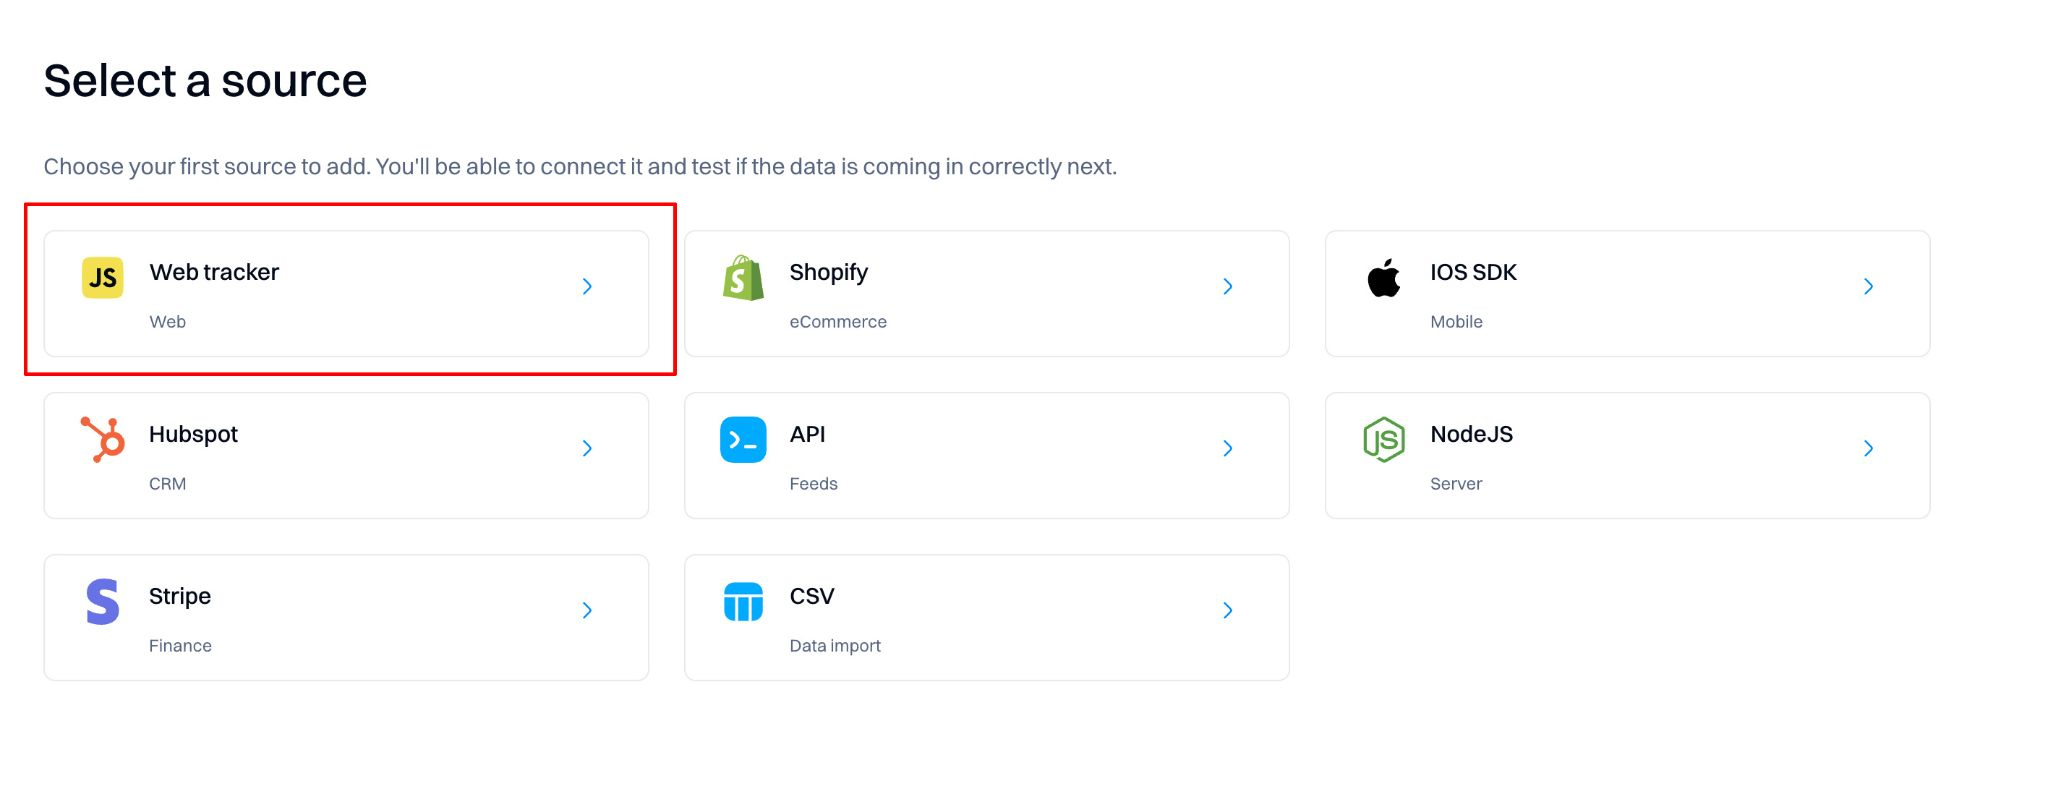
Step 1: Create a source & set up autocapture
Autocapture makes it easy to start getting data such as page views, clicks, and submissions from your site through a Javascript snippet. It doesn’t require setting up individual events and automatically captures data from new or changed components. This is useful, for example, if you restructure your frontend, autocapture continues to collect relevant events without you needing to update your codebase.
To set up autocapture:
- Go to “Sources”
- Create a “Web tracker”source
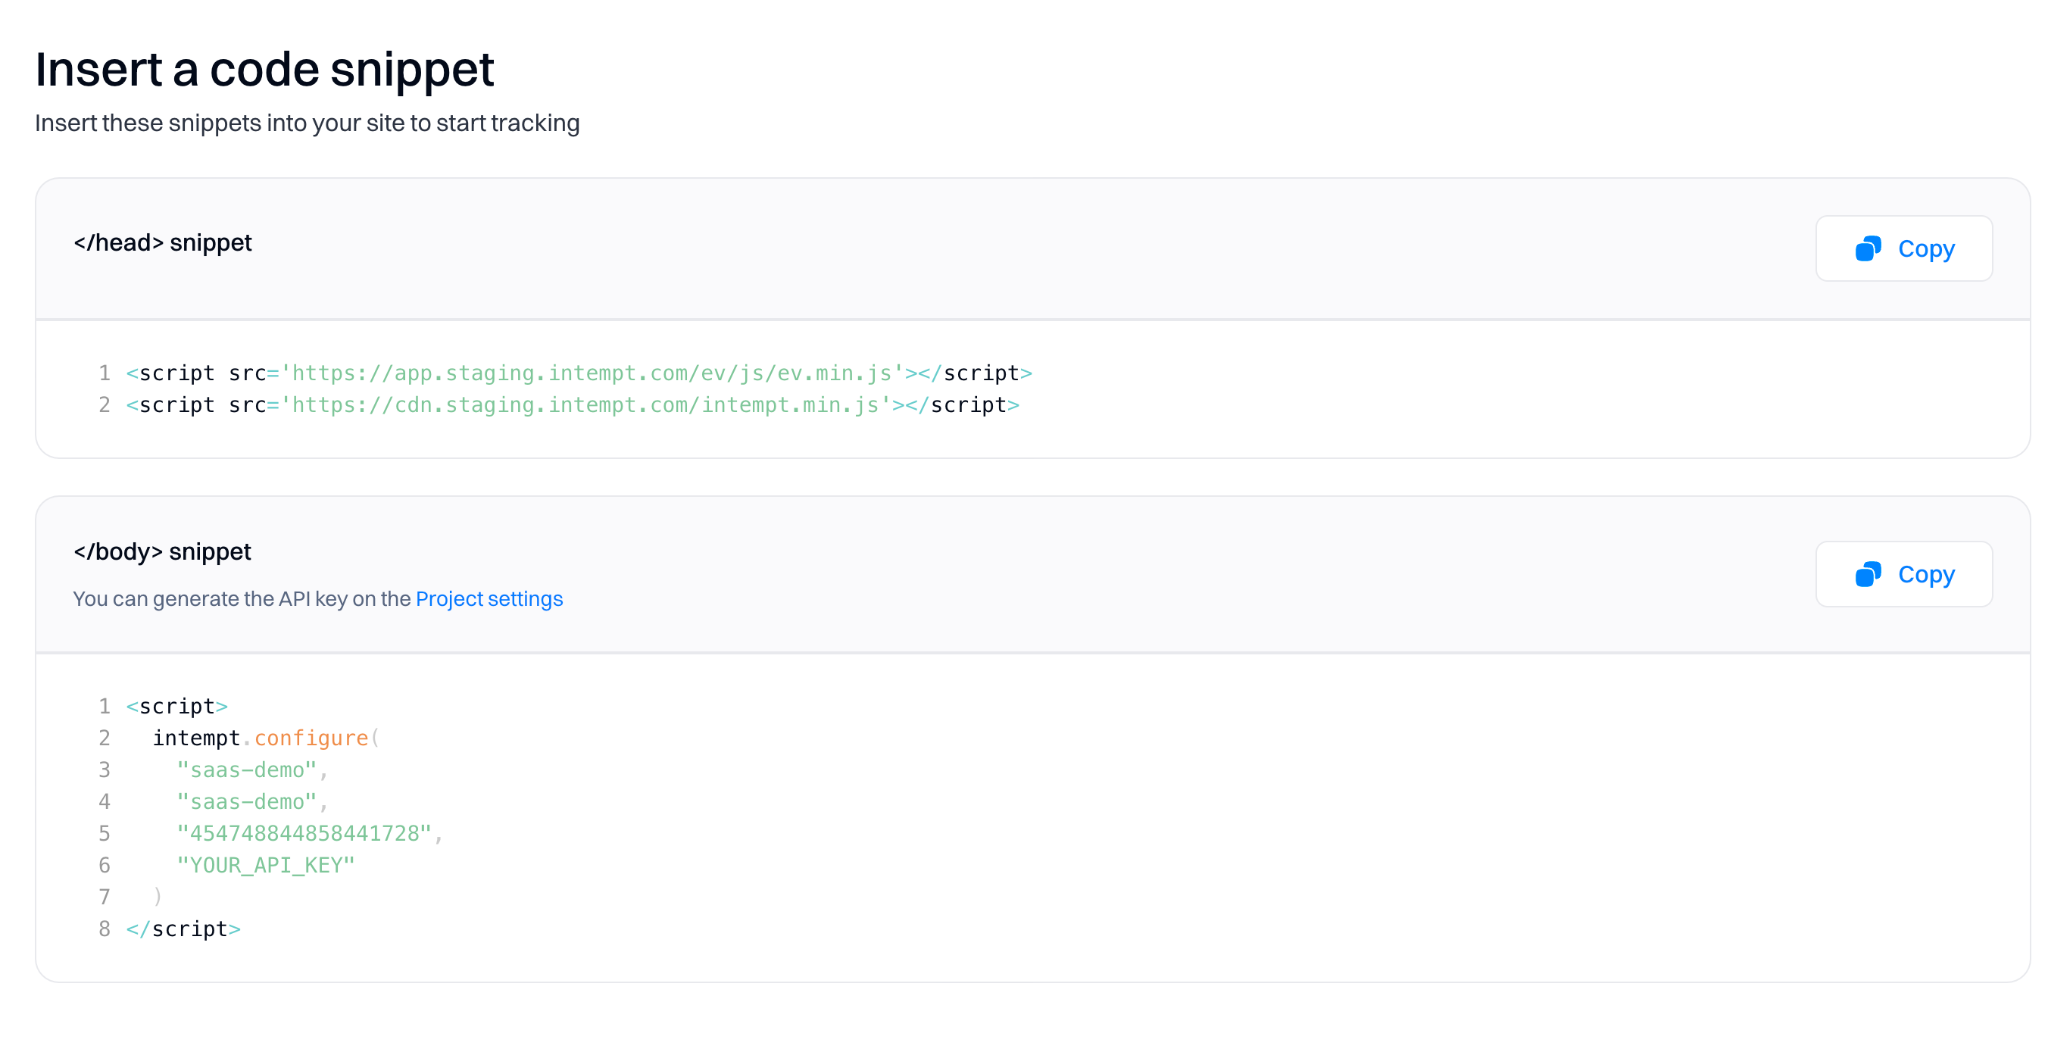
- Under “Insert a code snippet,” copy the code block snippet containing the script tags and Javascript function.
Don't miss out!
Remember to replace "YOUR_API_KEY" with the API key you generated in the first step.
- Paste the first block into your site’s HTML in the tags and the second one under the section. This should be an HTML page that acts as a base or template page (with other scripts your page loads) to ensure all possible events are captured.
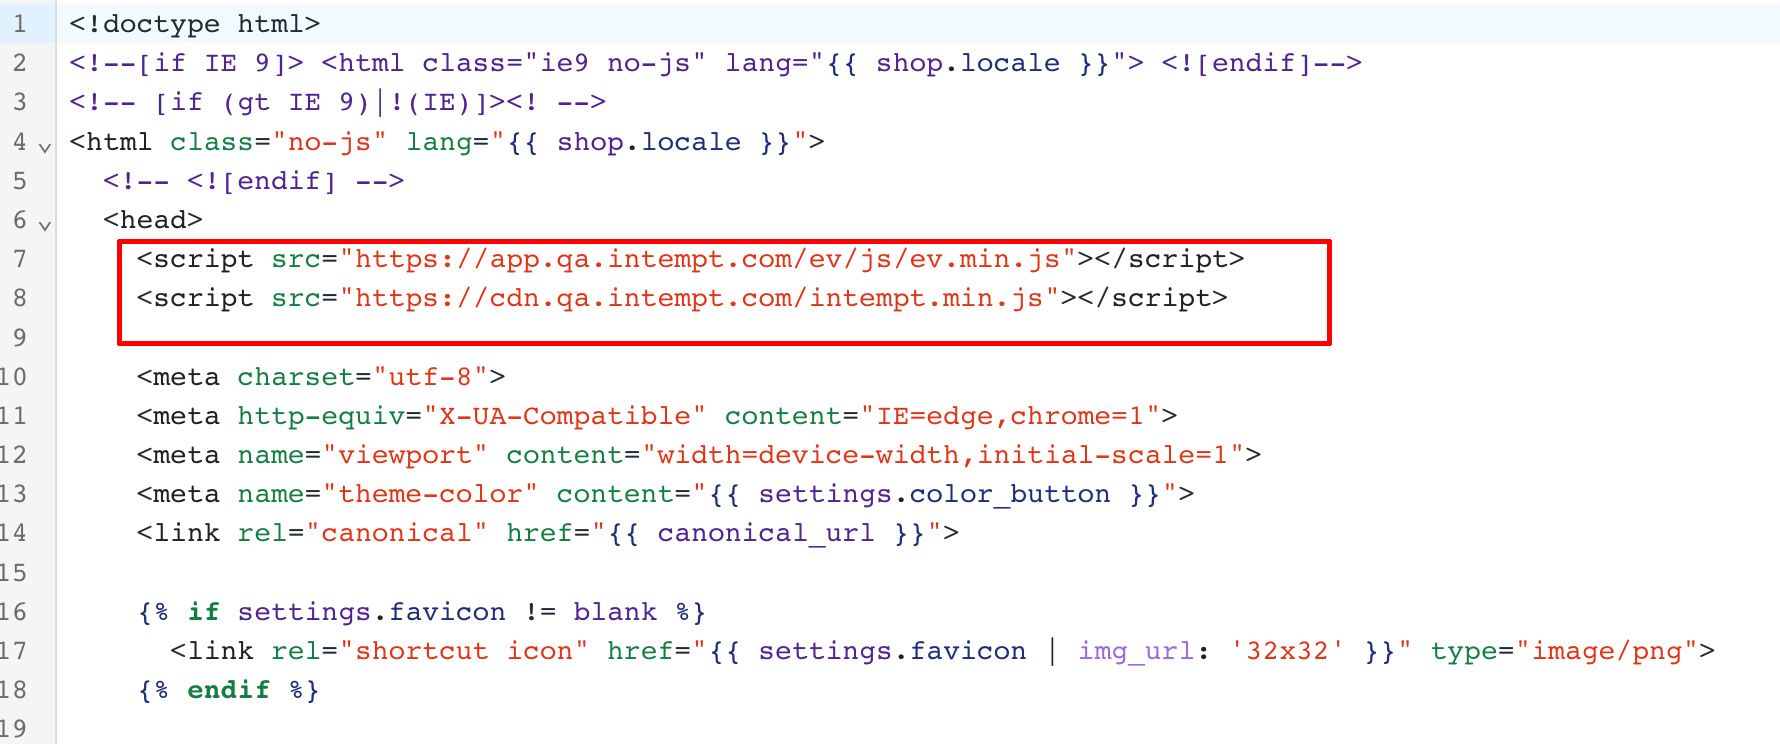
Header snippet
Body snippet
This allows autocapture to capture events like clicks, change of inputs, or submission of a button, form, input, select, textarea, and label tags. Once set up, those events flow automatically into Intempt for you to see and analyze.
For a detailed guide on how to install the snippet, read our installation guide.
Autocapture’s limitations
Although we are proud of our autocapture feature, we know it isn’t enough for more advanced product analytics. This is for two reasons.
First, event autocapture can be overwhelming. In high-volume instances, where events come in at a high rate, the live events table can contain so much information it can be difficult to determine exactly what you care about. Remember that every click, change of input, or submission is tracked here. Without proper filters, actions, and insights set up, this data can be overwhelming.
Second, autocapture is a general solution that provides value to many users. To get the most out of Intempt, you should be using custom events. Custom events let you track exactly the behavior you care about, ranging from a user hovering input to a function call in your backend.
Step 3: Set up custom events
To expand on autocapture, you can create and add custom events to your website or application. Custom events allow you to capture details from anywhere in the codebase, whether it is a button press on the frontend or a class method call on the backend. This ensures correct and comprehensive data capture.
To set up custom events, first, you need to install the Web tracker on your site (as indicated in the previous section). Next, you will need to create a collection in the Web tracker you created.
Intempt uses Avro schemas to structure data - this ensures that all ingested events are validated against the schema structure in the database. This is an advantage compared to schemaless architecture allowint to ensure proper data validation in all cases (so no wrong or broken events are ingested).
However, this also means creating event collection schemas are required to be created in advance to start ingesting custom events. Please note that tracked events have schemas already pre-created - so it does not need this step.
To create the collections for customer events, you need to:
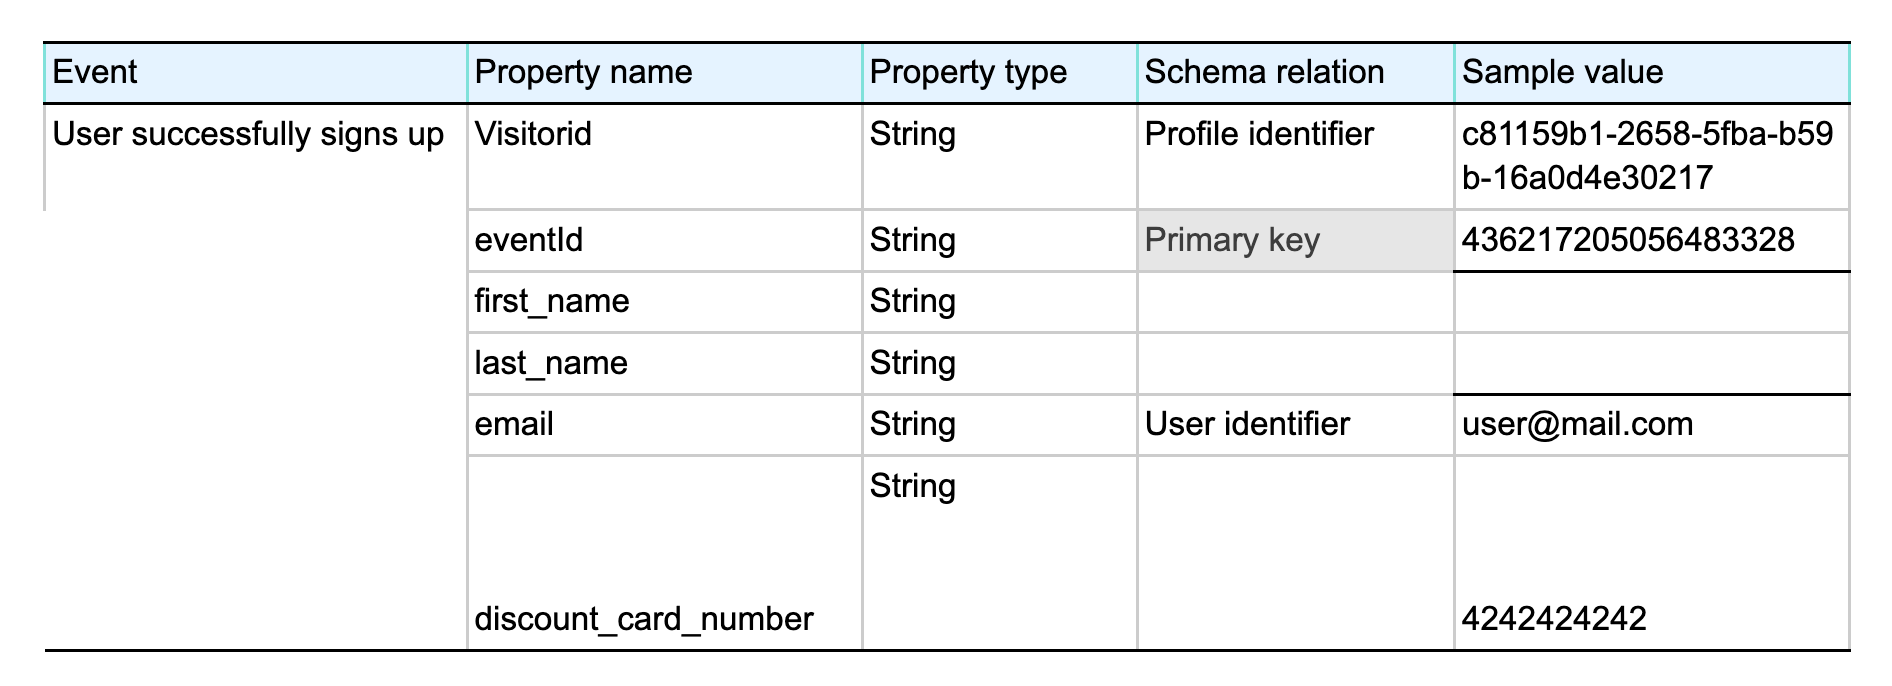
1. Map the schema of the event your want to track
Example of the mapped schema is below. You can read here to learn more about building a tracking plan.
2. Create an event collection in the Intempt console using the schema editor
Open the Web tracker source and select the “Collections” tab.
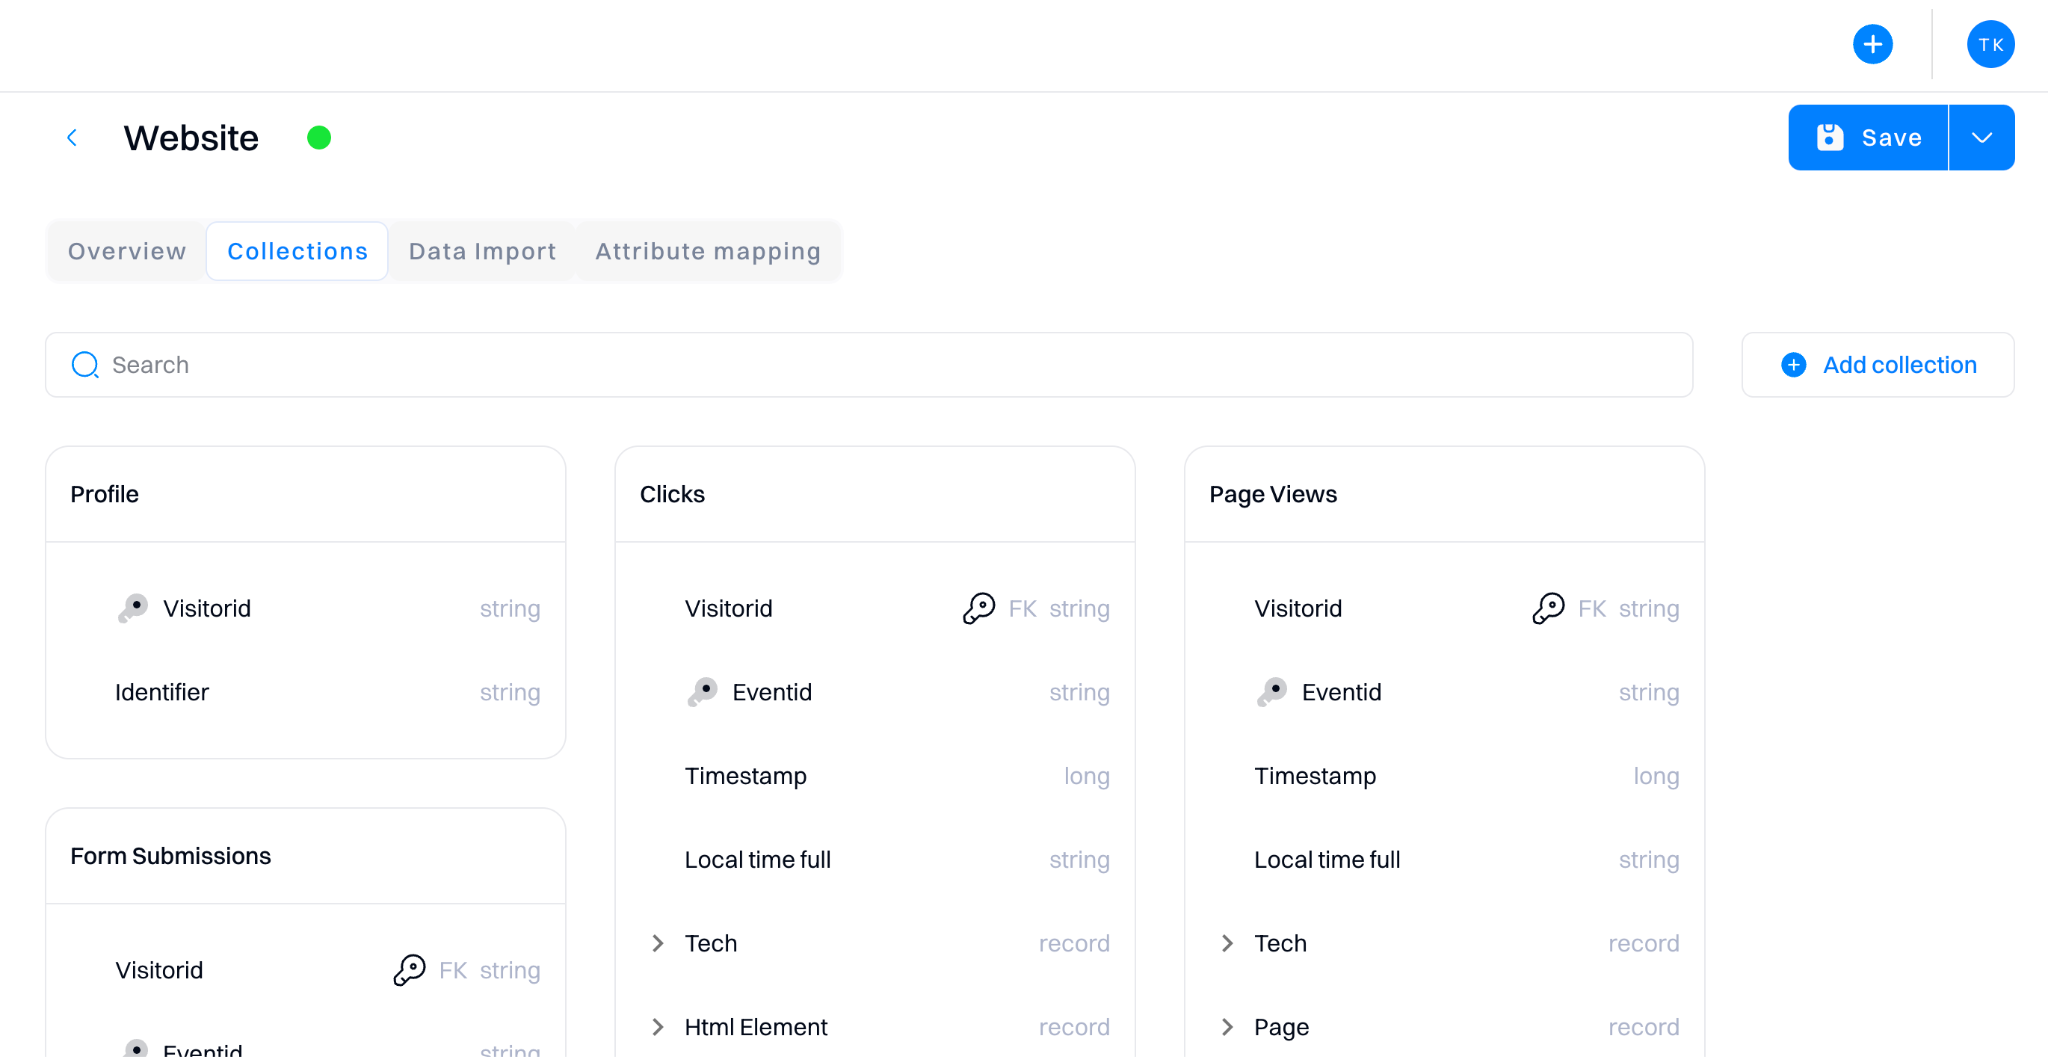
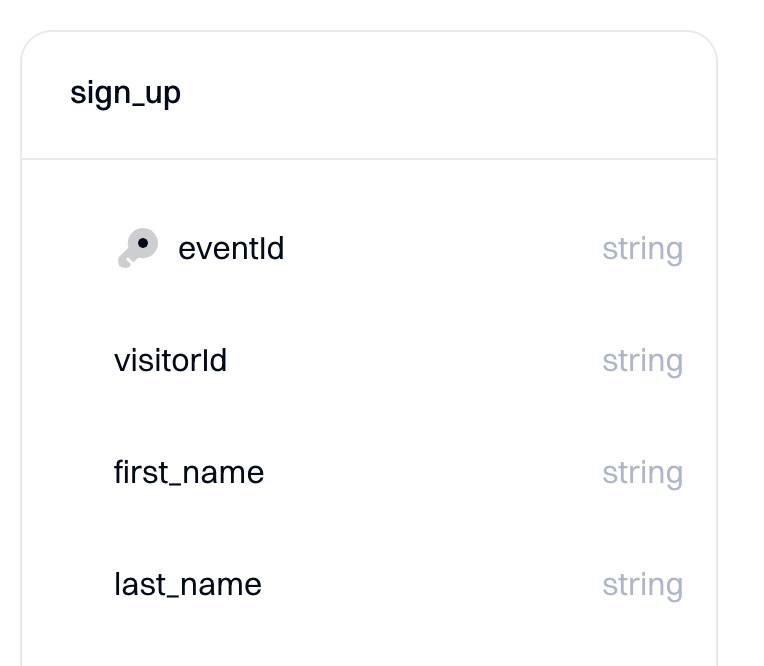
Create a new collection - name it based on the event you want to create.
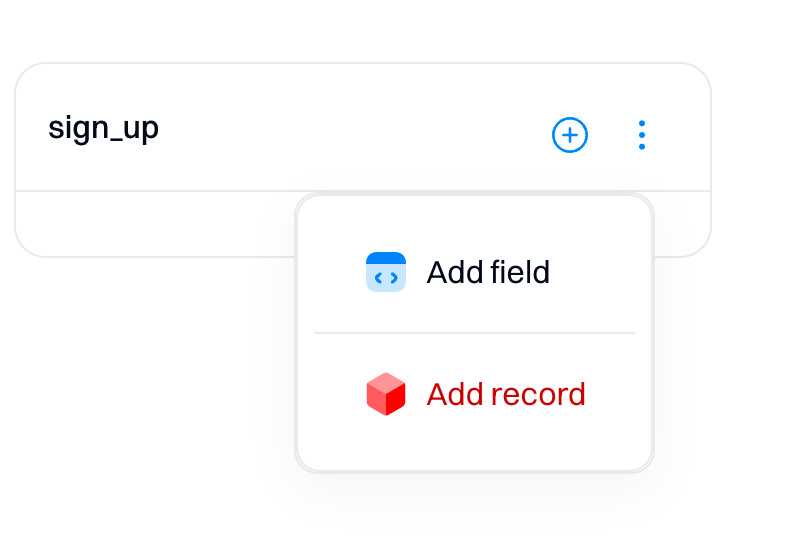
Add fields for each of the properties you mapped in the previous step (event schema).
Important
- Add a visitorId field and set a profile identifier as one of its properties.
- Make sure to also add an eventId to your schema - each event needs to have its unique identifier.
See our developer documentation for more information.
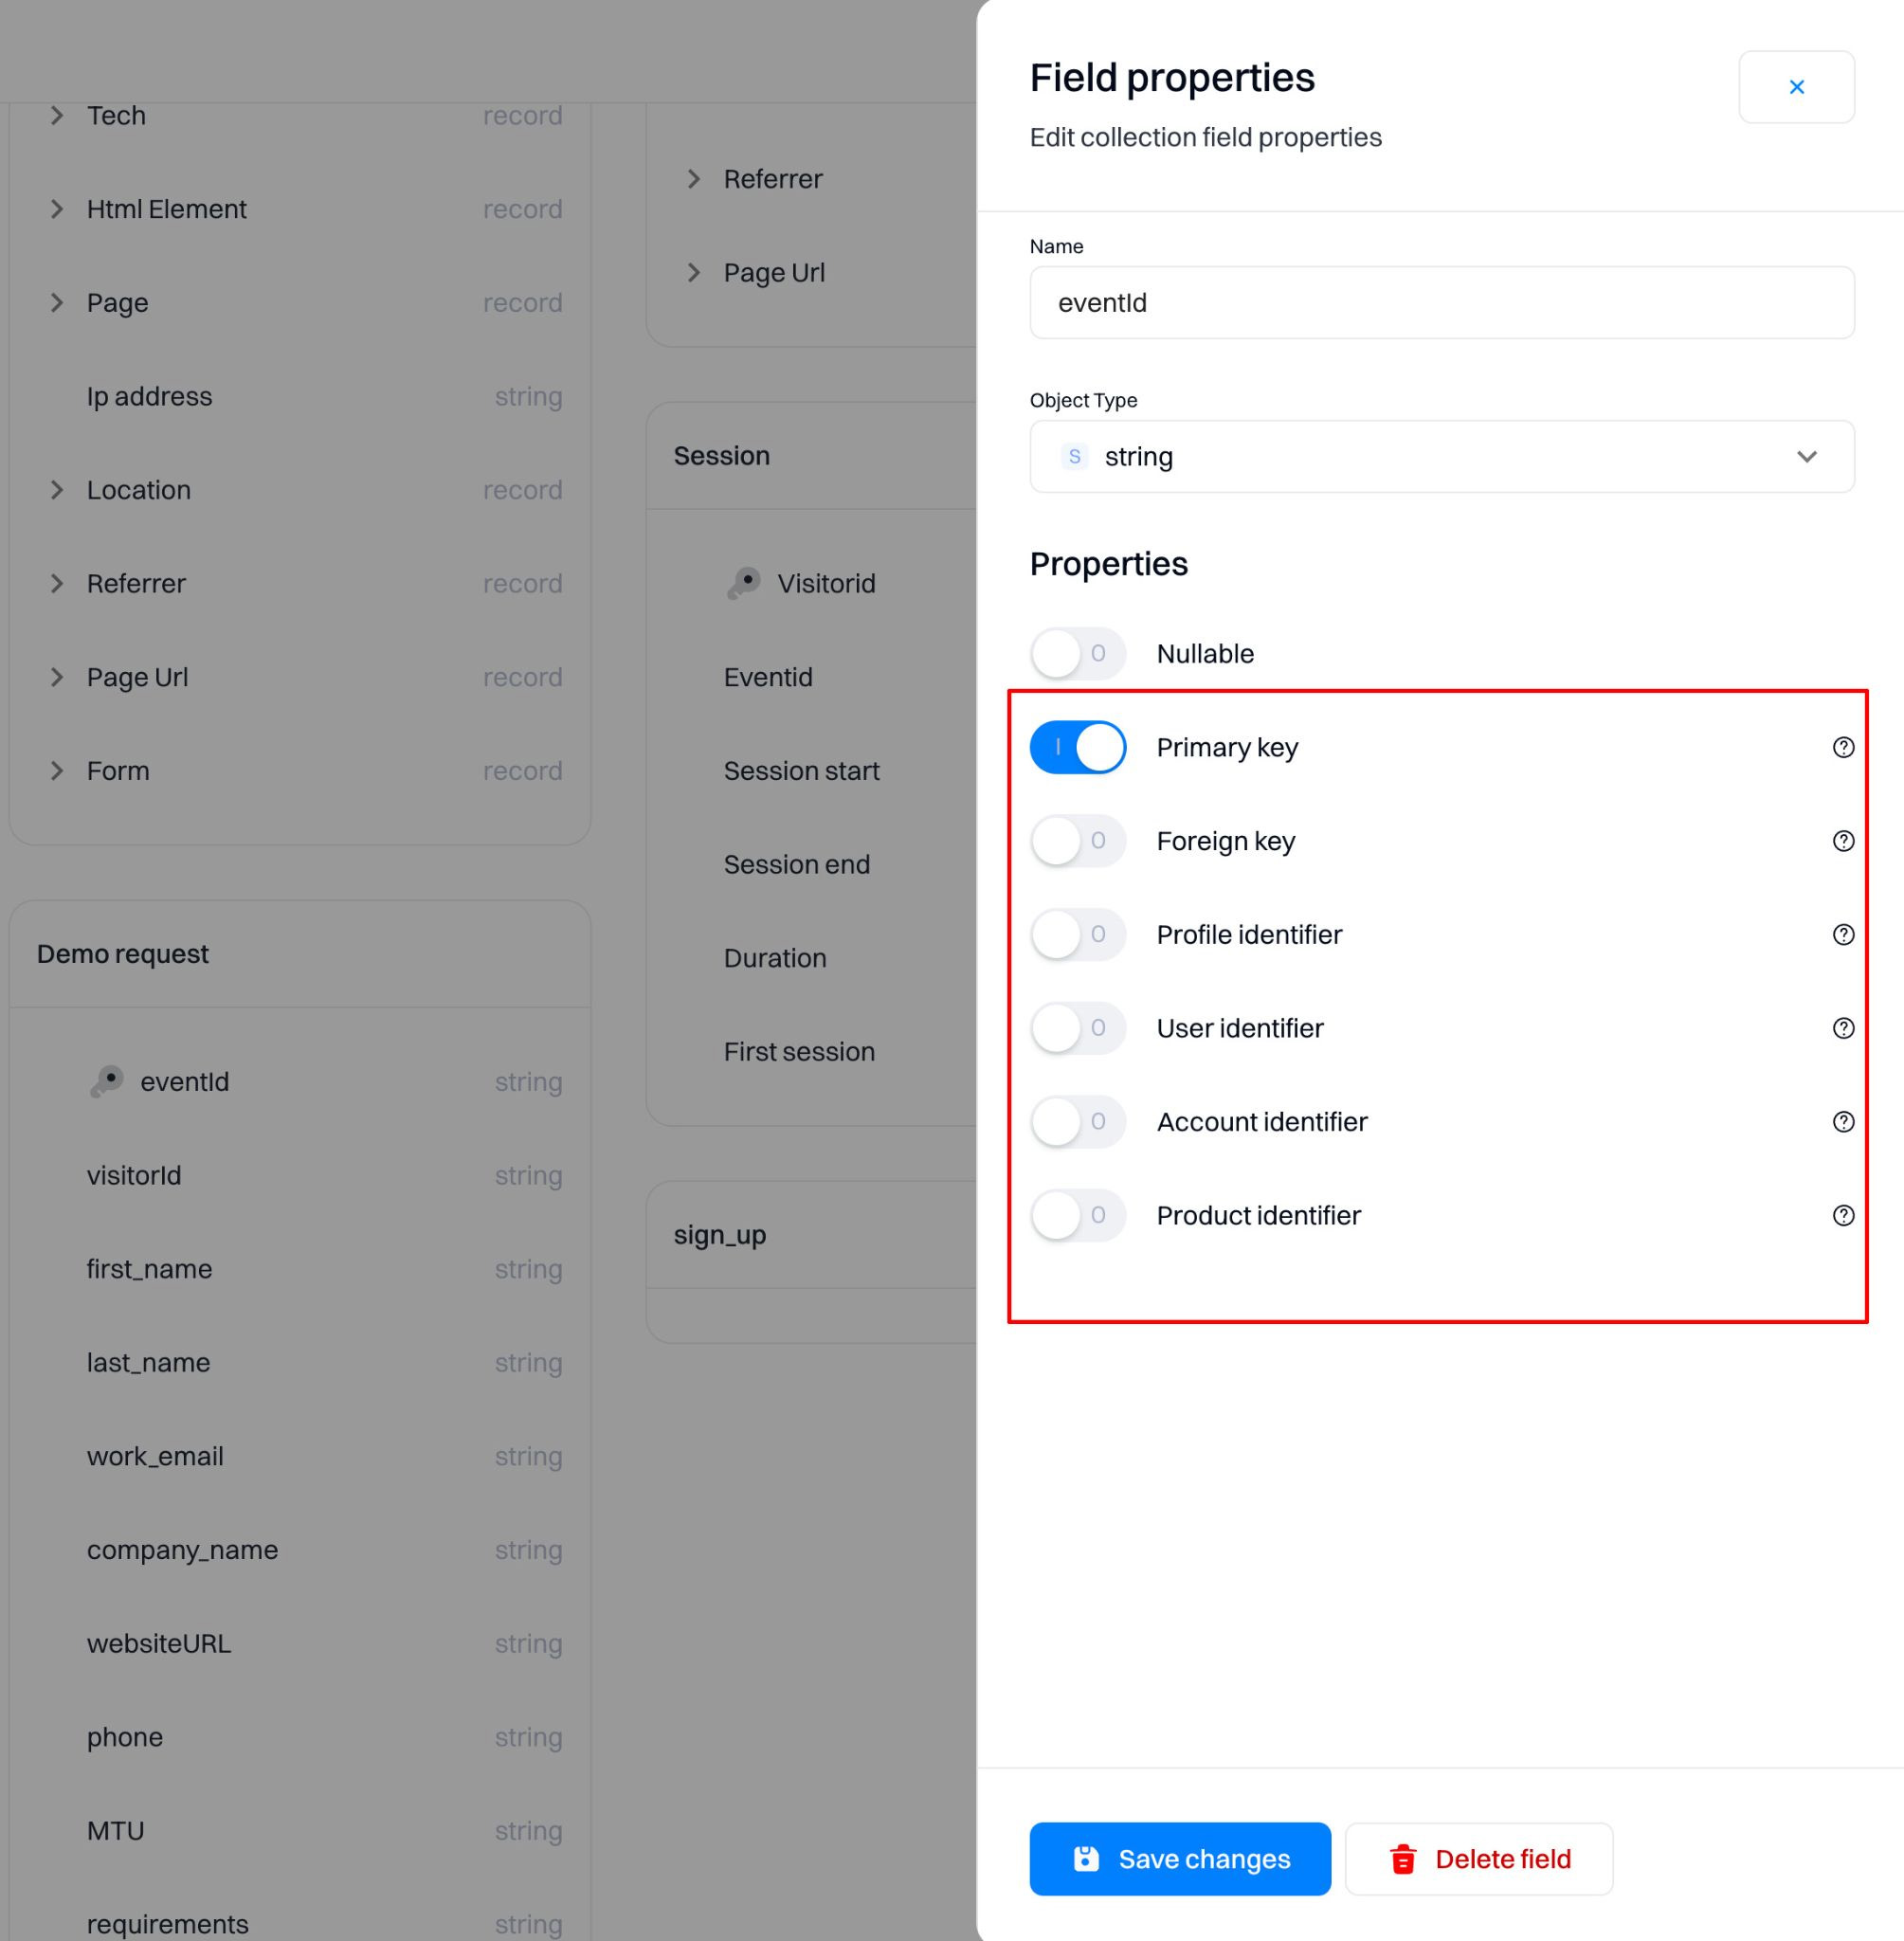
Note that Data type sent should match data type set when creating the collection. For instance, We are sending a property timestamp which has a Data type of number, Sending data with a type of string instead of number will prevent this event from being tracked.
3. Add tracking code to your codebase to track the custom event
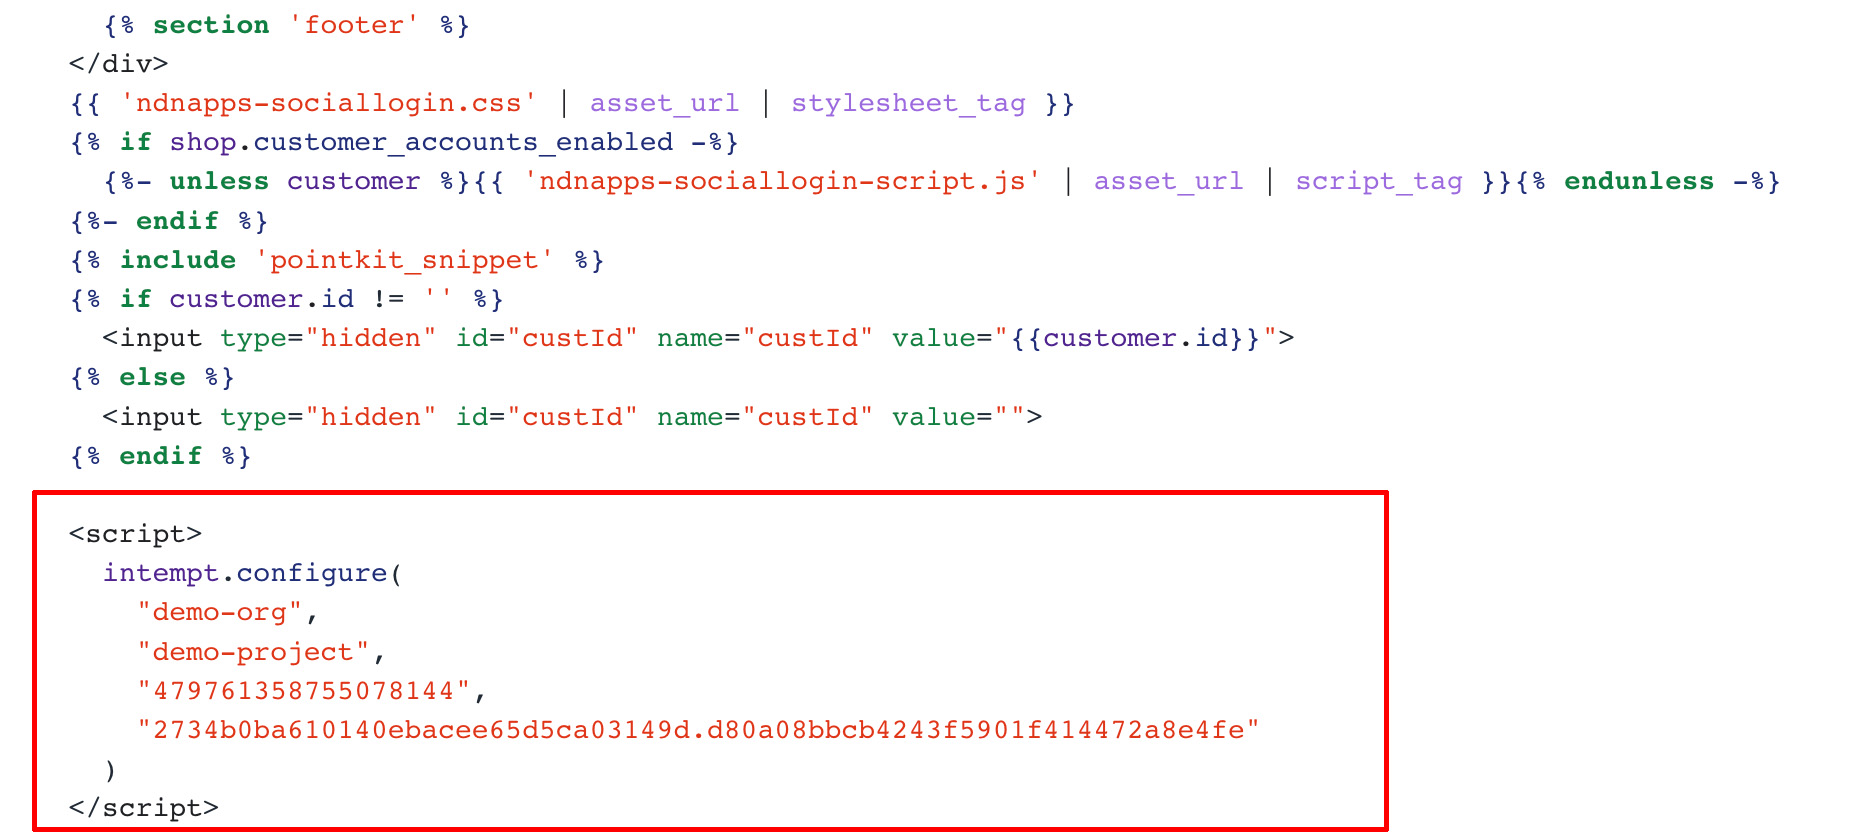
You can log a custom event by calling Intempt's recordEvent function, passing in a set of key-value pairs.
    intempt.recordEvent('COLLECTION_NAME', {
		key: value,
	});
The COLLECTION_NAME refers to an event type. For example, if you wanted to log every purchase made on your site, you might call that collection "purchase". Then, when a purchase happens, you call track and pass in the purchase details.
In the example below, we have a custom event with the name of purchase, then we have an object of key-value pairs. The pairs passed into the fields are the same as those created in the source collection.
intempt.recordEvent("purchase", {
	 "items": [{"item name": "item 1","price": 20}, {"item name": "item 2","price": 15}],
	 "totalprice": 35,
	 "ispaid": true,
	 "timestamp": new Date().getTime(),
	 "fixed.name": "John Smith",
	 "fixed.age": 28,
	 "intempt.visit.trackcharge": 35
})
In the another example below, the code snippet captures user sign-up data, such as their first name, last name, email, and discount card number.
    const btn = document.querySelector("#regBtn")
    btn.addEventListener("click", () => {
    const first_name = document.querySelector('input[name="customer[first_name]"]').value;
    const last_name = document.querySelector('input[name="customer[last_name]"]').value;
    const email = document.querySelector('input[name="customer[email]"]').value;
    const discount_card_number = document.querySelector('input[name="customer[note][DiscountCardNumber]"]').value;
    intempt.recordEvent('signed_up', {
    first_name: first_name,
    last_name: last_name,
    email: email,
    discount_card_number: discount_card_number,
  });
    },false)
When the "w" is clicked, the data is extracted from the input fields and passed as an object to Intempt's "recordEvent" function. The data is passed to Intempt as an object and includes the user's first name, last name, email, and discount card number.
Using event listeners
To track each custom event when it occurs, you need to use event listeners.
Event listeners are used in detecting user interaction with specific elements on the webpage, such as a button or a form input. In the code snippet example,, the "click" event listener is used to detect when the user clicks the "regBtn" or "loginBtn" button, respectively. When the event is detected, the function specified in the event listener is executed.
Getting custom events right
With some custom events being sent, it is time to refine those events to capture the data you want. Getting this right requires multiple steps.
- It starts with the goals of the product, which inform what data is needed about users and their behavior.
- Next is ensuring data is accessible in the right places in your codebase. This might require writing helper functions for access or formatting the data correctly.
- Finally, ensuring all the data is captured and added to Intempt for use in your analysis, visualization, and optimization. This is where we’ll focus for the rest of this tutorial.
There are multiple places where more details can be added to events to make sure you are tracking the right data. Here are some key ones.
Step 4: Identify users
To best capture data about users, you must understand who those users are. Autocaptured events identify users for you, while custom events require manually setting that user identification.
Examples of identifiers for users include session IDs and emails. For example, getting identifying a user by email using Javascript is as simple as calling intempt.identify() with a unique identifier.
function loginRequest(user) {
  return authUser(user)
    .then(authorizedUser => {
        intempt.identify(user.email)
    })
}
To track visitors across multiple browsers and apps (or sessions after cookies are removed), pass in a unique identifying string (user email, unique user ID in your database etc.).
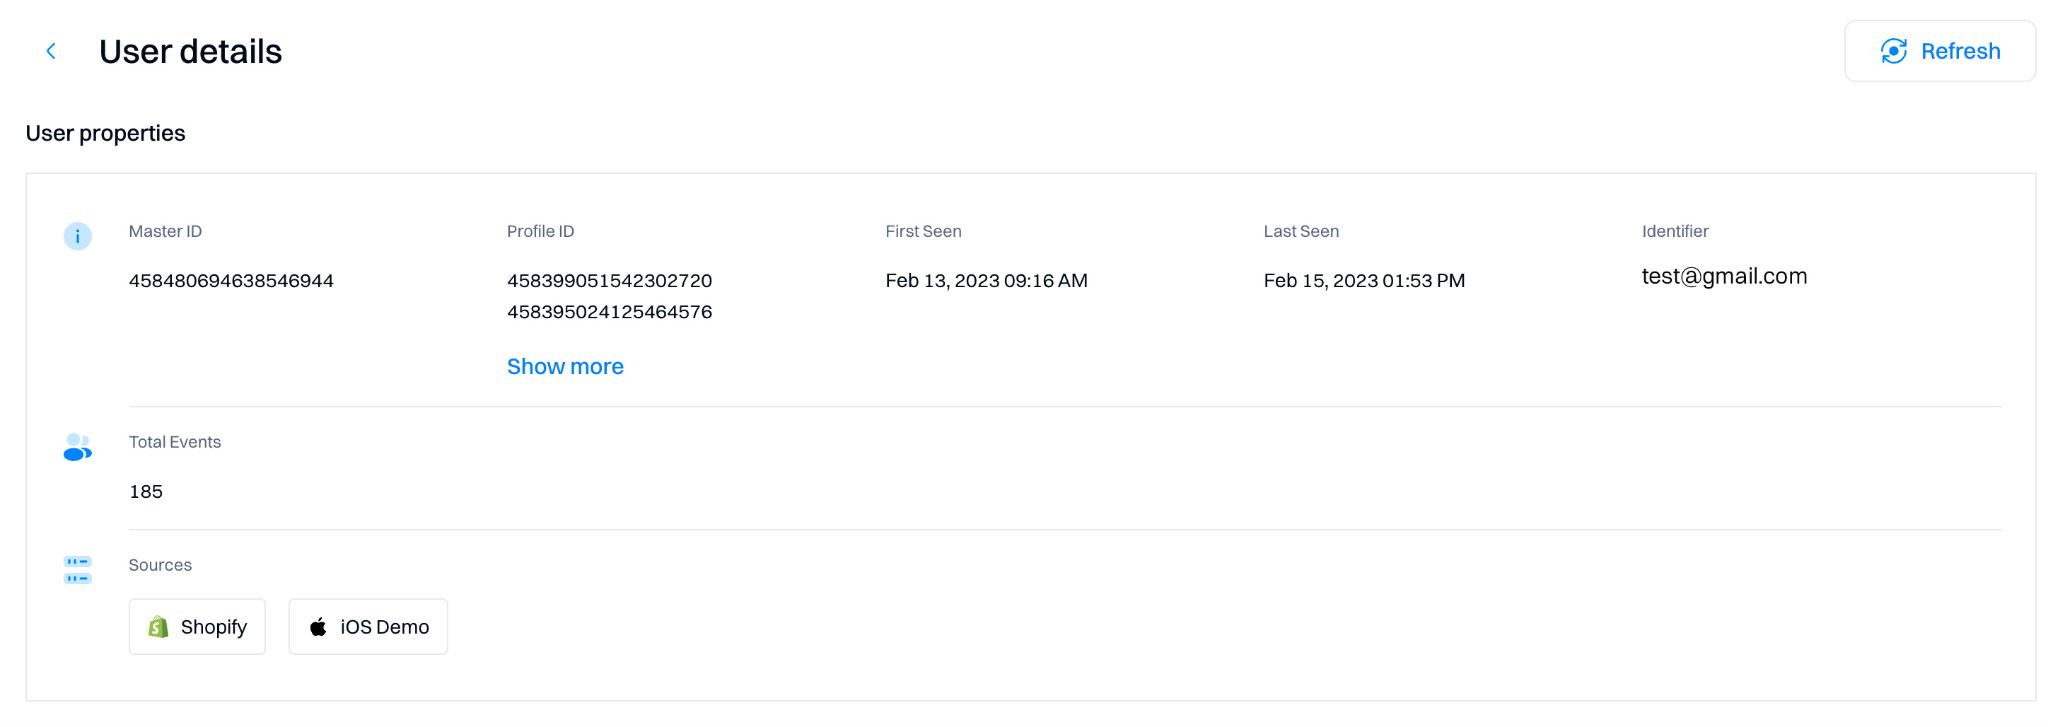
Identifying users helps us understand who those users are and what they are doing. Once identified, Intempt connects events related to formerly anonymous IDs with the unique set IDs.
An example below is when the same identifier was used across two different sources. For this user, Intempt got a unified view of all of the events across the Shopify and iOS demo sources.
Step 5: Create events
Often a single event does not make up an entire behavior that you want to track. For example, a signup can include not only pressing the signup button, but entering the correct information and making it past the basic information input stage. To truly track all the events and behaviors, events can be combined into defined events.
Defined events can be created by using the Intempt Event editor - autocapture events, custom events, and page views can then be combined to track better the behavior you care about. You can find more about using the event editor here.
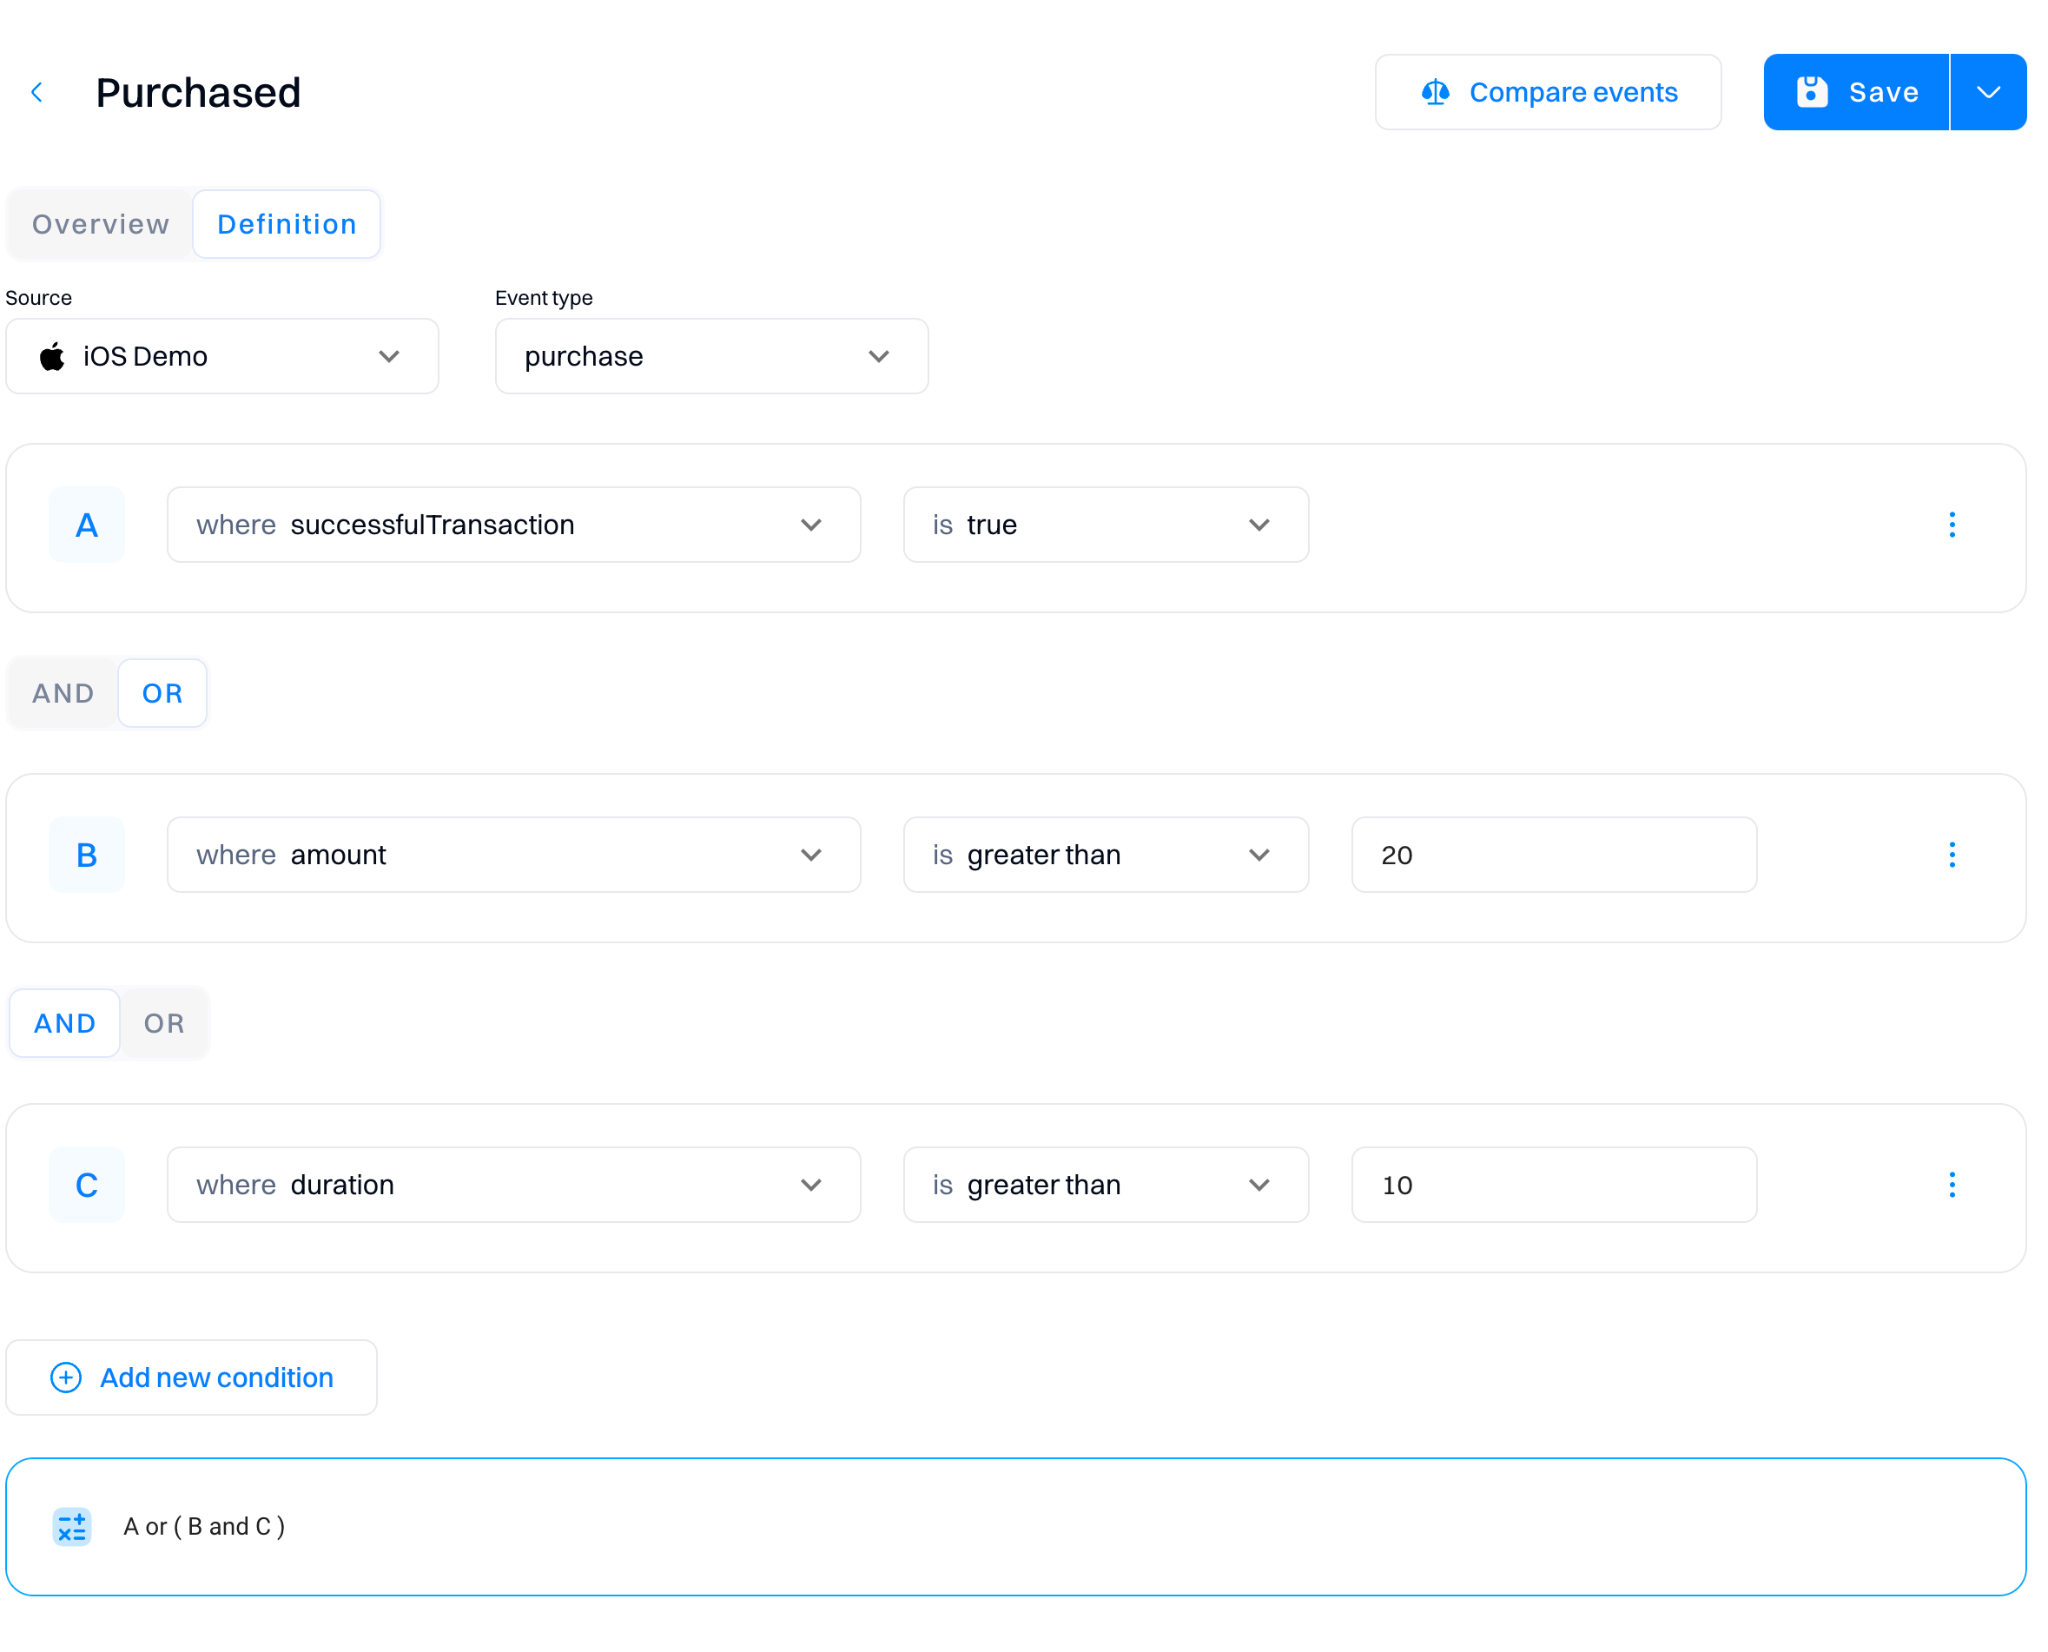
Important
Defined events also work retroactively, meaning they also tag events that happened in the past, not only events that happened after the action was created.
What’s next?
Now that you have set up autocapture, high-quality custom events, and actions, what’s next? If your website or application is active (we hope it is), you’ll be getting a flow of data into your Intempt instance. You can continue to expand the capturing and formatting of that data or you can begin to analyze it.
If you are looking to get started with the analysis of all the event tracking data you now have, you can look into creating a new report or explore our templates library to get inspiration on how to use Intempt.
Updated 7 months ago