
iOS SDK
Overview
iOS SDK enables you to track user interactions within the iOS app and manage its configuration via the console.
The initialized iOS SDK source will automatically collect the following events with data-rich properties:
- Interaction event. Aggregates all action events within the app. For example, the user clicks on a link or button or types text into a form.
- Launch event - gathers data on the launch time (timestamp when the iOS app was opened), app name (e.g. Intempt Demo Shop App), iOS device (OS version, device name), geolocation (city, country) screen size (e.g. 667 x 376 px) also records unique visitorId and eventId values.
- Scene event - gets all the data from the UI structure - how and when (timestamp) your user transitions from one view to another. For example, the user goes from the main app view (Intemp_Demo_Shop.ViewController) to the login view (log_in.ViewController) – the event records this transition.
- Location- get the user's country and city - if the user provides permission.
Following the guide below, you can also track custom events and perform personalization campaigns and experiments (A/B testing).
Requirements
- iOS 12.0+
- Minimum Xcode 10.0
Installation
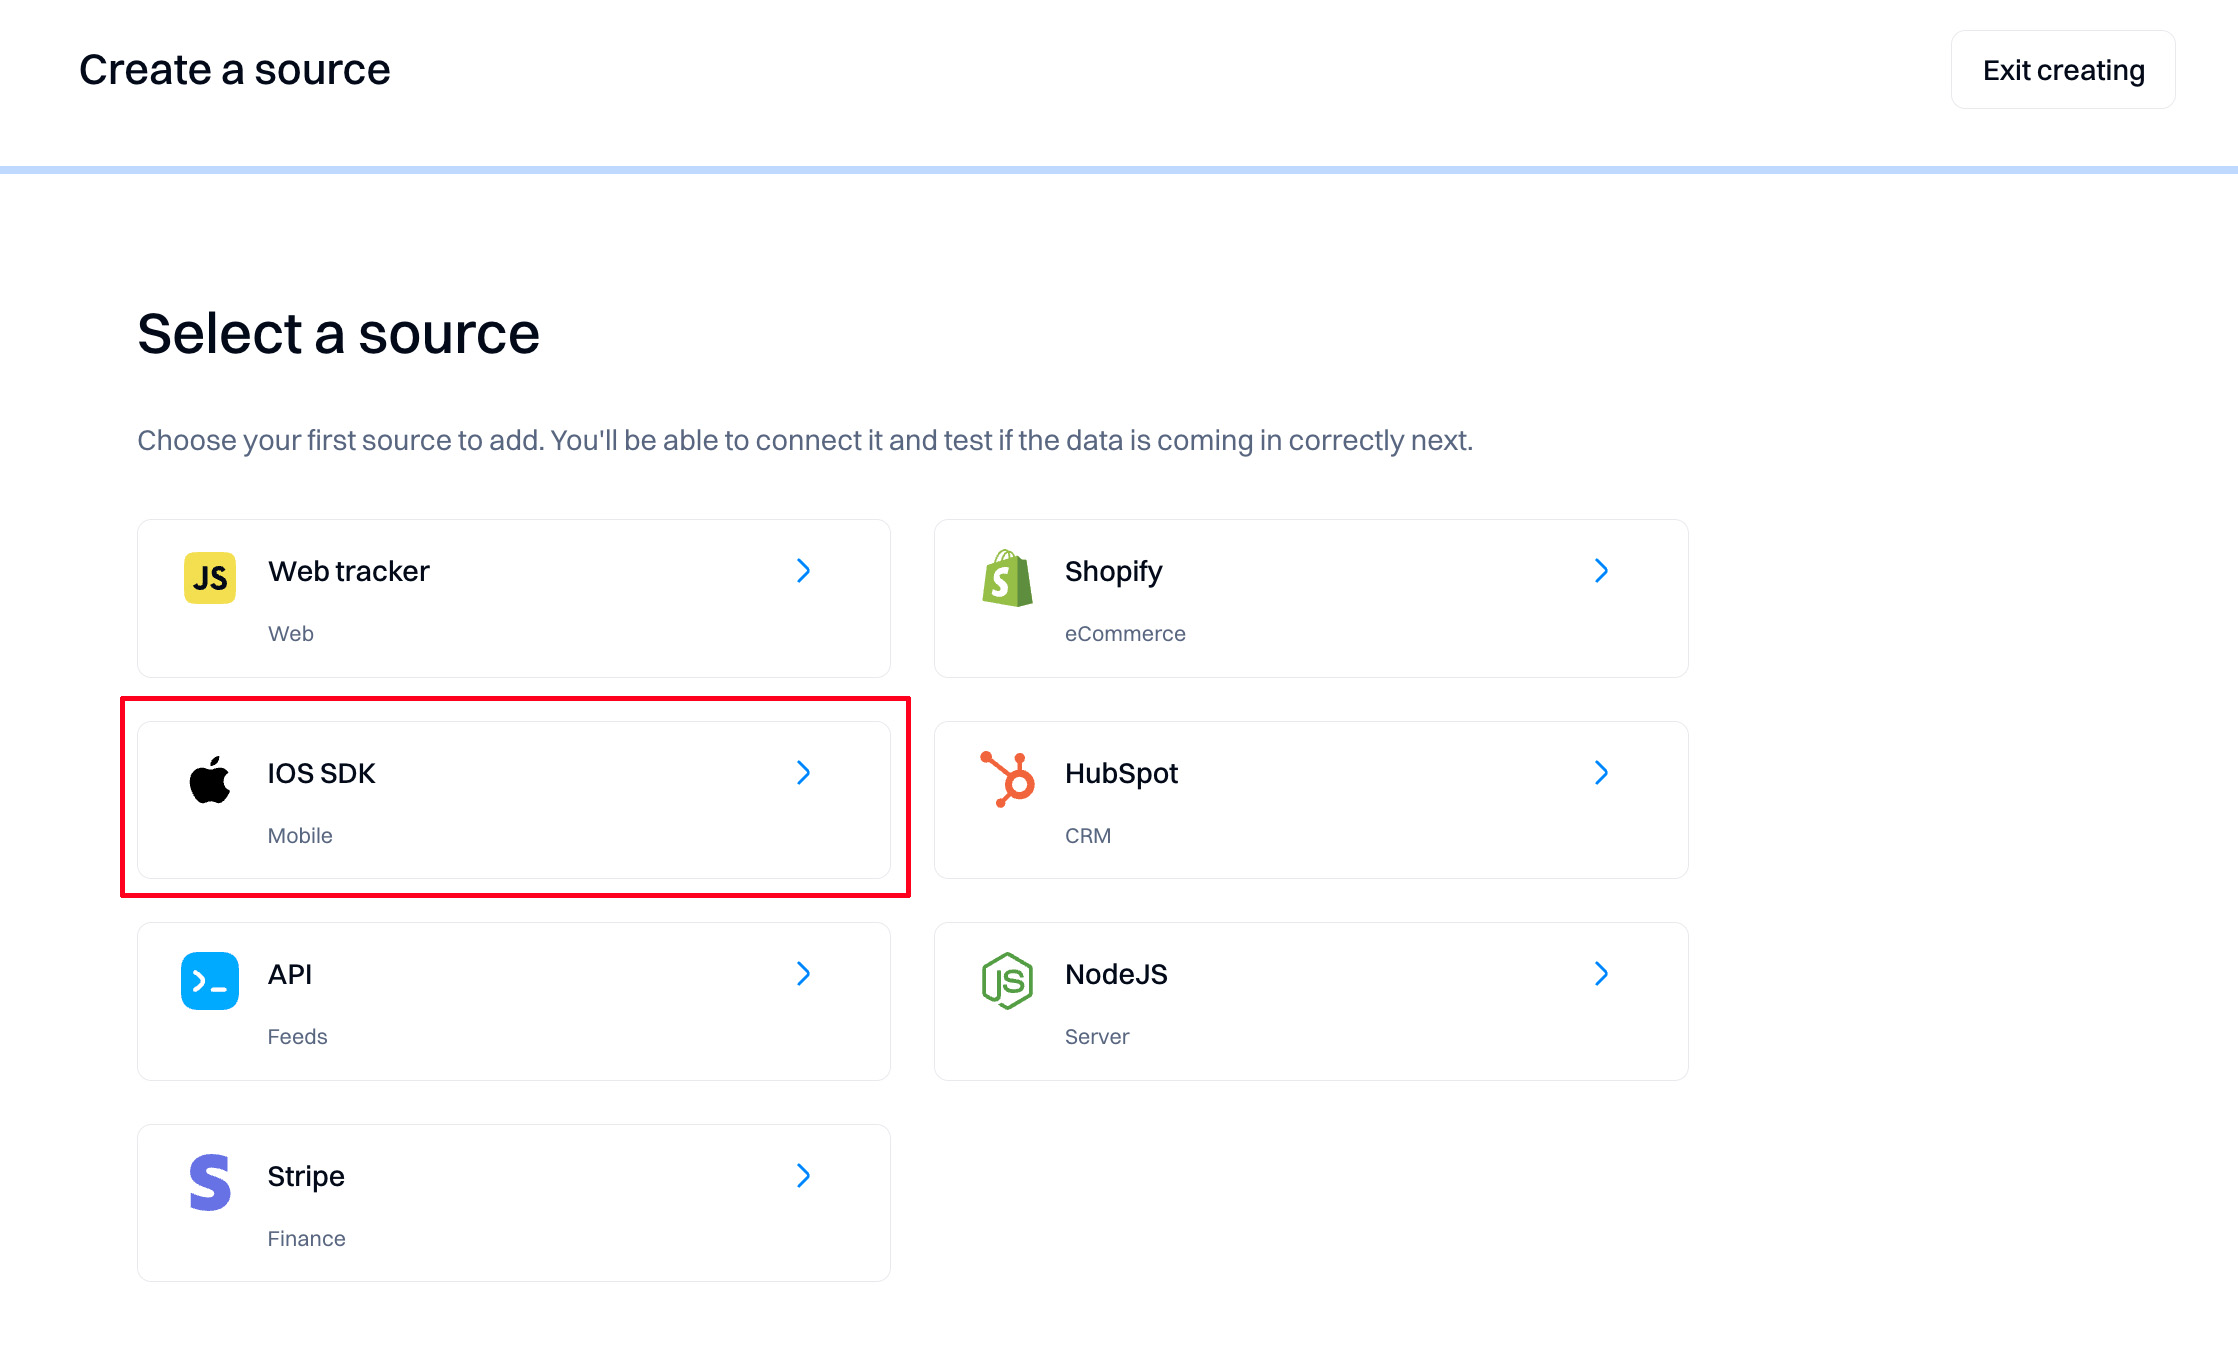
Create a source
Under the "Sources" page, select the "Create source" button and then the "iOS SDK" option.
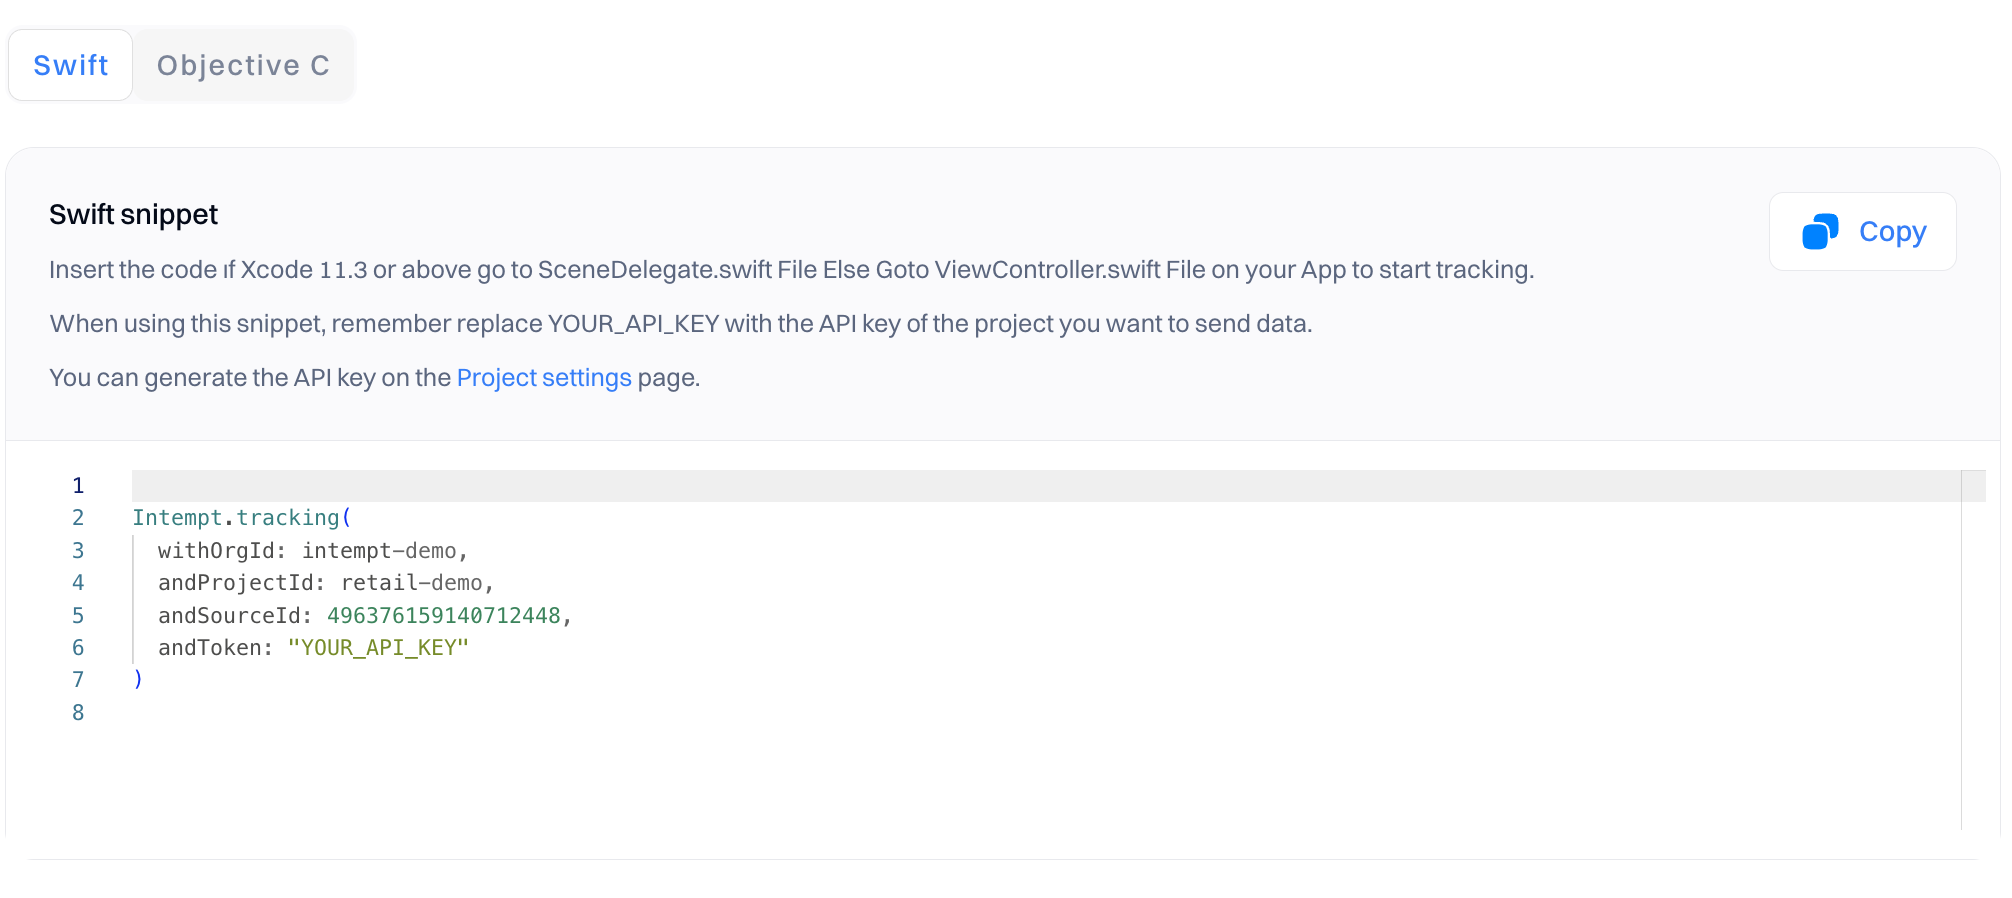
Copy the snippet and use it in the next step - SDK initialization.

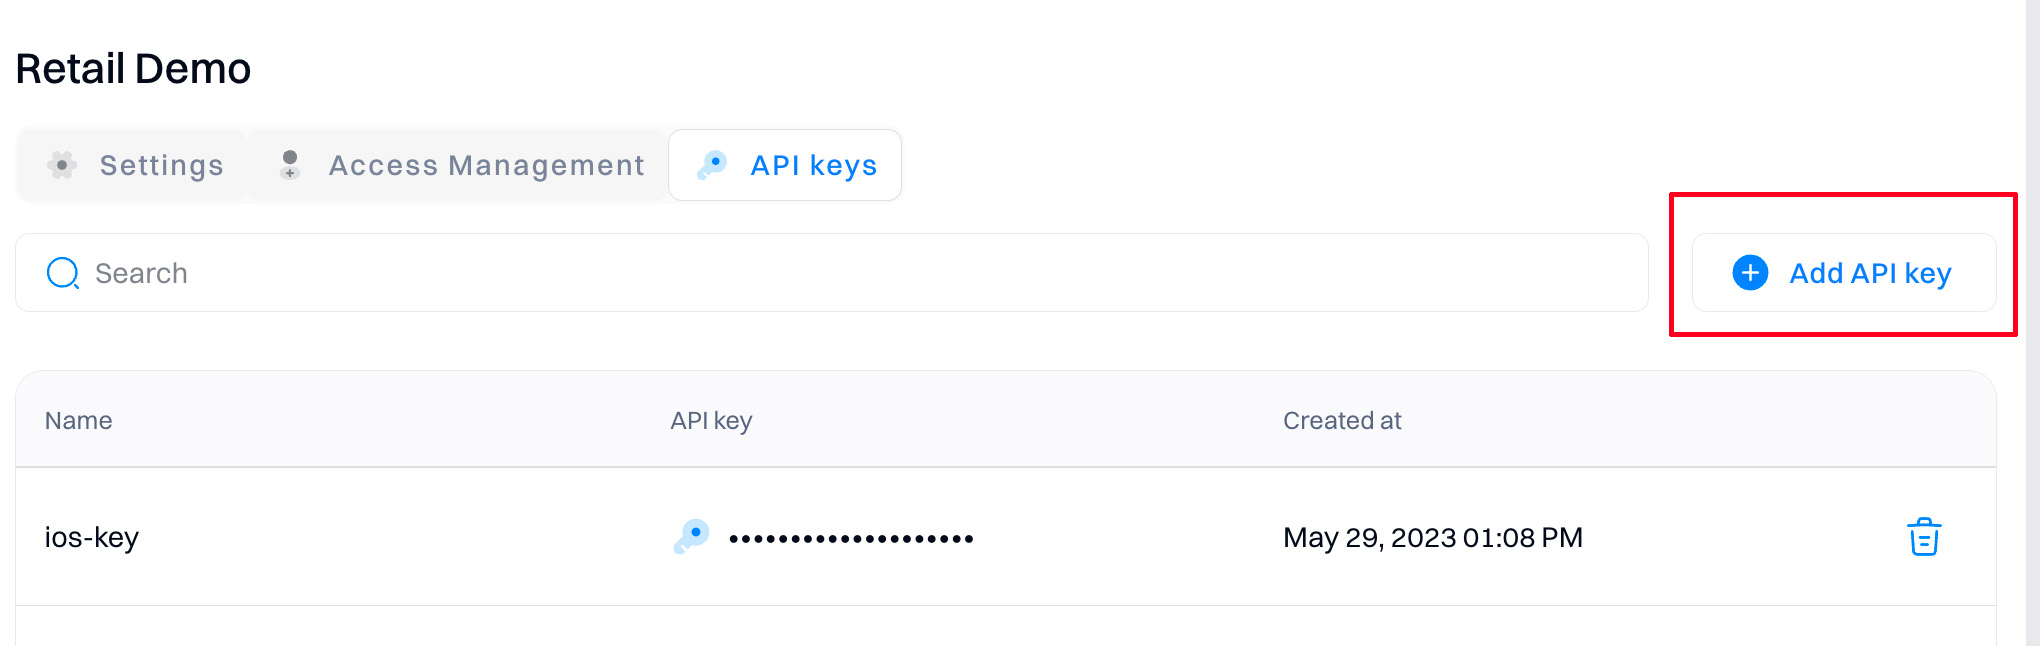
Create the API key
Refer to API keys to create unique API keys that you can use in your project to authenticate SDK access.
Initialize the SDK
Compile the framework
- Download SDK from the SDK repository. Then open the folder frameworks.
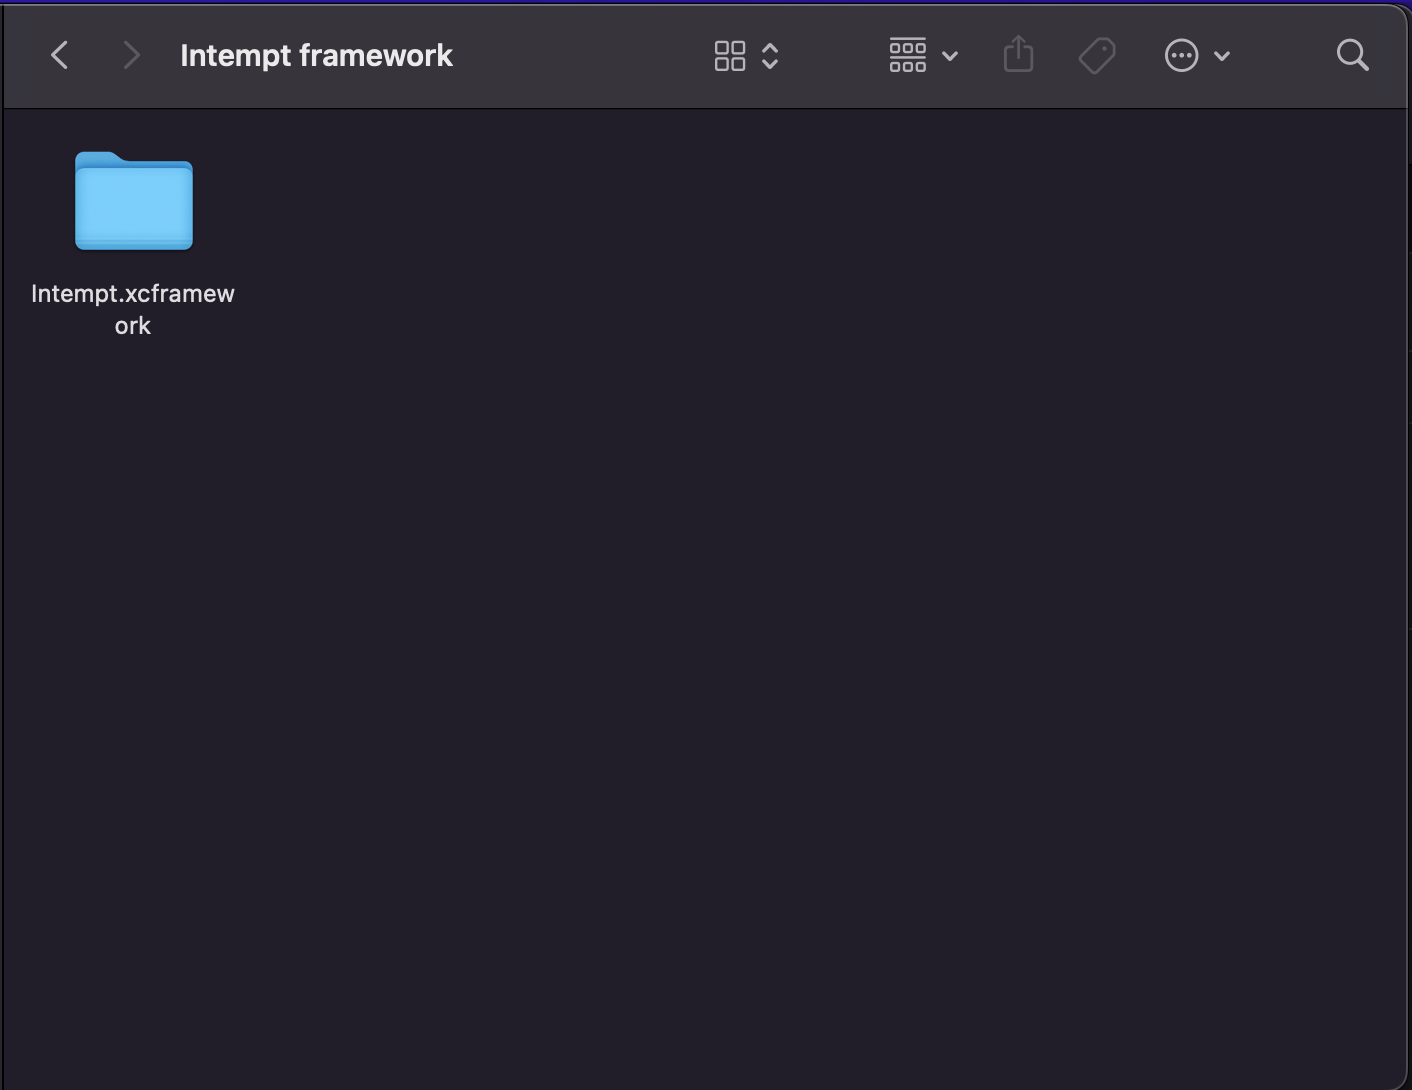
- Copy
Intempt.xcframeworkinto your project directory and then Drag & DropIntempt.xcrameworkin your iOS app.
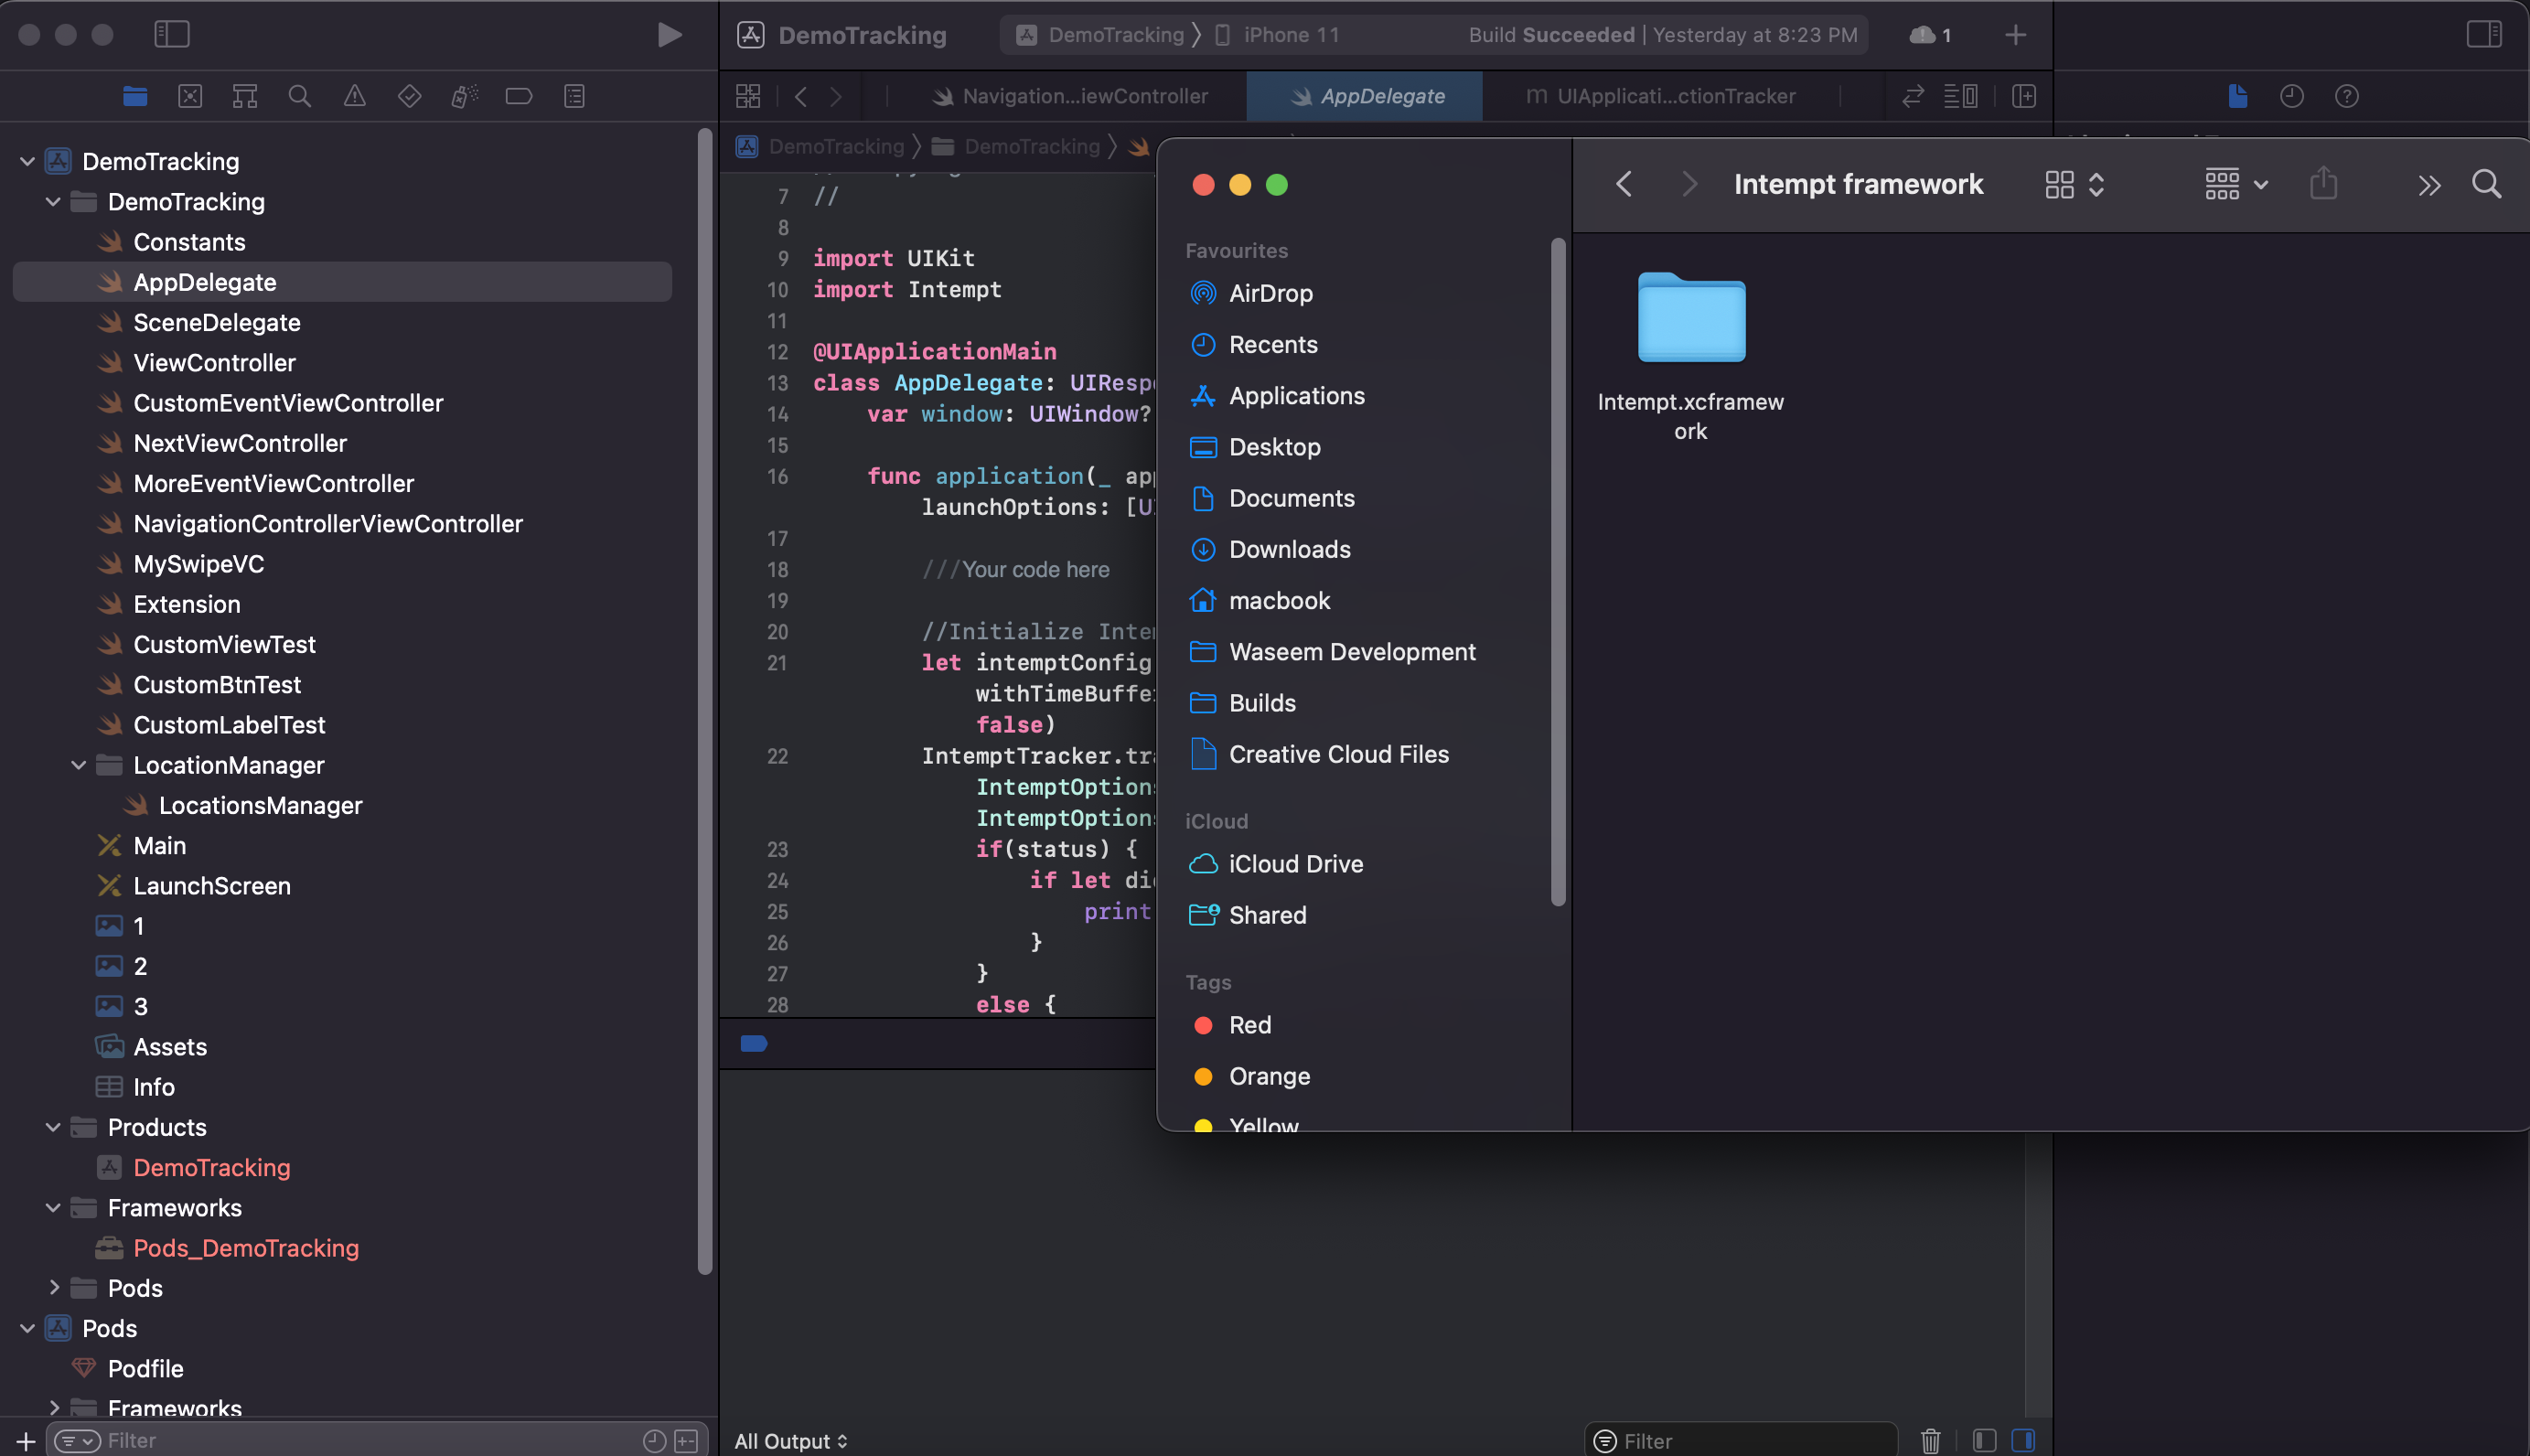
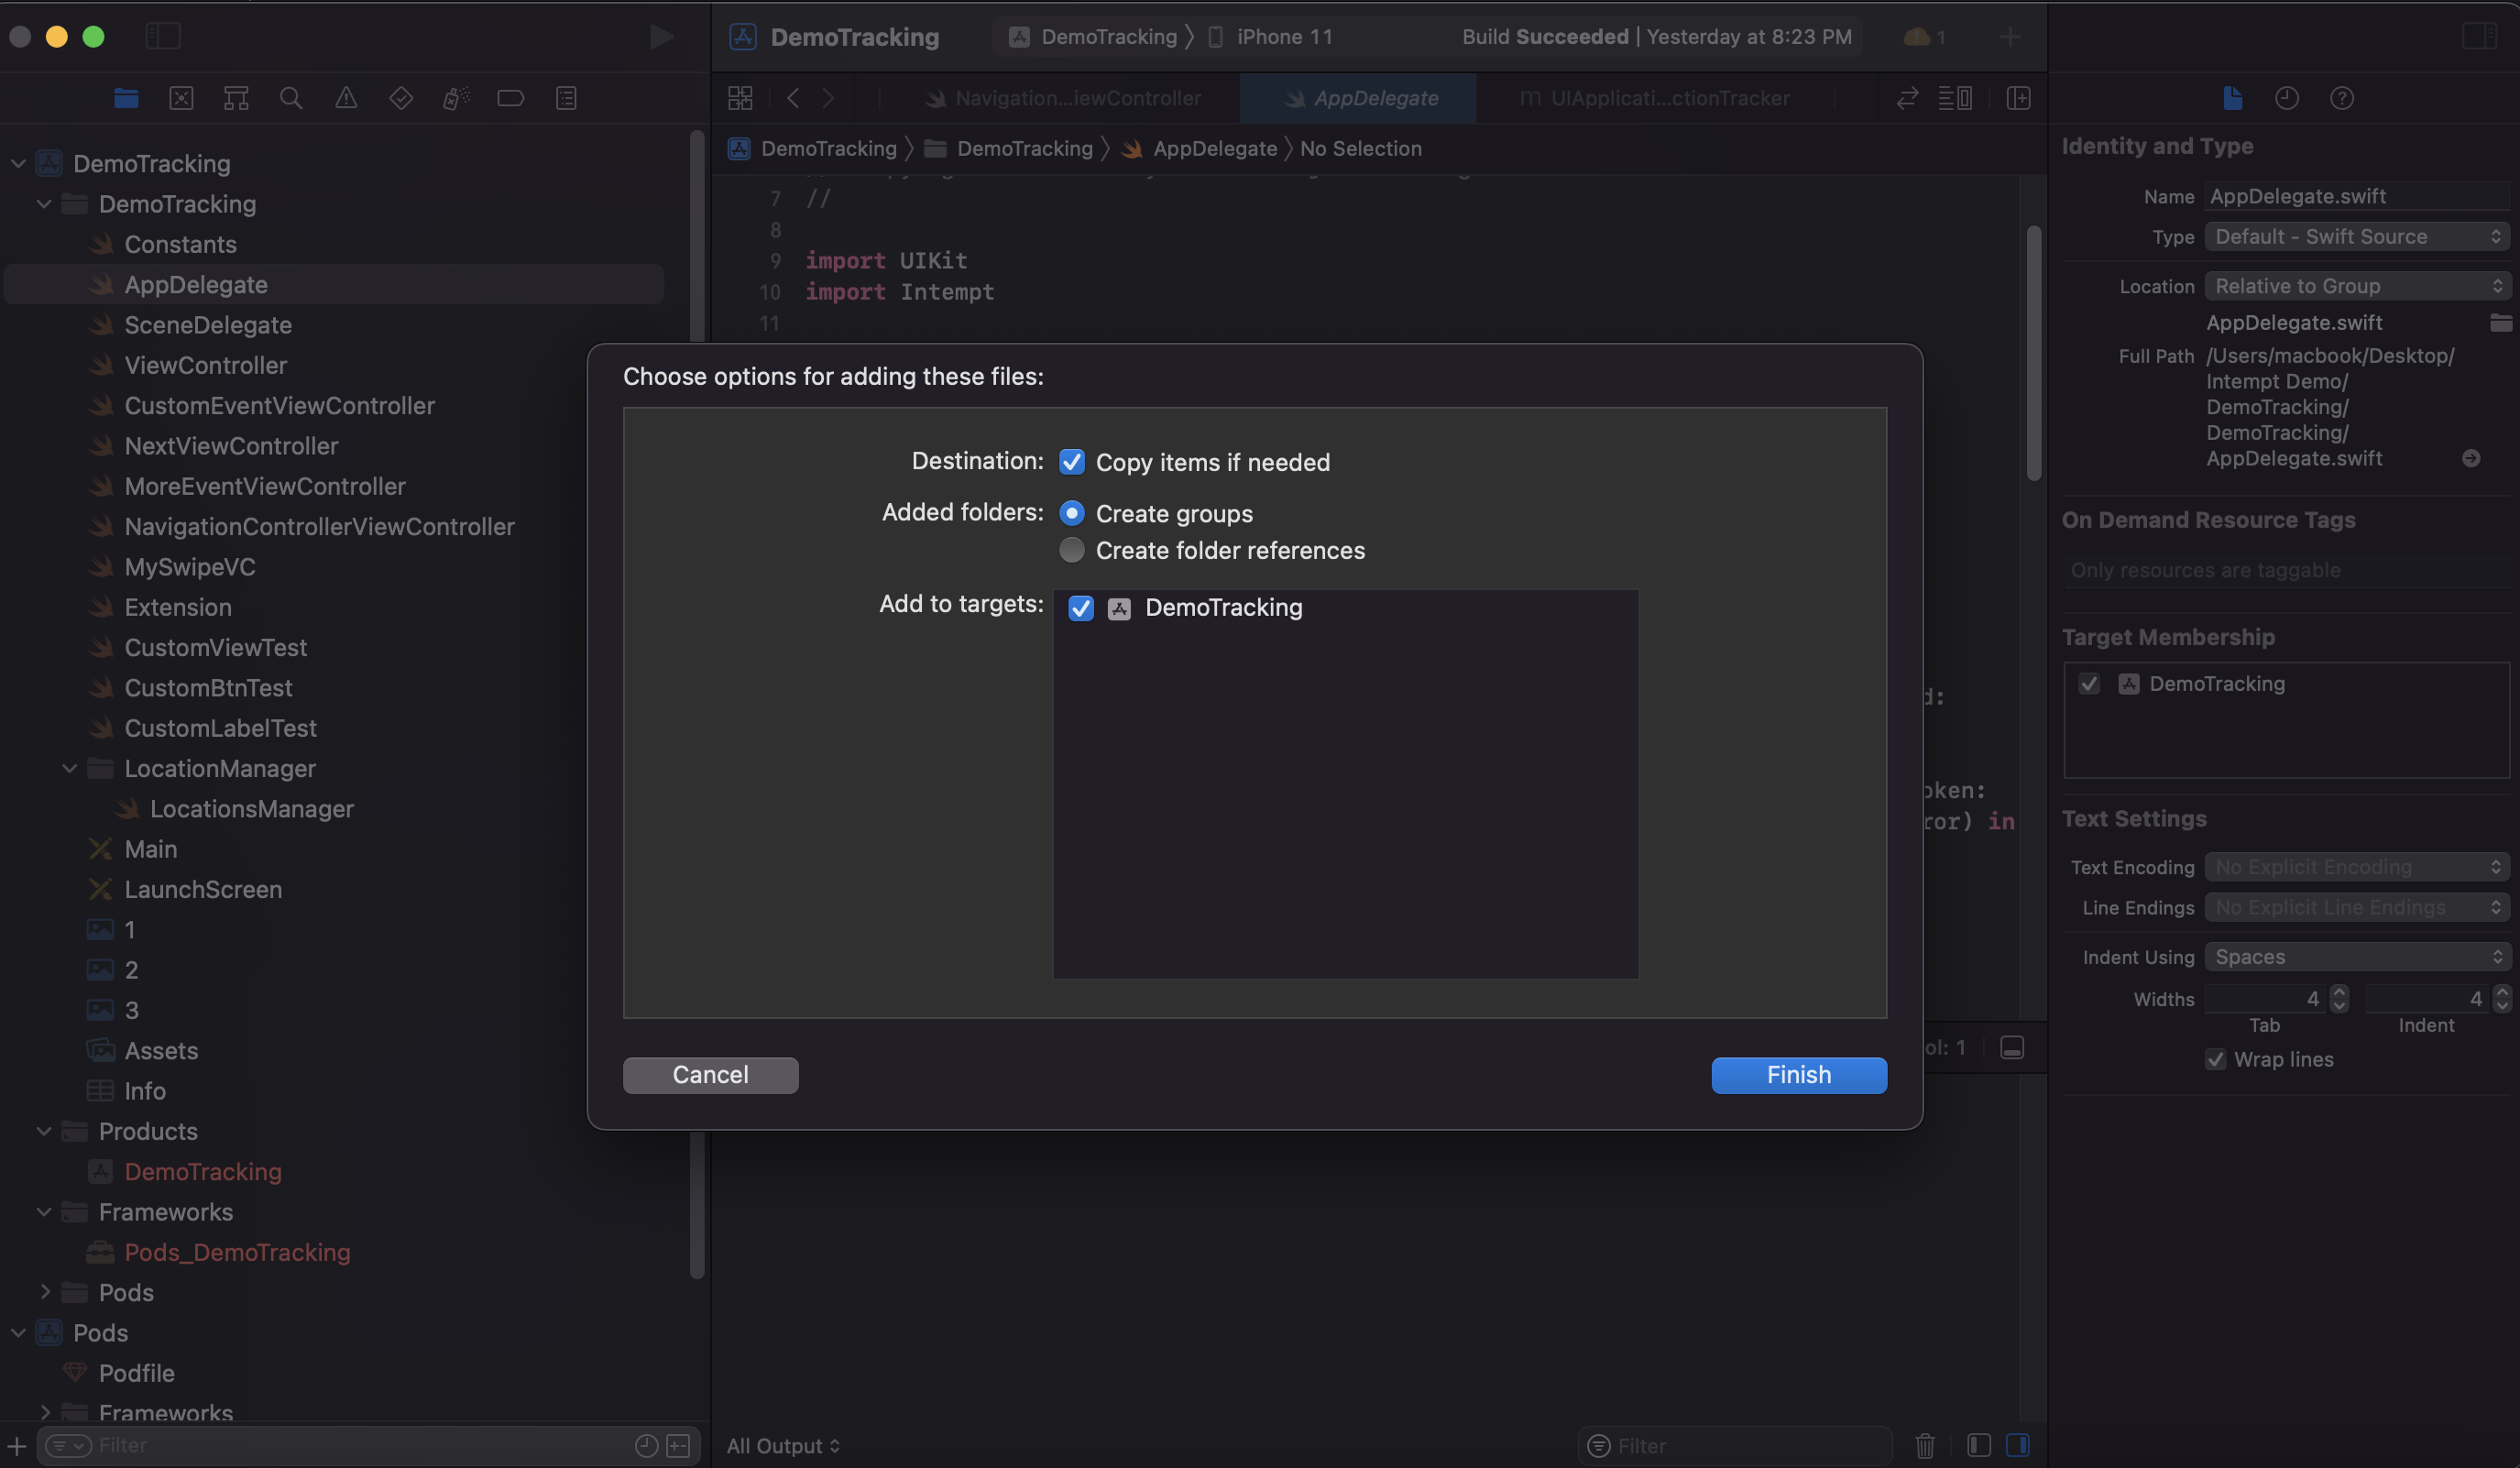
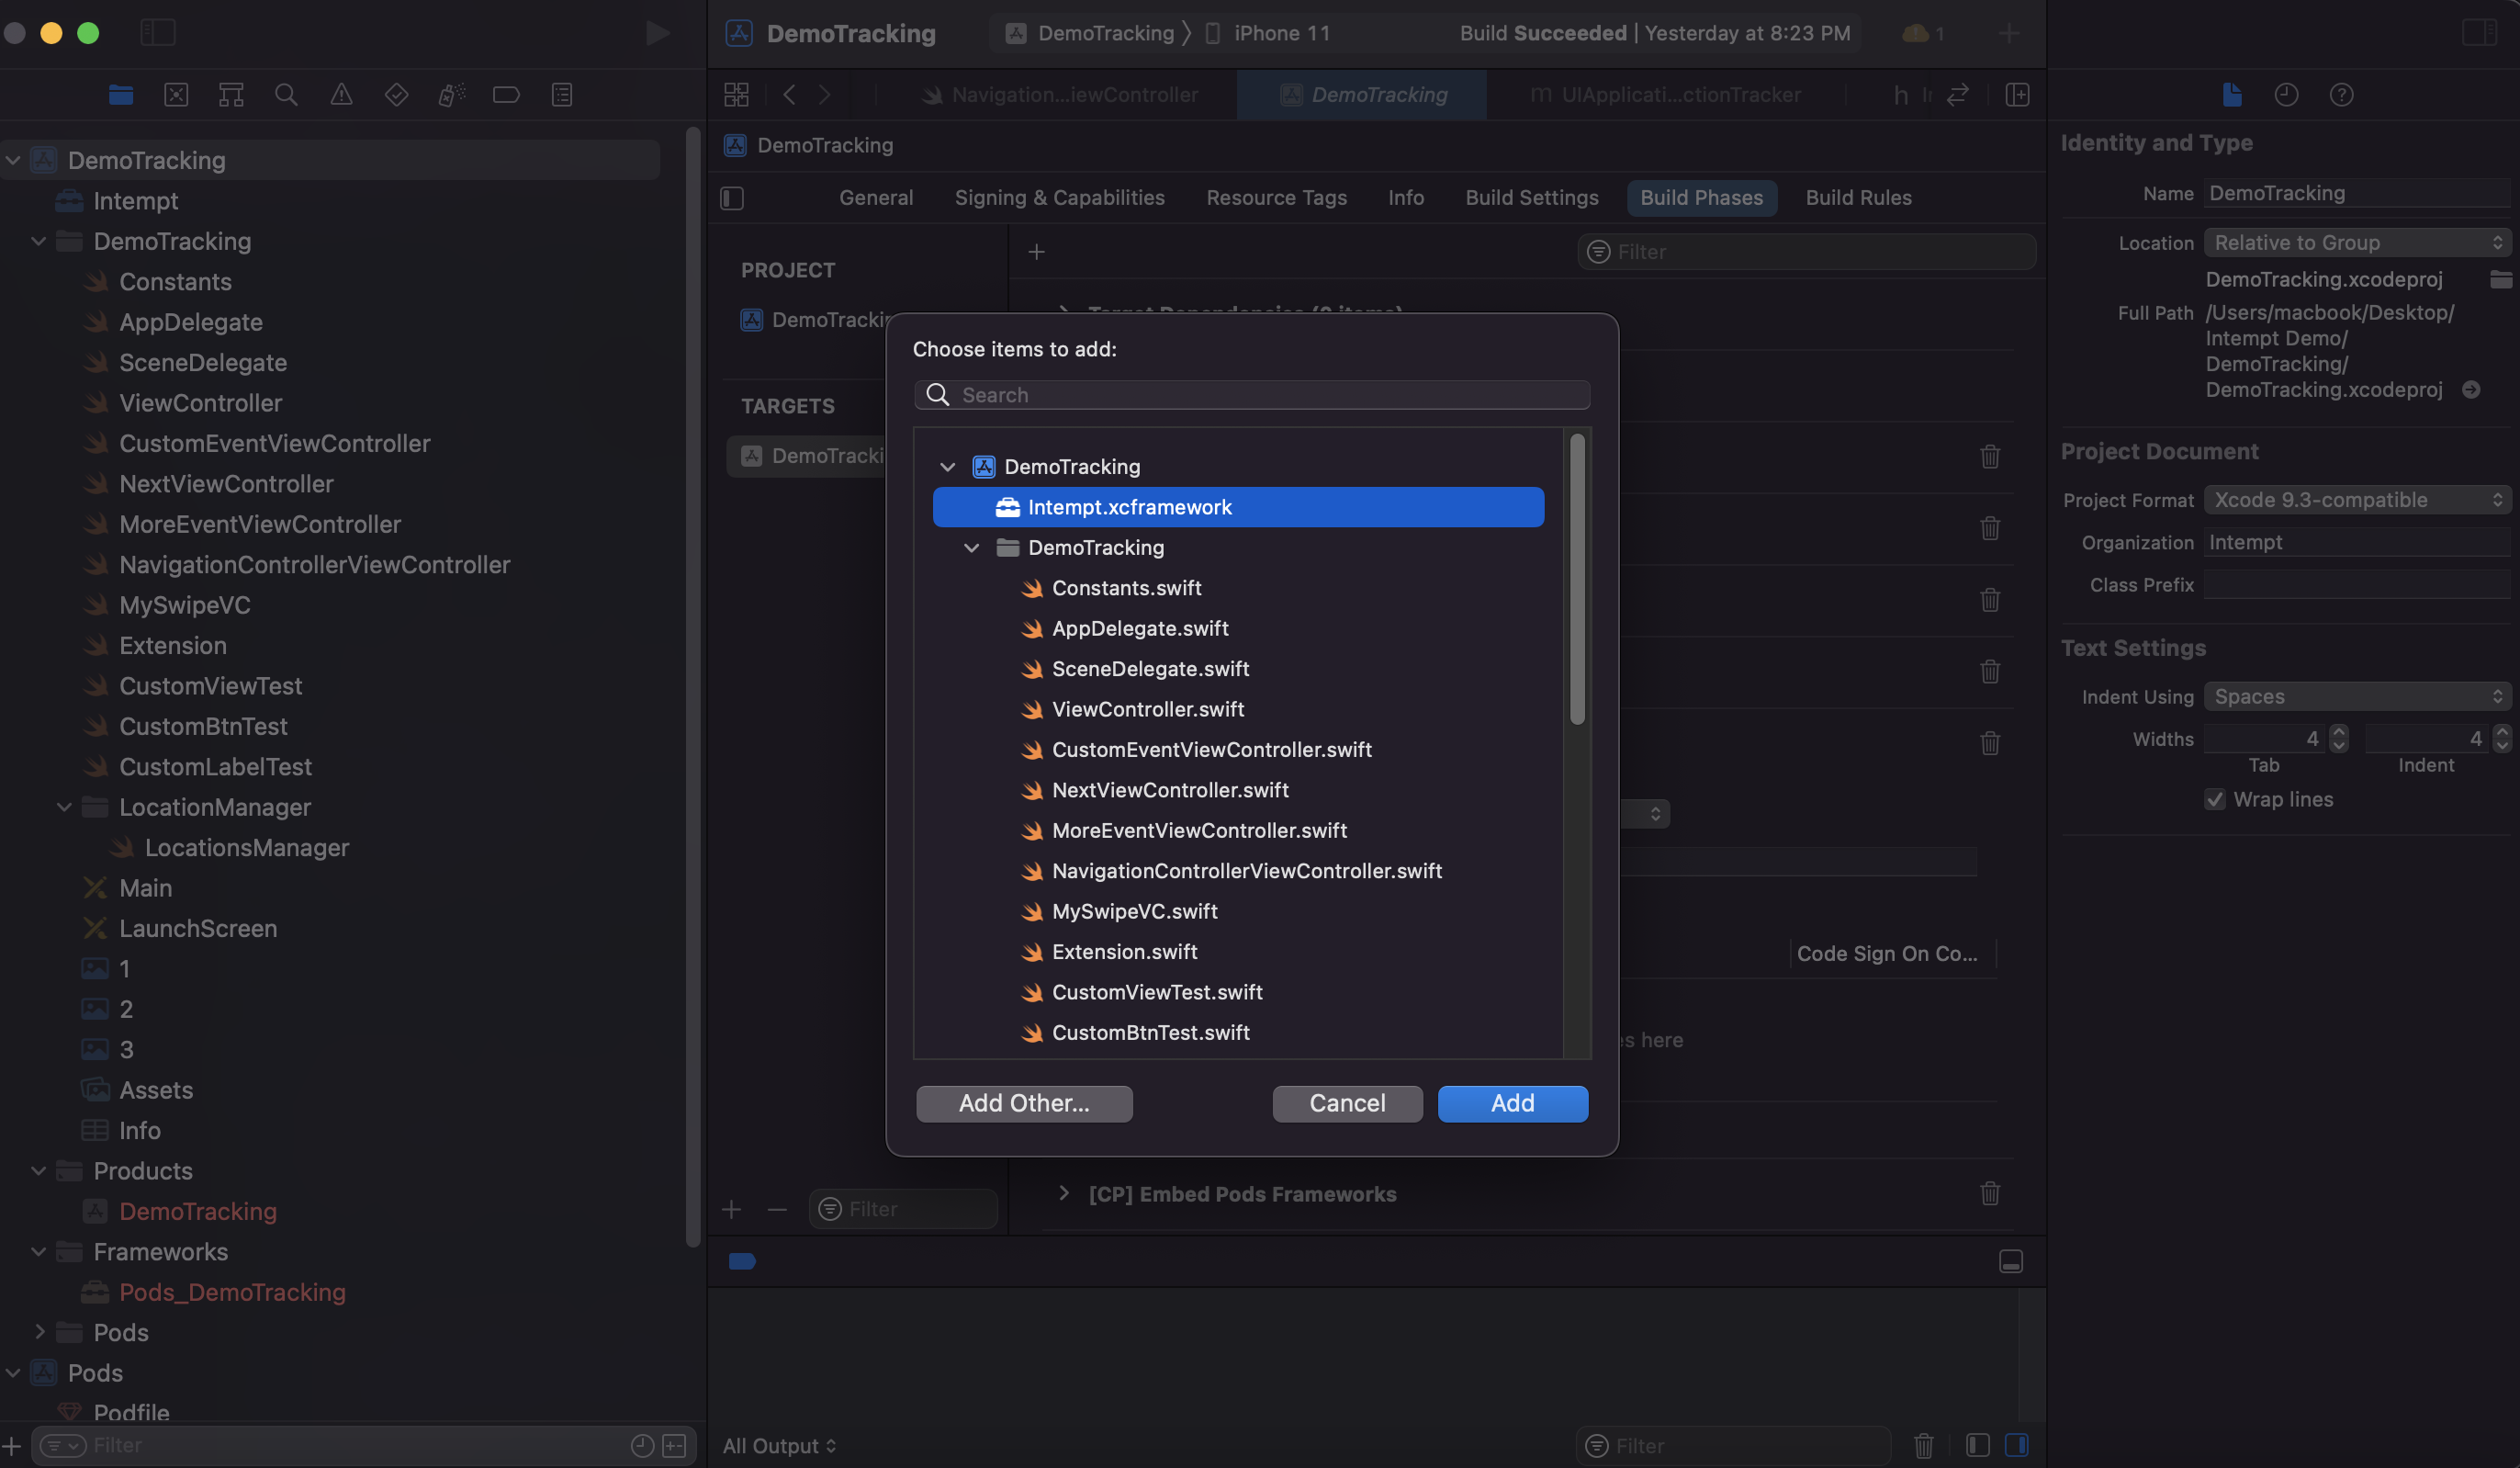
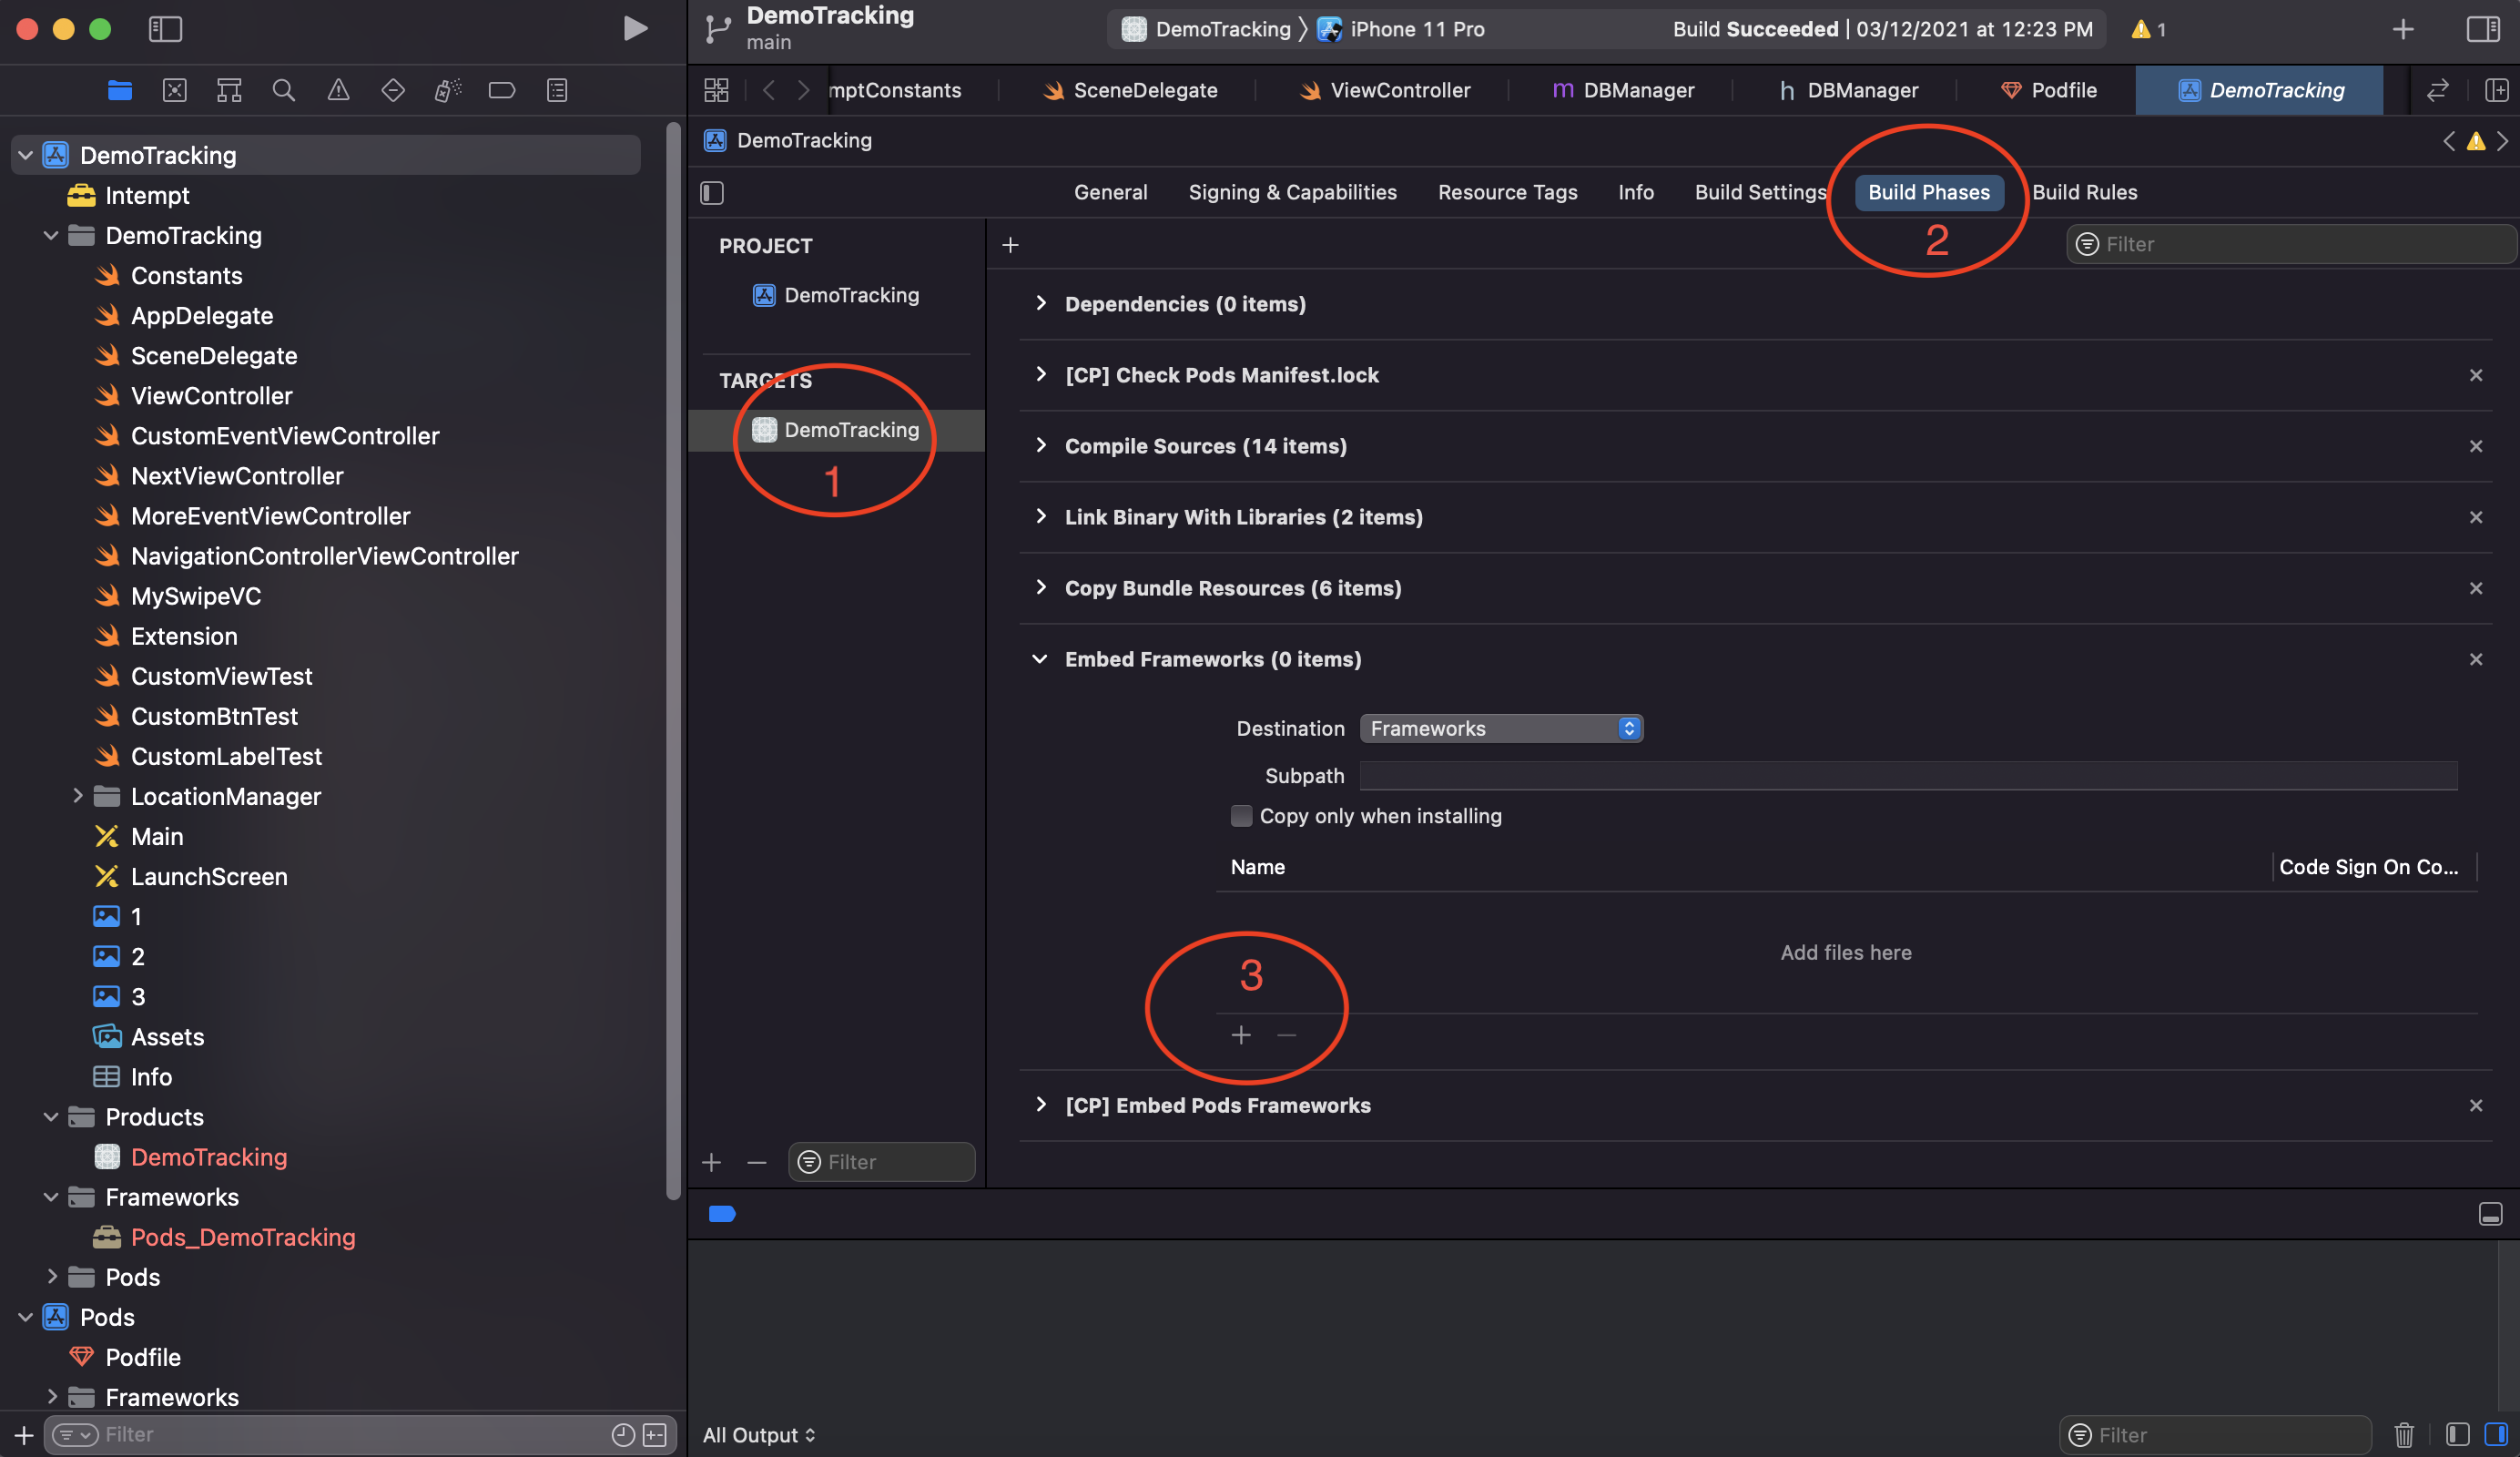
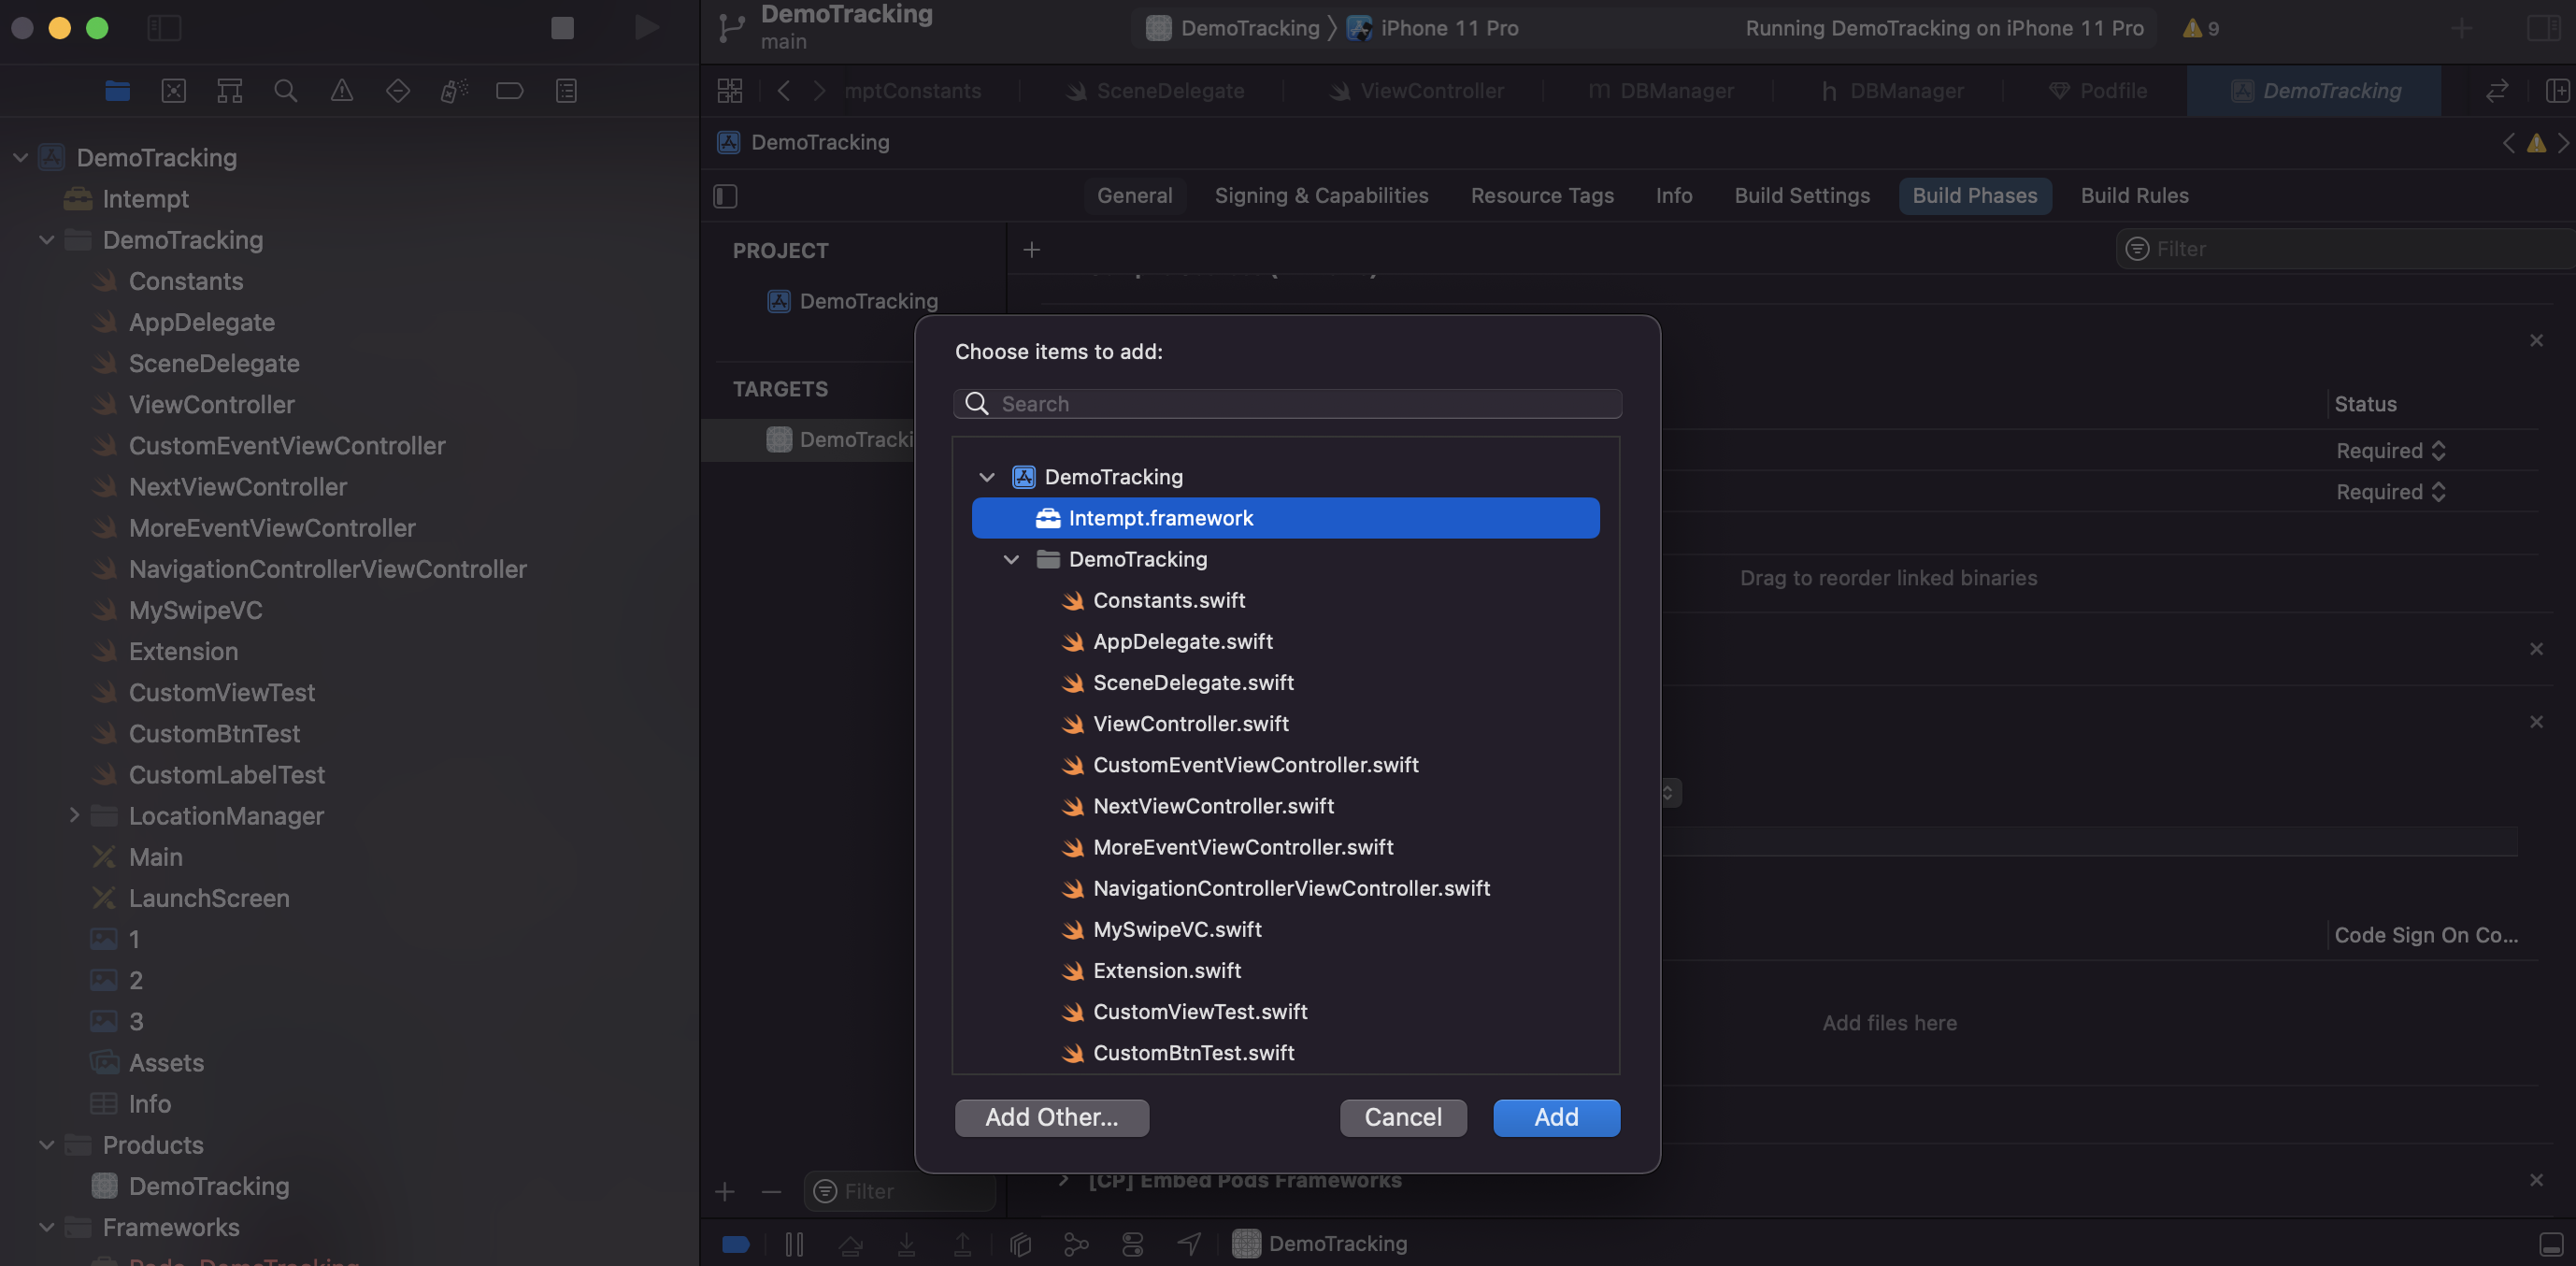
Intempt.xcframeworkmust set toEmbed & Sign, Select your projectTraget -> Build PhaseexpandEmbed Frameworkand press+addIntempt.xcframework
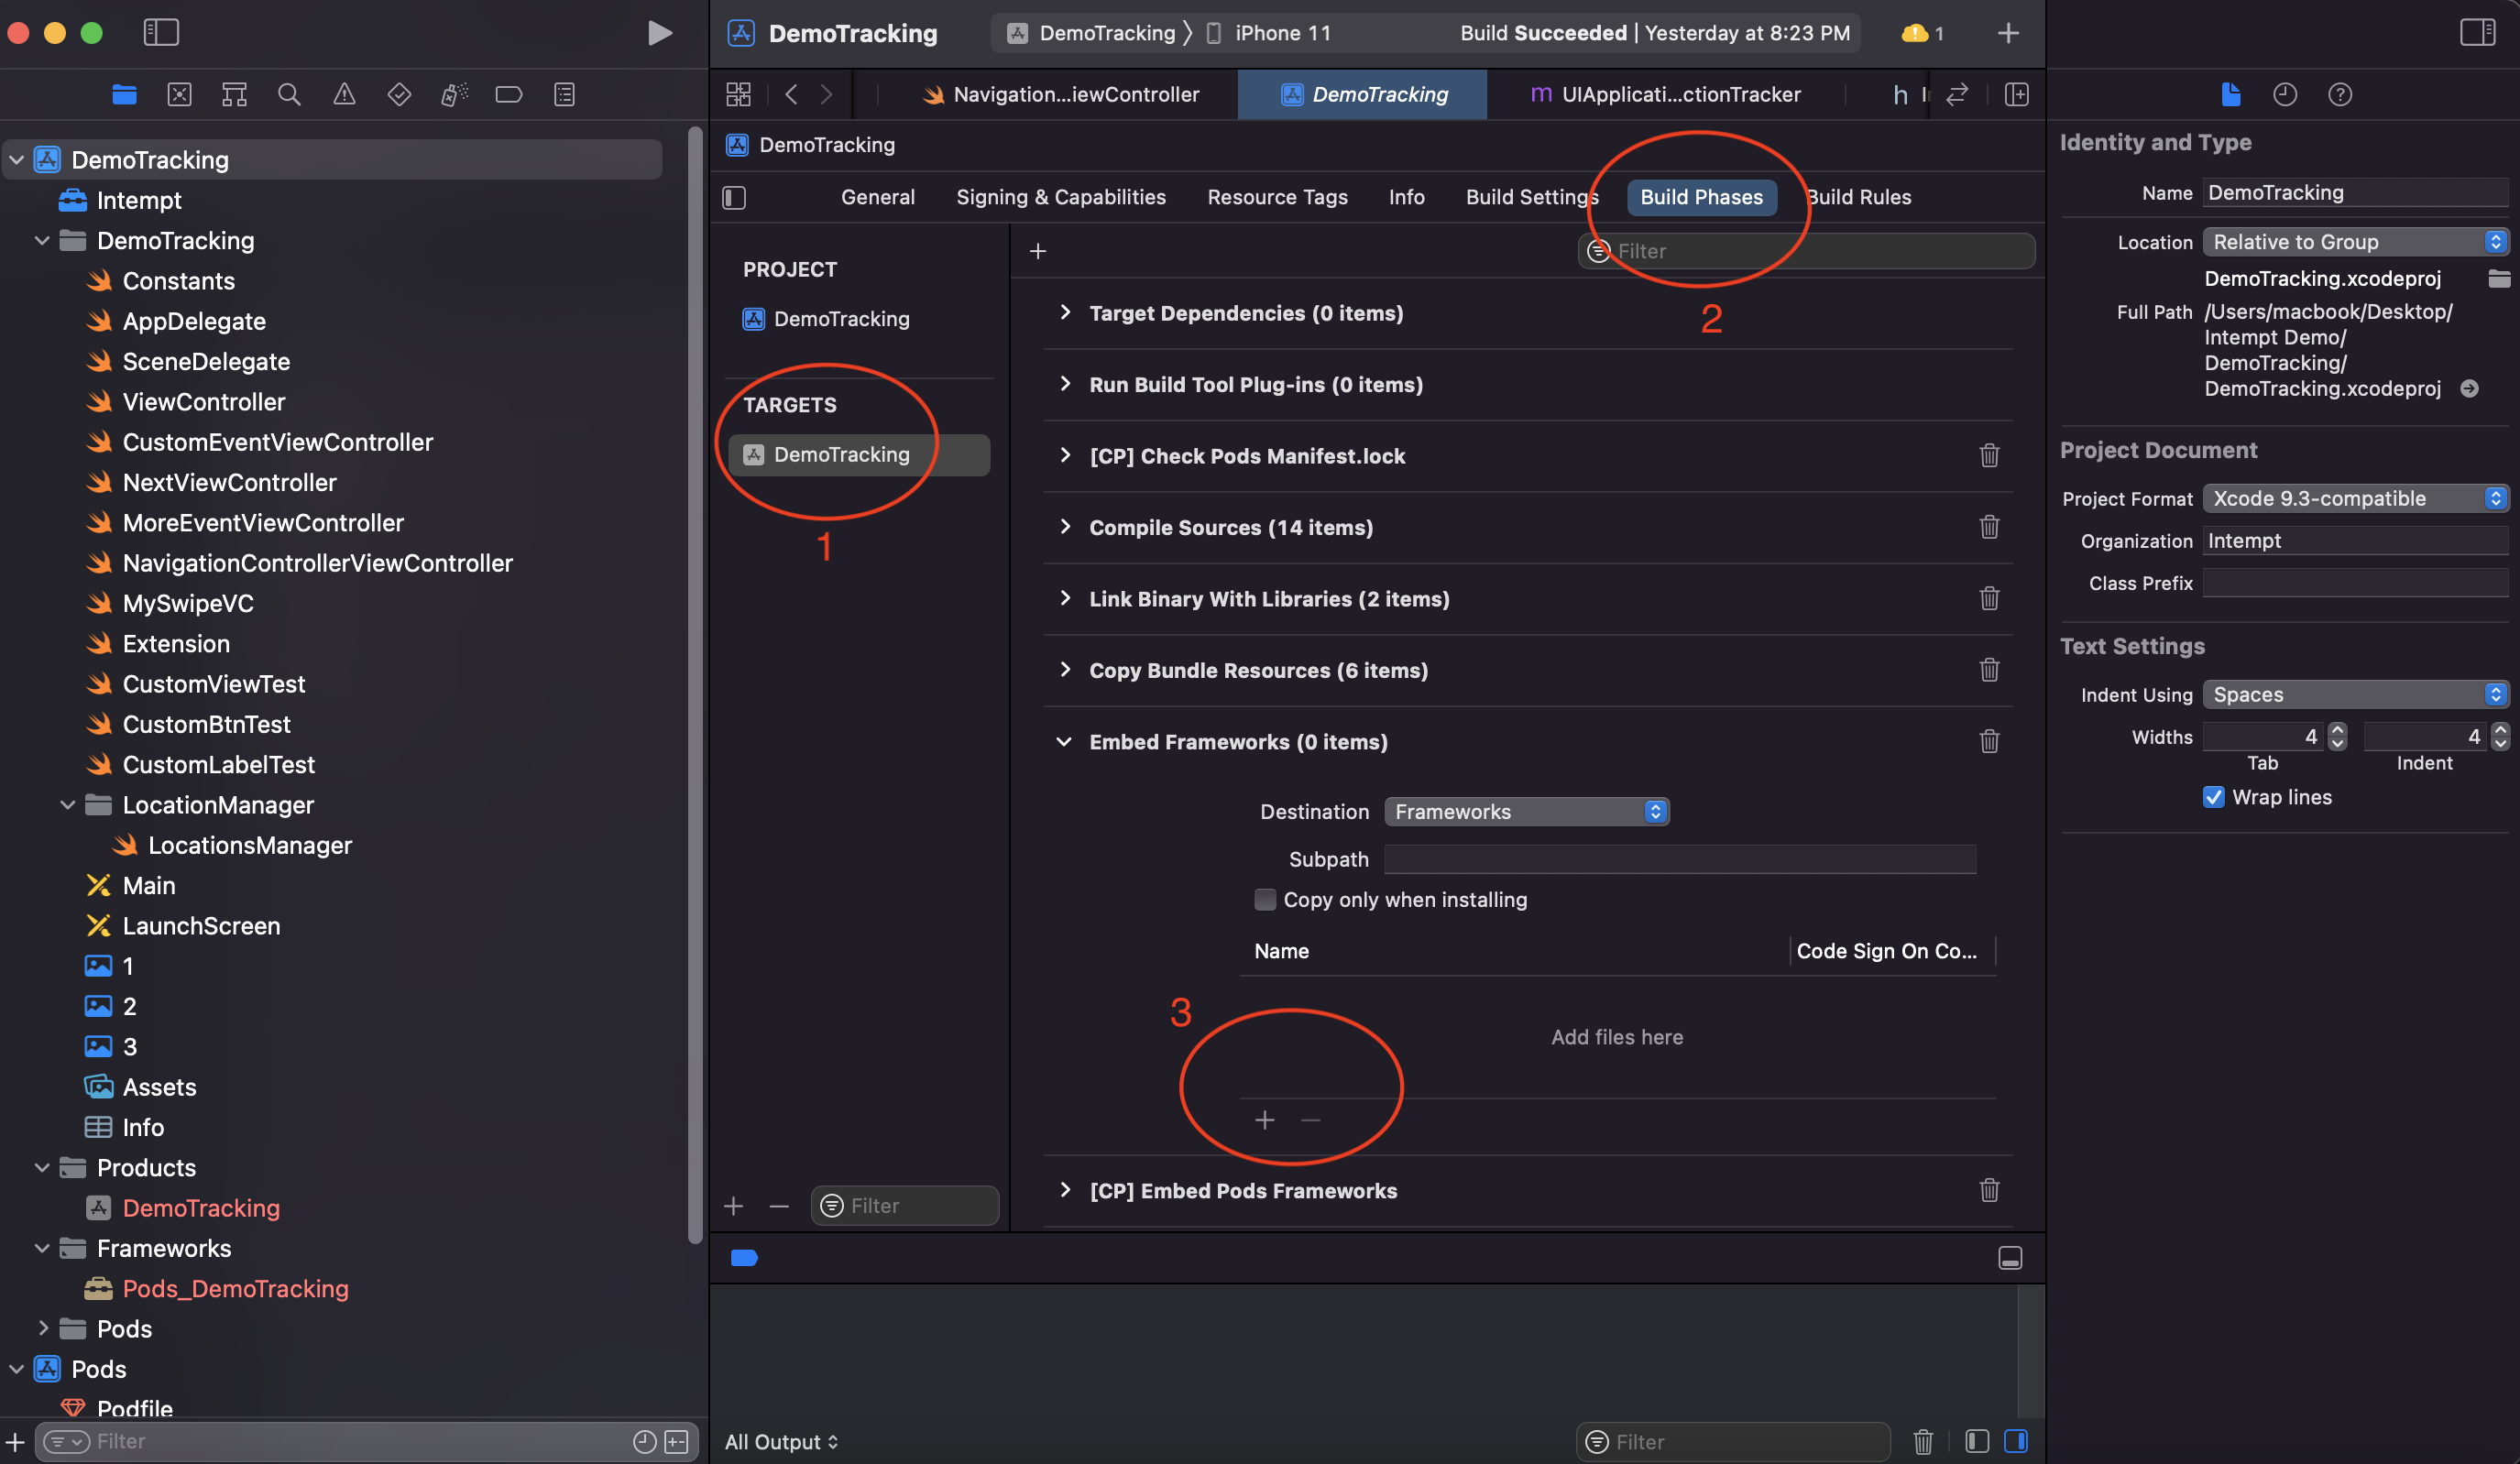
Make sure in Target ->General->Framework, Libraries and Embded Contents Embed & Sign is selected.

Following the above steps, you can compile without any error.
Initialize with Swift :
If Xcode 11.3 or above
Go to AppDelegate.swift file
    import Intempt
    func application(_ application: UIApplication, didFinishLaunchingWithOptions launchOptions: [UIApplication.LaunchOptionsKey: Any]?) -> Bool {

        ///Your code here

        //Initialize Intempt SDK
        let intemptConfig = IntemptConfig(queueEnabled: true, withItemsInQueue: 7, withTimeBuffer: 15, withInitialDelay: 0.3, withInputTextCaptureDisabled: false)
         Intempt.initialize(<orgName>, projectName: <projectName>, sourceId: <sourceId>, apiKey: <apiKey>, intemptConfig: intemptConfig) { (status, result, error) in
            if(status) {
                if let dictResult = result as? [String: Any] {
                    print(dictResult)
                }
            }else {
                if let error = error {
                    print(error.localizedDescription)
                }
            }
        }

        return true
    }
Access the ViewController.swift file and then paste the copied source snippet into the viewDidLoad function:
import Intempt
  override func viewDidLoad() {
        super.viewDidLoad()

     //Initialize Intempt SDK
        let intemptConfig = IntemptConfig(queueEnabled: true, withItemsInQueue: 7, withTimeBuffer: 15, withInitialDelay: 0.3, withInputTextCaptureDisabled: false)
        Intempt.initialize(<orgName>, projectName: <projectName>, sourceId: <sourceId>, apiKey: <apiKey>, intemptConfig: intemptConfig) { (status, result, error) in
            if(status) {
                if let dictResult = result as? [String: Any] {
                    print(dictResult)
                }
            }else {
                if let error = error {
                    print(error.localizedDescription)
                }
            }
        }
}
Initialize with Objective C :
If you are using Xcode 11.3 or above, go to AppDelegate.m file and paste the copied source snippet like the following:
@import Intempt;
- (BOOL)application:(UIApplication *)application didFinishLaunchingWithOptions:(NSDictionary *)launchOptions {
    // Your code here

    //initalize intempt SDK
    IntemptConfig *intemptConfig  = [[IntemptConfig alloc]initWithQueueEnabled:YES withItemsInQueue:7 withTimeBuffer:15 withInitialDelay:0.3 withInputTextCaptureDisabled:NO];
   [Intempt initialize:<orgName> projectName:<projectName> sourceId:<sourceId> apiKey:<apiKey> intemptConfig:intemptConfig onCompletion:^(BOOL status, id result, NSError *error) {

    }]

    return YES;
}
Else you will have the ViewController.m file and then paste the copied source snippet like the following:
@import Intempt
- (void)viewDidLoad {
    [super viewDidLoad];

     //initalize intempt SDK
    IntemptConfig *intemptConfig  = [[IntemptConfig alloc]initWithQueueEnabled:YES withItemsInQueue:7 withTimeBuffer:15 withInitialDelay:0.3 withInputTextCaptureDisabled:NO];
    [Intempt initialize:<orgName> projectName:<projectName> sourceId:<sourceId> apiKey:<apiKey> intemptConfig:intemptConfig onCompletion:^(BOOL status, id result, NSError *error) {

    }]
}
Authorize SDK
Copy the information from the source page: Source ID, Project ID, Organization ID, and API Key (saved in the previous step), and copy it to your Xcode app for the iOS SDK authorization.
Don't miss out!
Remember to replace "YOUR_API_KEY" with the API key you generated via API keys section.
SDK methods
IntemptConfig
This includes the configuration parameters.
| Parameter | Type | Purpose |
|---|---|---|
queueEnabled | BOOL | This queue sends batched events at a time. Default is YES. |
itemsInQueue | Int | No of items in the queue. FYI, This feature will only work if queueEnabled is set to YES. Default is 5 |
timeBuffer | TimeInterval | Send events periodically. Measured in seconds. Default is 5. |
isInputTextCaptureDisabled | BOOL | If you want to disable capturing input texts of UITextField, UITextView. Secure entries are excluded for privacy. Set NO to disable. Default is YES |
initialDelay | TimeInterval | Initial delay between consecutive calls. Measured in seconds. Default is 0.2. |
Events tracking
iOS SDK supports both auto-tracked and custom events. Auto-tracked events are automatically tracked when SDK is initialized; for custom events, you must write a custom event tracking code for your app.
Auto-tracked events
These are the auto-tracked events supported by the SDK:
- Application launch tracking
- Screen tracking
- Interaction tracking
- Consent
- Location (depends on the application, if a user of the app has allowed location permission, then country and city-level location is tracked)
Custom events tracking
Depending on the project requirements, you can create custom events to track user action within the app.
Custom events can be tracked via the following methods.
Track
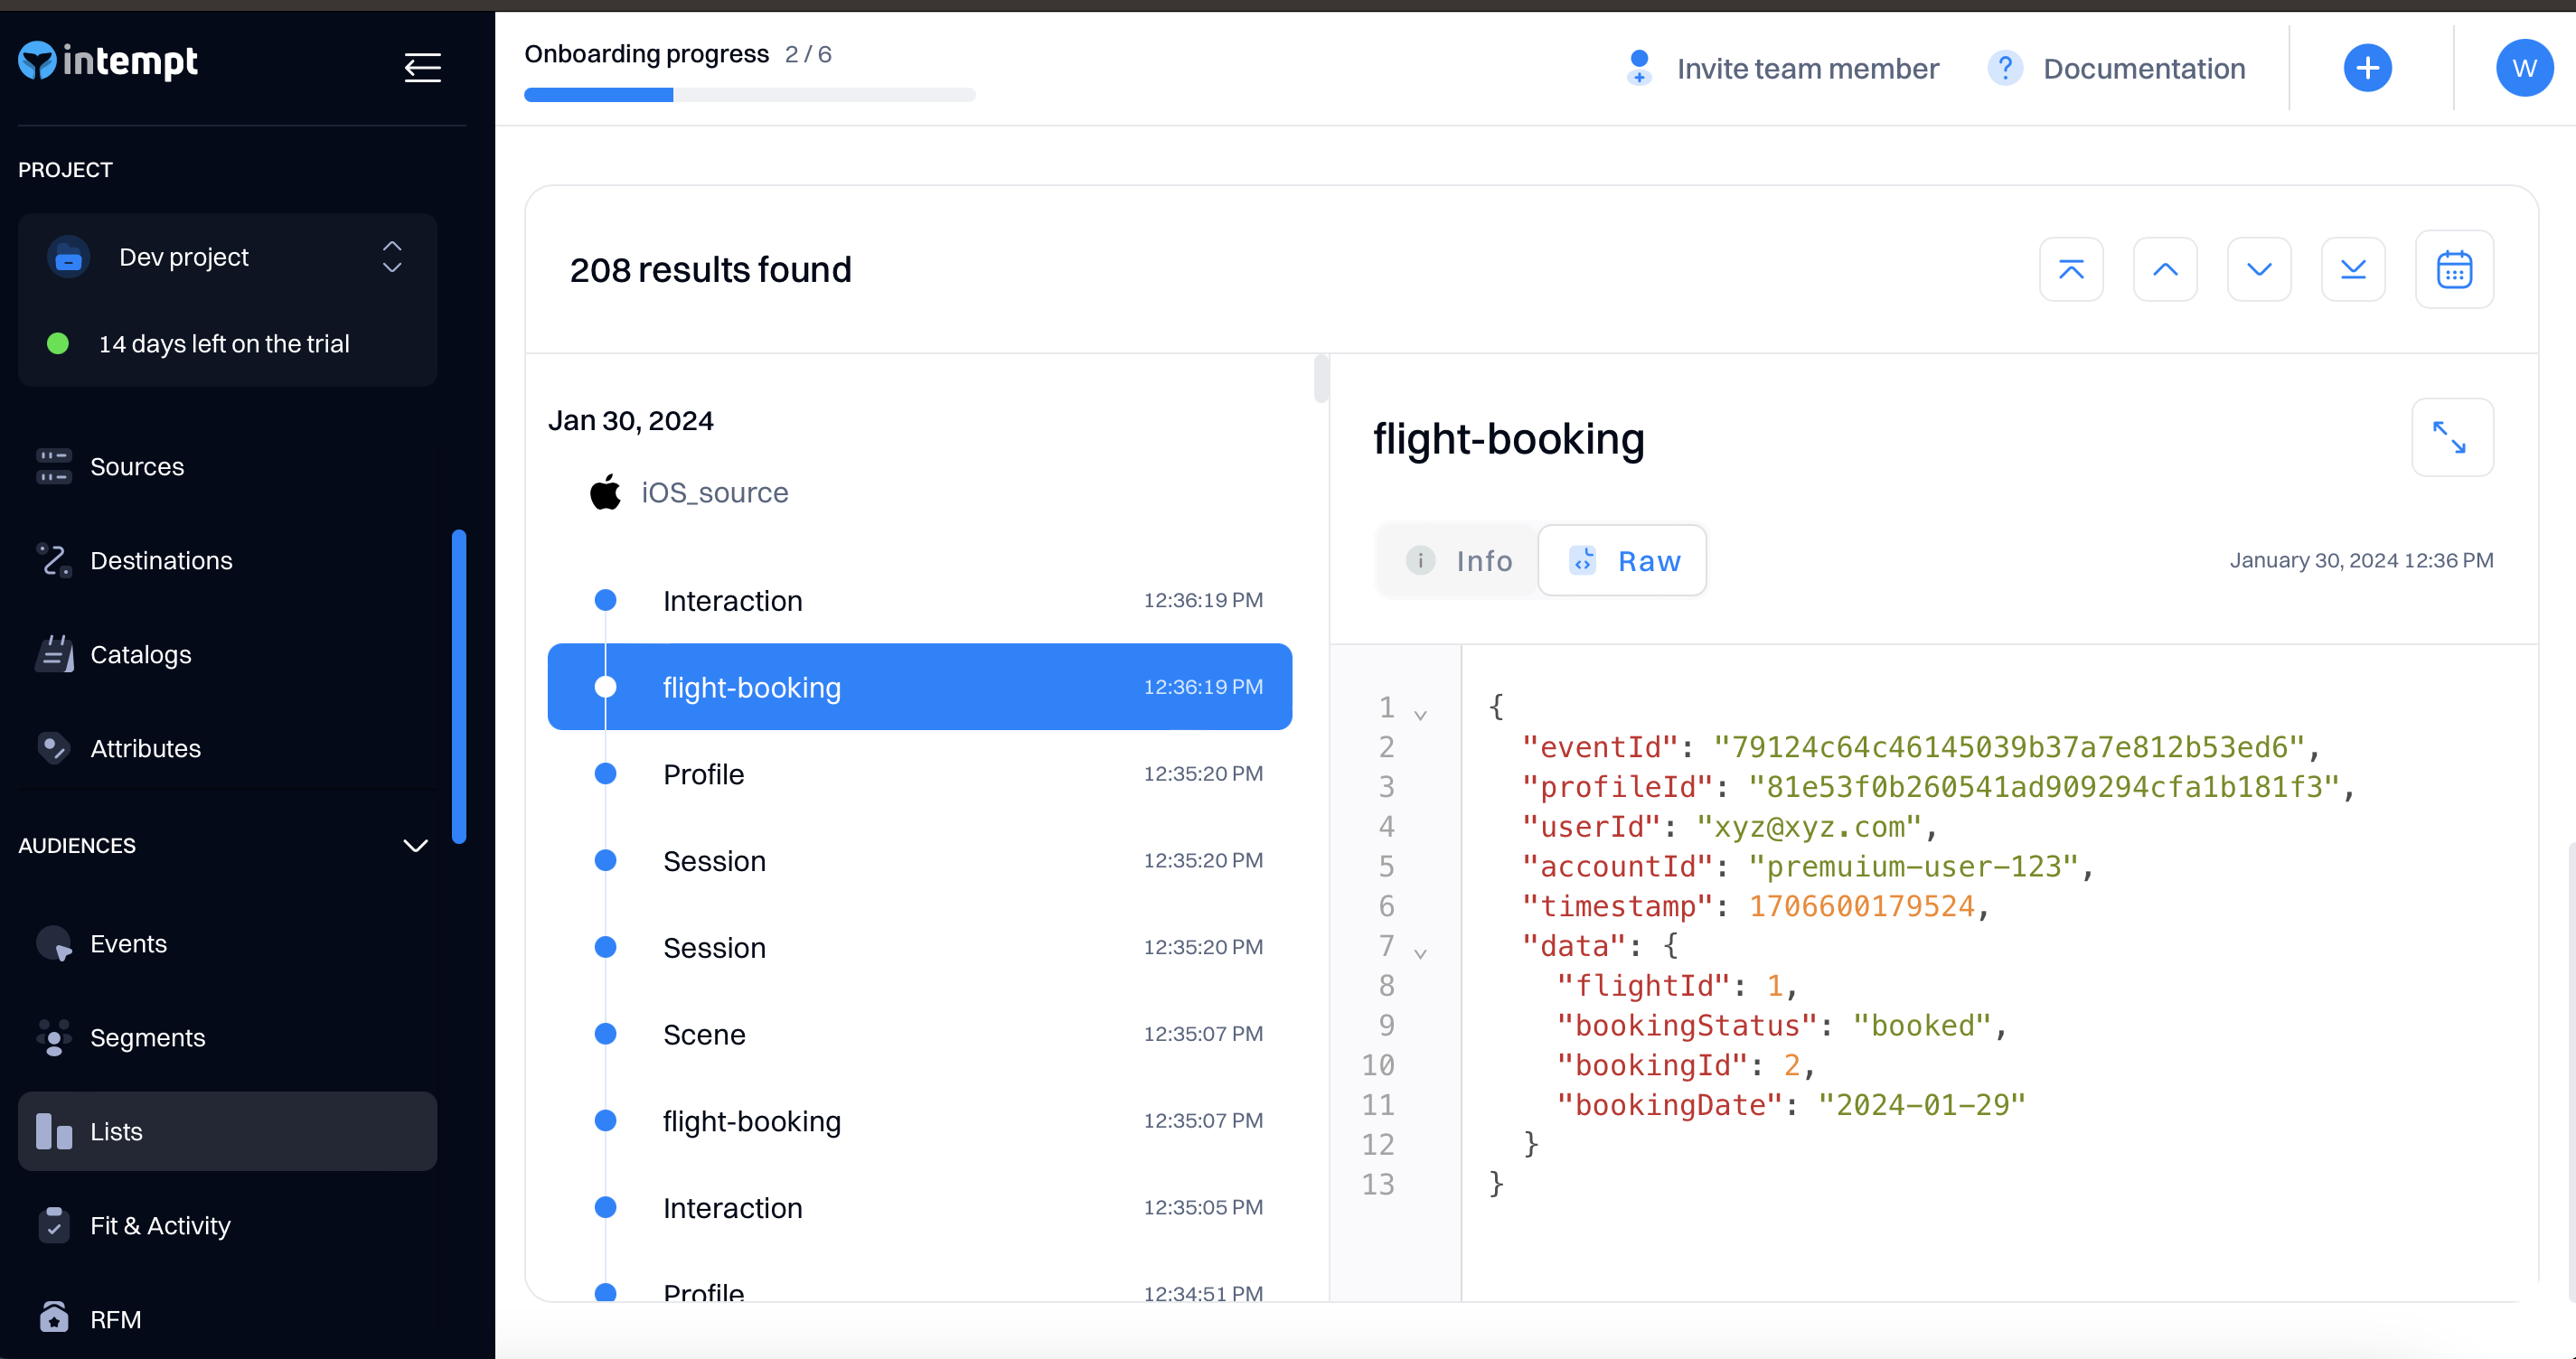
The method will add an event in the queue(if enabled) or send it directly to the Intempt server.
eventId,timestampvalues are automatically added; you don't need to include them while sending a custom event
    ////create object for anything need to track
    let objData:[String:Any] = [
        "flightId" : 1,
        "bookingDate" : "2024-01-29",
        "bookingId": 2,
        "bookingStatus" : "booked"
      ]

     ///call tracking method
      Intempt.track("flight-booking", data: objData) { (status, result, error) in
            if(status) {
                if let dictResult = result as? [String: Any] {
                    print(dictResult)
                }
            }
            else {
                if let error = error {
                    print(error.localizedDescription)
                }
            }
        }
    }
You verify custom event tracking via the app in the Lists -> Users-> User details page.
Record
Record is another method used to record a custom event with data, user attributes, and account attributes. The difference between the track method is that it allows adding additional customer data like user or account attributes.
    ////create object for anything need to track
    let objData:[String:Any] = [
        "flightId" : 1,
        "bookingDate" : "2024-01-29",
        "bookingId": 2,
        "bookingStatus" : "booked"
      ]

    ///accountAttributes
    let accountAttributes:[String:Any] = [
        "mtuCount" : "1000+"
      ]

    ///userAttributes
    let userAttributes:[String:Any] = [
        "city" : "New York",
        "country" : "USA"
      ]

     ///call tracking method
     Intempt.record("flight-booking", userId: '[email protected]' , accountId: 'intempt.com', data: objData, accountAttributes:accountAttributes, userAttributes: userAttributes) { (status, result, error) in
            if(status) {
                if let dictResult = result as? [String: Any] {
                    print(dictResult)
                }
            }
            else {
                if let error = error {
                    print(error.localizedDescription)
                }
            }
        }
Identify
Assigns a unique identifier for the user that allows a unified profile across devices. Once users are identified, Intempt connects events related to formerly anonymous IDs with the unique set IDs.
Intempt.identify("[email protected]") { (status, result, error) in

}
You can also send additional user attributes along with the method - like name, city and etc.
let userAttributes:[String:Any] = [
    "city" : "New York",
    "country" : "USA"
]
Intempt.identify("[email protected]", eventTitle: "CustomIdentify", userAttributes: userAttributes){ (status, result, error) in

}
Groups
Groups are similar to Identify, it's used to identify groups of users - mostly companies. Pass accountId to the below method.
Intempt.group("intempt.com") { (status, result, error) in

}
You can also pass additional information by passing account attributes - like company name, industry and etc.
  let userAttributes:[String:Any] = [
      "name" : "John",
      "country" : "USA"
  ]
  Intempt.group("CustomGroupIdentify", accountId: "intempt.com", userAttributes: userAttributes){ (status, result, error) in
  }
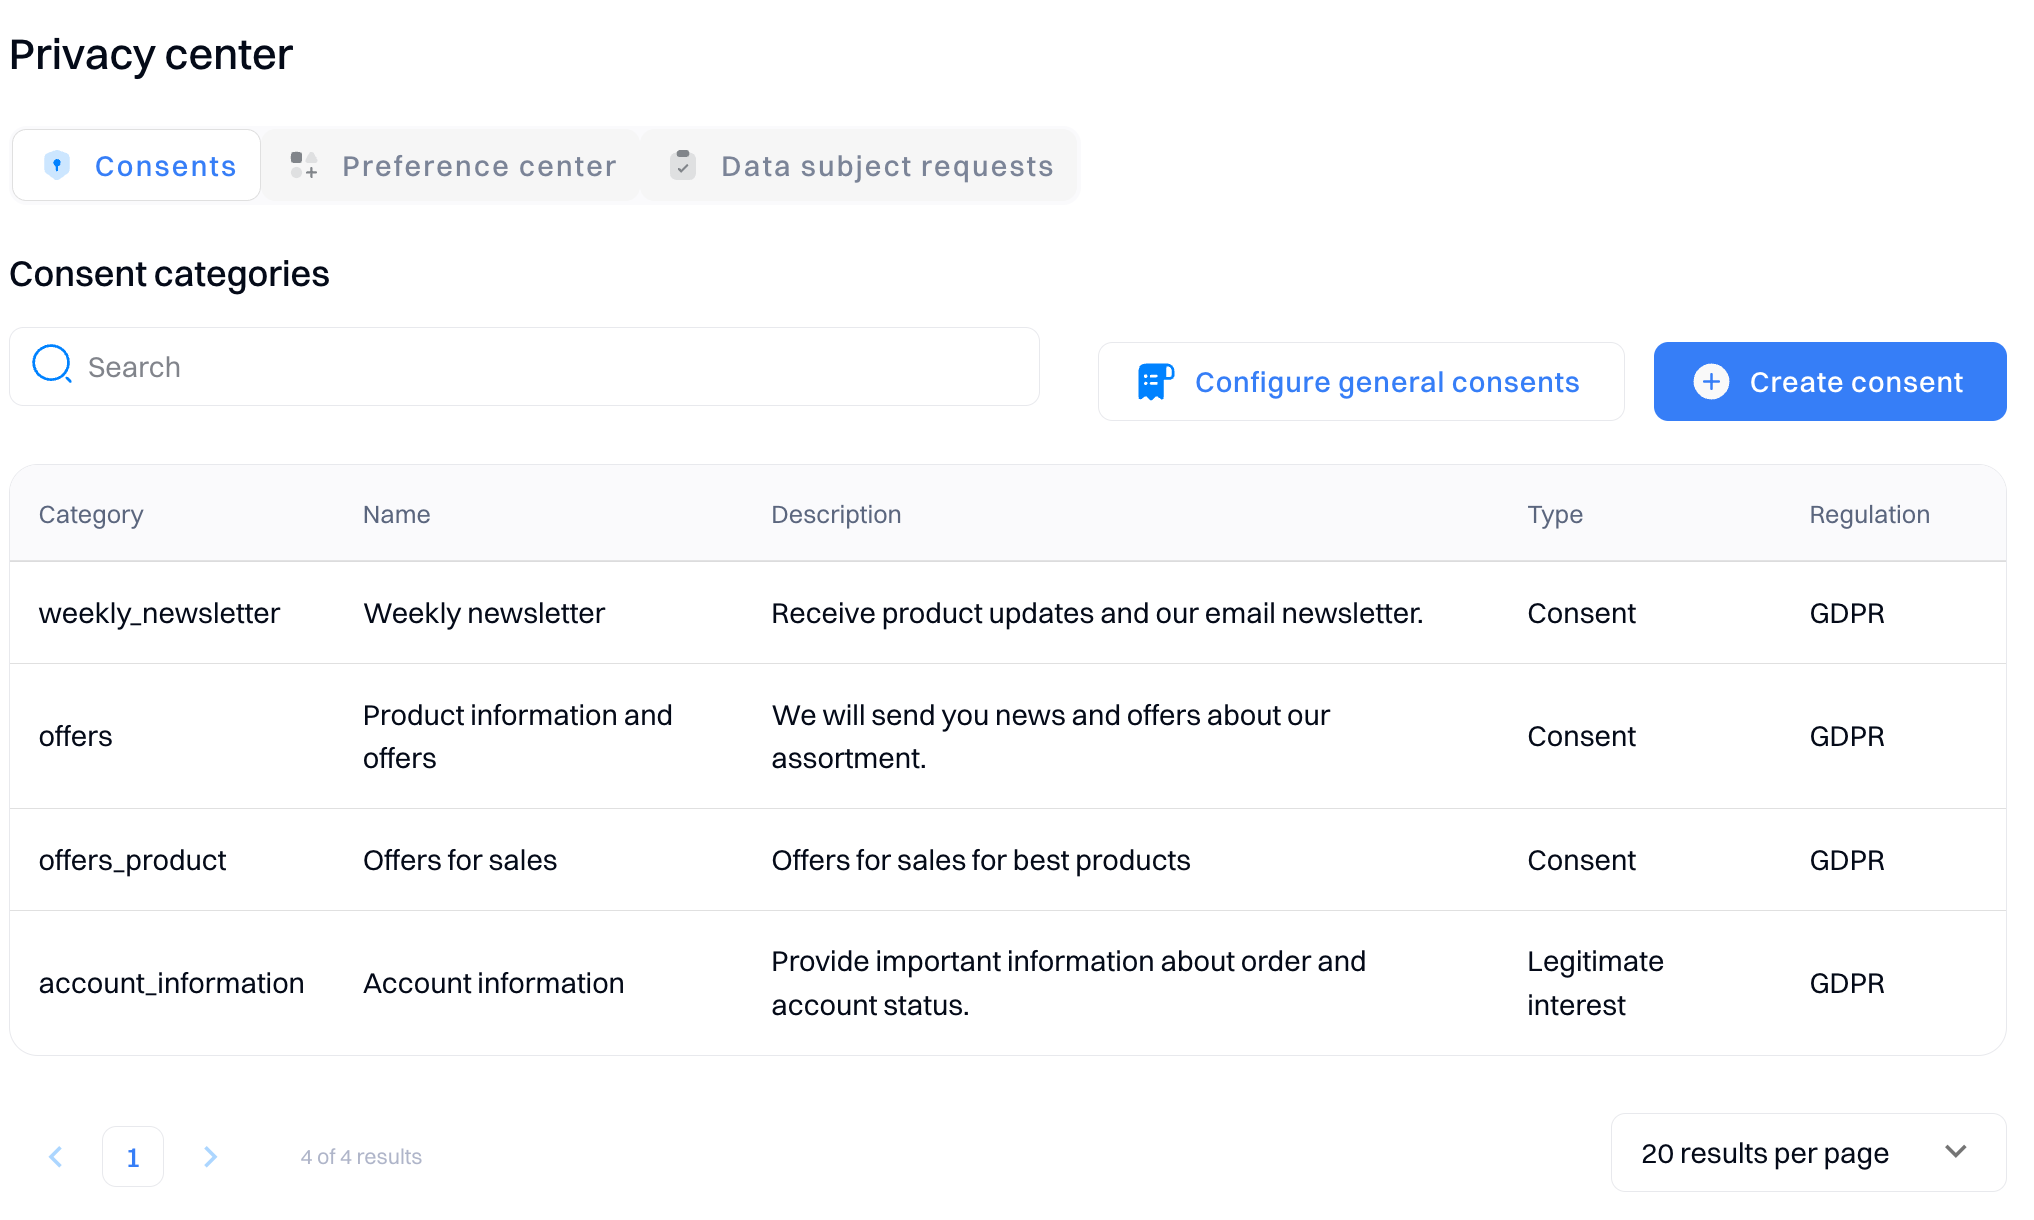
Track consent
You can use this method to track if the user has provided consent to use his data for consent purposes. This functionality is critical that you only use the data complying with privacy regulations like GDPR and CCPA. Below is an example of how the tracking can be implemented in the app.
Accept consents
Intempt.consents(IntemptConsentAction.Accept.rawValue, consentsExpirationTime: "Unlimited", email: "[email protected]", message: "Yes, email me offers, style updates and special invites to sales and events.") { (status, result, error) in

}
For consentsExpirationTime, either 'unlimited' can be passed or a future timestamp, e.g., '1528114618'.
Reject consents
Intempt.consents(IntemptConsentAction.Reject.rawValue, consentsExpirationTime: "Unlimited", email: "[email protected]", message: "Yes, email me offers, style updates and special invites to sales and events.") { (status, result, error) in

}
Consent can be used for a specific consent category.
Intempt.consent(IntemptConsentAction.Accept.rawValue, consentsExpirationTime: "Unlimited", category: "News", email: "[email protected]", message: "Yes, email me offers, style updates and special invites to sales and events.") { (status, result, error) in

 }
You can accept consent via this method.
Intempt.consents(IntemptConsentAction.Accept.rawValue) { (status, result, error) in

}
Short way to reject consent.
Intempt.consents(IntemptConsentAction.Reject) { (status, result, error) in

}
Alias
Using the alias function to merge two users into one
Intempt.alias("[email protected]", anotherUserId: "[email protected]") { (status, result, error) in

}
isUserOptIn
Return true if tracking is enabled and false if disabled.
Intempt.isUserOptIn()
Logout
Clear all cached data and generate new profileId, it also removes cached userId and sessionId
Intempt.logout()
Get ProfileId from the framework
Allows access to profileId. A profileId is a unique ID generated when the Intempt SDK is initialized for the very first time after installation. It remains the same as long as logout is not called.
let profileId = Intempt.getProfileId()
Get SessionId from the framework
Allows access to sessionId. A sessionId is a unique ID generated when the Intempt SDK is initialized. It remains same as long as logout is not called, and the app is not restarted.
let sessionId = Intempt.getSesssionId()
Disable text capture
Call this method if you want to disable capturing input texts like UItextField or UItextView. By default it isfalse. Secure entries are also excluded for privacy.
Intempt.disableTextInput(true)
OptOut
Call this method if you want to disable default tracking. This action is persistent; once disabled, the developer must enable it again to track default events.
Intempt.optOut()
OptIn
Call this method if you disabled tracking and want to enable it again.
Intempt.optIn()
Enable event logging
Call this method to see the logs of all generated events and errors for debugging purposes. By default, logging is disabled.
Intempt.enableLogging()
Disable event logging
Call this method if you don't want to see any log output in the console.
Intempt.disableLogging()
Reset tracking session
Call this method to reset the tracking session. It will end the previous session and start a new session.
Intempt.validateTrackingSession()
End tracking session
Call this method to end the tracking session.
Intempt.endTrackingSession()
Start tracking session
Call this method to start a new tracking session.
Intempt.startTrackingSession()
Choose experiments by name
The method allows you to get experiments by the optimization selector name that should be served to the customer to display A/B tests on your iOS app.
Intempt.chooseExperiments(byNames: ["Special_Discount"]) { (status, result, error) in

}
This method will return variants list in the 'result'. It will return the response in the completion handler. 'result' is the key value dictionary, which can be wrapped to NSDictionary or as [String: Any].
Choose experiments by group
The method allows you to get experiments by a group selector that should be served to the customer to display A/B tests on your iOS app. The optimization selector is unique to each experiment/personalization, but the group selector can be applied to multiple experiments to call them in one batch.
Intempt.chooseExperiments(byGroups: ["Banners"]) { (status, result, error) in

}
Based on the experiment setup, the above method will return a result (if successful) or an error (if the experiment is misconfiguration).
{
  "profile_shape": "circle"
}
Troubleshooting
If you received and error code of 204, these might be the reasons:
- User is not in the target audience
- The experiment is not active/running or out of schedule
Note
It is necessary to set user identity before calling experiments. If you are going to set identity and call experiment method simultaneously, you should first call "identify" and only after that the "choose experiment variant" call.
Choose personalization by name
The method allows you to get personalization by the optimization selector name that should be served to the customer.
Intempt.choosePersonalizations(byNames: ["home_page_pop-up"]) { (status, result, error) in

}
Choose personalization by group
The method allows you to get personalizations by a group selector that should be served to the customer to display A/B tests on your iOS app. The optimization selector is unique to each personalization, but the group selector can be applied to multiple experiments to call them in one batch.
Intempt.choosePersonalizations(byGroups: ["banner"]) { (status, result, error) in

}
Based on the experience setup, the above method will return a result or error. In case of a valid request, the response will be a key/values JSON object you have set in experience.
App tracking transparency (ATT) and Privacy
Our iOS SDK does not require enabling IDFA because data is not forwarded to any external services or linked with third-party data. Analytics is captured to observe the user behavior and visualizations of app usage and improve user experience based on their activities. So with the default configuration, there is no need to add Apple Tracking Transparency permission in info.plist and ask for user consent. However, if your app has other external integrations or you have implemented custom events that track users or share user data with 3rd party services, then you have to include it.
Privacy - Location Permission
iOS SDK doesn't ask the user for location permission or fetch the user's location. However, the SDK has reference to the CoreLocations framework, and if the app (where SDK is integrated) has obtained user consent for Location, then the SDK will track the user's location of the city, region, and country.
As the SDK has reference to the CoreLocations framework so it is required to add Privacy - Location in info.plist with explaining the purpose of location fetch and usage.
Go to the app's Info.plist file and add the privacy keys.
| Option | Explanation |
|---|---|
| Privacy - Location Always Usage Description | Location used to track where you are and showing most relevant content to you. |
| Privacy - Location When In Use Usage Description | Location used to track where you are and showing most relevant content to you |
| Privacy - Location Always and When In Use Usage Description | Location used to track where you are and showing most relevant content to you |
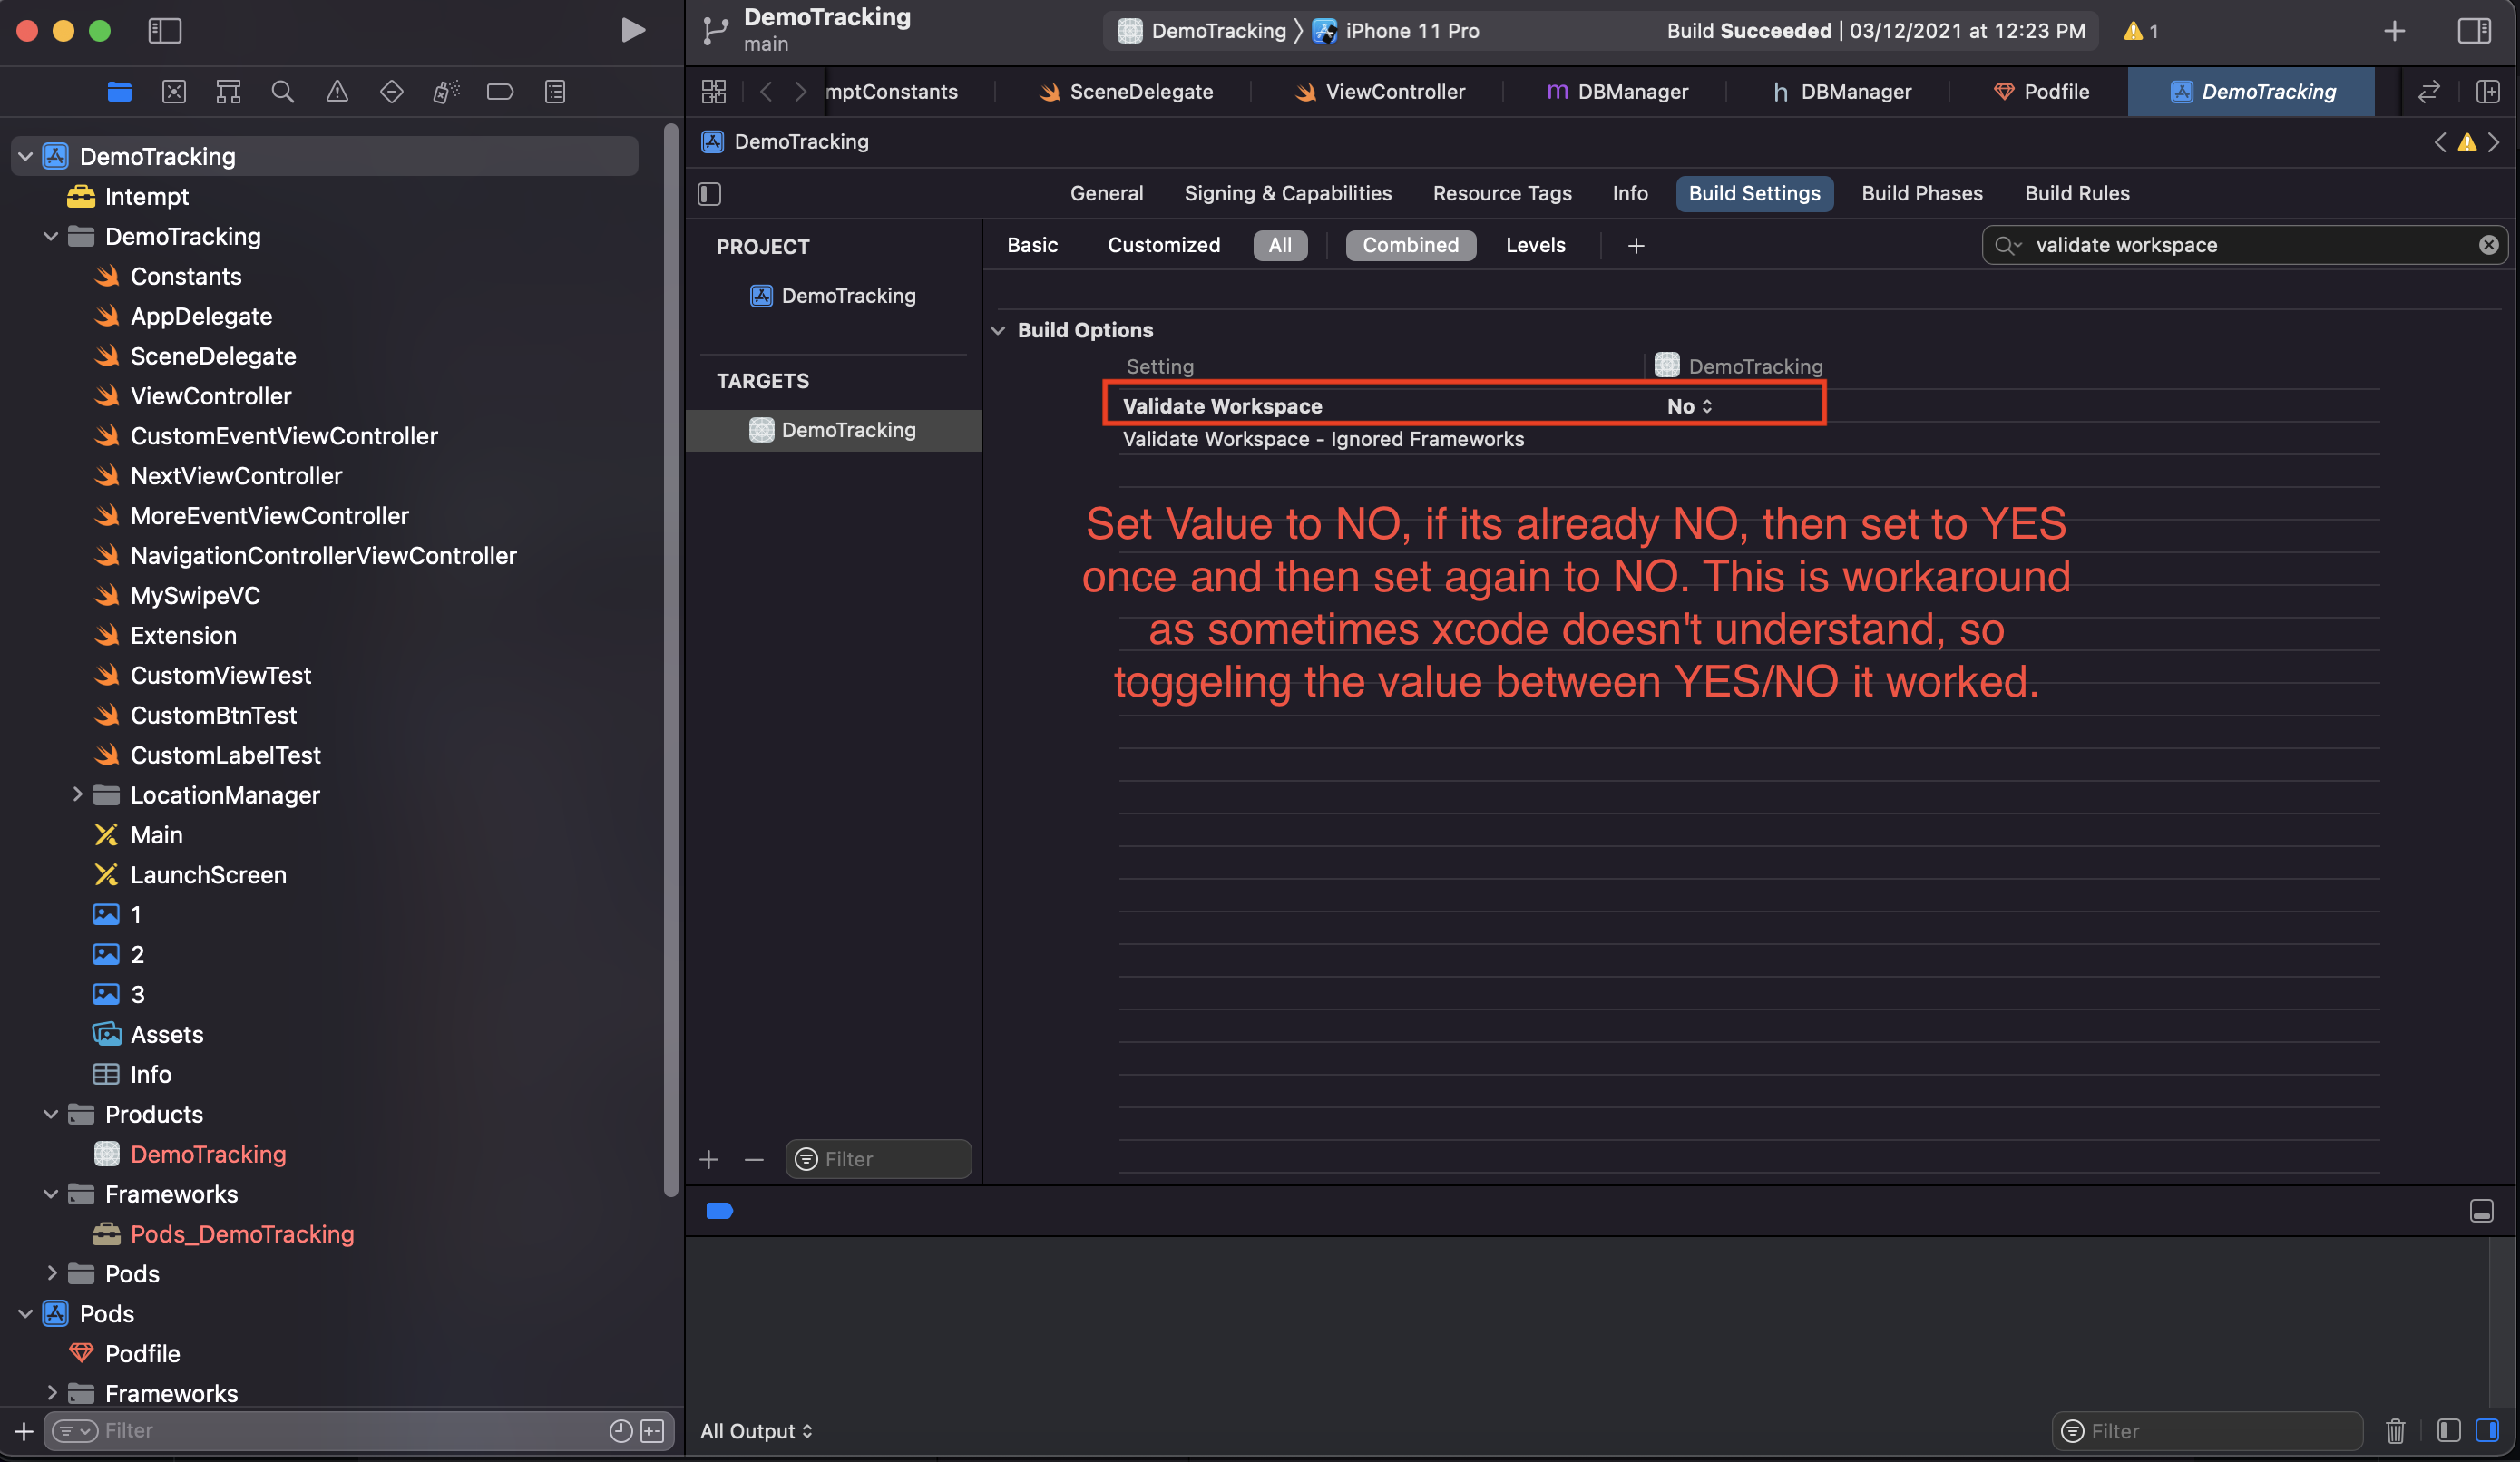
Troubleshooting
Building failed because the linked and embedded framework 'Intempt.xcframework' was built for iOS + iOS Simulator
You may face this error if you have used the Intempt universal framework. To resolve this, please follow the below steps.
Select your project Target -> Build Settings and search Validate Workspace Set Value to NO, if its already NO, then set it to YES once and then set it again to NO. This is a workaround as sometimes Xcode doesn't understand, so toggling the value between YES/NO solves it.
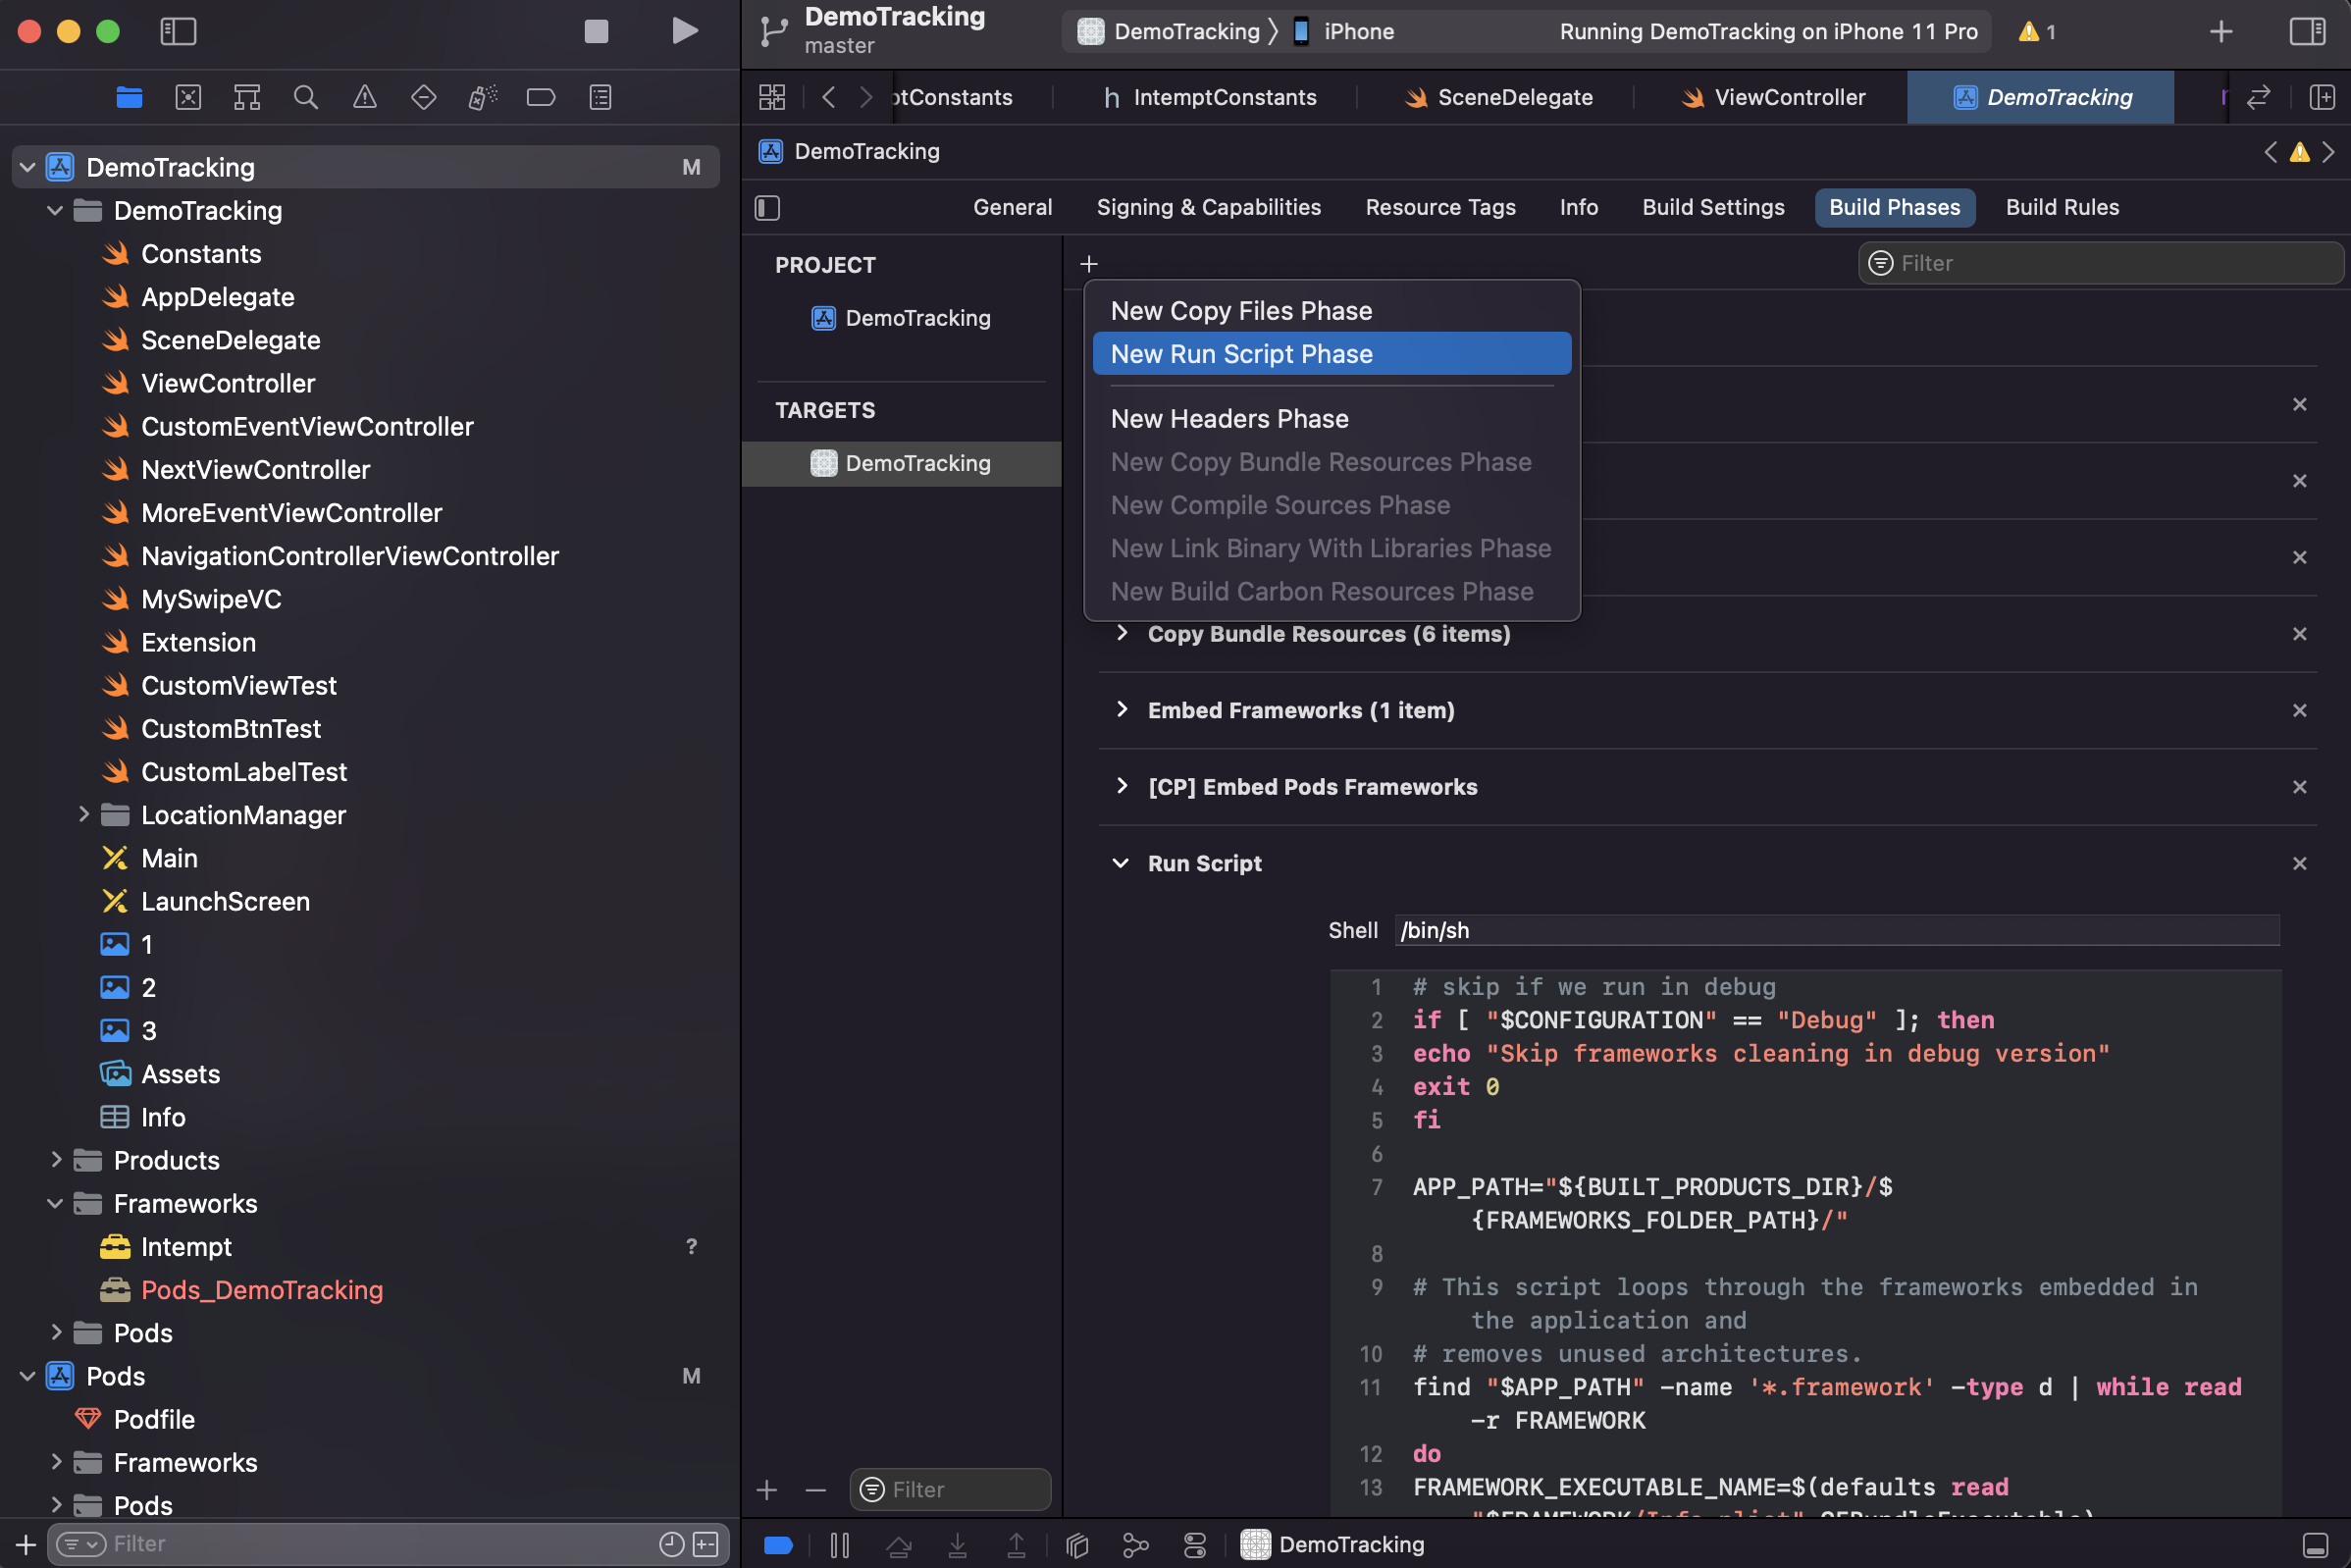
Apple App Store uploading issue of invalid unsupported architectures
If you have added intempt.framework as universal then, when submitting to the Apple App Store, it will show the error of simulator architectures. To resolve this issue, please select your project Target -> Build Phase and select + sign and add New Run Script Phase. It will add an empty script below.
Expand it and put the below script, as shown in the screenshot below
# skip if we run in debug
if [ "$CONFIGURATION" == "Debug" ]; then
echo "Skip frameworks cleaning in debug version"
exit 0
fi

APP_PATH="${BUILT_PRODUCTS_DIR}/${FRAMEWORKS_FOLDER_PATH}/"

# This script loops through the frameworks embedded in the application and
# removes unused architectures.
find "$APP_PATH" -name '*.framework' -type d | while read -r FRAMEWORK
do
FRAMEWORK_EXECUTABLE_NAME=$(defaults read "$FRAMEWORK/Info.plist" CFBundleExecutable)
FRAMEWORK_EXECUTABLE_PATH="$FRAMEWORK/$FRAMEWORK_EXECUTABLE_NAME"
echo "Executable is $FRAMEWORK_EXECUTABLE_PATH"

EXTRACTED_ARCHS=()

for ARCH in $ARCHS
do
echo "Extracting $ARCH from $FRAMEWORK_EXECUTABLE_NAME"
lipo -extract "$ARCH" "$FRAMEWORK_EXECUTABLE_PATH" -o "$FRAMEWORK_EXECUTABLE_PATH-$ARCH"
EXTRACTED_ARCHS+=("$FRAMEWORK_EXECUTABLE_PATH-$ARCH")
done

echo "Merging extracted architectures: ${ARCHS}"
lipo -o "$FRAMEWORK_EXECUTABLE_PATH-merged" -create "${EXTRACTED_ARCHS[@]}"
rm "${EXTRACTED_ARCHS[@]}"

echo "Replacing original executable with thinned version"
rm "$FRAMEWORK_EXECUTABLE_PATH"
mv "$FRAMEWORK_EXECUTABLE_PATH-merged" "$FRAMEWORK_EXECUTABLE_PATH"

done
dyld: Library not loaded: @rpath/Intempt.framework/Intempt
Intempt.xcframework must set to Embed & Sign

Intempt no such module found
Sometimes xcode behaves strangely and does not link properly, so first delete Intempt.xcframework from your project, clean build and delete Drived Data
then again, follow the steps to add the framework:
Copy Intempt.xcramework into your project directory and then Drag & Drop Intempt.xcframework in your iOS app.


Intempt.xcframework must set to Embed & Sign, Select your project Traget -> Build Phase expand Embed Framework and press + add Intempt.xcframework
make sure in Target ->General->Framework, Libraries and Embded Contents Embed & Sign is selected.
No data visible on app.intempt.com console dashboard
For performance and efficiency purposes, the iOS SDK sends events as batch periodically; it may take a few seconds to appear your events on the console.
Events not sending, taking too long
if you see your events are captured and shown in debug mode but sent too late on the intempt server, then you need to check these configurations:
TimeBufferits value is in seconds - SDK sends data to the server periodically based on the value of this parameter.ItemsInQueueits value is the number of events; if you set the value to 10, SDK will wait until 10 or more events are captured then it sends
Updated 2 months ago